
First of all, you must stock up on the necessary tool, since without it you will not succeed. They are simple and affordable, so you shouldn't have any complications with their preparation. In the arsenal you need to have:
- building level and pencil;
- screwdriver;
- drill with a perforator;
- roulette;
- ladder;
- Phillips or slotted screwdriver;
- fasteners (brackets) and drills of different diameters.
But tools aren't everything. You must decide how the slats will move along the cornice. There are several options to choose from:
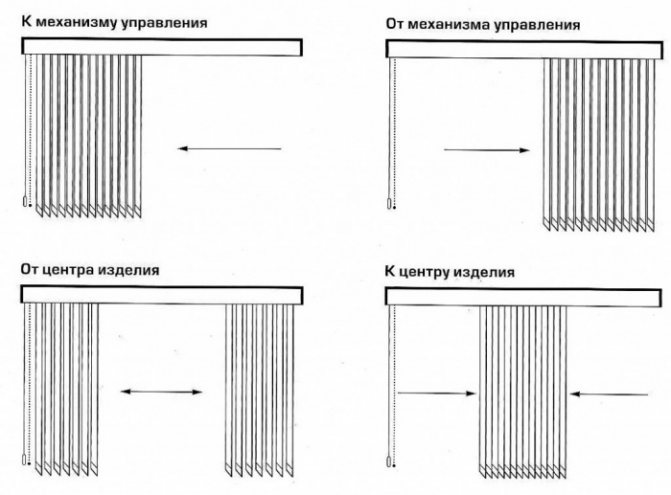
- From the control, when the slats are extended from the side of the control and retracted towards it.
- To control when the lamellas are on one side, and the blinds are controlled on the other.
- From the center, when the slats move apart in different directions.
- To the center, like in a theater, when the blinds are pulled apart on both sides.
In fact, this does not affect the functionality in any way, it's all about showiness. You can choose what you like. The photo shows how each of the options looks.
Now you can start solving the question of how vertical blinds are attached to the window. The instructions are pretty simple, so if you follow them correctly, you will succeed.
Basic installation rules
When installing vertical blinds with your own hands, it is important to correctly calculate the place of attachment of the brackets. The guide should be installed at such a distance from the plane of the plastic window or wall so that the lamellas hang strictly vertically, without creases, and the protrusions do not interfere with the movement of the curtain. The indent is calculated in each case individually, and depends on the design features of the window and blinds. It is necessary to take into account the width of the lamella and add half of this size + 10-20 mm to the gap. Let's consider some examples of calculations.
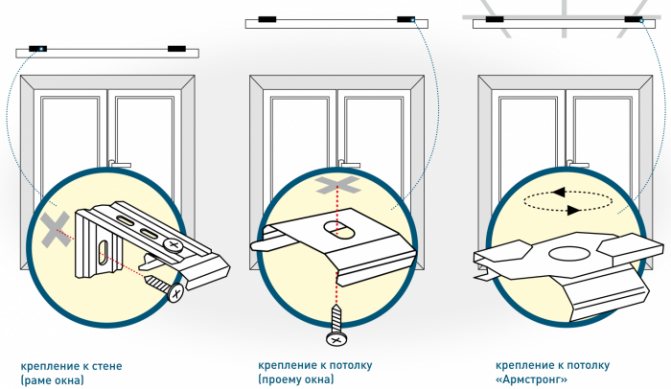
Where to hang?
If vertical blinds are to be installed on the ceiling, any indentation can be made. There are limitations for wall mounting as the standard bracket is up to 150 mm long. In both cases, in order to save useful space, the curtain is hung as close as possible to the plastic window. Here you should pay attention to the ledge of the window sill, the distance is calculated as follows:
- draw a visual line from the edge of the window sill to the ceiling, you can put forward a tape measure for clarity or use a long stick, mark a point;
- to the mark to the side of the wall / ceiling interface, add half the width of the lamella and +10 mm.
Example: the width of the lamella is 128 mm, the projection of the sill along the ceiling is 70 mm. We calculate: 128: 2 +10 + 70 = 244 mm - the minimum distance from the ceiling / wall interface.
How to properly fix the brackets on the wall
If the blinds are mounted in the opening of a plastic window, then the ledge of the window sill is not taken into account, therefore, the indent to the eaves: 128: 2 + 10 = 74 mm.
The length of the lamellas must also be taken into account. If the blinds are to the floor, then a gap of 10-30 mm should be left below for free movement of the canvas. If the canvas is up to the windowsill, then the minimum allowable gap is 5 mm.
For wall mounting of blinds, it is recommended to install the cornice 50-100 mm higher than the upper horizontal slope.
Ceiling mount is optimal if you need to visually increase the height of the room

Installation of horizontal blinds in a cover
We measure the width and height of the window opening, the blinds should exceed it in these indicators by at least 3 cm or more.
In the case of attaching the blinds to the ceiling, we measure the distance from the ceiling to the window sill.
In the case when the window is flush with the wall, the handle can get in the way when opening, so you will have to use brackets. Make sure that they do not touch the mechanisms inside the eaves.
Of the tools, you will need a puncher or a drill and a screwdriver.
- We fix the brackets at the desired height.
- Install the cornice
- We mount the control knob.
- Checking the result
Installation instructions
Before installing vertical blinds with your own hands, carefully read the manufacturer's instructions. The eaves assembly must be carried out in strict accordance with the attached diagram. For more information on how to assemble vertical blinds, see the video below.
For installation you will need:
- roulette;
- level;
- pencil;
- drill;
- self-tapping dowel No. 6 or 8;
- screwdriver.
Follow the instructions above to make the markup.
If a large indent is required for wall mounting, use the offset brackets
Draw a line between the marks. Since the geometry of the rooms is far from ideal, so that an even gap is obtained from below, it is important:
- blinds to the window sill - the line along the marks should be strictly parallel to the window sill;
- canvas to the floor - the line along the marks is strictly parallel to the floor.
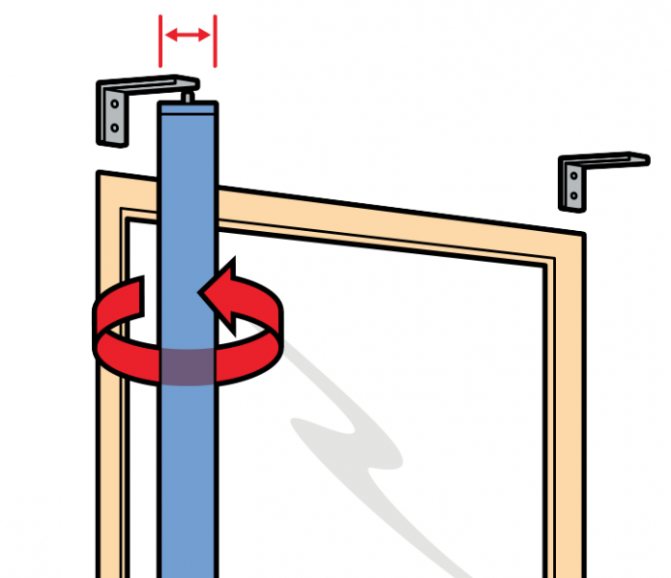
Attach the curtain rod to the line, mark where the brackets will be installed. Measure the distance to the center of the window, the holders should be at the same distance from the center axis.
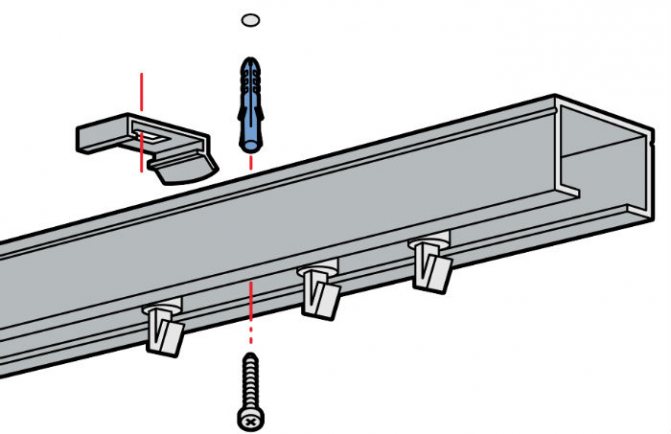
Drill holes with a drill, remove dust, insert the plastic part of the dowel, it should be flush with the surface. Attach the bracket and screw it on with self-tapping screws. Check the installation geometry with a level. If the brackets are flat, fasten the slide rail.
The video shows a detailed master class on how to fix the brackets on the wall with your own hands, correctly fix the guide and hang the slats.
Assembling the canvas:
- install the eye-holder in the upper pocket of the lamella;
- hang the strip on the slider and measure the desired length of the lamella + 50-70 mm for the hem, depending on the size of the weights;
- remove the bar, cut to size, hem;
- make an intermediate fitting, if the result is satisfied, then fit the rest of the lamellas using this template;
- unfold the runners perpendicular to the plane of the glazing, hang the strips;
- insert weights;
- thread the connecting chain.

Vertical photo blinds should be adjusted in height from the edge from which less damage to the integrity of the image is caused


Installing a roller blind on a window
Tools: drill or hammer drill, drills, level, double-sided tape, anchor screws, screwdrivers.
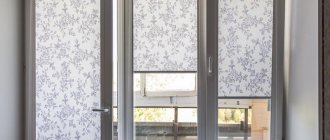
Roller blinds can be mounted on a wall, in a window opening, or installed without drilling.
Make sure that nothing will interfere with the opening / closing of the roller blind. If, for example, a window handle interferes with the opening of the structure, then you can turn the curtains so that they unfold counterclockwise, and not along it.
- We collect the roller blind. We insert a plug into one of the ends of the pipe, mount a mechanism with a control circuit into the opposite end;
- To mark and drill holes for self-tapping screws, we apply curtains to the window. Align the shaft horizontally, for this you need to use the level.
- After that, install the retainer in the bracket, fasten it to the bracket.
- Pass the fishing line through the special lower hole in the bracket so that it does not fall out, make a knot. The line from the other end must be threaded into the guide and pulled into the lower retainer.
- Apply double-sided tape to the bracket. Do not forget to degrease the surface before doing this.
- Having removed the top layer on the scotch tape, we mount the curtain on the window.
- We snap the hooks on the brackets all the way.
- Next, we fix the bracket with self-tapping screws and fix the bracket on the other side.
- We check the quality of the installation.
Installation on non-standard openings
Vertical blinds can be installed on beveled and non-standard openings, they are also actively used in space zoning.
To form a curved opening, flexible guides are used to suspend the lamellas; to fix them to the surface, holders must be installed every 200-600 mm, depending on the shape of the bends and the weight of the blinds.
When installing vertical blinds with your own hands on a beveled opening, it is important that the slats move during the opening of the canvas from the high side to the low. Installation is carried out as follows:
- we collect blinds and hang slats;
- apply in place, outline the line along which to cut the strips;
- remove the slats from the runners and adjust to size;
- we return the strips to the sliders;
- we apply the assembled blinds over the opening;
- mark the place for the lower bracket;
- make a hole, insert the plastic element of the dowel, attach the lower bracket;
- we catch the guide with the canvas and, moving it up / down, adjust the position of the upper bracket so that the lower edge of the curtain is strictly parallel to the window sill or the floor.

It is better to trim vertical slats on beveled openings to size after the blinds are installed
And be sure to watch the video review of vertical blinds in the interior.
Do-it-yourself blinds installation
Blinds, 10 years ago, looked like a real foreign exoticism, today they have firmly entered our life. Most office spaces and institutions have moved from using standard blinds to universal blinds that are less dusty, sturdier looking and incredibly comfortable.
Do-it-yourself blinds installation
Blinds are used even in classic-style rooms, as their functionality, ease of maintenance and appearance are excellent. In addition, blinds provide effective protection of spaces from sunlight, make it easy to adjust the level of illumination in the room, and reliably screen the room from prying eyes.
Do-it-yourself blinds installation
The installation of blinds should be carried out in accordance with all the rules, otherwise you risk getting a lot of problems: the canvases will not move, the curtain will be difficult to assemble, etc. High-quality installation ensures the blinds have a long service life. When installing, you need to take into account the design features, the specifics of the walls (or window frames) in the room.
Do-it-yourself blinds installation
Blinds types
PVC window manufacturing companies offer blinds of a wide variety of shapes and sizes. Depending on the purpose, the blinds are made of:
- plastic;
- wood;
- aluminum;
- fabrics.
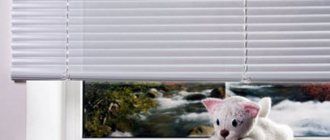
Wooden horizontal blinds
By type of blinds there are:
- vertical;
- roll;
- horizontal.
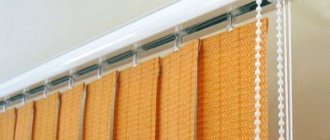
Roller blindsVertical blinds
These types differ significantly in the location of the lamellas and in the installation methods.
Vertical blinds are rare in ordinary living spaces, they are more often used in offices. They are mounted above the top edge of the window, similar to curtains, although this may adversely affect their functionality. Roller blinds and horizontal blinds are more often used at home instead of traditional curtains. They are installed not only in the window opening, but also over the window.
Vertical blinds String (filament) two-color
Roller blinds are mounted on the front surface of the corner of the upper slope of the window profile.
Blinds with horizontal slats can be mounted directly on the window profile, on each sash. Often, horizontal slats are complemented by curtains with curtains. Installing blinds directly on the window profile saves valuable space in the room itself and frees up space on the windowsill.
Horizontal aluminum blinds
Features of vertical blinds
Vertical blinds have gained their popularity for a reason.After all, this is not just a fashion trend, but the features of the product itself. It has a number of advantages and positive qualities. What are they?

- Blinds are able to visually expand the space and increase the height of the ceilings. It is these properties that are so necessary for those rooms that have low ceilings and look small.
- You can buy custom-made vertical blinds, making them original and different from everyone else. Anything you want to see in your window can be brought to life. Various shapes, shades and colors, the texture of the blinds - you choose all this yourself.
- They do not need frequent and thorough care. In addition, vertical blinds can be assembled and disassembled equally easily and quickly.
- Serve as a decorative element, complementing the design of your room. The difference between such models is a combination of comfort, style and beauty.
- Vertical blinds let in soft and diffused light, while preventing the penetration of too bright rays.
- Simple, mobile, practical and easy to operate.
As you can see, there are a lot of advantages. Therefore, choosing this type of blinds, you will not go wrong. Let's look at what the structure consists of and how to attach such vertical blinds.
What are blinds made of?
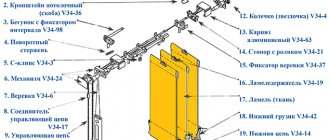
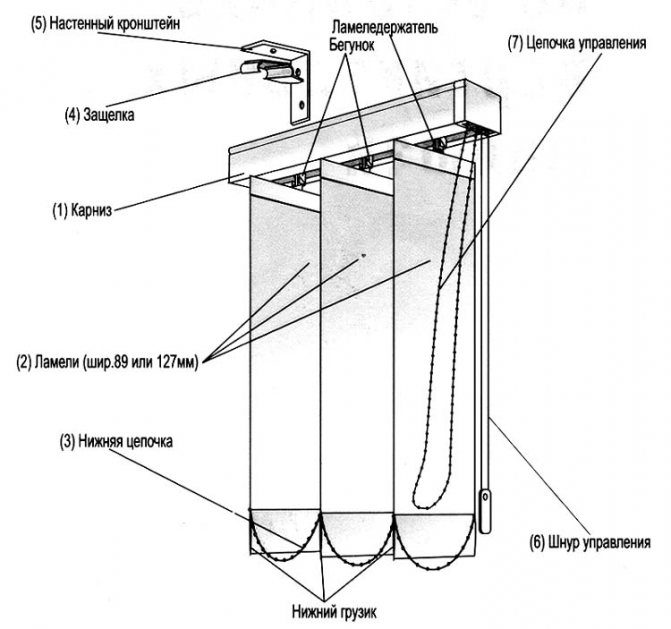
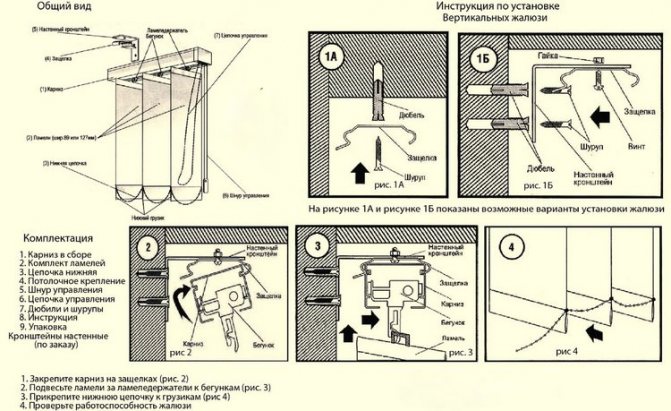
The blinds are made up of:
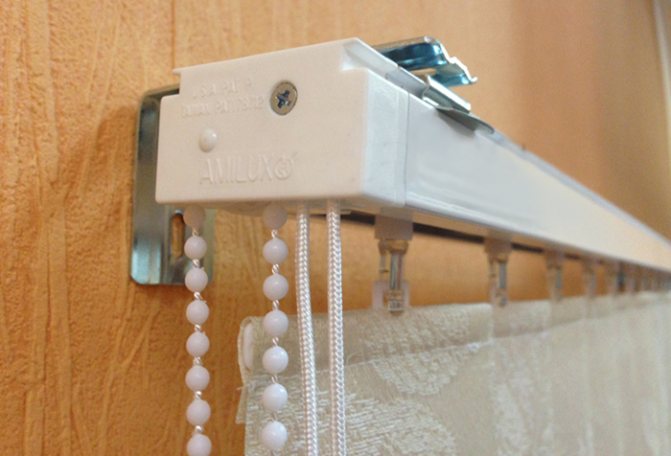
- cornice for fastening the canvas;
- sliders, thanks to which the strips of the blinds move;
- the lamellas themselves (strips of canvas);
- chains or cords to secure the shutter assembly.
What are blinds made of?
For windows of a non-standard shape, it is necessary to use lamellas of a special length, which will best provide the light protection of the room.
If your window has two sashes, then when installing the blinds, pay attention to the location of the blind lifting mechanism (right, left).
What are blinds made of?
Three ways to install blinds:
- overlay;
- on each casement of the window separately;
- directly into the window opening.
The factory set of blinds usually includes all the materials for their installation: screws and self-tapping screws, as well as other parts.
Vertical fabric blinds
The choice of installation option is associated with the peculiarities of the window design: it is a little easier to install blinds on standard double-leaf windows than on inclined dormer windows. One of the most difficult is the installation of blinds on PVC windows, since working with plastic, in comparison, say, with wood, has a number of specific features. The installation of the cornice on plastic windows must be carried out as carefully as possible and it is better to do this in the warm season (at temperatures above +5 degrees Celsius).
Horizontal louver design
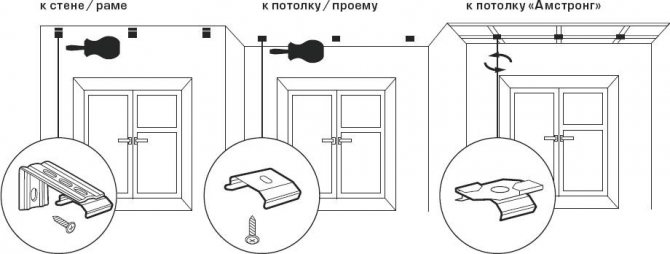
The installation of the blinds on the window sash can be carried out using self-tapping screws, brackets or by drilling holes in the frame. This is the most durable and reliable.
Important! The tightness of the profile when attaching the curtain rod to it by drilling does not suffer. If it becomes necessary to remove the cornice, and holes remain in the frame, they can be filled with white silicone sealant.
If you don't feel like drilling holes, use brackets that attach to the frame without drilling.
Important! In most cases, the blinds can be fixed to the screws that are already in the window profile. This mounting method is no less reliable than drilling holes. You can learn about the possibility of such a simple installation from the blinds manual.
Jalousie
Benefits of vertical curtains
Vertical type curtains are considered the most popular and widespread type of blinds. They got their name because of the vertical arrangement of fabrics. Compared to horizontal curtains, this type is considered more cozy and homey.
The advantages of vertical curtains:
- excellent protection from bright sunlight;
- mobility, simplicity and reliability in operation;
- the ability to close the overall, non-standard window openings;
- wide range of applications.
In order for the blinds to last as long as possible, they need to be hung very carefully and carefully. The functional scope of the window structure depends on the correct installation.
Blinds installation progress
After unpacking the blinds, read the instructions. Installing blinds means: measure the window and adjust the size of the blinds to it; then install the mountings for the cornice and the cord system; collect strips on the cornice and check the performance of the system.
Measurements and markings
Measurements and markings
Measurements are necessary so that later it would be convenient to use the light-shielding cloth without complaining about distortions or frequent breakdowns. It is especially important to check the dimensions of the canvases and adjust them to the place of attachment if the window opening has a specific geometric shape.
Before screwing, you need to mark the position of the fasteners with a pencil, checking them with a level and a tape measure in order to avoid a skewed fit and leave an opportunity for adjusting the container, and also so that the strips do not go beyond the window glass.
Installation of eaves and slats
Installation of blinds
Before installation and direct installation, it is necessary to mark the fasteners with maximum accuracy and symmetry. Additional fastening must be provided for the control cord so that the structure can withstand the additional load. All elements are fixed to the wall with screws or dowels. Next, the installation of the cornice is carried out. The slats and runners themselves will be attached to it. The rigidity of the structure is guaranteed by the upper cornice bar, so there is no need to additionally strengthen the bar with glue, sealant or foam - it is fixed quite rigidly.
When reinstalling, measure the width of each window sash so that the window fittings do not interfere with the free hanging of the lamellas. Also, when choosing the installation "in the window opening", you need to decrease the height on each side by 2 cm so that the canvas does not touch the window sill. To fix the blinds close to the plastic window, you need to drill the plastic frame of the window according to the markings - pre-drilling will prevent the plastic from cracking.
The height of the blinds must be at least the height of the window opening
If the plates on which the blinds are hung do not fit snugly against the window profile, use shims.
Brackets for blinds are screwed into the holes with self-tapping screws. Next, the brackets must be fastened upwards with latches and a container with blinds inserted into them.
Brackets for blinds are screwed into the holes with self-tapping screws
Next, the brackets must be fastened upwards with latches and a container with blinds inserted into them.
The lower holders are attached as follows: lower the curtain to mark the lower points (the canvas should be loosely stretched). Drill the holes along these marks, into which the lower holders must be screwed, which fix the canvas in the "micro-ventilation" position. Make sure the staples sit firmly in the plastic.
When installing overlay, the width must be added by 5 cm so that the entire opening is closed. The height is freely adjustable and can reach the windowsill or the floor itself.
There are a number of modern methods of installing blinds, involving the installation of a curtain rod with lamellas on brackets that are attached to the window frame without drilling. The striped cornice is simply hung on the brackets and snapped into place. The design is collapsible, which allows you to remove the blinds when you need to wash the window glass or wipe the lamellas. This is the easiest way to install blinds.
Blinds on the bracket
Installation of horizontal blinds on PVC brackets
You will need a screwdriver and wire cutters
- Using a special screw, we connect the PVC bracket to the universal bracket.
- We take a piece of cable of the required length and fix the upper cable clamp with a screwdriver
- We pass the cable through the cornice and slats
- We install PVC brackets on the cornice and attach it to the sash of the plastic window.We tighten the cornice with a special wrench from the set of fasteners.
- We install PVC brackets for the lower part of the window
- We pass the cable through the retainer in the lower bracket and tighten it
- Now it remains to put the control knob and check how successful the installation was.
Features of installing blinds by type
Vertical blinds
Before starting the installation of vertical blinds, you need to decide whether a wall or ceiling mount for the cornice will be more convenient. The height of the light-shielding fabric depends on the place of attachment of the cornice.
Installation diagram of vertical blinds
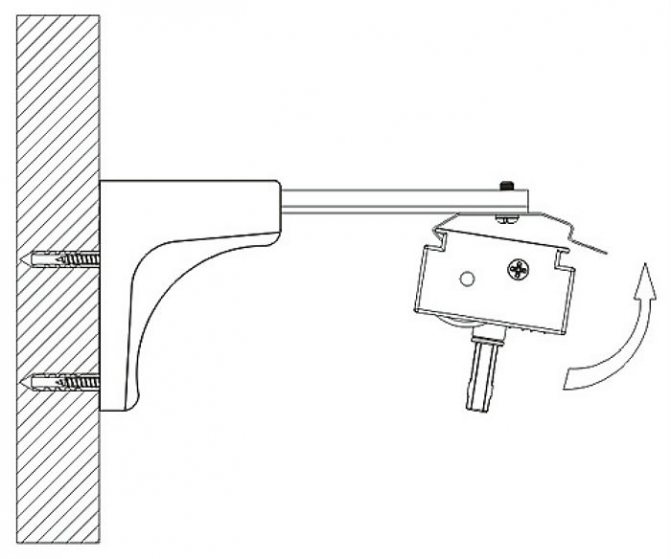
The thickness of the guide for vertical blinds should be at least 5-6 cm, such a gap will provide free movement of the lamellas. If there is an obstacle between the blinds and the wall (batteries, etc.), then you will need to install an additional bracket, which is not included in the kit, you must buy it separately.
If you want the blinds to be at some distance from the wall (there are different cases: a pipe, etc.), you must additionally purchase a bracket
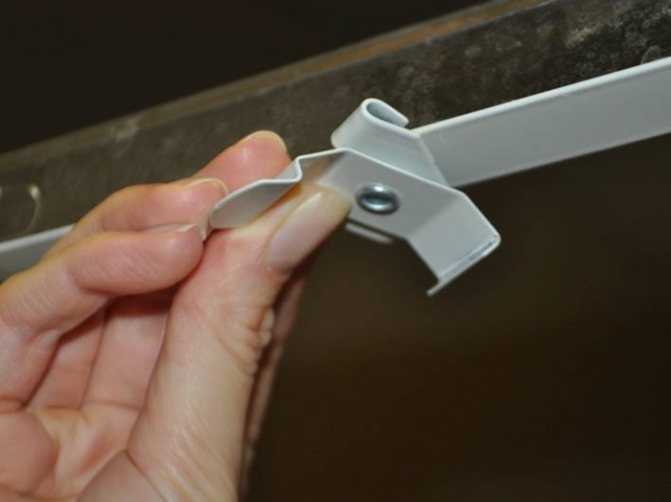
Bracket attachment
For vertical blinds, the order of suspension of the lamellas is also important: they must be attached to the cornice in the same order that was in the factory box. Also, before starting the installation, it is necessary to determine the correct direction of the hangers. The correct position, when closed, you do not see the seam on the material of the blinds.
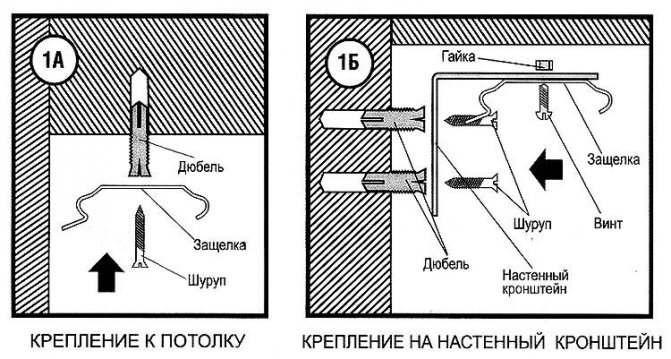
Figures 1A and 1B show possible options for installing blinds
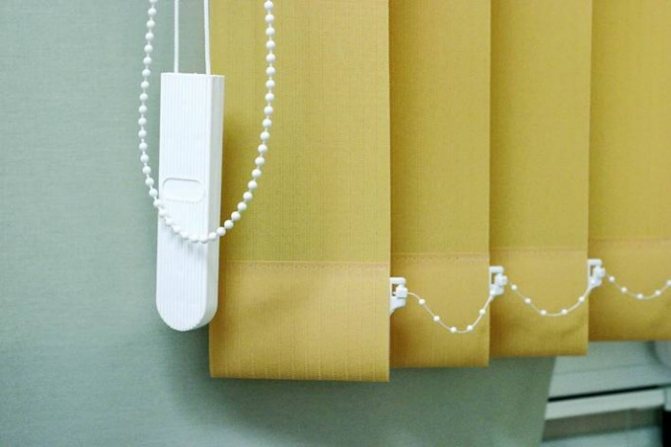
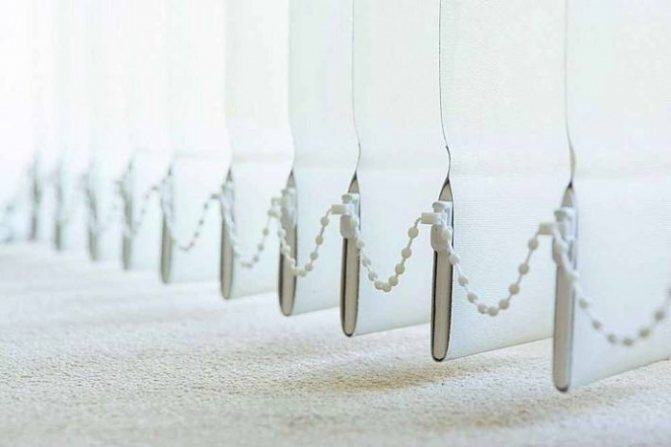
Remember to set the lower weights on the vertical strips to keep the canvas looking even. Loads from the outside and inside are connected by a chain. The plumb bob is attached to the cord that is included in the kit. Different manufacturers use plumb bobs of different shapes.
Fasten the curtain rod with snaps
Attach the bottom chain to the weights
Place the weights on the plates
Installation of weights
Connect the plates
Spread out the blinds, the slats should be parallel to each other
There are many different vertical blinds in stores, but they are often unreliable. The safest thing to do is to mount the blinds using a pair of brackets that need to be screwed to the wall with self-tapping screws.