Photo from the site: obalkonah.ru
Plastic, as well as metal-plastic windows are found more and more often today, although some twenty years ago they could be called a real wonder, available only to wealthy people. Everything is changing, and in the modern world more and more new technologies are being introduced, and mastering them, learning how to properly perform certain actions, correctly mount, and then take care of the structures, is already our direct task, if the laurels of a true home craftsman haunted.
In fact, there is nothing complicated, but, for example, how and with what to cover the foam after installing plastic windows, anyone can figure it out if necessary. Let's clarify a few nuances and present some options that will greatly simplify the task and allow you to cope without the help of a professional master, whose services are, as you know, not cheap at all.
How to cover up polyurethane foam after installing plastic windows
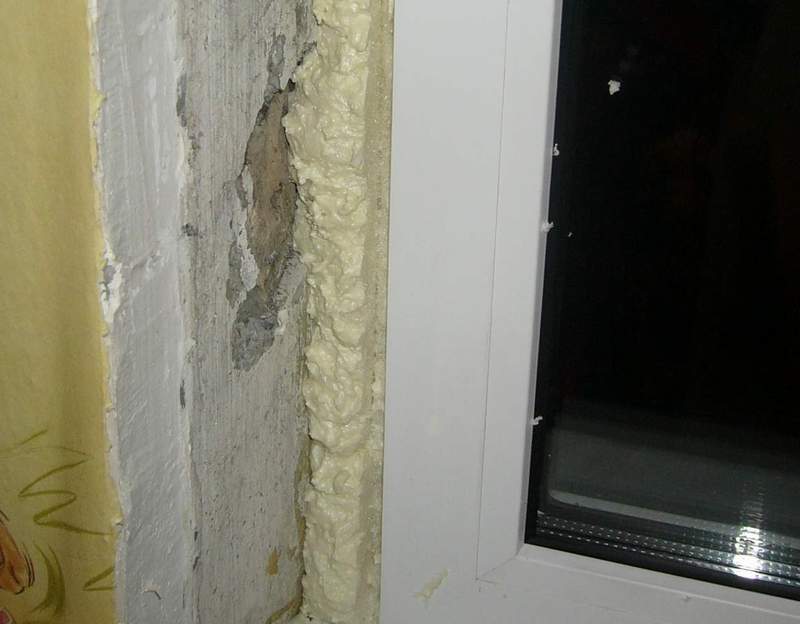
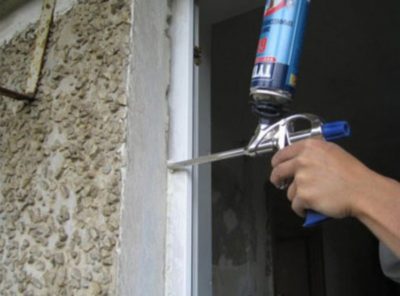
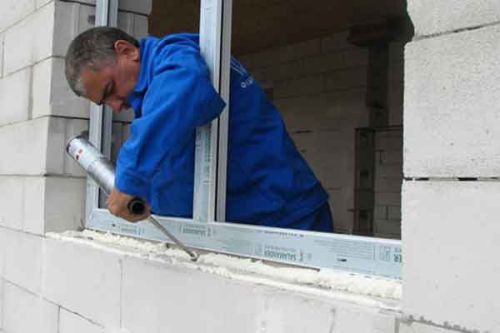
When installing windows or working with other openings, builders often need to use polyurethane foam to seal gaps of different diameters. After processing, the surface must be cleaned so that all further manipulations can be freely performed. For these purposes, you can use durable slopes from different materials or plaster solutions.
Over time, the foam can lose its properties, due to which the quality of the sealing joint is significantly deteriorated. In order for the structure to serve as long as possible, you need to use auxiliary materials. Dry mixtures are in demand, since after hardening they form a strong film through which moisture does not penetrate.
Final finishing of the structure
Feasibility of processing with construction foam
This insulation is a high-quality sealant, the main task of which is to fill all voids efficiently and bond the surfaces together. Polyurethane perfectly connects two surfaces, including brick, natural wood and even concrete. This material can be used as a reliable waterproofing agent and a means to combat extraneous noise.
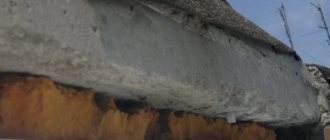
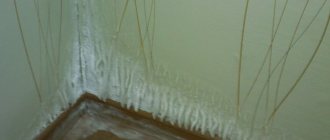
High density and strength only appear under certain operating conditions. Due to exposure to rain, snow and bright sunlight, the final performance will gradually decrease. After several years of use in improper conditions, the foam will simply begin to exfoliate, voids of different diameters and cracks will form in the seam.
This situation is fraught with complete resolution. That is why experts recommend covering the seams with special solutions. After final hardening, the foam takes on a characteristic light beige shade. If the material turns brown after a while, then the process of gradual destruction can be considered complete. In such a situation, it is necessary to clean the window opening from the previously used sealant again and carefully close all the seams.
Sealing joints
Protection of the structure from the outside
Protect the foam used from destruction should be in order for it to retain its properties. In a different situation, you will often have to spend money on new repairs.Before sealing the base with sealant or putty, you should try to cope with the situation with a universal sealing tape. This product is actively used by professionals to hide various irregularities in the window opening, which are difficult to avoid when installing new structures. For working with old products, a tape with waterproofing parameters is more suitable.
The coating can be safely performed with other materials:
- Polyurethane sealant.
- Putty / plaster. The master needs to make sure that the material is well resistant to the negative effects of low temperatures.
- Acrylic based paint.
- Quality mortar made from durable cement, river sand.
- Special putty for sealing defects.
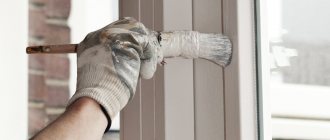
Before you start filling the foam, you need to prepare a small bucket for mixing the components, a sharp knife, gloves and a trowel.
Proven recommendations from experts can be found in the video:
How heating of a plastic window works
Heated double-glazed windows for most Russian buyers are a rather incomprehensible design, it is worth taking a closer look at the features of this product. In fact, this is an ordinary double-glazed unit equipped with a special glass that has a heating system. Such an element combines two functions: heating the air streams and letting natural light into the room.
Heating helps to get rid of ice, condensation, equalize temperatures, getting rid of their drops. In addition, heat often escapes through the glass, and heated glass windows will help get rid of this problem. The function not only retains the heat in the room, which comes from heating devices: it can be an effective means for heating rooms, regardless of their area. The glass is heated using electricity. For this, power supply should be provided to the window structure; you can hide it in a special box or walled it up in the wall.
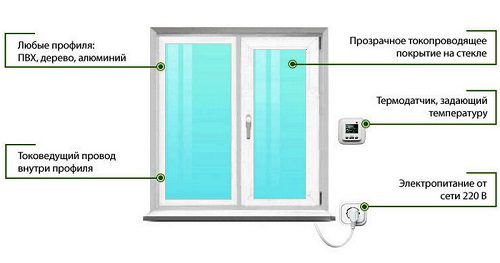
The principle of operation of glass heated in a window
Protection principle
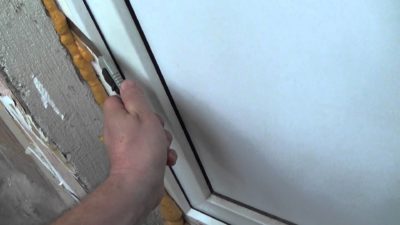
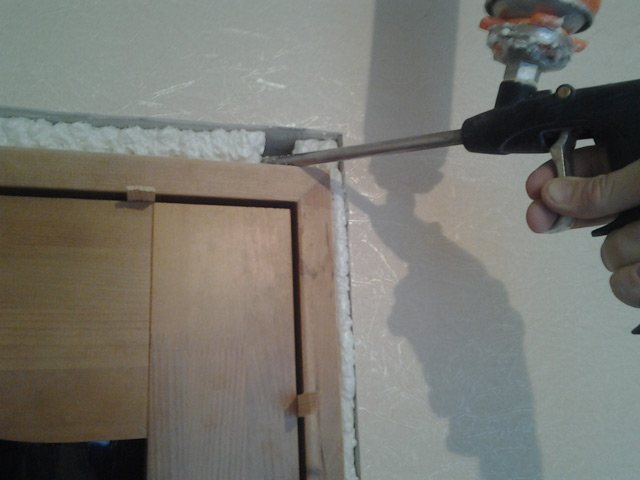
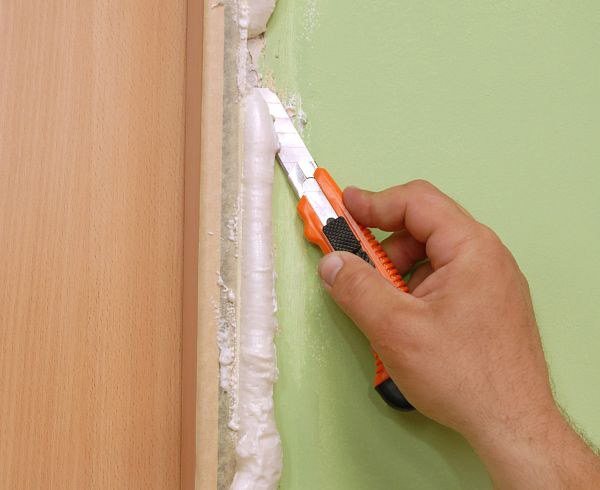
If the master decided to use a putty to cover the foam, then you need to adhere to a certain algorithm of actions. You can start any manipulations only after the foam has completely dried. This process most often takes 10 to 12 hours. If there are areas that protrude above the level of the glass unit, then they must be carefully cut off with a sharp knife.
During this procedure, it is worth going a little deeper into the base. The surface must be cleaned of debris and covered with a layer of primer. When the applied product is dry, you can apply the putty solution, but not in a thick layer. After complete hardening, the prepared building mixture is applied again.
Gain
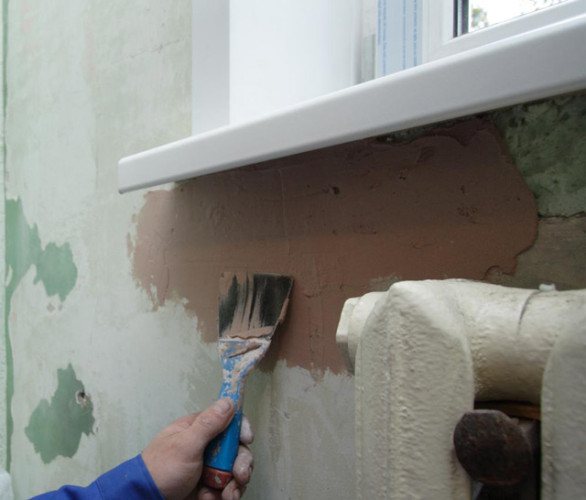
The surface must be rubbed with sandpaper, primed and painted. If the master does not plan to use putty, then the excess protrusions are cut off flush with the PVC window. Remove all irregularities with sandpaper. At the final stage, it remains only to paint the surfaces. For these purposes, it is advisable to use an acrylic-based composition.
The product is applied only upward, gradually approaching the corners of the frame. If putty or paint is applied to the surface, then the final service life of the formed seam will definitely not be inferior to the operation of the building itself.
Important! To putty the foam, it is better to choose a frost-resistant material that is freely sold in modern construction departments. Many of them are powder, to which a certain amount of pure water must be added to obtain a solution of the desired consistency.
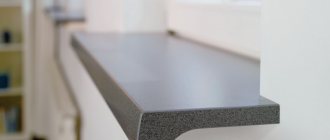
Putty is applied to the surface to be treated and carefully leveled.If the layer turns out to be too thin, then over time it can become covered with numerous cracks. The thickness of the finishing material must be at least 3 mm. To give the seams an aesthetically pleasing appearance, it is better to use construction mesh.
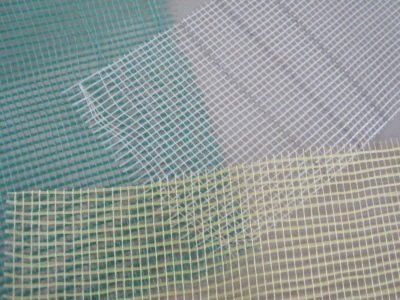
Classic mesh for improved adhesion
How to putty foam under a windowsill
"Window sill" How to putty foam under the windowsill
Savig
6441 0 2
The putty protects the polyurethane foam from the harmful effects of sunlight
Don't know how and how to putty polyurethane foam? The experience I have accumulated allows us to assert that all the necessary materials will be found in the nearest hardware store, and anyone can cope with the task. Detailed illustrated instructions will help me prove this.
From material preparation to mortar application
Can polyurethane foam be putty? Not just possible, but even necessary. This is done to achieve two goals:
- Protection against the harmful effects of ultraviolet radiation. Despite a lot of positive performance characteristics, polyurethane foam has one fatal drawback: it crumbles after being under the sun for a long time;
Foam exposed to the sun will not last long
- Decorating. Yellowish clouds of solidified mass around a door or window do not look very aesthetically pleasing. Better to cover them with something more attractive to the human eye.
A window blown out with polyurethane foam can hardly be called beautiful
In order to complete the task, you need:
- Prepare tools and materials by visiting a hardware store if necessary;
- Prepare the surface to be treated, that is, bring the dried substance into a form suitable for filling;
- Apply putty.
Stage number 1: preparation of tools and materials
Before starting work, make sure you have on hand:
- Primer. Will the putty stick to the foam without first priming? It will be, but much worse, plus the level of danger of its detachment will increase in the future. Why risk it?
I recommend choosing an acrylic primer, as it has high performance properties, environmental friendliness and reasonable cost.
Acrylic primer does not release toxins and has a high cure rate
- Wide - for applying the solution to the surface to be treated;
- Narrow - for applying mortar from a container to a wide spatula;
The wide and narrow spatulas are used in pairs
- Putty. Depending on the place of work, use the following rules when choosing a suitable mortar:
- Street - facade mixtures based on cement or polymers. As an example, consider the technical characteristics of the NEOMID putty:
The prices in the article are current in the summer of 2021.
| Parameter | Value |
| The nature of the work | Indoor and outdoor |
| Recommended application tool | Metal spatula |
| Recommended application temperature | Above +5 degrees Celsius |
| condition | Ready-to-use mixture |
| Hardening period | At a humidity of 70% and an ambient temperature of +20 degrees Celsius - two days |
| Price for a five-kilogram bucket | 625 rubles |
Putty-putty Neomid is specially designed for sealing polyurethane foam
- Room - gypsum fillers for interior work. As an example, consider the technical characteristics of the Knauf Uniflot mixture:
| Parameter | Description |
| Brand name | Knauf |
| Country of manufacture | Germany |
| The nature of the work | Internal |
| Color | White |
| Weight | 25 Kg |
| Recommended application tool | Putty knife |
| Storage period | Half a year |
| Price | 1650 rubles |
Knauf Uniflot is distinguished by increased strength indicators
If we are talking about a room with high humidity, then it is also better to use facade compositions, since gypsum in such an environment is deformed and destroyed.
- Ceramics or thermal insulation boards - adhesive putties.As an example, consider the technical characteristics of a Weber Vetonit product:
| Parameter | Description |
| Brand name | Weber |
| Weight | 20 Kg |
| Connector type | Glue |
| Color | White |
| Amount of water for dilution of 1 kg of dry mix | 400 ml |
| Recommended Application Tools | |
| Maximum permissible layer thickness | 4 mm |
| Minimum permissible layer thickness | 1 mm |
| Recommended application temperature | +15 to +30 degrees Celsius |
| Fraction size | 0.5 mm |
| Pot life of the solution | Two days |
| The value of adhesion to the surface | 0.5 MPa |
| The cost | 410 rubles |
Weber Vetonit can be applied mechanically
If we are talking about sealing slopes, then you can additionally purchase another sealant and reinforce the edges of the polyurethane foam with it so that they do not start cracking over time.
- Serpyanka tape for reinforcing the putty layer;
- Gloves. The price of such an accessory is low, but your hands will remain clean;
- Mounting knife for trimming excess dried mass.
Stage number 2: preparation of the treated surface
The putty will not fit on the polyurethane foam without preliminary preparation:
Pruning and priming are two basic preparatory steps
| Photo | Description |
| We cut off all the protruding excess of frozen foam with our own hands using an assembly knife. | |
| Apply a primer with a roller. | |
| We are waiting for the soil to solidify. |
If you are afraid that you can stain the window with a primer or putty, then glue it with masking tape in advance. You just take it off after the end of the work, along with all the accumulated dirt.
Stage 3: applying putty
After the primer has hardened, you can start filling:
| Photo | Description |
| We knead the putty. This can be done by hand, but a construction mixer will give more uniformity to the composition. | |
| Apply the first layer of putty to one side of the window perimeter. | |
| We sink the serpyanka tape in the putty. | |
| Apply the second putty layer covering the serpentine tape. | |
| We remove with a rag the excess putty that has fallen on the window frame. | |
| Similarly, fill in all visible areas of the polyurethane foam. |
After finishing the work, I recommend immediately washing the tools. If this is not done, then it may not be possible to clear them in the future.
Which formulations are better to choose?
Any foam is gradually destroyed by exposure to direct sunlight. At the first stage, it simply darkens, but after a while the material becomes brittle and crumbles. Due to regular exposure to ultraviolet radiation, the foam becomes unusable in 1-4 years. The intensity of destruction depends on the thickness of the layer, the angle of incidence of the sun's rays, as well as the quality of the insulation material itself.
The operational life of the structure can be extended only if reliable and high-quality finishing materials are used:
- Putty. Finishing compositions with the addition of universal frost-resistant additives are in the greatest demand. Liquid plastic is no less effective, as well as the classic putty. All these compositions are applied to the prepared base from the bottom up with the most accurate strokes. A spatula is useful for work. Excess solution can be removed with a regular sponge.
- Enamels and varnishes. Acrylic paint has optimal characteristics, since it has good adhesion. The enamel is applied with an exceptionally thin paint brush. For maximum protection of the foam sealant, you can combine acrylic enamel with a putty.
- Special tape. This is one of the easiest and most effective ways to protect the foam involved, but the aesthetic side does not impress every user. Even if you try to choose the adhesive tape in accordance with the color of the frames, you will not be able to paint over the surface, since the adhesive tape will simply come off. If the real estate owner is ready to glue all the joints several times a month, then this option is the best solution.

Demanded plaster
There are a lot of ways to accurately cover the assembly seam. That is why the master needs to be as responsible as possible when choosing the right material, since it all depends on what result needs to be achieved in the end. Experts recommend taking into account the operating conditions of the windows. From the outside, only frost-resistant solutions should be used that are not afraid of moisture and ultraviolet radiation. From the inside, the seams should be plastered with those means that are not afraid of temperature changes.
Important! If the foam crumbles or loses its basic properties, then the PVC profile can be significantly damaged. In such a situation, you will have to change the window sill and window, which entails large financial waste.
How to fix window problems
Problems with window blocks are very diverse. In some cases, it will be enough to do the simplest adjustment of the plastic window with tightening the adjusting screws with your own hands, and in others you will have to change the broken fittings. Here, much like with heating - most often you can achieve comfortable temperatures in a room by simply turning the room thermostats for gas boilers. But in a number of situations it will be necessary to rebuild the existing heating system with the replacement of some of its elements.
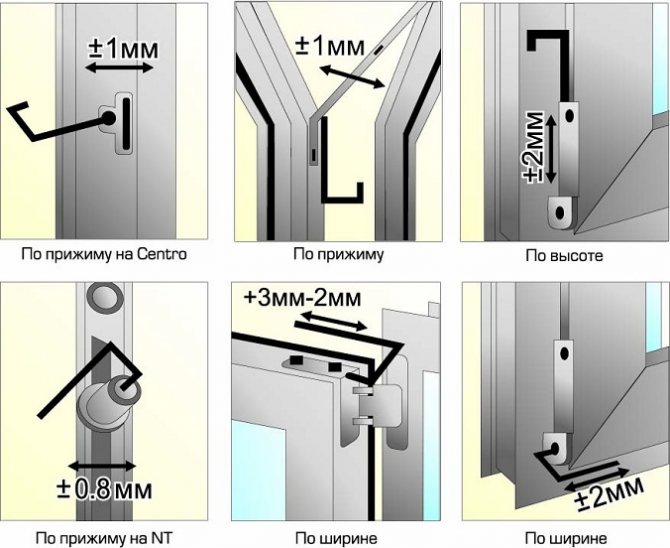
Window system adjustment methods
Among the main problems are:
- If the sash touches the frame profile from below - adjustment in height is required by tightening the end screw on the upper hinge and the inner screw on the lower one.
- Clinging with the frame sash from the side - you need to adjust the bolt under the lower hinge.
- Loose fit of the sashes - this is regulated by the pins.
- Worn or broken striker plates - change, and then re-adjust the entire window.
- Handle jammed - first grease the top of the swing-out unit and both hinges with oil, but if it does not help, replace it completely.
- Broken window handle - just change.
The handle can also become jammed due to improper operation of the bollard. There is no need to tighten or unscrew anything here. It is only required to move the lever of the locking mechanism to its original position at the end of the sash. Jammed fittings should be released.
Recommendations for adjusting the plastic door of the balcony block
Protective agent application technology
Foam treatment should be carried out at all stages of the installation of a double-glazed window. From the street, the material is protected from snow and rain, as well as from condensation and steam. If the budget is limited, then you can use a sealing tape, which is glued to the frame even before installation in the prepared opening. If we are talking about old houses, then it is better to use a diffusion tape, which works like a membrane. The product perfectly protects against condensation inside the room and against moisture outside.
To significantly extend the durability of the foam, you need to choose the right filler. The mixture is prepared in strict accordance with the manufacturer's instructions. All proportions are indicated on the packaging of the purchased mixture. The prepared solution should have a thick, homogeneous consistency. Distribute the solution perpendicular to the seam, since only in this case it is possible to achieve optimal filling of all cracks and cracks.
The prepared putty solution is evenly applied not at the same level with the joint, but with a margin. Before applying the paint and varnish, the surface is polished. You need to start work only after the surface has hardened in order to ultimately get a smooth base. If there are doubts that the sun's rays will not fall on the open areas of the foam, then the involved sealant must be putty and painted without fail. Experienced builders recommend following several effective guidelines:
- For uniform mixing of the solution, it is necessary to use a construction mixer.
- The mixture is applied to the foam with a good margin, since the final layer should be at least 6 mm.
- After the performed manipulations, the involved tool should be cleaned, since it is very problematic to remove the fossilized solution.
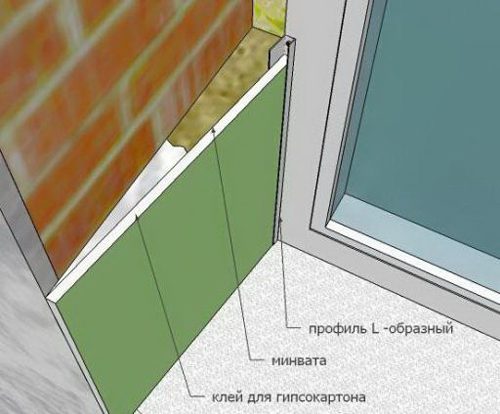
Creation of a durable external structure
Indoor joint sealing
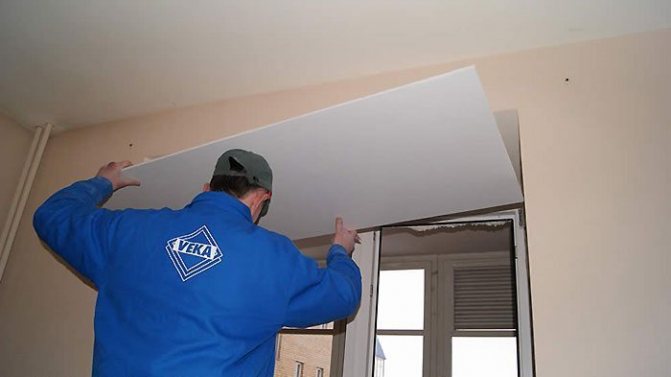
To implement this construction task, the same technologies must be used. For optimal results, aesthetically pleasing drywall can be used. This material will hide the foam seams from prying eyes, in addition, small plates can be protected with an emulsion or pasted over with wallpaper.
There is only one drawback - drywall is afraid of high humidity, which is why it is not intended for the street side of the building. The material can be easily attached to the surface using standard size anchors and self-tapping screws. The craftsman can create a truly perfect surface with his own hands at an affordable price. Once the panels are in place, they should be coated with a quality primer for optimal adhesion to the upcoming finish.
Important! The drywall sold today lends itself to any processing, but at the first stage you need to putty the cracks, holes, and also the caps of the screws.
To install drywall, you need to build a solid profile from natural wood. If the walls are even, then you can get by with the classic crate. In this situation, the panels are simply pushed onto a special glue, which greatly simplifies and speeds up installation. Thanks to this, in the process of many years of use, users will not encounter various unpleasant moments.
Otherwise, leaks, drafts, the growth of ice crusts, as well as uncontrolled growth of mold on those surfaces that adjoin the frame and the wall opening are not excluded. The typical lifespan of the foam joint is 17 years if all construction work has been done correctly. But the final figure depends on the factory, operating conditions, as well as the degree of compliance of the construction work performed with the established standards.
Putty application inside the house
What if you need to trim the slopes from the inside?
For interior work, the same technologies can be used, however, in addition to plastic and plaster, you can also use drywall: it will hide the foam from the eyes, it can be painted or pasted over with wallpaper. The only drawback of the material is fear of moisture, so you cannot use it from the street side. Drywall is easily attached with screws or dowels, helps to create a perfectly flat surface, and is inexpensive. Once the panels have been installed, they must be primed for better adhesion to future finishing finishes.
Installation of plasterboard slopes inside the building
Please note that a wooden profile is required to mount the panels. If you have flat walls, you can skip the lathing. It is enough to glue the panels with special glue. This greatly simplifies the installation task.
What are the methods of sealing polyurethane foam
In all construction and installation work, it is often necessary to resort to sealants, the most popular of which is polyurethane foam. This type of building material has entered our lives so tightly that we consider it an indispensable tool for sealing small joints, building cracks and various cracks. However, it must be hidden under the finishing material, and for this you need to know how to seal up the polyurethane foam.
Very often, foam is also used to seal cracks when installing plastic windows and doors. Such popularity is easily explained by its performance characteristics and the fact that it always eliminates the problem as much as possible.Today, this material is a polyurethane foam sealant, which in most cases is produced in an aerosol can. You can now find polyurethane foam on the shelves of all hardware stores in a huge assortment. Construction foams are used in two cases:
- for thermal insulation of premises;
- sealing seams.
Polyurethane foam is in demand due to the fact that it is excellent for materials such as wood, metal, glass, concrete. Unfortunately, due to its unusual appearance, it does not always fit into the external interior of a room or premises. Precisely in order to preserve its special characteristics and at the same time make it invisible, it is required to seal up the foam with another material. Most people have no idea how to repair it, so they immediately call the master if such work is required. However, everything is quite simple, and you can easily do it yourself, even without special education, skills and special knowledge in the field of construction.
If you used polyurethane foam to work with the outside of the premises, be sure to remember that for all its durability, it requires constant protection from ultraviolet radiation and getting wet. If you do not protect the polyurethane foam from adverse factors, then its service life will be significantly reduced to 5 years. Sometimes during installation work, in order to avoid such situations, the cooled foam is lubricated with a special primer solution.
Flexible window heating system
Infrared elements and heat curtains are generally effective, but have some disadvantages. For example, they require space for installation, sometimes they create noise and in some cases have a negative effect on the interior. European engineers figured out how to make a quiet and inconspicuous device that prevents windows from cooling. Its work is based on thin heating elements, which are a flexible tape that runs along the perimeter of the glass unit. Such a system consumes little energy and raises the temperature of the glass unit, eliminating cold bridges in both deaf and active sashes.
In addition to being economical and compact, this system is suitable for windows that are already in use. Due to the minimum thickness and flexibility of the heating elements, it is possible to remove the glass unit from the frame, wrap it in tape and insert it back, and then connect it to the control unit. Such a device prevents condensation from forming and slows down the heat transfer process. Its integration guarantees frost-free windows even at very low temperatures.
The flexible system is best suited for openings with relatively small dimensions, since it only slightly warms these products around the perimeter. If significant heat loss through the windows is foreseen, then it is better to use a device that is able to heat the glass over its entire area.
Required materials for embedding
Many people ask: how to seal up polyurethane foam? There are several options: ordinary sealant, putty or pre-sealed self-adhesive tape.
The choice of material for covering the polyurethane foam must be approached carefully, because it must be waterproof and vapor-proof. According to experienced and qualified craftsmen, a putty for outdoor use would be an excellent choice. A common putty is sold in the form of a powdery mixture, which must be diluted with a certain amount of water to obtain a special solution. You can find putty at almost every hardware store. Pay attention to the frost-resistant version of external putties: their range is quite large, based on this, you can choose exactly the one that will best suit your financial capabilities.
In order to reliably seal the polyurethane foam, you will need to stock up on materials such as:
- putty for outdoor use;
- small knife;
- container for solution;
- water;
- latex gloves;
- Master OK.
Advice
- Keep in mind that if you purchase polyurethane foam that is released directly from the cylinder, then you will not be able to use it twice. You have to use up the entire volume, so see where else you can apply it to use up the remainder. The locking mechanism must be lubricated every two years to prolong its trouble-free life.
- Lubricate the locking mechanism and window hardware once or twice a year to prolong their life. Proper care will prolong its smooth operation for up to 12-15 years.
- The sealing rubber should be washed twice a year, wiping it with glycerin after drying. The service life of rubber is from 4 to 5 years, so it needs periodic replacement.
- Do not use aggressive detergents. Soap and warm water are the best cleaners for plastic windows.
- Regularly clean the rubber, the inner space of the sash, lubricate the mechanisms of the plastic window.
The main reason for poor sealing of plastic windows is aging and wear of the sealing rubber. It is in unfavorable conditions and, over time, loses its elasticity and begins to crumble. It needs to be changed periodically. When adjusting the clamping of the sash to the frame, do not make the clamp too tight. This contributes to the rapid wear of the rubber.
Keep in mind that on your own, without at least minimal experience, you need to adjust with extreme caution! If, after replacing the seals, "grazing" suddenly begins, which does not disappear after a week or two, then in no case start adjusting! Be sure to first check the quality of what was replaced (gluing, being in regular places, etc.)! Otherwise, you can “skew the sash”, and this is fraught!
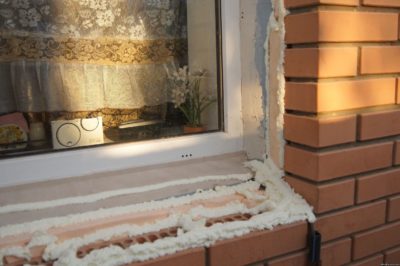
I advise you to pay attention to the space under the windowsill, most often the cold air comes from there. Unscrupulous installers, when installing windows and, in particular, a window sill, in order to save an extra balloon of foam, just for the sake of appearance, foam the space between the concrete and the window sill, and poke this foam with your finger and it will fall a good five centimeters
In my apartment for two winters in a row I could not understand where it was blowing from, then I just guessed, I thought plastic windows, which one was blowing, it seemed, but in fact, the air blew through the entire space under the windowsill! To eliminate this, you need two cans of foam (one may be enough). Remove old foam, foam with new one. Everything is simple enough. Coziness and warmth are now with you again.
Termination technology
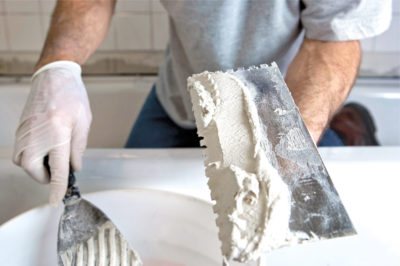
First of all, you need to prepare the surface of the polyurethane foam. Cut off the top layer of foam from the surface. Next, put on gloves and start preparing the putty solution for outdoor use. You won't need a lot of putty solution, so don't overdo it. It is better to knead less and then finish more than to transfer expensive building materials.
You can find the instructions for preparing the solution directly on the pack with the putty. Using a trowel, apply the wet putty so that you can quickly level it before it hardens. In some cases, cracks may appear. This is due to the fact that the layer is too thin, it is for this reason that a layer with a thickness of several millimeters should be applied. It is also not recommended to apply thick layers of putty, as it will flake off as it dries. Correct application of a layer of this building material will allow you to maintain a pleasant appearance of your work and reliably seal the polyurethane foam.
After the applied putty has dried, the surface to be treated is rubbed with sandpaper or construction mesh.This is done in order to remove roughness and give the seams that were closed up an aesthetic and neat look.
Another way to protect the polyurethane foam from exposure to moisture and ultraviolet radiation from the sun is a sealing tape. This tape is in most cases used to fill holes and irregularities in various openings that arise as a result of the installation of new structures.
Every owner wants his house to look perfect. With the help of the above method, you already know how to cover up polyurethane foam, and you can easily hide traces from sealing cracks, as well as protect the surfaces finished with foam from adverse weather conditions and other harmful factors. The main thing in such finishing works is not to rush, because the accuracy and the final result of the work done depend on your movements. Be patient and you will definitely succeed.
Why does the foam need to be covered?
If the polyurethane foam is used indoors, it is not affected by external factors in the form of high and low temperatures, precipitation, wind, and sunlight. On the street, all these problems are present, so they can be solved by finishing the facade. If this is not done, the quality of the foam will deteriorate and it will not be able to perform the functions that are required of it.
In addition, non-closed decorative mounting foam spoils the aesthetic perception of the facade. The windows look unattractive, unfinished. Cold air can enter small cracks, which can create a draft in the room. Closing the assembly seams will help solve these problems.
Exterior metal slopes are very practical. How to install them yourself, read the link https://oknanagoda.com/okna/naruzhnye-metallicheskie-otkosy-na-okn.html
How to properly foam windows and slopes after installing plastic windows, read on our website.
Methods for sealing polyurethane foam seams on windows from the street
Installation plastic windows is without doubt a step forward in terms of comfort, convenience, efficiency and durability.
Comfortable and reliable designs, which will almost never age, will provide a high level of heat retention in the house during a cold period, as well as appropriate illuminationare appreciated by many.
However, usually the work of installers who have only been ordered installation of specific sections, does not provide for further sealing of cracks and technological gaps from the outside.
Considering that windows and other similar structures are most often installed on foam, this type does not fit very well into any architectural style of the house.
Of course, you can spend extra money and invite specialists who will carry out the appropriate finishing. However, a much more convenient and affordable option, subject to the required amount of time, is self-termination corresponding flaw.
The modern building materials market is extremely rich in the most various types of finishes. You can use both rigid panels and structures, and cover up the cracks with different mixtures, depending on the specific situation and wishes.
The fastest and most affordable way to hide assembly seams is use of appropriate slopes.
It is best for metal-plastic samples to take plastic optionsalthough there are a fair number of metal samples available today.
The overlap of these segments allows you to completely hide the existing holes, as well as to seal the seams additionally, which will undoubtedly significantly increase the overall service life of the existing structure.
Many apartment owners resort to using what is most familiar, familiar, and perhaps even already in the house. In particular use plaster.
This option is undoubtedly the most accessible, although it will also require a lot of time and skill. Unlike the previous version, where the plastic panels fit tightly with the structure of the window itself and safely block all the underlying cracks, here virtually every millimeter of the wall will have to close neatly by yourself.
It is imperative to prepare the wall to ensure high-quality adhesion and even application of the plaster to the surface. In addition, absolutely any existing material will not work for external walls.
It will be required exclusively exterior plaster, resistant to harsh environmental conditions, temperature extremes, humidity and other aspects.
Filling the joints with any substances is possible only after the complete and absolute drying of the running construction foam.
After that, it will take cut off any protruding excess foam, and it is desirable to do this as smoothly as possible. But in case you want to seal the seams with plaster, it is recommended to cut off the foam no deeper than a couple of millimeters.
The outer layer should be made thicker in order to provide better protection and a secure grip. Remember that too many material for sealing hardly needed.
It is enough to dilute a small portion and proceed to the next one only if the previous sealant is not enough. After creating the waterproofing layer, you can start applying the putty itself. It is best to use a spatula or at least an ordinary knife for this.
Putty is applied in layers not thinner than three millimetersotherwise it may crack. After applying the plaster, it is advisable not to dwell on the effect obtained.
It is better to ensure not only the preservation of the obtained effect of protecting the openings, but also to think about the external aesthetic component of the house.
Perfectly suited for this water-based paint... It creates a protective layer on the surface of the plaster application, provides a significant reduction in moisture penetration. In addition, the correct selection of color will allow you to create an appropriate style, completely preserve the architectural unity of home design.
In the event that manually smearing every centimeter is not the best option for you, then plastic panels are quite capable of showing all their advantages.
All the necessary construction materials are already available for sale in a completely finished form, while their price remains affordable.
You just need to cut parts of the appropriate length that are able to overlap the corresponding technological slots... Individual sections are attached and interconnected with a plastic rail.
Work progress
It should be noted right away that if you insulate plastic windows for the winter with your own hands, the warranty on them will automatically disappear.
If the owner nevertheless decides to carry out the work on his own, it is necessary to find a place for a draft. Sometimes it happens that it occurs due to depressurization of glass units. Unfortunately, in this case, it will not be possible to carry out high-quality insulation on your own. In most other cases, this is quite realistic.
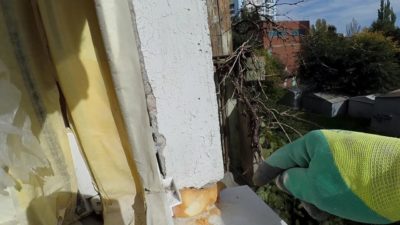
Insulation of slopes
If voids appear under the facing of the slope, this means that it is necessary to repair it. Finding them is quite simple: this is done by tapping on the surface. Where the sound will be more sonorous, there is empty space.
The old insulation under the cladding of the slope must be replaced
In this case, it is necessary to remove the cladding material. There will be insulation under it. In most cases, foam is used as insulation. If the problems are not too serious, it is enough to simply add material to the places where voids are formed. When the insulation has already served its purpose, it must be replaced.The material can be very diverse: basalt wool, foam, foam, etc.
After replacing the insulation, it is necessary to check the cladding material. If the sheet has cracks or other serious damage, it must be replaced. It is better to use PVC or plastic panel as cladding. Such materials not only look good, but also provide excellent thermal insulation.
Insulation of street slopes is carried out in the same way. However, if the apartment is located above the second floor, you need to contact the professionals. It will not be possible to carry out the work without special equipment.
Replacing the seals
In plastic windows, one of the fastest wearing parts is the rubber seal. After several years of operation, it loses its properties and ceases to perform its functions. To increase the life of the seals, you can use a special silicone grease (this is done twice a year). However, if the material is already worn out, it must be replaced.
To replace, it is necessary to pry off the glazing bead that holds the glass unit. After that, you need to remove it. The rubber is now easily pulled out of its groove.
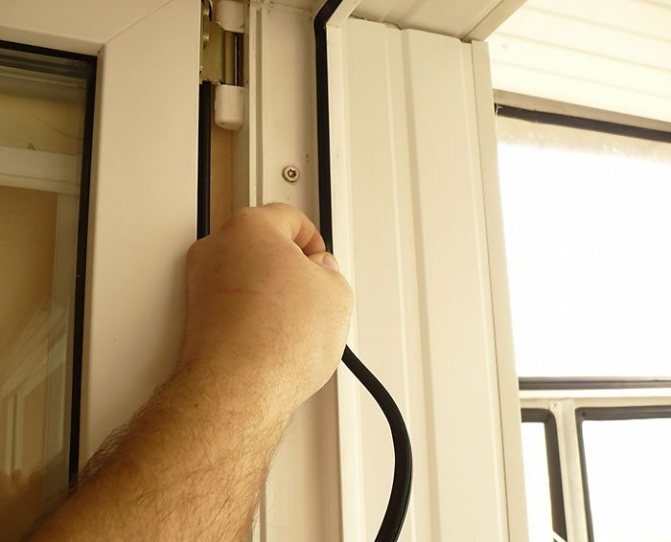
Replacing the sealing tape will increase the thermal insulation of the window
Cut off the new material (it is better to leave a margin of 5-6 cm and after installation, cut it to the desired length). Ensure that there is no dirt in place before assembly. If necessary, the seal can be fixed with glue.
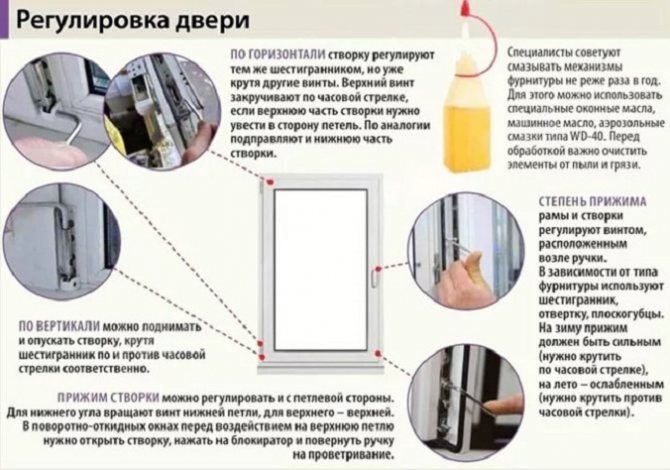
Clamp setting
In modern plastic windows, the sash pressure can be adjusted. This is done by rotating the eccentrics (located at the end of the sash). A 4 mm Allen key is used for adjustment. There is a risk at the eccentric itself, which helps to determine the adjustment. If it is on the side of the street, then the clamp will be weaker.

Modern windows allow you to set the summer and winter sash pressing mode
Adjusting the position of the sash relative to the frame
There is another mechanism in the sash hinges, which can be used to adjust the sash. Adjustment is carried out by tightening the screws.