What threatens the installation of window sills on polyurethane foam
Polyurethane foam is an excellent building material that is used for gluing surfaces, insulating and sealing various cracks. More it is intended for insulation and waterproofing materials, however, it can also be suitable for installing a window sill.
What are the features of working with foam:
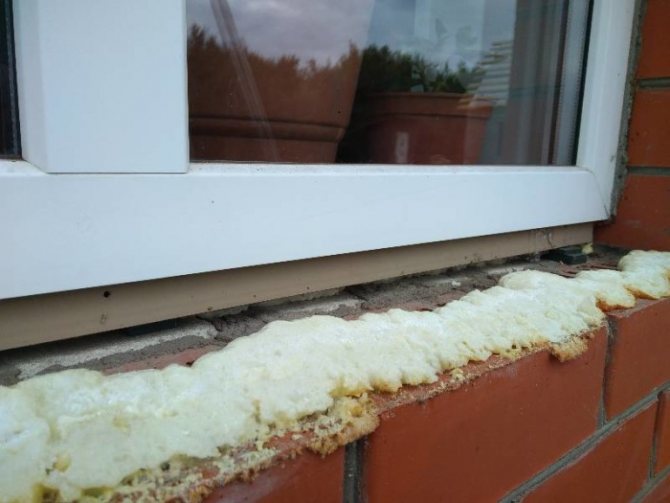
- so that the structure does not deform after working with foam, it is necessary to install safety attachments. The foam swells and the window sill can lead;
- it is necessary to work with foam with gloves;
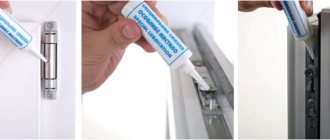
- use polyurethane foam in work at temperatures from +5 to 30 degrees Celsius. If it's cold outside, then you need a special foam in composition;
- it closes cavities no more than 8 cm. if the connector is used more other means;
- when applying, first moisten the surface with water, then shake the foam for a while, and only then apply to the desired area;
- the mass hardens after 8 hours;
- to protect the foam from exposure to sunlight, cover it with paint or sealant at the protrusion site.
When installing a window sill, it is necessary to take into account what material it is made of. When choosing a window sill made of wood or MDF boards, it is necessary to insulate the material from the walls, otherwise the condensate will destroy it. This can be done with polyethylene.

How to close the gap under the windowsill after installing plastic windows
For thermal insulation, the same building materials are taken: sealant and polyurethane foam. They quickly insulate the windowsill. Before starting work, it is better to treat the concrete surface and brickwork with an antiseptic or sealant.
Process guidelines:
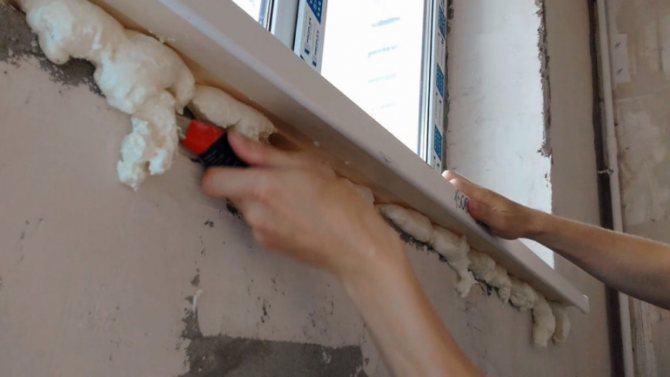
- It is easier to fill the gap between the wall and the window sill with foam for installation along the entire object.
- Small cracks in the thermal insulation or wall, it is better to treat with a sealant. Silicone will penetrate deeper than other building materials and cover even small gaps.
- When the question is how to cover up the cracks under the windowsill outside the plastic window, then the solution is to walk along the slopes with extruded URSA XPS expanded polystyrene foam. This will protect against frost.
Alignment of elements and openings (after all work), and waterproofing is done with a cement mortar or covered with a dry mixture.
If the window sill is made of wood
Before installing the window sill, it is wrapped in cardboard so as not to damage it. The end is coated with a remedy for fungus and mold. The window sill is placed in the slot under the window with a downward slope and fixed by the bars. They are placed in space with a board that lies on the windowsill.
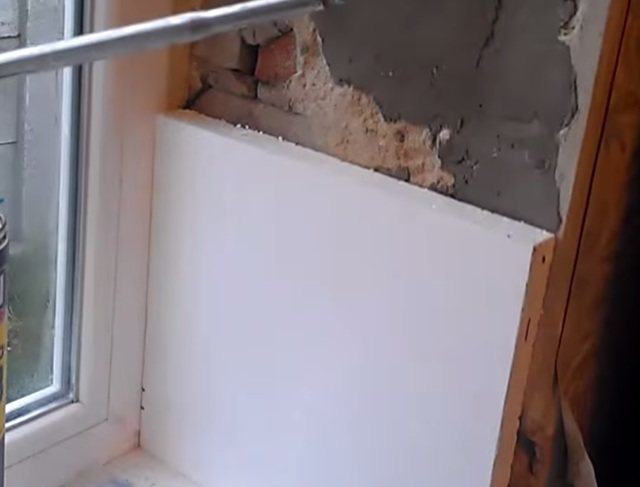
All voids under the windowsill are treated with foam, after which the spacers are removed. The general rule for installing a window sill. The board should protrude no more than the middle of the battery across its width. Otherwise, the window will fog up.
If the window sill protrudes strongly above the free edge, then you do not need to get up and put heavy objects on it, otherwise it will break off. In general, such window sills are considered non-standard and are rarely used in construction.
You can also install a stone window sill. This is even easier, since this material has nothing to spoil.
Preparatory stage
Having completed the preliminary analysis and drawing up a work plan, you can proceed to the preparatory stage. It consists in preparing surfaces and eliminating those factors that theoretically place the foaming process.
Algorithm of actions:
- Carefully and effortlessly clean the tip of the gun to which the product is applied. In most cases, the can is screwed tightly to the gun.
- In winter, the mounting material needs to be heated. To do this, it is enough to place the cylinder in warm water, or leave it next to a heat source. It is important not to overdo it with the heating temperature, otherwise the balloon will explode.
- If the installation takes place in the summer, then the temperature of the cylinder decreases. Otherwise, in the process of work, it will involuntarily expand, which will create voids in the opening.
- Shake the can well. It is important to shake the container already screwed to the gun. If it is shaken separately, then the internal pressure of the cylinder will rise and it will be difficult to screw it into the gun.
- Carefully examine the surface of the opening, remove dust from it. A vacuum cleaner will do. If the installation takes place in winter, then attention is drawn to the formed ice. If it is there, it is removed.
- Apply a little warm water or a primer to the surface of the opening (if the wall is made of aerated concrete). It is best to use a sprayer.
Advice! Experienced builders recommend wetting the foam after application with water, then it will dry a little faster.
Also, close attention is paid to the gun for mounting. If it has not been used for a long time (more than 24 hours), or a zero cylinder has been screwed to it, then you will need to lower it a little into an unnecessary bag or trash can. However, you must press hard and not hold.
Important! If the liquid is brought to the correct consistency, then its exit from the pistol will be accompanied by certain sounds. If there is no sound, then the consistency is of poor quality.
Otherwise, there is a possibility that the liquid will come out too concentrated and liquid. Such a container will not cling to, or stick to the surface. It will just slide along the wall. After waiting for solidification, it is easier to find gaps inside, due to which the technological indicators will not be met.
When installing PVC window sill
PVC window sills are installed simultaneously with windows and ebb. If the window sill was old, then you can change it to a new one without touching the plastic glass unit. And it is not necessary to cut the slopes of the PVC window. The main thing is to leave a gap between the window sill and the bottom of the window opening. We adjust the sill in length and level it. It is necessary.
So that the window sill does not move upwards, it must be pressed down after gluing with foam with a load. And it is better to choose frost-resistant foam, such an expansion is much less than that of a regular one.
As you can see, polyurethane foam is an excellent building material that is suitable for installing window sills.
If it seemed difficult to install the window sill yourself, then invite specialists. They will install it quickly and smoothly.
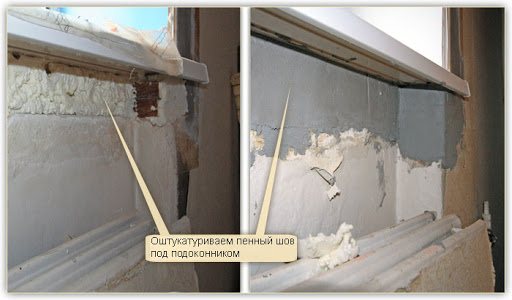
Joint processing
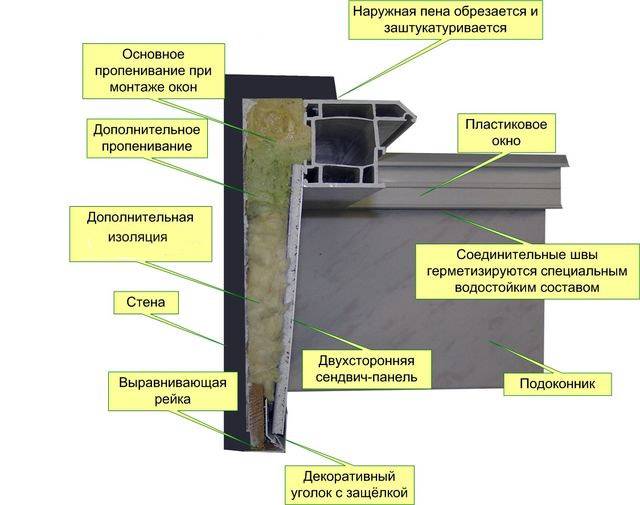
Fig. 9. Finishing the slope in the "cut"
In order to give the insulated window sill a finished look, plastering of the slopes is carried out. To do this, you can use both a cement mortar and an ordinary dry mixture that can be applied with a spatula. After the mixture has dried, the slope is finished. To give the slope a complete look, the finish coat is rubbed with sandpaper. In order to ensure an aesthetically beautiful appearance, the plastered slopes can be painted, and the wallpaper peeled off during the dismantling process can be glued back.
What mistakes in installing a window sill on foam lead to drafts
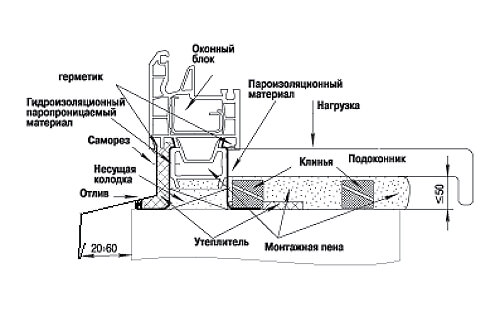
When installing window sills, unfortunately, many make a number of irreparable mistakes. In order to prevent them, we will consider the installation details in all details. After installing the window, all the gaps that have formed must be filled with foam.
The main feature of the product is to increase greatly in size. The foam is used for reliable sealing and thermal insulation.Thus, your living space will be isolated from noise and blowing from the outside. But, not everyone knows how to achieve the desired result.
The reasons
There are three main reasons why it blows from under the windowsill.
Blowing is generated by:
- initial processing of the bottom of the object with low quality building materials (cement and construction waste);
- wizards errors during installation;
- deformation of the foam layer for installation (drying out of the material during operation).
Failure to correct damaged elements will lead to wear of the entire structure and an increase in sources of cold penetration.
Advice: if you installed the window system of the company's wizard, it is better to check whether the warranty period is valid. If violations during installation were made by specialists, then according to the rules they will eliminate them.
Otherwise, the work can be done personally.
The most common mistakes when installing a window sill on foam
- Installation of the sill strip after painting the slopes. If you mount the window sill immediately after installation work, it will damage the side surfaces of the slopes.
- Product quality. You cannot save on mounting foam, this will lead to the formation of microcracks, which will entail unpleasant consequences.
- The amount of product squeezed out.When the container is opened, the gas sprays the contents outward and the foam is infiltrated with air. Under the influence of moisture particles, it begins to expand and harden quickly.
- Thermal regime. A different product is suitable for use, depending on the air temperature.
The choice of polyurethane foam
Divided into several categories:
- household and professional;
- for summer and winter use;
- refractory and combustible.
Household foam, in terms of technical characteristics, is much worse than professional foam, in the initial result it is less. If you plan to install a window sill, it is better to use the first one.
In warm weather, summer foam is used, which shows its best qualities at temperatures from 15 to 35 degrees Celsius. In the cold season, they switch to the winter version, it can be used up to 18 degrees below zero.
Important! The container with the product should not be very cold, before starting installation, it must be heated to 11-16 degrees.
There are also all-season polyurethane foams that can be used in any temperature regime.
Basic rules for installing a window sill
- In accordance with the window sill profile, a strip is selected, which should freely enter the installation position. Remove interfering plaster if necessary.
- Install the windowsill using a level. The inserted edges must be sealed with a sealant before installation.
- Treat the concrete surface of the window base with water.
- To prevent the solidifying foam from squeezing out the window sill, place a heavy object on top.
- Fill the resulting empty space with building material.
- After hardening, remove excess with a special tool.
Failure to comply with one of the conditions can cause damage to all the work done. It is important that the foam adheres well to the surface, and the niches are completely filled and have no gaps.
For those who have never dealt with this business, it is important to know that there are several components of success here: accuracy, attentiveness, and the availability of the necessary tools for the job.
How to learn how to foam plastic windows?
In order to learn how to properly foam windows, you need to go through a little workout. It consists of three stages.
Stage - 1. The simplest. It consists in applying a strip of foam on the horizontal surface of the window opening from left to right. At the same time, with the tip of the spout, it is as if to press down the foam to the surface. Remember the principle of correct foaming described above. And do not forget to prepare for foaming according to the instructions, which are also described at the very beginning of the article.
Stage - 2.It is also necessary to apply a strip, but only on the vertical surface of the window opening. This is more difficult to do, because the foam rolls down. Therefore, the main task is to prevent the foam from falling and to apply the foam in the same way, pressing it against the wall with the tip of the gun.
Stage - 3. The most difficult. Now everything is the same, only the foam must be applied to the upper surface of the opening. If at the same time the foam does not fall, then you can be congratulated and consider that you know how to fill a window and you can teach others.
As always, I'm waiting for comments and subscriptions to update the blog. Best regards, Vyacheslav Lankin.
Construction site
Installation of a window sill is usually the final stage of installation of a plastic window, which is usually carried out by professionals - the company where you ordered this window. However, the installation of the window sill is quite simple compared to the installation of the window itself, and it is quite possible to do it yourself, without having special skills. We will consider the installation of a plastic window sill, since this material is quite popular - it is cheap, durable, does not corrode and washes well.
So, we need the following tools:
- jigsaw or circular saw;
- level;
- a gun for polyurethane foam and the foam itself (if there is no gun, you can do without it);
- tape measure and pencil or marker;
- perforator with a chisel (if you have to groove recesses under the windowsill).
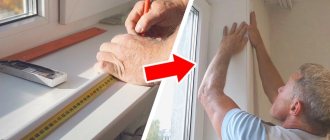
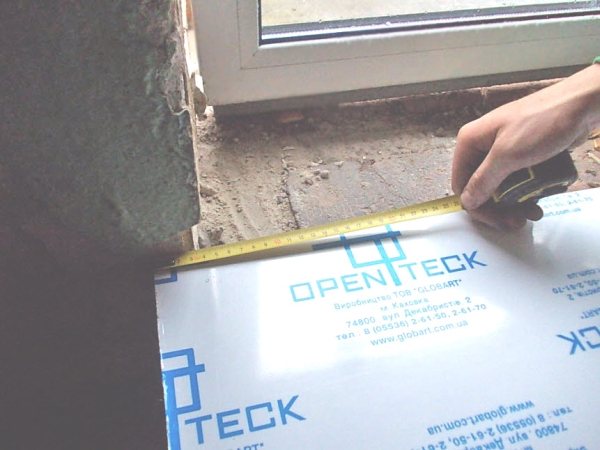
Getting started - measurements
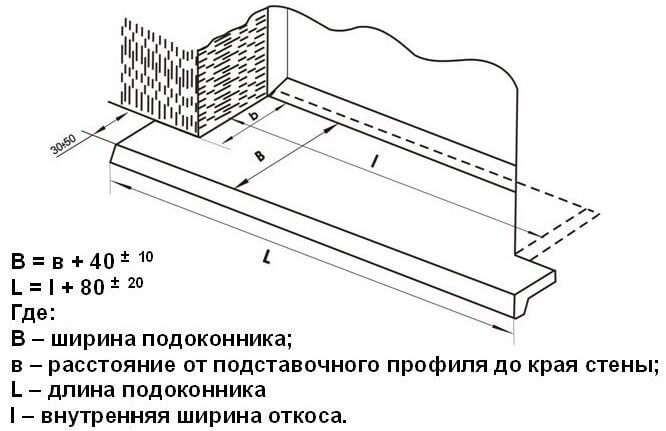
Of course, any work to install anything starts with careful measurements. Decide how wide your window sill will be - it depends on the thickness of the bearing walls and how much it will protrude beyond the wall. The recommended protrusion is a maximum of 10-15 centimeters, otherwise it will simply get in the way. You need to add 2 centimeters to the total width of the window sill, since this part will be located under the window.
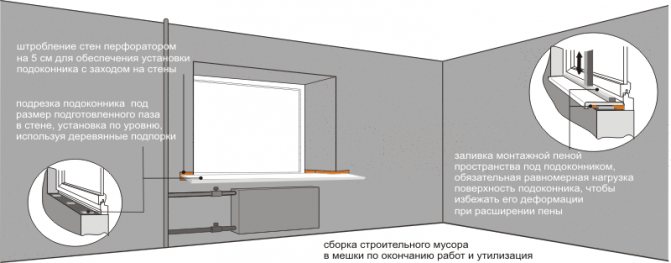
We add 5 centimeters to the length of the window sill on each side - this part will go into the side slopes of the window so that the cut edges of the window sill are not visible. By the way, if the slopes are already installed, you will have to break their lower part in order to insert the window sill there. If there are no slopes, you need to grind grooves 5 cm deep with a puncher.
Installing a window sill
We measured it, checked all the calculations - you can cut off the excess from the window sill, which you should have already purchased. Of course, you need to purchase when you already know the dimensions, and you will have to cut it only in length, and certainly not in width. You can cut plastic with an electric jigsaw and a hand-held circular saw - what is available on the farm.
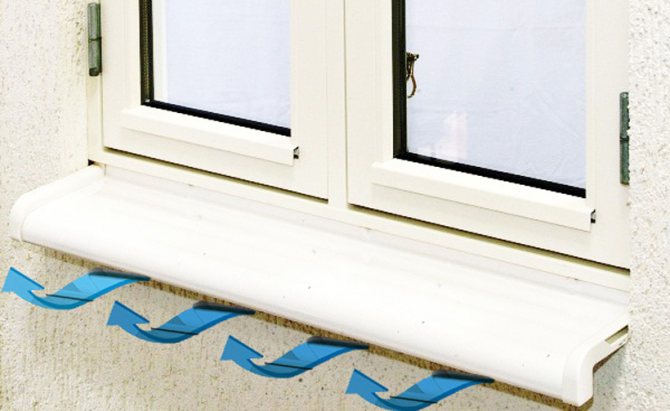
Requirements for foaming window sills
Correct installation of window sills is the key to a good climate inside the living space. If, after installing the attribute, gaps or gaps are found, then the window sill should be foamed with polyurethane foam. This recommendation is spelled out in the state standard No. 30971-2002 and No. GOST 23166.
If you have any problems after installing the PVC window sill, then our specialists will easily eliminate the difficulties. Call +7 (964) 640-20-03.
What are the requirements for installing plastic window sills?
In accordance with the specified state standards, the filling of the seam that formed during installation must be complete, which is performed along the section. In case of continuous foaming, attention should be paid to the voids that may form under the windowsill.
In the event of cracks, gaps or ruptures that reach more than 10 mm, the resulting defect should be eliminated. Otherwise, there is a great chance of fogging windows, drafts and freezing. In addition, it should be remembered that the polyurethane foam securely attaches the window sill to the base. However, you should not fix the problem yourself, it is better to seek help from specialists who will do it professionally and without additional problems.
If the gap between the window sill and the window or wall is minimal, then it can be eliminated with the help of a sealant. Otherwise, only polyurethane foam should be used.
To fill up the window sill for a few hours? No problem, call our consultants and order the service. We will fix the problem in a short time and at the lowest prices.More information about our specialists and work by phone.
When installing windows and window sills, you should:
- Pay special attention to the polyurethane foam that is used at this stage.
- Do not forget that polyurethane foam must have a protective waterproofing layer.
- To close the foam, it is necessary to use a vapor-permeable tape of foreign or domestic production. After that, you should close the polyurethane foam and tape with a decorative strip made of polyvinyl chloride.
Today, the use of vapor-permeable tape for the installation of windows and window sills is practically not used. This is due to the fact that this material increases the cost of providing the service. However, in accordance with state standards, this stage is simply necessary for the proper functioning of PVC window sills.
In our company you can get a full range of services that are required when installing PVC windows and sills. It is very easy to leave a request, just dial our phone number or order a call from our consultants. Call +7 (964) 640-20-03.
vsepodokonniki.ru
How to properly foam a window sill video
A plastic window sill is an integral part of a window today. Thanks to a high-quality product, we can expand the functionality of the area near the window and make it more beautiful and suitable for our design.
A properly selected window sill is only a small part of your happiness, it still needs to be properly installed and secured. After that, we can assume that the purchase was a success, and you will receive a quality product that will meet all your requirements.
Determining the parameters of the window sill
Manufacturers can produce window sills of any size and shape, but they are common, the parameters of the window sill do not exceed three meters in length and sixty centimeters in width. Since the standard width of the window varies from one to one and a half meters, and the depth of the window is about forty centimeters, then these window indicators can be considered more standard.
How to take measurements
There are some rules and restrictions, following which you will be able to change the old window sill to a new one as efficiently as possible. What to follow:
- Be sure to make a margin of two to three centimeters on each side of the window to deepen and fix the window sill in the wall. If necessary, you can increase the deepening.
- The width of the sill should be measured from the frame profile and protrude no more than ten centimeters.
- If there is a radiator under the window sill, it should not overlap too much. In this case, the protrusion should be about four to six centimeters.
If you adhere to these simple rules, then the window sill you have selected will be of very high quality, comfortable and functional.
We make surface preparation
Do-it-yourself pvc window sill installation begins with preparatory work. The first thing you should do is dismantle the old coating. Let's do this, start cleaning and preparing the newly formed surface.
After dismantling the old window and sill, you must completely get rid of their remnants. Dismantle all flaking and chipping pieces of concrete and other things. The surface should be as consistent as possible.
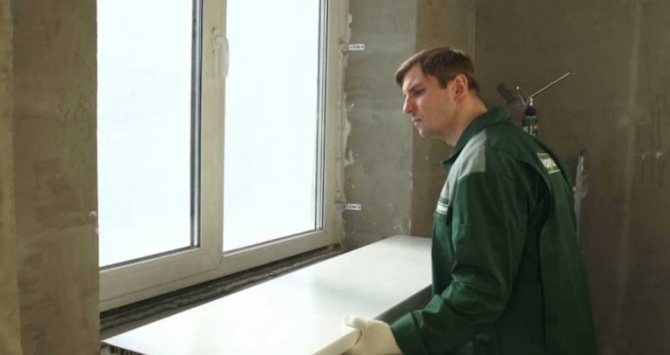
Installation of a window sill block
So we come to the answer to the main question, how to install a plastic window sill. First, you need to adjust the material, the best and easiest way to do this is with an electric jigsaw. After cutting to the correct size, attach the slab to the desired location to make sure everything is done correctly.
In order not to be mistaken and not to spoil the plate, first cut off a little with a margin, attach and accurately measure the area that needs to be removed. Then make a control cut and again check the compatibility of the slab with the opening of your window.
Window sill installation diagram
If there are no indentations in the walls, they must be made using a punch. Do not make them very deep at once, knock out the holes evenly and slowly. Even if there is extra space, it can be easily sealed with polyurethane foam.
If you have fitted the window sill plastic plate and prepared recesses for it, you can proceed to the next stage of installation.
Next, you need to set the plastic board in place and start wedging the leading edge of it with wooden wedges. Wooden wedges should be driven in gradually every thirty to forty centimeters. Thus, you will ensure maximum distribution and uniformity of the load. The maximum wedge height may not exceed two to three centimeters.
If you use wedges of long length and with a small angle, then they are able to distribute the load well and take most of it onto themselves. Thus, the installed window sill will be able to support more weight on its plane.
Once you've secured the sill tightly with wooden wedges, you need to measure its position with a construction bubble level. Using such a tool, make sure that the plate is positioned level in relation to all planes. If there are deviations, they must be adjusted by controlling the wooden wedges. Insignificant deviations from the level can be left as is, they will not affect the quality.
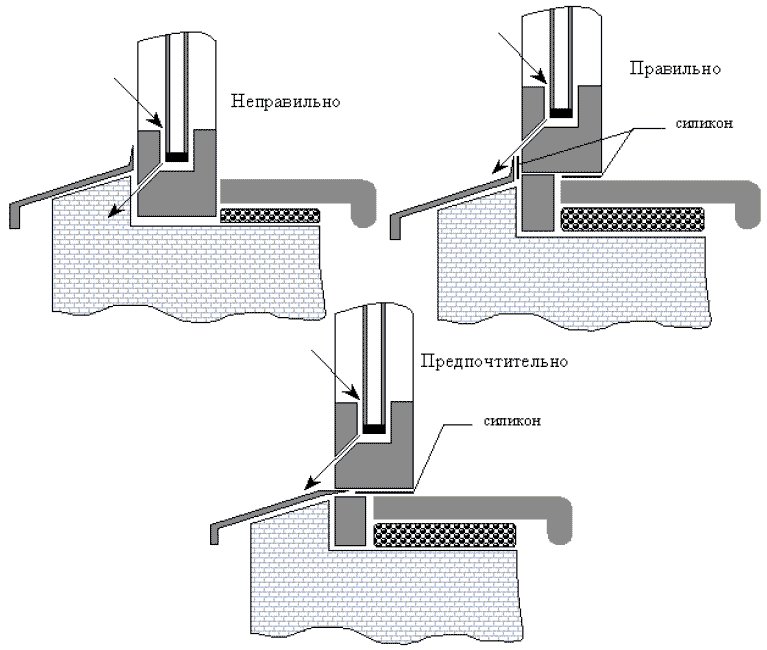
Correct and incorrect installation
The final stage of installation will be a reliable fixation and insulation of the window sill. This is done using polyurethane foam and a special gun with an extension for applying this very foam. It is necessary to foam all the empty space under the stove so that there are as few voids as possible. If you cannot get to the farthest edge, carefully seal the part closest to you.
Tips for improving quality
If too much void is formed under the window sill during installation, then it can be laid with foam or mineral wool. So, you will save on significant costs of polyurethane foam. It is better to use mineral wool, as it will be possible to install it more tightly. The edge is also covered with polyurethane foam.
To make the installation of the plate more dense, after foaming, you can put something heavy on it and leave it there until it dries completely, ideally overnight. In the morning, the weights can be removed and the window sill will be completely ready for further use.
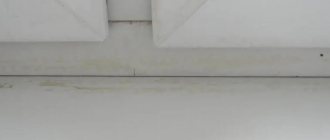
To protect yourself and the surface of the product, do not remove the protective film during installation, it will protect the surface from scratches and the installation will be of the highest quality. Slopes and window sills should be exactly joined so that there are no cracks and gaps.
Insulation of slopes from the inside
Before thinking about how to insulate a window sill, you need to find weak elements under the window. You will need to determine exactly where it blows. Common drafts are the joints between the stove and the plastic. The second most popular “cores” of heat loss are cracks and crevices. They appear from mechanical stress and thermal action.
To cover up all the weak points, it is required to eliminate the previous insulation and walk along the entire perimeter of the slope with a hermetic agent.