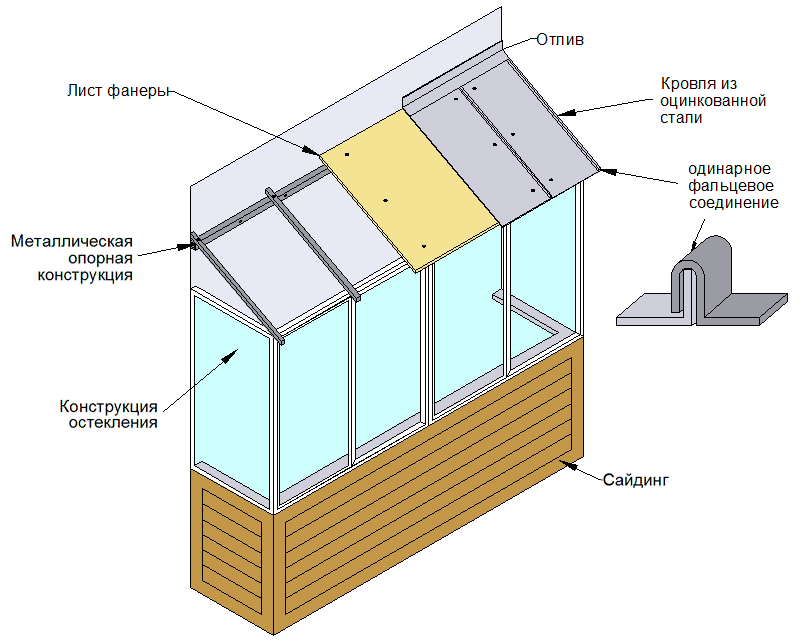
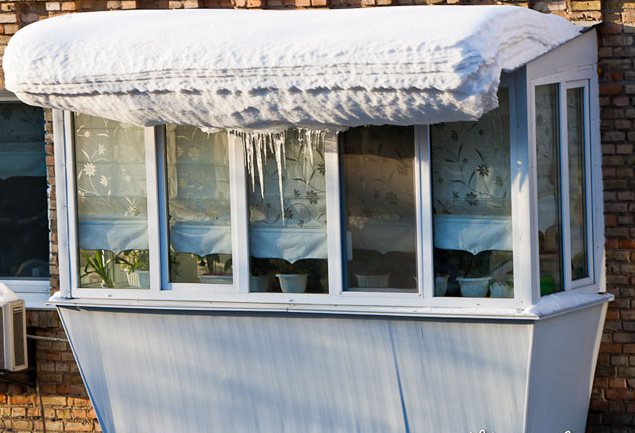
One of the main conditions for comfortable living in an apartment is warmth. But it is not enough to carry out high-quality thermal insulation of residential premises, especially if a balcony adjoins one of the rooms, and the apartment itself is located on the top floor. The main problem in this case is the old or even missing roof. Without it, it will not be possible to carry out glazing and thermal insulation of the room, not to mention protecting the balcony door and window from gusts of wind, rain or snow. All these factors make the owners of balconies think about arranging a good roof for their balcony.
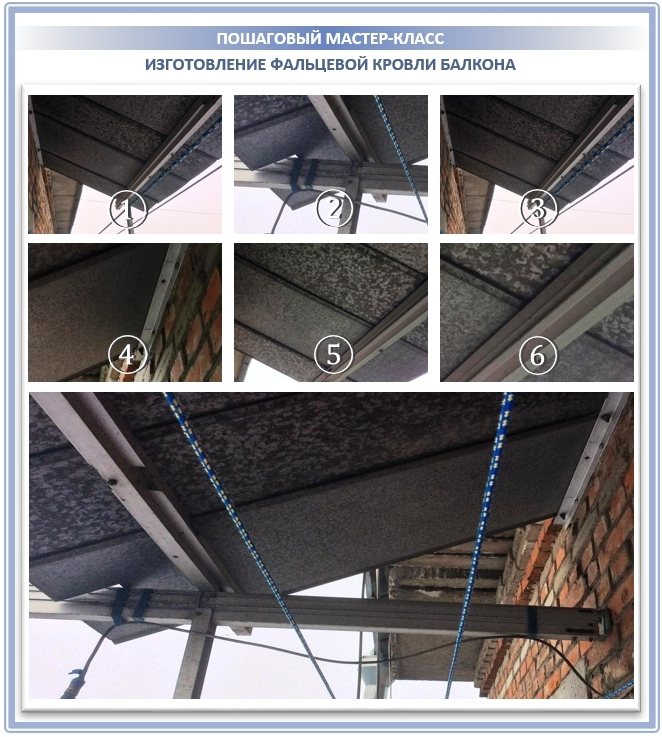
Step by step installation
First you need to take the following tool:
- puncher;
- screwdriver;
- roulette;
- pencil;
- spirit level, level (80-100 cm long);
- a hammer;
- tracer;
- drywall knife.
Markup
It is necessary to mark the level of the ceiling, that is, where it is planned that the plane ends. This is necessary so that when the ceiling is fully assembled, it does not interfere with the opening of the window sash.
Therefore, it is important that the ceiling does not reach at least 2 cm to the open sash. If the facing material is a wooden lining, it is 1.5 cm thick, which means that the ceiling lathing must be set at a distance of 3.5 cm from the sash
Since usually balcony frames are set on a level, starting from the frame elements, you can get an exceptionally flat line in the horizon along the window. It also needs to be transferred to the opposite wall. The spirit level will help with this. Along the adjacent wall, the line from the window is transferred to the opposite wall. The four corners are marked with a pencil. The tracer connects these marks. In this case, you cannot do without a partner.
Installation of the lathing
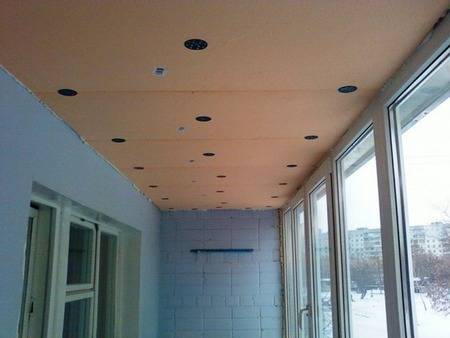
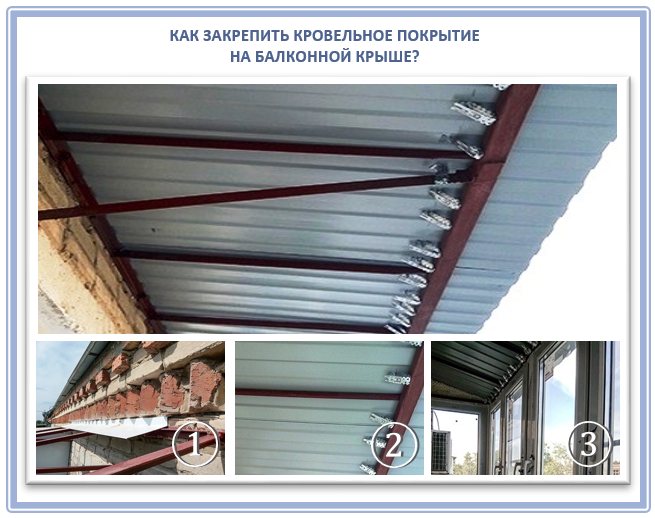
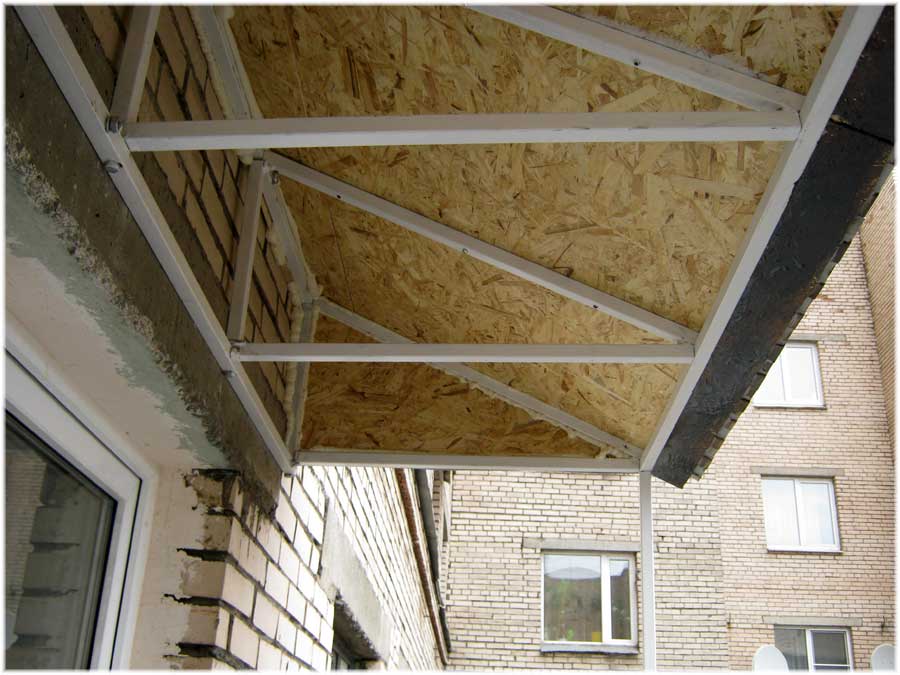
After marking, you need to mount the lathing from the rail or timber. Focusing on the line along the perimeter of the balcony ceiling, a bar / rail is placed along its entire length, fixing to the ceiling. The puncher drills holes along the place where the timber will be in increments of 60 cm, a nylon dowel with a diameter of 8 mm is hammered into the holes with a hammer, and then a screw corresponding to the diameter of the dowel is screwed through the timber with a screwdriver. If, due to the unevenness of the laying of the slab, the timber deepens from the horizon mark, then in the place of the screwed-in self-tapping screw under the timber you need to put a piece of wood and fix it with a small nail so that it does not jump out from under the timber over time. By the same principle, the timber is placed against the wall.
Wooden lathing on the balcony ceiling
First, a beam is installed at the window and at the opposite wall, and the middle beam is set flush with the already installed ones. The spirit level will help you check that all the bars are in the same horizon line. This will keep the ceiling flat.
If in the plans the balcony is sheathed with plasterboard, then the crate should be made of metal profiles CD and UD. Thanks to the markings, there is a line around the perimeter of the balcony. Using a puncher, we nail the UD profile on brick (concrete) walls, and fasten it with self-tapping screws along the plastic window frame. Will fit "fleas", self-tapping screws 9.5 mm long. The CD profile is installed along the width of the balcony with a step of 40 cm. For rigidity, the CD profile is fixed with U-shaped hangers, which are attached to the ceiling with 6x40 dowels, and the profile itself is screwed with a flea screwdriver. The spirit level will help to check the single plane of the CD-profile with the UD attached to the walls.
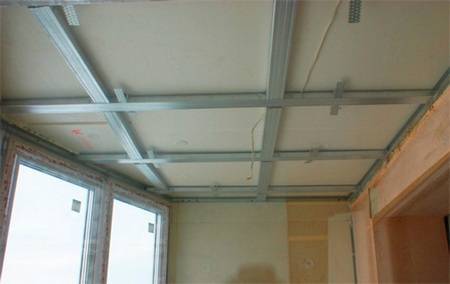
Ceiling lathing with metal profiles
Insulation laying
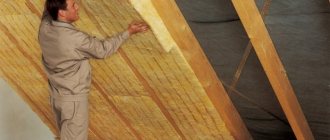
After the crate is mounted, you can lay insulation: expanded polystyrene, foam or mineral wool. Having measured the width between the beams or the profile with a tape measure, cut the required size from the sheet of insulation with a knife on drywall. The size must be made 2-3 mm larger than the desired size, so that the cut pieces of foam will fit very tightly into the space of the crate. This will allow it not to fall out when nailing the facing material (you can use glue for high-quality fixation of the insulation). It is advisable to blow out any small cracks with polyurethane foam.
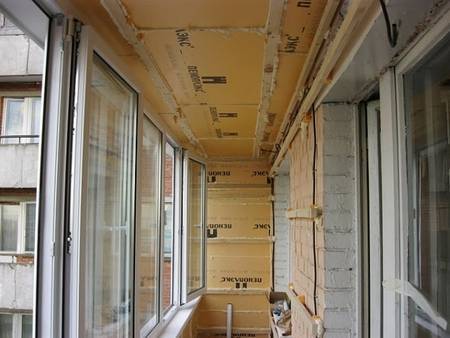
We carry out insulation of the ceiling with penoplex, laying it between the wooden crate
Installation according to the rules
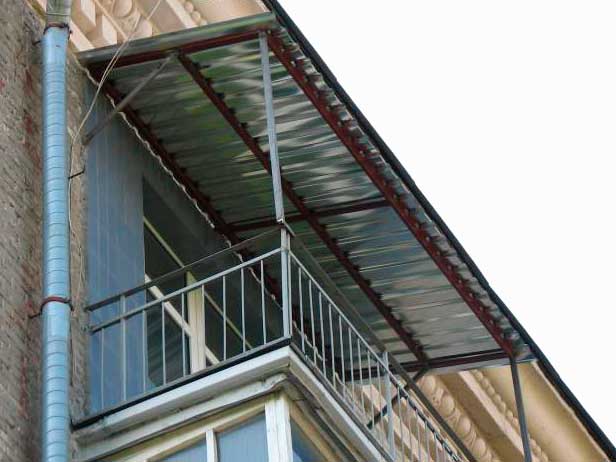
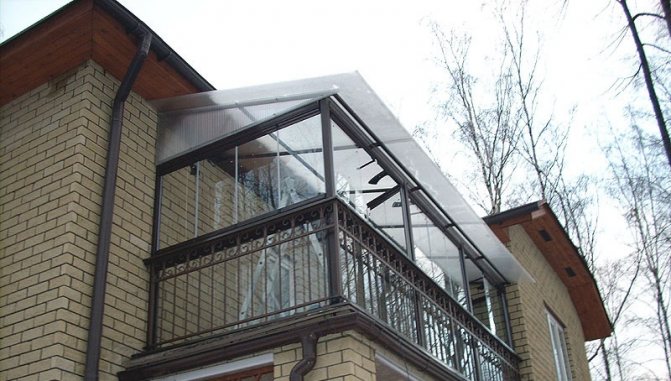
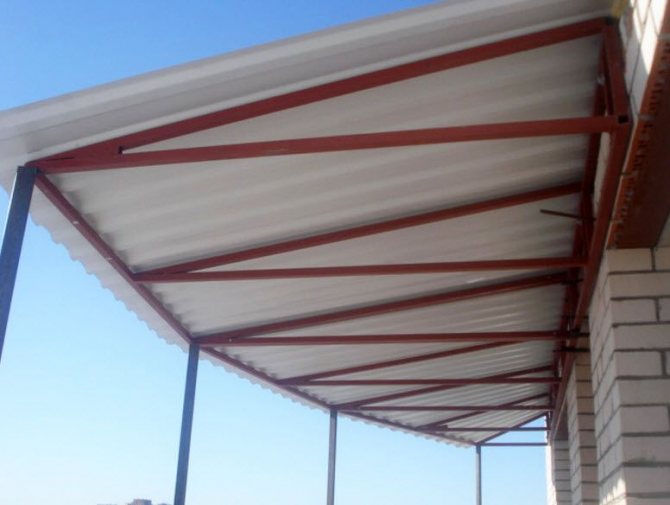
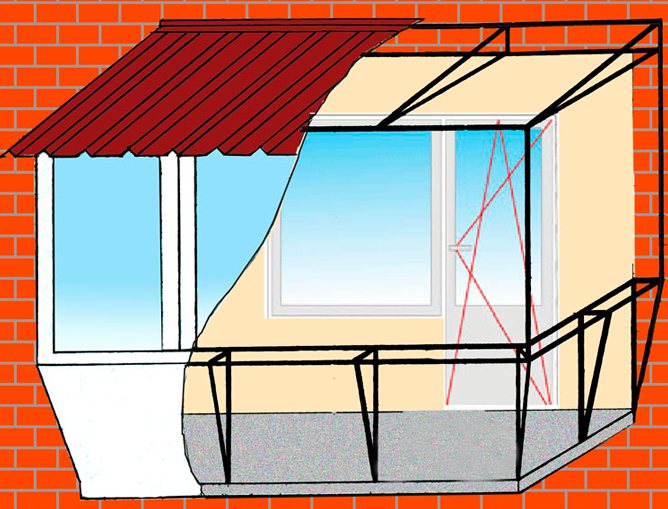
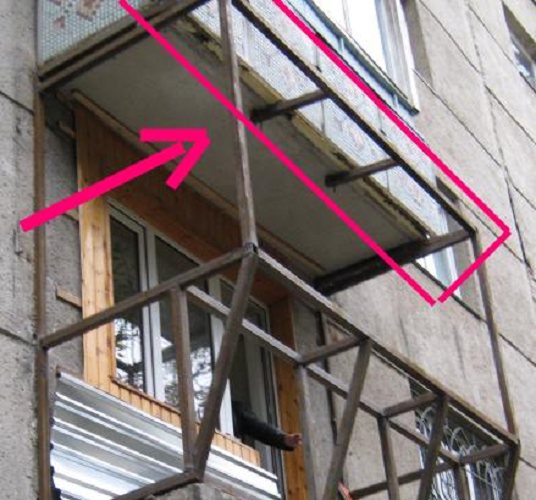
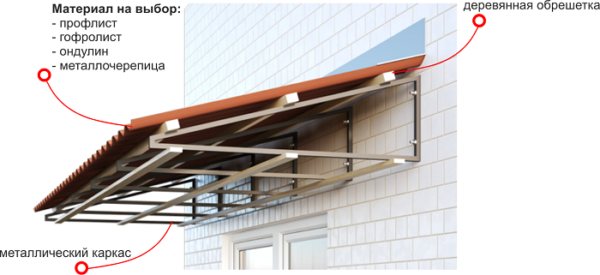
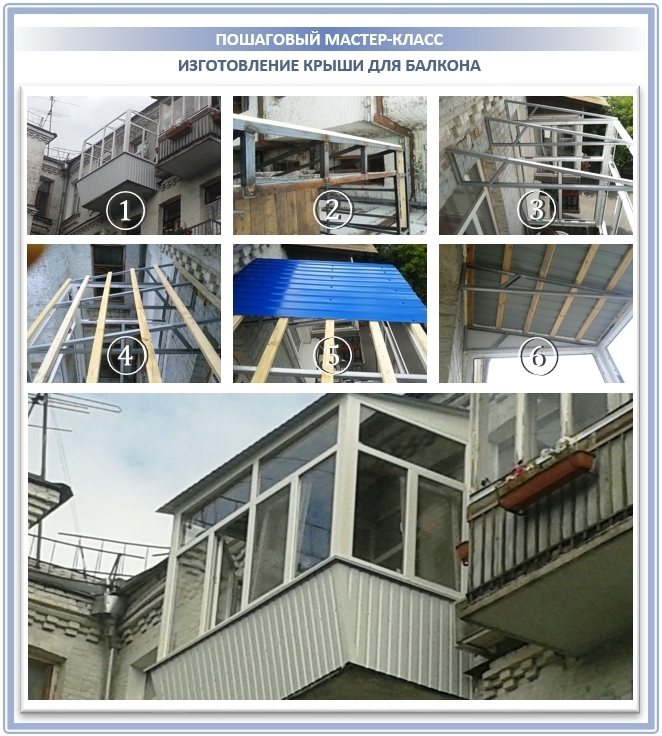
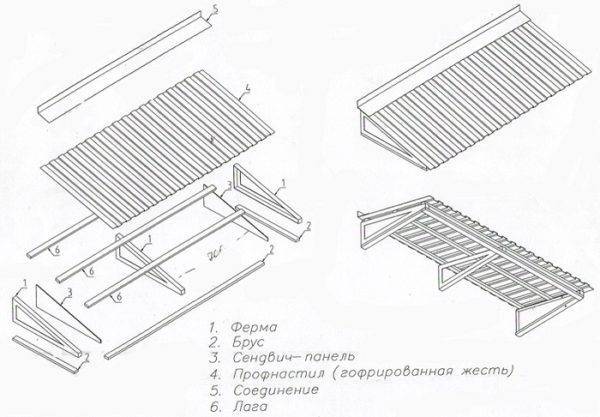
The independent design is perfect for the device of a separate canopy, that for support on frame glazing. In the first case, the frame can be made of wood, and in the second - only from metal: a steel corner or a galvanized profile pipe. In both situations, the elements that form the roof slope are triangular trusses with one right angle.
The only difference will be that when welding the frame of a separate visor, these triangles should be, as in the photo below, tied with longitudinal belts for rigidity.
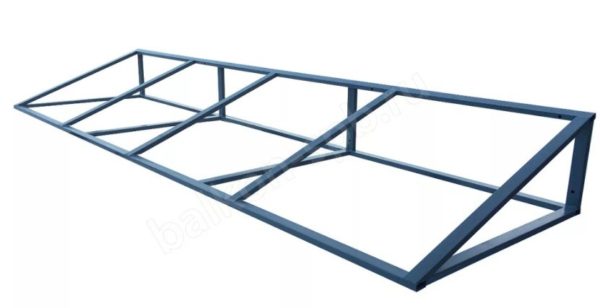
One-piece frame for separate visor
And in the case of leaning on window frames, these can be just separate triangles. Since they have a fulcrum, the strapping that will be done with the outer and inner sheathing is quite enough for them.
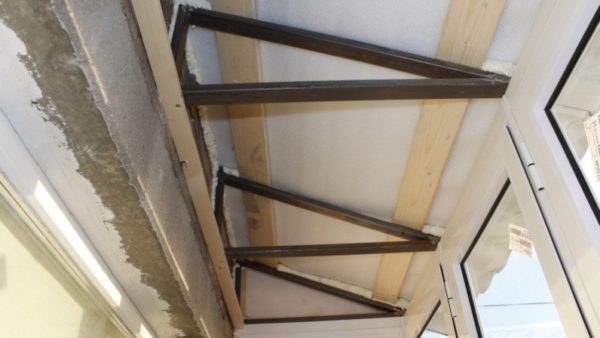
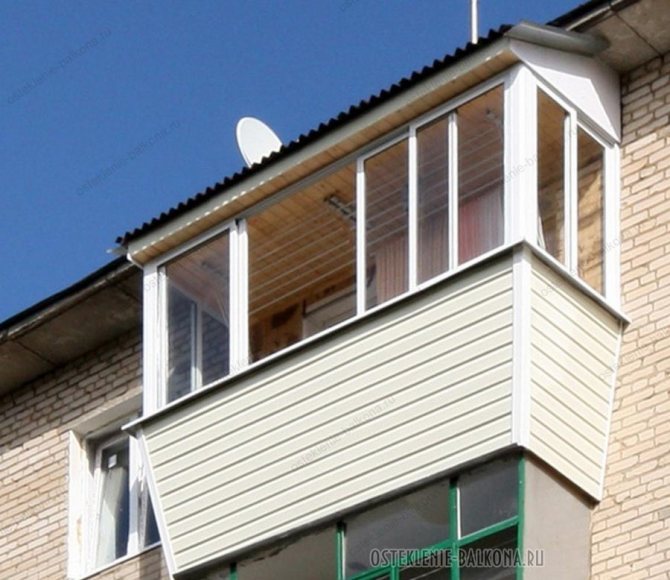
Glazed balcony frame
Insulated visor made of 3-angle trusses
For a standard balcony 3 m long, you need 4 such farms. It is not difficult to determine their dimensions, knowing the width of the balcony (we also take into account a small overhang of about 15 cm). The short, 40 cm high post forms a right angle with the horizontal plank, and the hypotenuse connecting them ensures the optimum slope angle.
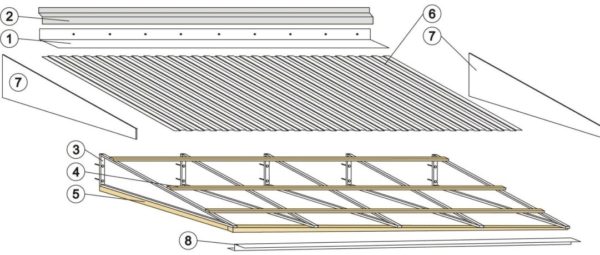
The general structure of the visor is something like this
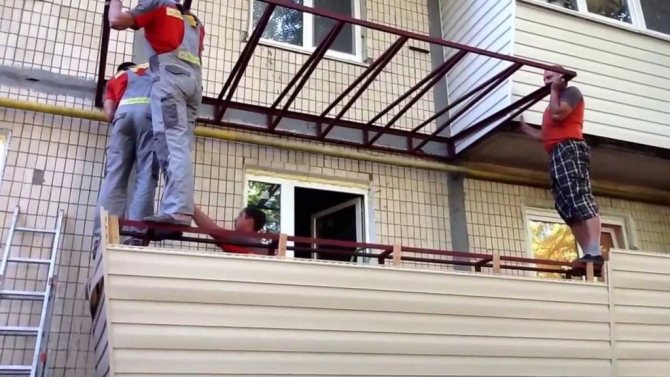
These elements need to be made in advance, after which you can start attaching them to the facade.
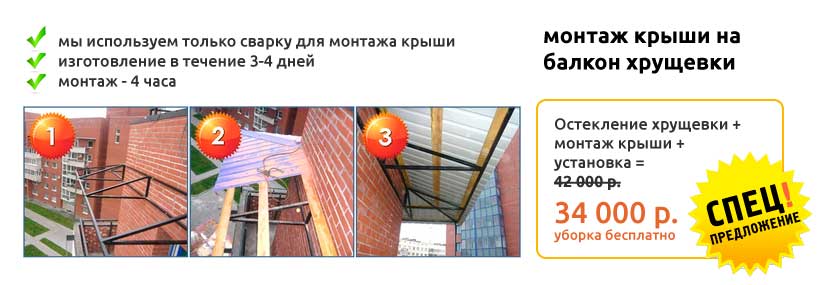
Table 1. Attaching the visor to the trusses
| Steps, photo | Explanation |
| Step 1 - markup | First you need to determine the height of the visor. It shouldn't hang too low. The ideal option is 2.45 cm from the level of the clean floor of the balcony. Note. Note that this is not a mark on the top of the balcony slab, but the surface of the floor finish that will be installed during interior decoration. You mark the attachment points of the trusses on the wall, and then proceed to fix them. |
| Step 2 - drilling fastening holes | Drill two holes for each truss. Their depth and diameter must correspond to the type and size of the anchor bolts used for fixing. Advice! The type of fastener should be selected depending on the material of the walls. If it is a hollow brick, ceramic block or aerated concrete, we recommend using either expansion dowels with collet or chemical anchors. |
| Step 3 - driving anchors | In this case, anchor bolts are used. First, drive the studs into the prepared holes ... |
| Step 4 - planting the truss on the fasteners | ... then you put the truss on them using the appropriate holes and manually screw on the nuts. |
| Step 5 - tightening the connection | Tighten the fasteners well with a wrench. |
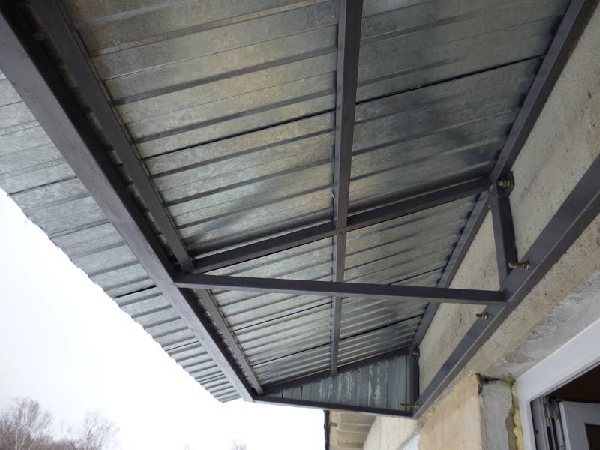
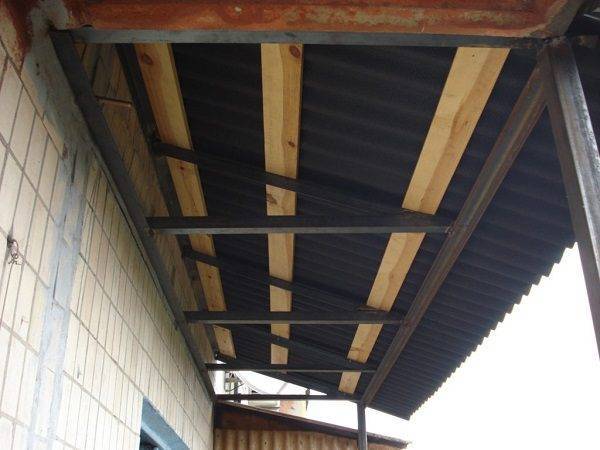
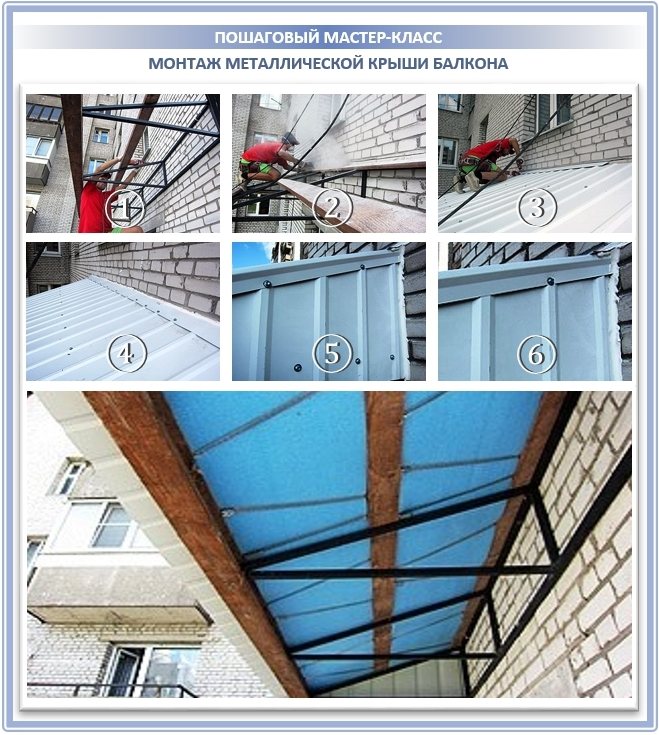
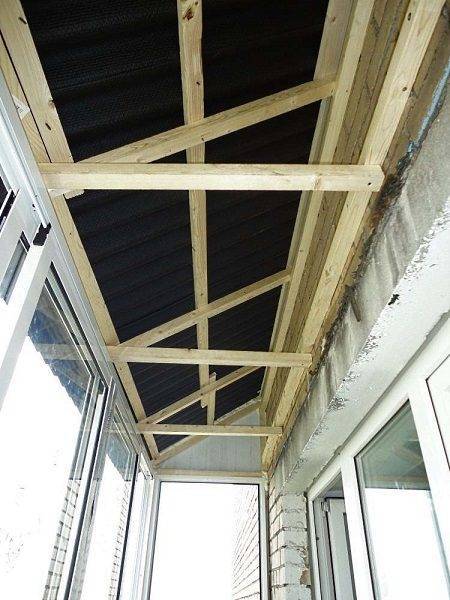
| Step 6 - mounting the top lathing | After all the triangles of the frame are installed, a crate of three longitudinal bars is mounted on top of them. They are attached to the frame elements with wood-metal screws. |
| Step 7 - applying sealant to the ebb mounting area | In the process of marking the fasteners, you must immediately draw a horizontal line along which the ebb will be installed. When the installation of the lathing is completed, a sealant must be applied along this line, and while it has not hardened, proceed with the installation of the ebb.The sealant will prevent rainwater from flowing under the bar. |
| Step 8 - installing the ebb | Install the bar and secure it with nails. Keep in mind that the distance between the lathing and the ebb must be such that the roofing material will fit. |
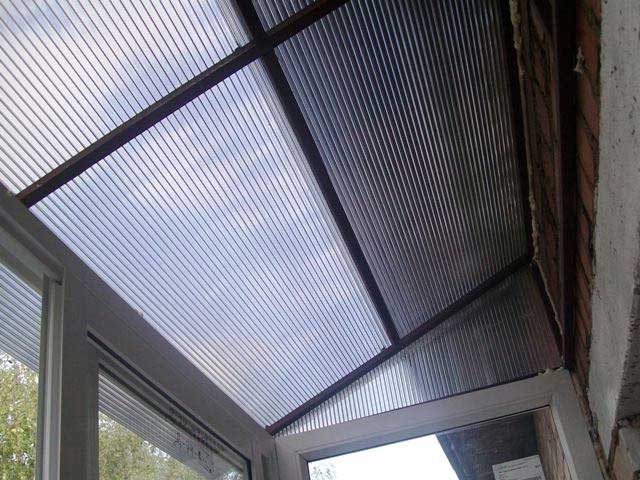
| Step 9 - installation of a waterproofing layer | Further, a waterproofing film is mounted on top of the crate: roofing material, membrane, or just polyethylene. |
| Step 10 - laying the roofing material | The roofing material can now be laid. Try to choose lightweight options: profiled sheet, flexible slate or metal roofing. |
| Step 11 - mounting the bottom lathing | The roof has been formed. Next, proceed to the filing of the ceiling. To do this, mount the crate again. The distance between the bars should be such that the layers of mineral wool fit in width. |
| Step 12 - installing insulation boards | You put insulation in the cells, after which all this will need to be closed. |
| Step 13 - installing membrane and sheathing | Since the mineral wool does not like moisture, a vapor barrier membrane is necessarily mounted on top of it. It will prevent condensation from forming inside the roof, which quickly renders this material unusable. When using foam, vapor barrier is not necessary. The cladding is mounted last. If the balcony will be glazed, for this purpose you can use lining, drywall, PVC panels. Otherwise, the material must be chosen as front. An excellent choice would be, for example, perforated siding panels - soffits. |
| Step 14 - closing the first end of the visor | Now that the top and bottom planes are lined, it is necessary to arrange the ends. Cut out two side fragments from the roofing material in a mirror image, but first mount only one. |
| Step 15 - installing the wind board | After that, you need to install a wind board, which is mounted on the front side of the roof. |
| Step 16 - closing the second end | Now you can close the second end - and your pretty roof is ready. |
Video - Installation of a roof on a loggia
Installation of a roof on an all-welded frame
The installation of a one-piece roof frame is carried out in the same way as described above, the only difference is that the entire structure must be fixed at once. All other actions are approximately the same, and may differ only due to the use of different materials.
One-piece visor design
Table 2. Fastening the visor to a one-piece frame
| Steps, photo | Description |
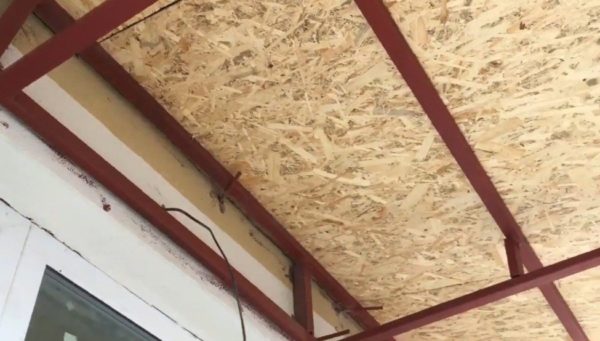
| Step 1 - installation of OSB boards | In regions with a large snow load, it is better to give preference to this type of frame. As you can see, it is very durable, since it can withstand the weight of an adult. At the time of installation of the metal structure, it must be treated with paint primer, which will protect the metal from corrosion. Since in this case the profiled sheet will be mounted, instead of the crate, it was decided to install an even base of OSB boards. Given their insensitivity to moisture, it will serve much longer than ordinary timber. |
| Step 2 - paint waterproofing | However, the surface of the boards is covered with a layer of paint. Protection is never superfluous! |
| Step 3 - cushion layer | The next layer in the form of a polyethylene foam backing is laid directly on the wet paint. In this case, it will act as a shock-absorbing layer so that the iron does not rattle in the wind. |
| Step 4 - mounting the profiled sheet | Now the corrugated board is being mounted. Here is taken galvanized, but you can choose the option with polymer spraying. |
| Step 5 - heating up the waterproofing bitumen tape | It remains only to seal the joint of the corrugated board with the wall so that rainwater does not flow into it. In this case, a bituminous waterproofing tape was used for this. It is cut into small pieces and heated with a building hair dryer. |
| Step 6 - sealing the joints of the roof and wall | Due to the fact that the bitumen impregnation softens when heated, the pieces of tape adhere perfectly.Its width allows for a small overlap both on the wall and on the roof. Naturally, the fragments of the waterproofing should also be connected with an overlap between themselves. If this is not done, the roof over the balcony will leak. |
Inner side of the roof
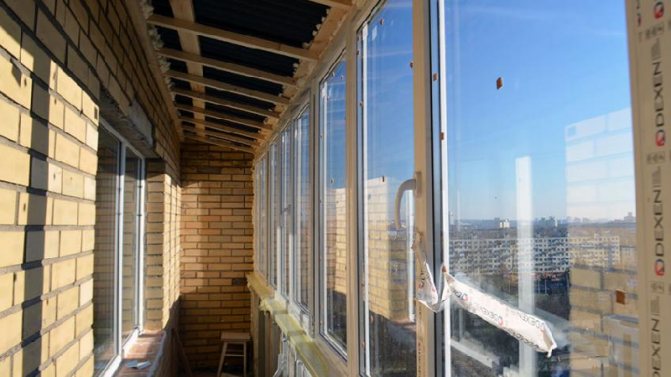
To insulate it, in the same way as in the previous case, form a crate, put insulation in it and make an outer sheathing.
Prices for corrugated board
Corrugated board
Video - Installing a roof on the balcony
Thermal insulation with penofol
Laying insulation on the ceiling is not always carried out as the final element of the installation of the loggia. Sometimes it is completely absent, which is why the owner of the room loses coziness, comfort and quality of warmth.
The simplest way, which does not require a lot of time for thermal insulation, is considered to be laying with foam foam. This installation looks like this:
- We make accurate measurements of the length and width of the surface.
- We transfer the dimensions to a roll of construction foam, after which we cut off the required amount of material.
- We install the first layer of thermal insulation using transverse wooden slats (3-4 pieces are enough).
- We remove all grooves and joints with a special sealant or polyurethane foam.
- We are waiting for the surface to dry completely.
- We carry out the installation of the second layer of insulation, using the longitudinal slats. The finished ceiling structure must be connected to the thermal insulation of the walls without defects.
- The finish can be fixed using external strips that form a flat surface.
Thermal insulation of the ceiling of the loggia with penofol, including high-quality insulation of the floor and walls, will retain a significant part of the heat of your apartment in the winter. And self-installation of loggia insulation will save you a good amount of money, tk. penofol is one of the easiest materials to process and relatively inexpensive.
Necessary materials
First of all, we prepare a drawing of the future roof.
If the frame is wooden, then you will need:
- 1 bar with a section of 40x40;
- 1 bar with a section of 20x40;
- metal corners for joining parts;
- profile pipe with a diameter of 20x20.
Prepare for sheathing:
- waterproofing film;
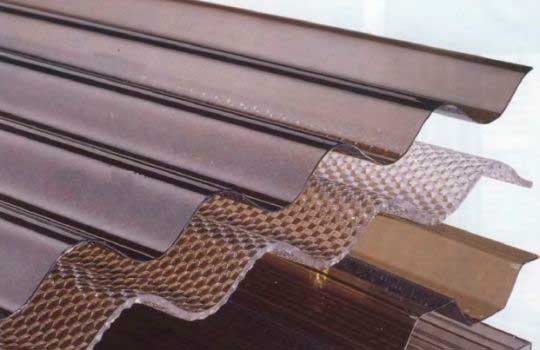
- polycarbonate;
- corrugated board;
- slate;
- wooden slats;
- corner for waterproofing;
- sealant;
- mineral or balsa wool.
After that, proceed with the installation of the frame, wood or metal, to the installation of the roof itself.
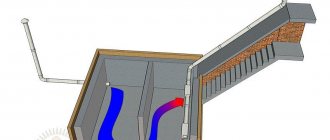
Do-it-yourself balcony roof insulation from the inside

Penoplex insulation
It is better not to start insulation work without first improving the quality of the roof, since most likely the defects in the roof will soon make themselves felt and again you will have to start all over again. And only after the completion of work with the roof comes the moment when, if you have the skills with your own hands, you can correctly insulate the roof of the balcony from the inside.
In order for the insulation work to be completed in full, you need to prepare everything necessary for this in advance. So, to carry out the insulation of the roof of the balcony, you will need to purchase the following materials and observe some technological conditions:
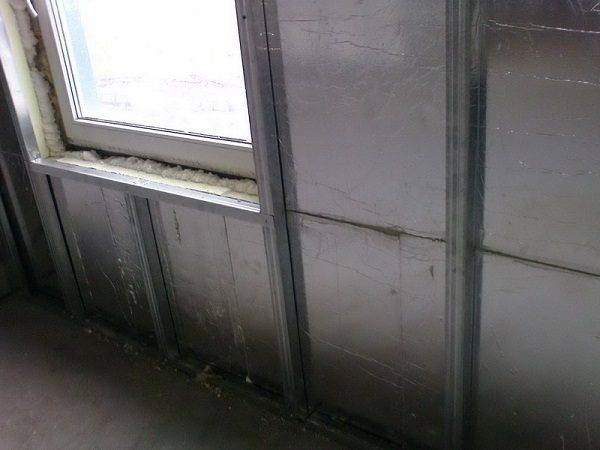
- first of all, a self-adhesive film is used, which is necessary to increase sound insulation. It is fixed from the inside without sagging directly to the roofing: corrugated board, metal tiles, flexible tiles in rolls, etc.;
- then there is an anti-condensation film with a pile on one of the sides, due to which the accumulation of moisture on the insulation located below is blocked;
- the film and the roof frame should be located at a distance of 2-3 cm to ensure normal ventilation of the roof;
- heat insulating material: mineral wool, expanded polystyrene, etc. It is fixed to the crate, after which all large and small seams of high quality are sealed with polyurethane foam;
- another, lower, vapor barrier layer, which prevents moisture from entering the insulation from the inside of the balcony itself.
General recommendations
Whichever roof option you choose, there are some general guidelines.
- Observe safety precautions when working at height. If roof installation cannot be done from the balcony, contact industrial climbers.
- As a material for the frame, you can take metal corners, rectangular or square pipes or wooden bars. The corners should be at least 60 mm wide, if they will be connected to a wooden bar, it is better to take corners of the same width as the bar.
- It is better to choose anchors with a washer. For masonry, you will need special anchors with a riving pin.
- The cement mortar for fixing the anchors in the wall is made in the proportion of cement and sand 1: 3. Add water gradually, in portions, until the desired consistency.
- To connect wooden elements, reinforcing metal parts are needed: corners, plates. The covering is fastened to the crate with self-tapping screws with sealing gaskets. If the roof is assembled from several pieces of profiled sheet, they are laid with an overlap.
- The roof is made with a slope of at least 40 degrees so that snow does not linger on it.
- If it is necessary to repair the roof, replace part of it, contact a specialist.
Another possible sequence of work
In the above version, there was the following sequence of warming the ceiling of a balcony or loggia with your own hands: lathing - laying a heat insulator - facing. But there is another option with the reverse sequence of insulation and installation of a wooden crate or metal frame. Its essence is as follows. Even before the installation of the lathing / metal frame, a layer of foam / polystyrene insulation is created over the entire area of the balcony ceiling. It is glued to the ceiling with special glue, and with plastic dowels, often called "fungi", is fixed at five points on the sheet - four in the corners of the sheet and the fifth in the center. The joints of the sheets should be foamed with polyurethane foam for additional insulation.
We fix penoplex to the ceiling of the loggia
The same can be done by insulating the ceiling with mineral wool. Plastic "fungi" fix it well during insulation, press it tightly against the concrete surface. If the glued polystyrene / penoplex will not undergo additional finishing (plaster), then a layer of foil-clad heat reflector (penofol, isolon) can also be pulled over the insulation. If mineral wool is chosen for insulation, then the heat reflector must be installed. It contains several important and useful properties: thermal insulation, sound insulation, waterproofing, vapor barrier and wind insulation. The joints of the heat reflector are glued with adhesive tape intended for it. And then it is already possible to mount a crate made of beams or a frame made of metal profiles, which will additionally press the insulation.

Fixing the lathing when insulating the ceiling with mineral wool
But you need to remember that such a scheme is good when the balcony plastic frame is not installed close to the floor slab. Otherwise, the distance from the top of the sash to the slab may be less than five centimeters. And this is very little for a layer of insulation, plus the thickness of the frame / lathing, the thickness of the facing material.
Method of fastening the structure to the wall
In order for the structure to serve for a long time, and to be able to withstand any loads, one should worry about reliable fastening. You can use a construction gun to drive the dowels into the concrete wall surface. If there is no such tool, it is enough to drill a hole in the wall and insert the fastening element. Then we screw a special bolt into the prepared hole and securely fix the supporting structural elements. Strong reliable bolts must be used to ensure the durability and strength of the structure.
The main components for work
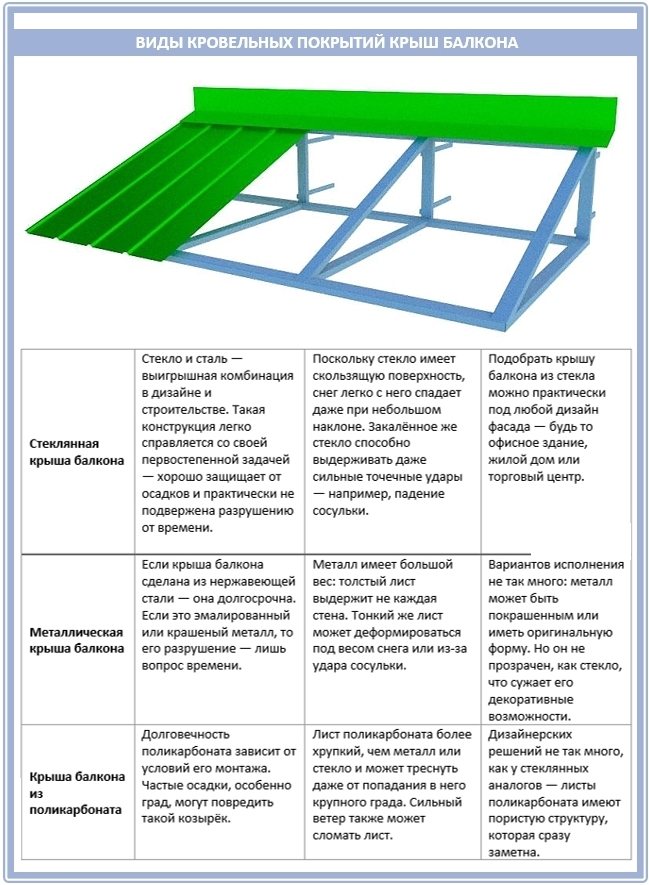
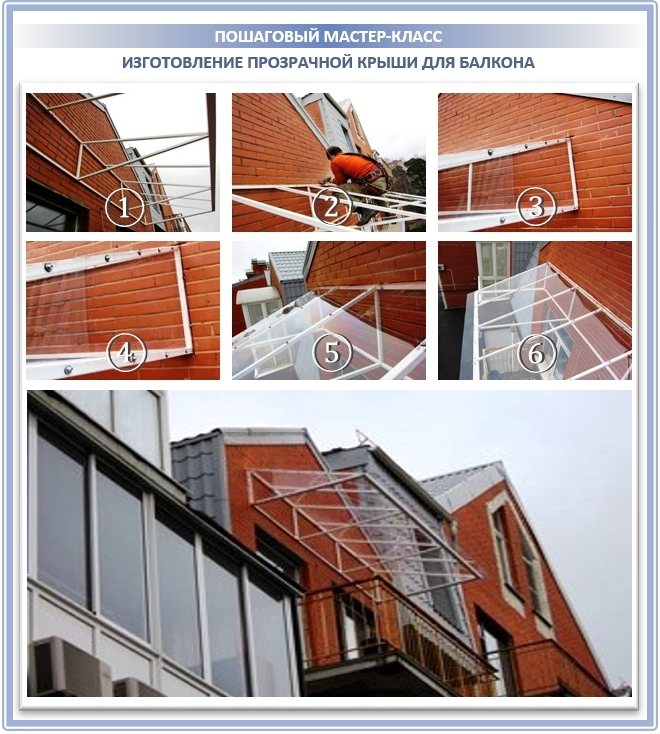
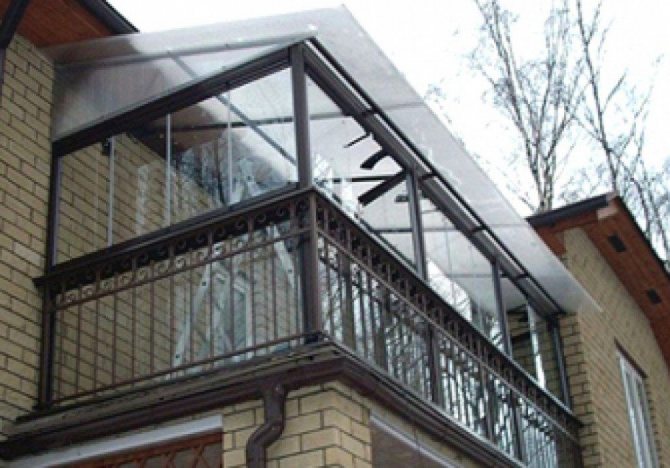
Repair of the roof of the balcony on the top floor is carried out using various elements: steel sheets, cellular polycarbonate, soft roofing components, special glass units for roofs.
The most demanded building sample is corrugated board. It is suitable for any roof, it is characterized by a rigid structure, therefore it does not deform from wind or precipitation. In this case, repair of the roof of the balcony is not required. This option needs sound insulation, but with a large assortment, you can always pick something up.

Roof scheme
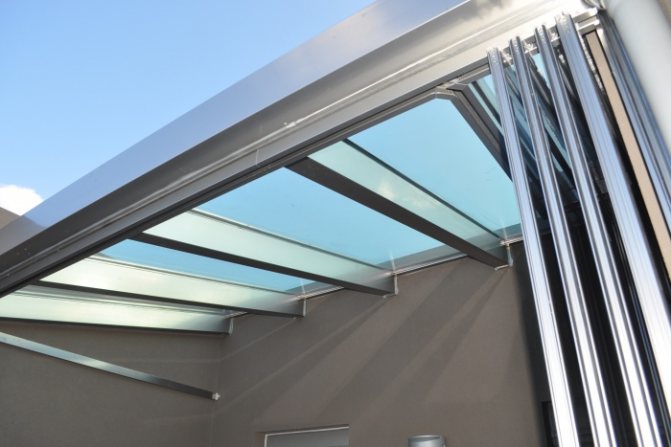
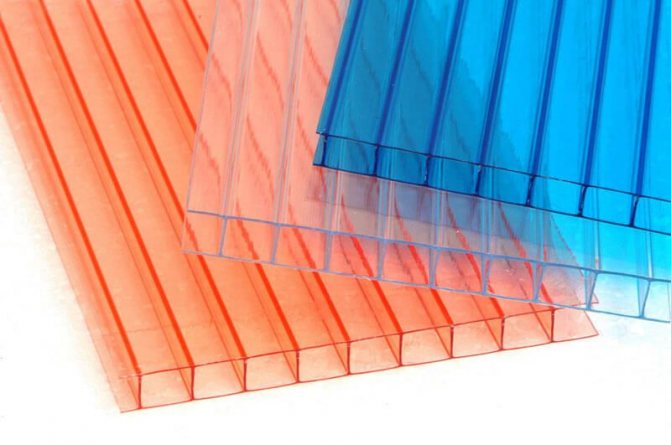
Polycarbonate sheets are essential for warm glazing. At first glance, they look very fragile, but in reality they are 15 times stronger and lighter than the same glass. This element can withstand temperature drops of -45 +80 degrees.
You won't have to repair the roof if you use one of the expensive materials - double-glazed windows made of tempered glass. These materials are reliable and not afraid of mechanical damage. Characteristic features - moisture protection, heat retention. The use of this material is the simplest coating option. The transparent roof on the balcony looks very impressive and allows you to enjoy the view, which is why it is in demand. The work uses pre-prepared supports, profiled sheets, bolts or anchors, beams, sealant, antiseptic and many other tools that may not be at hand.
Polycarbonate roof
Price from 2500 rubles per 1 sq. m
When you want a lot of light. Ideal for balconies on the shady (north) side of the house. Also from the pros - the roof is lighter.
If you want to insulate your balcony, then it is better to choose a different material for the roof. It is impossible to insulate the roof of the balcony made of polycarbonate without losing its transparency.
Basic waterproofing options
When choosing an option for waterproofing a balcony, not only the condition of its surface is taken into account, but also the material from which it is made.
Simultaneous use of various options on the same balcony is allowed. The main options for waterproofing are:
- Coating method. Bitumen-based paint is applied in layers. The coating protects well against moisture ingress. The method has been successfully used on wooden and brick balconies.
- Plastering method. The prepared solution is laid in several layers. Good adhesion to the reinforced concrete base is noted.
- Okay way. A moisture-resistant material is glued to the surface. It is even used for surfaces with a polyethylene base.
- Cast method. Heated or cold mastic is poured into the formwork. It is considered the most reliable way to protect a balcony concrete slab from moisture.
- Penetrating method. Used for concrete base. Elements of a special solution penetrate the pores of the concrete and create a protective layer.
Roof installation method
- The rafter system is being mounted. A beam or corner is anchored to the wall and boards are attached to it.
- We install overhangs. The standard length does not exceed twenty centimeters.
- We install the crate, to which noise and waterproofing is attached.
- Sheets of thermal insulation are placed in the intervals of the lathing. They can be polystyrene, glass wool or basalt mats. A vapor barrier layer is attached on top of the insulation. It is attached to the crate with a construction stapler and protects the insulation from moisture.
- We install the roof covering. The fastening method depends on the material used.
- We mount the wind bars.
Tips for insulating and waterproofing a balcony roof
In order for the glazed balcony with a roof to be used both in warm and cold seasons in any weather, it must be properly insulated and waterproofed. A few tips on this matter:
- The lathing is covered with a high-strength waterproofing material - ordinary plastic film will not work, because after a few years it will lose its useful properties under the influence of various weather conditions;
- A soundproof self-adhesive film is attached directly to the roof from the inside in an interference fit;
- The next layer is stretched a fleecy film against the formation of condensation;
- The distance of the film from the roof frame should be 2-3 centimeters to ensure ventilation;
- The heat insulator itself is attached from the inside directly to the roof lathing;
- Joints and seams are sealed with polyurethane foam or a special sealant for a certain type of insulation;
- With the last layer, another vapor barrier is mounted - polyethylene foam with a foil layer (should be directed to the insulation).
After carrying out hydro and thermal insulation works, the inside of the roof can be finished with any material you like, for example, wood or plastic panels.
The surest option is to equip a solid roof, glaze and insulate the balcony at the same time. In this case, it is worth calculating in advance the load of all materials, ensuring the safety of structures, taking into account the options for the further use of the balcony. A competently drawn up project and a precisely calculated action plan will help you to complete all stages of arranging the roof and glazing the balcony correctly, save time and money for reworking the "jambs".
Tips for beginners
- Carefully consider the choice of material.
- Don't chase speed.
- Draw a detailed plan and consult with experts. Better to spend a few extra days preparing than to pay money for the rework.
- Consider windage and wind load.
- Make sure all structural components are securely fastened.
- The most durable and reliable frame is made of metal, so first of all, consider this design option.
- All work at height should be carried out with good insurance and in the presence of an assistant. Pay close attention to the advice of specialists, this will help to avoid injury and financial loss.
If you decide to protect your balcony from wind and rain, consult with the master. If building experience is not enough, seek help from an organization that specializes in the manufacture of such structures. Small costs are fully compensated by the quality factor and strength of the construction made by the hands of a specialist.
The choice of roofing material
When planning how to make a roof on a balcony, it is very important to choose the most suitable material in accordance with specific conditions. To date, a fairly wide range of similar goods is on sale.
Various types of roofing materials can be used to mount the balcony roof:
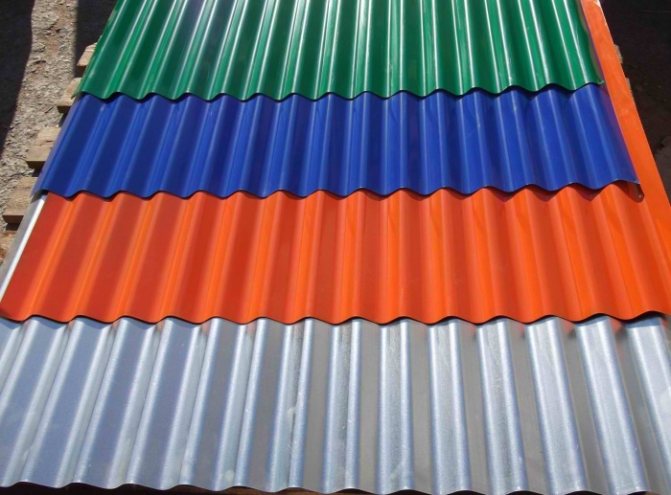
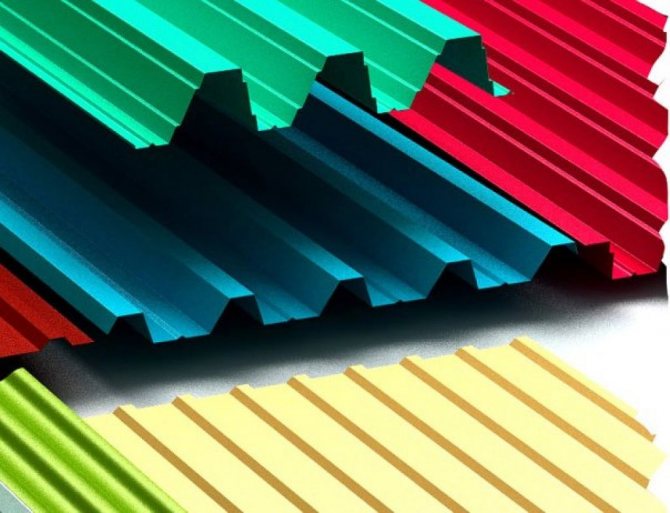
- Various variations of steel sheets (in the form of corrugated board, including laminated, galvanized, corrugated sheet, etc.) These materials are distinguished by an advantageous ratio of quality and price, as they are characterized by significant rigidity and resistance to deformation, strength and durability. The roof of the balcony made of corrugated board will not bend under the influence of wind and precipitation, and does not require repair. Metal sheets can be attached to various roof structures, both dependent and independent. In addition, by installing such a cover on top, you can significantly strengthen the roof visor. The disadvantages of this roofing material include noise when gusts of wind, drops of rain and hail get in - nevertheless, it is easy to eliminate it by installing a layer of sound-insulating material, which can be purchased at any hardware store.
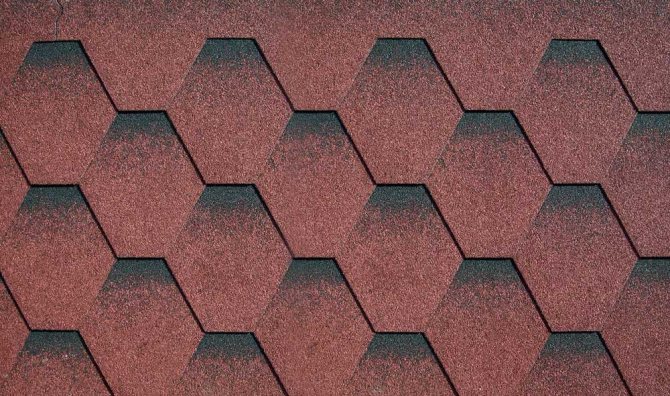
- Soft roofing materials such as ondulin, shingles, roofing bitumen and roofing felt. These roofing materials will cost a little more than metal sheets.In addition, this design is less shock-resistant, but it is characterized by excellent noise insulation properties. It is also worth considering that for the installation of a soft roofing, it is necessary to equip a strong supporting frame - more rigid than in the case of installing a metal roof.
- Transparent roofing materials:
- in the form of sheets of cellular polycarbonate (transparent or translucent tinted plastic). Such a balcony roof looks very attractive and original. Polycarbonate sheets are flexible and particularly durable (no less than metal or concrete, and much higher than glass), as well as light weight, resistance to temperature extremes and ultraviolet rays. The roof made of transparent plastic perfectly transmits light, in addition, a special coating is applied to the outer side of the sheets, which protects against ultraviolet radiation. These panels do not fade over time and are safe to use, since they do not crack and do not crumble upon impact. Due to the presence of air gaps between the layers of material, polycarbonate panels are characterized by high heat-insulating properties, therefore, it is advisable to use them for insulating a balcony room. This roofing material can be used for arranging various types of roofs;
- roof insulating glass units for the roof are made of special tempered glass or triplex (laminated safety glass with polyvinyl butyral film of various shades, which increases its strength and protects it from spillage during household shocks). Such a roof on the balcony looks very aesthetically pleasing, while it is distinguished by high heat-saving properties, reliability and durability, as well as strength (it is not afraid of various mechanical influences). To install such a roof on a balcony does not require much labor and time - usually the installation of double-glazed windows is done by the manufacturer. As a disadvantage of this coating, one can mention the rather high cost.
Currently, the glazing of balconies with a roof in Khrushchev is in significant demand. In old houses, as an economical option, such a roof is built on the basis of wooden support trusses with a roof made of a widespread roofing material - corrugated board or ondulin. More expensive is the equipment of a frame made of closed metal trusses. The most comfortable in operation are the options for roofs with corrugated roofing (with additional noise insulation of the entire roof surface and its insulation), as well as of cellular polycarbonate.


Selection and installation of roofing
As a roof covering for a balcony, corrugated board, metal tile, plastic slate, polycarbonate, soft roof and galvanized sheets are great:
Let's consider each type of roofing separately, taking into account its pros and cons specifically for the balcony.
Decking: ideal for a balcony
Consider right away that a metal roof will annoy with noise from rain, but it can be soundproofed, and at least use damper tapes.
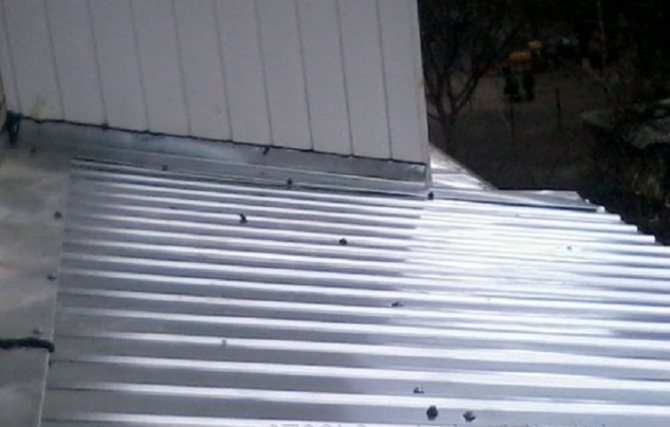
And yet the most typical roof for a top-floor balcony is a galvanized profiled sheet with a thickness of 0.55 mm and a wave height of 20 mm. The corrugated board itself is good for its ease of installation, a wide choice of colors and light weight. But if it gets damaged during installation, it will start to corrode.
So, for the installation of corrugated board you will need the following materials: the corrugated board itself, the number of sheets of which you can easily calculate on your own, anchor bolts 10 cm long, an antiseptic for timber, screws with gaskets, a bar of dry wood 20x40 or 40x40 mm for the lathing and pre-welded supporting triangular trusses from corner No. 6.
As soon as the farms are installed (we have given the technology above), follow these instructions:
- Step 1. Make a lattice from a bar, take sheets of corrugated board and cut with scissors for metal.
- Step 2. Now, using screws with sealing gaskets, fix the corrugated board in the wooden crate.
- Step 3. There will be a small gap between the corrugated board and the wall - seal it with polyurethane foam. Just don't leave it open for a few days.
- Step 4. Additionally, under the future low tide, lay foam rubber, which will help prevent snow from falling under the profiled sheet.
- Step 5. Install the ebb itself. To do this, start by drilling holes with a puncher, and then fix the ebb with plastic dowels with 6x60 nails.
- Step 6. After that, fill the gaps from the outside with cement mortar and treat with a two-component sealant. In order for the sealant to be laid evenly, use masking tape, which will then need to be removed.
- Step 7. Proceed with glazing, and for convenience, mount a wooden beam along the edge of the roof, to which the frames will be attached.
Here's how such work goes:
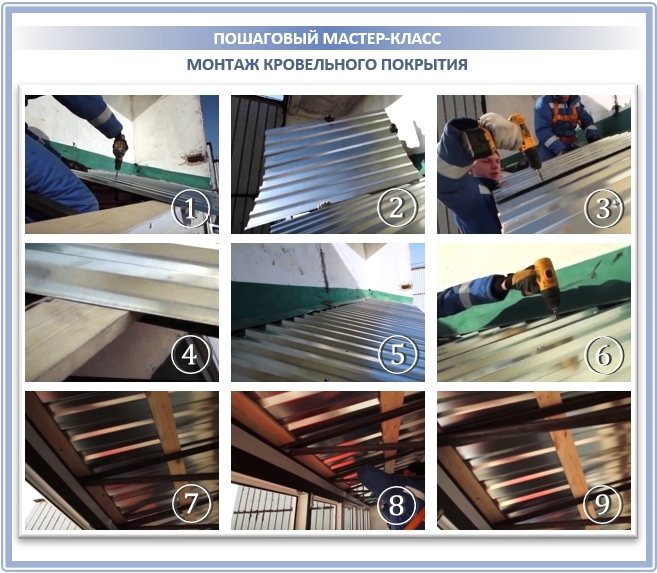
During the installation of sheets, it is important not to tighten the screws, otherwise the rubber will crack and moisture will pass through. Imagine how difficult it is then to make roof repairs at such a height. This is what the correct mount should look like:
To fix sheets on metal trusses, it is also good to use a special mount:
Metal roofing: for beautiful projects
A beautiful and popular metal tile is similar in its properties to corrugated board, but has a more aesthetic appearance. But all these reliefs can prevent snow from rolling at a low angle of inclination of the roof. In this case, the snow itself will begin to accumulate and fall down in an avalanche, which is bad.
They install metal tiles on the balcony according to the same principle as corrugated board, it is only important that each wave has its own wooden base. In advance, also mark the metal tile and drill holes for the ropes that will hold the sheets at a height. And all you need to take care of is that the edges of the sheets go into a niche in the wall and are well protected from moisture.
Seam roofing: as in the old fashioned way
We also note such a practical and inexpensive roofing material for a balcony, like galvanized iron. It has a low susceptibility to mechanical stress and can withstand quite serious loads.
Among the disadvantages is the complete lack of sound insulation. Those. when it rains, the roar will be incredible, so immediately think about the insulation and sound insulation of the ceiling of such a balcony:
Soft roof: bituminous mastic, roofing material and euroruberoid
A less popular, but quite convenient option for arranging a balcony roof is a soft roof. It is appreciated for its quietness, integrity and water resistance. In other words, such a roof has no potential moisture penetration points. It also fits easily to any angle or bend.
But keep in mind that the same euroruberoid does not tolerate direct sunlight and prolonged frost. Therefore, if the climate in your region is rather harsh, give up the soft roof, otherwise, over time, cracks will appear on the roof of the balcony.
The heat also has a bad effect on it: bitumen heats up and an unpleasant smell can penetrate into the apartment. If the weather is usually mild, then this option is fine.
To equip a soft roof, you will need to build a continuous flooring:
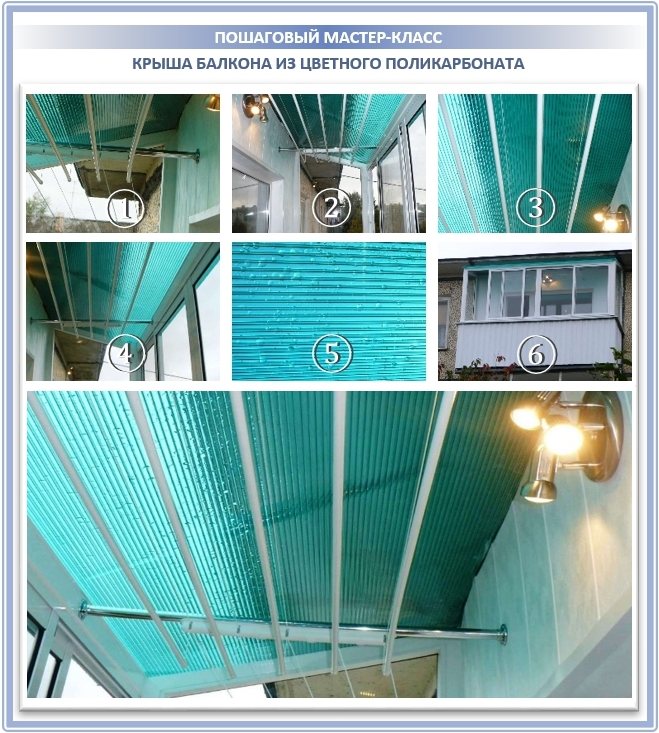
Transparent and honeycomb polycarbonate: plenty of light inside
Another good option is a polycarbonate coating, which is expensive, but compensates for its remarkable performance properties. Such a coating will be transparent enough to equip a personal office or just a recreation area, but at the same time it will be durable, heat-insulating and quite resistant to mechanical stress.
And not just resistant: stronger than glass, and at the same time 15 times lighter! And this is important: if your balcony is on the top floor, then it is at risk, because teenagers love to spend their leisure time on roofs today, throwing everything they can down.
In addition, polycarbonate is resistant to ultraviolet rays and does not lose its transparency even over time, and its operating temperature range is from -45 ° C to + 80 ° C. Specifically, for a balcony, take panels from 10 mm thick - this will be enough:
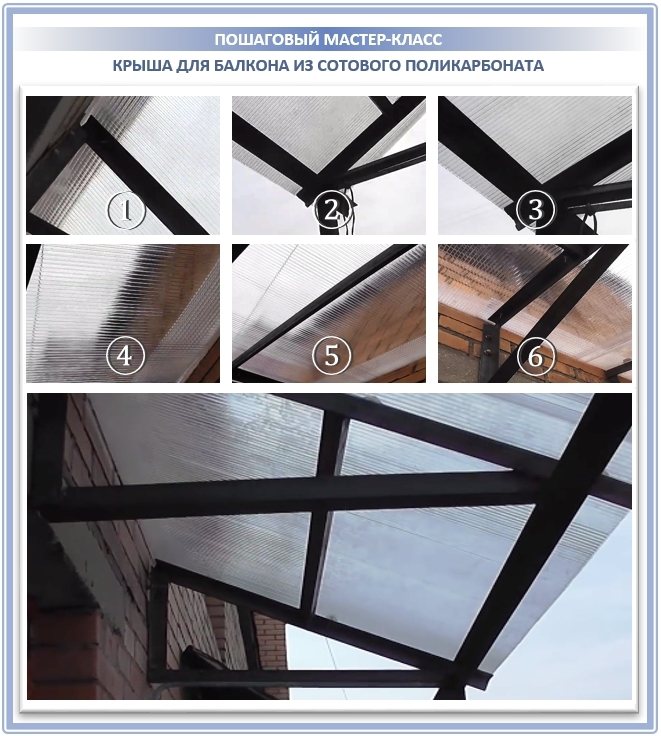
And the choice of color in the installation of a polycarbonate roof is simply pleasing to the eye:
To install a polycarbonate roof, you need the same trusses as for corrugated board. It is only important to correctly equip the rear abutment unit:
- Step 1. To do this, make a 40 mm deep slot in the wall.
- Step 2. Fill it with silicone sealant and insert the back of the polycarbonate into it.
- Step 3. Those excess sealant that will be squeezed out of the groove should be smeared along the seam. Such a sealed mount lasts a very long time.
- Step 4. After installing the roof, it remains only to remove the protective film.
See how easy it really is to work with monolithic polycarbonate:
Also, polycarbonate is good because it is easy to make balcony roofs of complex shapes from it:
The only unpleasant moment in the case of a polycarbonate roof is that it is not repaired, but immediately replaced with a new one. After all, any traces of repair spoil the entire appearance, while the same corrugated board with the same damage can still be patched and patched.
Ondulin roofing: fashionable strength and durability
Also, one of the most beautiful roofing for a balcony is ondulin, or euro slate. It is distinguished by ease of installation, light weight (6 kg per 1 m2) and excellent sound insulation properties, which is important for the last floors.
But, unfortunately, since ondulin is just a multi-layer sheet of the most ordinary paper impregnated with bitumen, it has not the best indicators of impact resistance and resistance to mechanical damage.
Also, the surface of euro slate is usually rough, which is why it traps snow and accumulates dust. As a result, such a coating on the balcony serves no more than 10 years, simultaneously fading in the sun and twisting itself out if rainwater gets into random cracks.
But it looks beautiful, you can't say anything here:
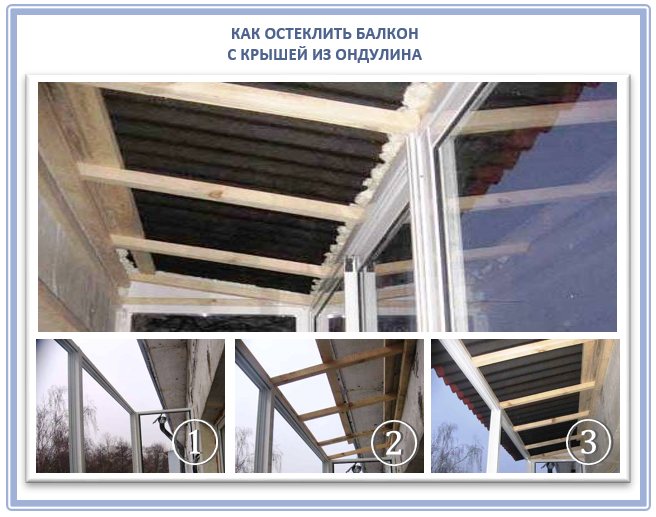
For fixing the euro slate to the balcony, the same special fasteners are used, as in the case of installation on a regular roof of a house. Here's a great video tutorial on this topic:
An effective way to seal the roof of balconies or loggias
With internal waterproofing with sealants, moisture leakage from the ends and side surfaces that remained unsealed is not excluded. Therefore, with precipitation accompanied by a strong wind, it is impossible to assert about one hundred percent sealing. The cardinal way to solve the problem is to equip a pitched roof. In this case, not only is the leakage of the balcony or loggia eliminated, but their thermal insulation also increases.
Sealing balconies in this way is carried out by specialized companies licensed to perform such work. Their sequence is as follows:
- 1The frame is mounted under the roof using a galvanized steel profile;
- 2A layer of external weather-resistant insulation is laid;
- 3The soft roof is being laid;
- 4Around the entire outer perimeter, galvanized steel slopes are mounted to protect the external seams from moisture infiltration.
For external sealing of the roof of a balcony or loggia using this method, high-quality materials are needed. It is advisable to use penoizol or foam glass as a weather-resistant insulation. A soft roof is formed using any bitumen-based roll material.
If you have a strong concrete canopy, you can also use metal tiles or profiled flooring. The use of traditional coatings, for example, ondulin or polycarbonate, is ineffective in this case, since they do not have high impact resistance (they will collapse when massive icicles fall from the upper floors of the building).
We build a roof on the top floor with our own hands
In theory, a visor over a balcony platform can be built according to several schemes. The simplest design is cantilever, it is used for 2x1 m balcony areas. Most often, these are decorative balconies, common for the last floors of very old buildings.
Such a roof is most often made in the form of an arch with struts and a polycarbonate sheet roof. The whole structure is designed in the form of a very rigid and durable steel frame, and the small rounded roof surface makes it insensitive to strong gusts of wind, rain or snow at the top floor level.
For modern balconies, the console scheme is practically not used, with the exception of cases when the balcony platform adjoins the side wall to the corner surface of the building box, like a loggia.
But even in this case, the owners prefer to support at least one edge of the cornice on a vertical stand made of oak beams or metal pipes.
At an altitude, the wind speed doubles for every 20 m of the building, so the canopy cantilever structures are often deformed and folded under strong gusts, although at the level of the first floor they can serve for decades without problems.
We assemble the frame for arranging the roof of the last floor
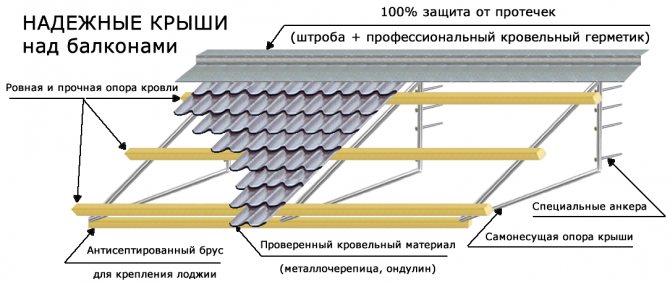
The general structure of the roof support structure is shown in the diagram below.
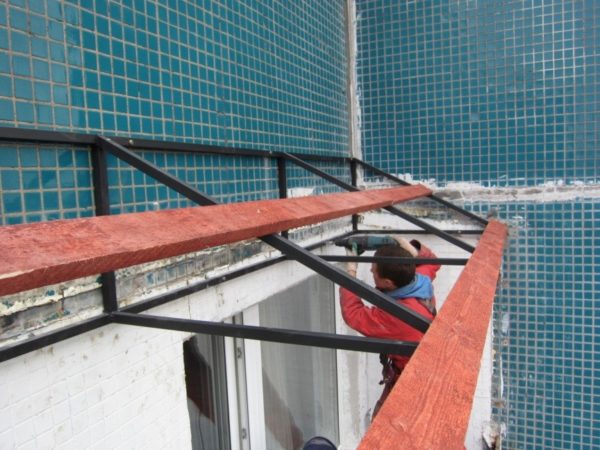
The upper frame rests on four vertical posts made of a 40x40 mm profiled square tube. Usually, a steel pipe frame is used to reinforce old balconies before installing double-glazed windows, especially if the owners want to expand the glazed space.
But the use of a frame is also very suitable for arranging a conventional balcony canopy, especially in windy conditions on the upper floors. Using such a solution gives several advantages at once:
- The weight of the roof and everything on it is evenly distributed over 10-12 points of attachment with anchor bolts to the wall of the house. Even if three people stand on the roof of your balcony, or a snowdrift of ice and snow 50 cm thick forms, the canopy will freely withstand the load;
- A properly made frame system significantly increases the strength of the balcony of the last floor, especially if the roof has to be made over an old concrete slab, with concrete crumbling at the corners.
Of course, if you do not plan to glaze the balcony with metal-plastic double-glazed windows, then a lighter profile can be used for the frame, for example, 15x15 mm or 20x20 mm. The base of the roof slope can be made in the form of a type-setting truss made of triangles or trapezoids. The latter option is used mainly for glazed balconies, where usually the roof is insulated together with the walls and concrete base.
The entire structure is cut out and adjusted in the form of ready-made elements on the ground, only then is it lifted onto the balcony and installed. Initially, the triangles of the roof slope are cut and welded according to the template. For the normal snow cover to disappear from the roof of the balcony, the angle of inclination should be more than 27-30 o. The smallest leg of the triangle, for which the roof of the balcony will be attached to the wall, is made of a double pipe or rectangular profile. For example, if a 15x15 mm section is used for the frame, then a 30x15 mm profile is required for the mounting side. Before installing the frame with anchors, two horizontal pipes are attached to the balcony wall along the entire length of the site. Triangles are welded to the pipes.
After installing the triangular rafters, vertical racks are installed that hold the roof, and a U-shaped belt is assembled from the pipe at the level of the balcony railing. If possible, it is advisable to install "balusters" from a professional pipe or even from a bar. This will equalize the load from the weight of the structure over the entire surface of the balcony slab.
Installing the roof
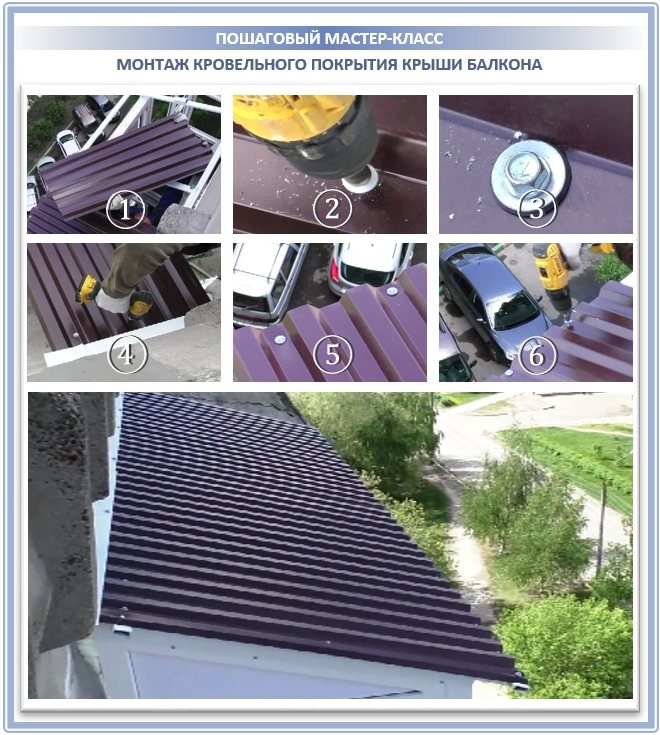
For arranging the roof covering of the balcony roof on the top floor, ordinary corrugated board or metal tile is best suited. Before laying the covering on a metal profile, fix horizontal boards of the crate with a width of 10-15 cm, with a step of 20-25 cm, with self-tapping screws.
Cut to size sheets of profiled sheet are laid on top. To improve the tightness of the roof of the balcony, laying is performed with an overlap in one wave and gluing the joint with liquid rubber or bitumen mastic. A corner bar is stuffed along the cornice and corners of the roofing.
The most crucial moment in the process of laying the roof is the arrangement of the abutment zone to the wall of the house. For this, a groove is cut out with a grinder for sealing the edge of the facing strip. The joint between the profiled sheet and the wall of the balcony is sealed with glass tape on bitumen mastic, after which the strip itself is installed, the seam in the wall must be sealed with a sealant.
Balcony Roof Construction Type
The first point of the building plan is the type of construction of the balcony roof. Its choice depends on several nuances, which must be determined immediately, since it will be difficult to make constructive changes to the finished roof.
What determines the choice:
- Desired roof size;
- Are there any plans for further glazing of the balcony;
- The bearing capacity of the floors;
- Climatic features of the area.
By comparing each option for these points, you can easily choose the one that suits your particular case.
Independent framework
An independent roof frame is attached directly to the outer wall of the building. The support goes to the spars, and the corners or I-beams act as stiffeners. Reinforce such a structure with oblique supports, which are also attached to the wall.
It turns out that the independent roof does not exert any load on the balcony itself, but at the same time, due to the lack of reinforced support, it has weight restrictions.
Pros of an independent framework:
- easy to assemble and install by hand;
- suitable for small balconies with little bearing capacity;
- will protect the balcony from rain and snow.
Despite the rather attractive appearance and ease of installation, such roofs are rarely installed. This is due to the disadvantages of an independent type of roof frame:
- there are restrictions on the weight of roofing materials;
- can be mounted only on non-glazed balconies;
- there is a danger of collapse due to the settling of heavy layers of snow;
- strong gusts of wind can blow off such a roof;
- not suitable for wide balconies.
So such a roof is not suitable for insulation and waterproofing of a balcony.
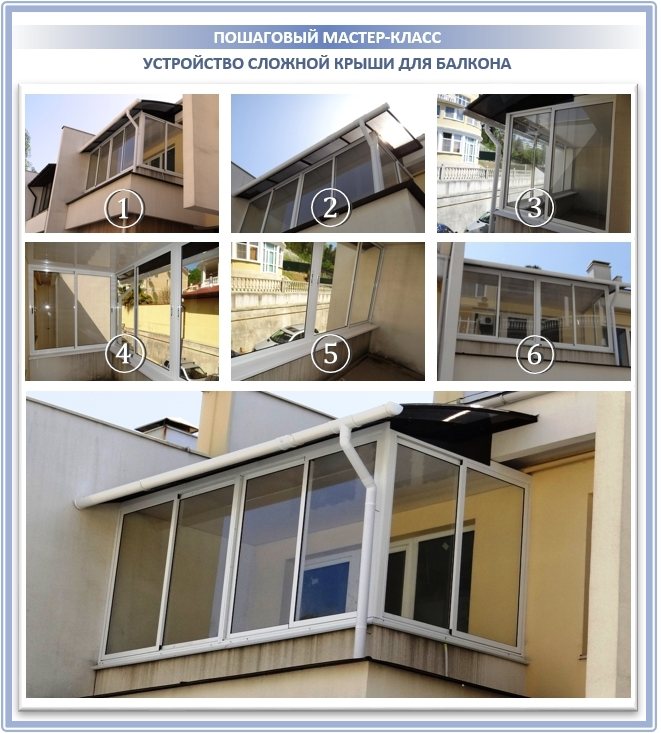
Dependent wireframe
The second option is a dependent roof frame, based not only on the load-bearing wall, but also on the frame of the balcony itself. In this case, most often, immediately after arranging the roof, glazing, waterproofing and insulation of the entire balcony begin.
Pros of a dependent framework:
- can be mounted on a balcony of any size;
- there are no restrictions on the choice of materials;
- able to withstand the load of snow settling on the roof;
- together with glazing creates a balcony completely protected from weather conditions.
There are already fewer cons in this case:
- it is necessary to calculate the maximum load of the balcony itself and, if necessary, strengthen it;
- higher cost.
A balcony completely suitable for arranging a living room, a dressing room or storing rolls and vegetables will have to be thoroughly strengthened and insulated. All stages will have to spend not only money, but also time - but the result is definitely worth it.
The main problems of arranging a canopy over a balcony
The scheme for arranging the roof over the balcony on the last floor is structurally no different from a similar structure installed in a private house or in the country. It will be necessary to make the frame and fastening of the roof structure, choose the appropriate type of roofing and correctly mount everything. But, before you make a roof on the balcony with your own hands, you need to take into account several important conditions:
- It is possible to build a canopy over the balcony platform only after the documentary formalities have been settled with the housing office, the architectural inspection in terms of obtaining permission to equip the roof;
- The frame for the roof of the last floor, regardless of the distance to the overhang of the general roof, must be done according to the reference scheme, when the part of the frame adjacent to the wall is fixed on concrete or brick, and the overhang rests on a rigid metal support;
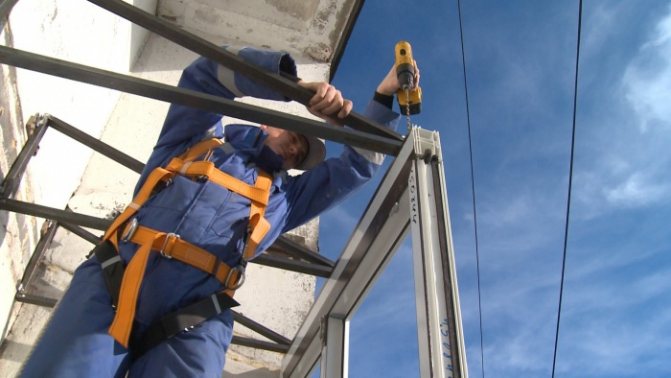
- To assemble the roofing and high-quality sealing of the abutment zone, it will be necessary to work at a decent height on the last floor of the building. It is best to entrust the installation of the roof, roof and abutment area by a written contract to an industrial climber with relevant work experience.
Firstly, such a solution will eliminate absolutely unnecessary risk, and secondly, it will make it possible to install the roof on the balcony of the last floor with maximum quality. You can, of course, try to blow out the cracks and joints from the balcony with foam, but, as practice shows, the quality of such a roof seal is very low.
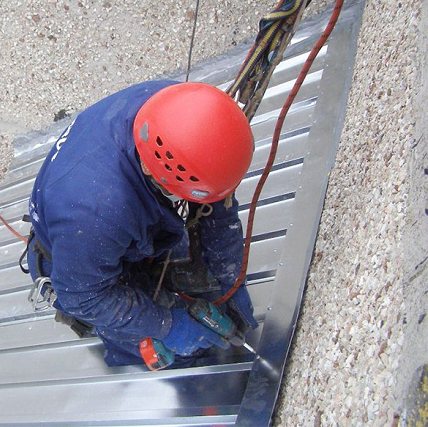
Even physically strong people are not always able to work at height, especially since it is necessary to do it as professionally as possible so as not to restore the tightness of the canopy and mountings after each strong wind or rain.
Estimated cost of a roof over a balcony
| Balcony view | The cost of making a balcony roof |
| P-balcony 3000 mm | RUB 18,500 |
| Balcony 4500 mm | RUB 29250 |
| G-balcony 3000-800 | RUB 25,900 |
Request a detailed calculation!
Features of mounting a balcony roof
First of all, the installation of the roof begins with measurements and the manufacture of the frame. Next, the frame structures are fastened. They can be made of light wood or durable and strong metal.
A timber-framed roof is not as reliable as a metal roof, however, it is cheaper. At the same time, the durability of the tree is significantly lower, which will lead to the need to repair the structure after a certain time. A more reliable and expensive option is a welded steel frame. Our company uses a hot-rolled corner for the formation of trusses, installed in increments of 60-70 cm.
Then the choice of roofing material is carried out, taking into account the design, budget and customer preferences. Various materials can be used - ondulin, profiled sheet, soft bituminous tiles, ceramics, etc.
Installation of a roof from a profiled sheet. Example with milestones
To ensure tightness, it is important to think over all the details in advance. So, in panel houses with tiles installed on the facade, leaks between the wall and the presented finishing material are possible
That is why our specialists often make a groove or longitudinal cut with a depth of about 20 mm, where a specially made Z-shaped ridge is inserted. It is this element that is installed overlapping the roof, which excludes leakage and destruction of the rear wall of the balcony. Also, a special mastic is applied, which ensures perfect sealing of the joints of the roof covering to the load-bearing wall of the house.
After fixing the supporting trusses of the roof and the ridge with a sealant, the roofing material is installed. When using the popular profiled sheet, a crate is made of wooden blocks, on which a metal roof is laid. Fastening is provided by specialized self-tapping screws, which are highly resistant to corrosion and various loads.
Next, the material is prepared to ensure the soundproofing of the roof. As the best option, you can choose penoplex, which is mounted under the ceiling on mounting foam, and covers absolutely the entire roof area. Further, you can make the ceiling trim with decorative panels, which are selected individually in accordance with the customer's requirements.
Our company replaces cold glazing with warm glazing without changing the appearance of the facade in the shortest possible time. Only experienced employees work at the facilities, who will create a reliable and durable structure and calculate its thermal insulation performance. We make wall insulation and turnkey balcony finishing.
How do we make the roof
ATTENTION! When choosing a roof for the balconies of the last floors, it is important to take into account wind and snow loads, as well as the type of balcony glazing. Incorrect and independent design can lead to sad consequences! Entrust the design and installation of the roof to professionals right now!
Of course, the choice of the type of roof is not everything, the next step will be the choice of the roof decking.
offers the following roofing options for balconies on top floors:
— Corrugated board Is a galvanized steel sheet that has extensive production and application in the field of construction and renovation. A huge number of color solutions for corrugated board allows you to create an aesthetic and beautiful view of a balcony or loggia. The disadvantage of this material is the increased noise generation.
"Khrushchev House"
"Stalin's house"
Color solutions for roof decking on balconies made of corrugated board material:
— Metal tile - differs in the increased strength of the material due to the multilayer polymer coating. Therefore, a roof made of metal tiles will serve for a long time and efficiently in any climatic conditions. Lack of material - increased noise generation.
"Khrushchev House"
"Stalin's house"
— Keramoplast Is a tough and environmentally friendly roofing material produced in Russia since 2000. Possesses extremely high strength and durability. The main advantage of this roof deck is noise absorption of all external sounds.
"Khrushchev House"
"Stalin's house"
Why should a roof for a balcony be ordered from?
- Consultants will help you, by phone, correctly navigate with the choice of the type of roof and draw up an order calculation.
- We purchase material for our balconies only from direct brand manufacturers.
- Each of our employees who installs the roof has a passport and a permit for the work carried out.
- For 12 years, the specialists of our company have been engaged in professional and mountaineering work on the last floors of residential buildings.
- Thanks to the specialists of the first category, we can provide a high guarantee for work.
- Only our managers will be able to draw up for you a detailed project and plan of your future roof on the balcony, which will serve reliably and for a long time.
- Only we! We will install the roof in 1 DAY!
And all this so that your balcony is always clean, comfortable and serves as intended!
Order a manager's departure for measurement to draw up a roof project on the balcony for FREE!
Step-by-step instructions for balcony partitions
Waterproofing of balcony partitions is made using a technology that does not differ from the treatment of the floor and ceiling. Insulation using foamed polystyrene foam plates is considered optimal. The board is glued to the partition with a building mixture with high moisture resistance. For tile joints, a reinforcing mesh is used.
The following sequence of works is selected:
the coating waterproofing layer is applied with a brush to the moistened surface of the slabs;
not earlier than five hours later, the next protective layer is applied perpendicular to the first layer;
external facing of layers is done by painting or plaster.
So, if the waterproofing work is carried out carefully without violating the technology, then the safety of the balcony slab and a comfortable environment on the balcony are guaranteed. In addition, any owner with little construction skills can waterproof the balcony.
Why insulate the roof on the balcony of the last floor
Why do you need to make a warm balcony with a protected roof? This thermal insulation procedure is necessary in order to provide protection against possible freezing, condensation formation in the interior of the room.
Experts identify the following reasons for this procedure:
- Keeping comfortable warmth in the spring-autumn period is a task that is subject to the insulation of the roof over the balcony.
- Preventing the formation of icing on the roof - drops collect on the cold metal surface, creating dampness, icicles begin to grow on the edge, a snow cap hangs, posing a threat to passers-by. Hermetic insulation of a metal balcony will help protect the balcony from this unpleasant effect.
- Reliable protection against heat - proper thermal insulation above the balcony is necessary to maintain a comfortable indoor climate when the roof is exposed to heating up to +70 degrees. High-quality insulation creates a kind of interlayer between two spaces with different levels of room temperature, leveling it out by means of heat transfer.
- Excellent sound insulation level - the rumble of raindrops on the roof will no longer interfere with your night's sleep.
- A full-fledged finish without roof insulation on the balcony is impossible, since the roof will suffer without moisture protection and insulation.
Varieties of roof for a balcony
There are two main types of design for balcony roofs:
- independent structure - in this case, a hinged roof is built without support on the balcony. To do this, support trusses from a metal profile are attached to the wall, and the crate is mounted on them and the roof covering is laid. Such a roof design is suitable if the balcony is not planned to be insulated, since it is unlikely that it will be possible to glaze and insulate it with high quality later. In addition, it is worth considering that with a very wide balcony, you will have to do, accordingly, a wide roof extension - as a result, it can turn out to be excessively heavy and therefore unreliable. To avoid such problems, lightweight materials should be used to equip an independent roof over the balcony. If a significant load of wind and precipitation is planned, it is not recommended to install a structure of this type;
- dependent structure, which is a solid and reliable roof with supports on vertical posts, while its dimensions and roofing can be of any size. Such a roof arrangement will require a significant amount of time and money, but it will be possible to insulate the balcony, since the bearing racks can be used for the installation of double-glazed windows. The installation of this type of structure is easy to combine with the performance of work on glazing and insulation of the balcony room.
How to negotiate with the supervisory authorities
If you have made the final decision on the construction of a roof over the balcony of the upper floor, before applying for a permit, you will need to draw up a competent project of the canopy with details of fastenings and calculation of loads. The main task is to obtain from an expert an opinion on the possibility of installing the structure of your choice with conclusions about the safety of a canopy for the walls of the building. With such arguments, it is much easier to talk to both the housing office and the inspection.
Usually, as the motivation for the need to equip a shed or roof of the balcony of the last floor, they indicate:
- On the top floor, the balcony is flooded with rainwater and debris from the roof;
- In winter, the balcony area is exposed to icing, and the residents are threatened by huge icicles.
Despite the fragility of the arguments presented, none of the officials will dare to refuse permission in writing, especially if there is at least a theoretical threat to life.
If this is not done, then even the most beautiful roof above the balcony of the last floor, made of wrought metal and colored polycarbonate, can be demolished at the request of the ZhEK management, on the basis of a complaint from neighbors or even by a court decision. Believe me, the compiled package of documents can come in handy more than once while you live on the top floor.
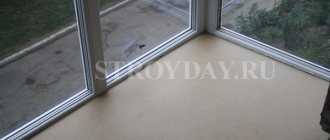
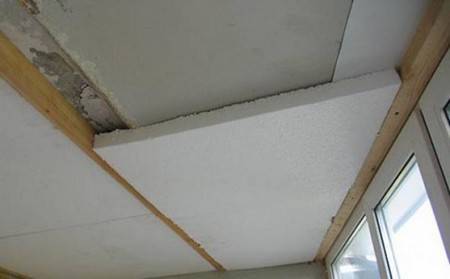
Ceiling decoration
To sheathe the ceiling, the rail is screwed with concrete anchors. With the help of a laser level and shims, it is easy to deduce the plane of the ceiling. Any covering made of lining, plastic or drywall is mounted on the bar.
The screws must not pierce through the finishing sheet and the batten. Putty, plaster or painting is applied on top of the finish. On an unheated balcony or loggia, only facade materials are used: putties, primers, paints.
It is convenient to prepare the ceiling for painting with the help of a side light projector, it allows you to detect even the smallest defects. The ceiling is painted several times so that the layer is even and without visual imperfections. Corrected with putty and sanding.
The final painting of the ceiling is carried out after the subfloor has been made.
When insulating from the inside, it is important to create the effect of a thermos. Ceiling, floor, walls should become a continuous heat insulator
https://youtube.com/watch?v=UMl80rEuJwM
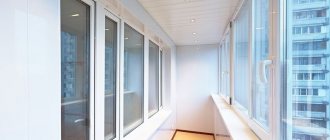
This is one of the reliable and simple options for insulation in a standard apartment building. The insulated balcony keeps the house warm in winter and cool in summer, pleases with its beautiful and durable finish. The apartment becomes warm and cozy.
Balcony roof on the top floor: material for manufacturing
Before proceeding with the selection of the material from which the installation of the roof will be made, you need to select the type of roof. Roof type can be dependent or independent. It is easier to install a dependent roof if the balcony is glazed. Because its structure will be supported by vertical posts, which are needed for the installation of double-glazed windows. This design is more reliable and can withstand any roofing material, regardless of its weight. The independent structure is fixed directly to the wall, does not need to be supported by uprights. Therefore, for this type of roof, a lighter roofing material is used. This type is not practical.
For the roof, materials that are very resistant to any changes in weather conditions are suitable. They must be of high quality and durable.
Roofing material that is perfect for installing a balcony:
- Polycarbonate;
- Ondulin;
- Decking;
- Metal tiles;
- Wood;
- Glass.
Polycarbonate roofing is very reliable, it is distinguished by its strength, despite its fragile appearance. This material is durable, so it will delight us for many years. It is much lighter than glass, but very durable, it can withstand any blows. It also does not lose its transparency when exposed to ultraviolet rays. Decking is popular among other roofing materials. It is used for any structures, since it can withstand any loads without deforming. One drawback of this material is that additional sound insulation is required. The most expensive material for making a roof is a glass unit. Tempered glass is used for them, so it is not afraid of any mechanical stress. It is very durable, conducts heat well, does not allow moisture to pass through, and can serve for a very long time. All roofing materials are suitable for finishing the roof, the most important thing is to know some of their pros and cons so that the device is durable and can serve for a long time.
Types of types of balcony roofs
Remember that the balcony on the top floor has its own characteristics and pain points.Therefore, first, it is better to invite a specialist for a consultation so that he will examine everything and discuss all the details with you.
If this is the first time you come across such a concept as a balcony roof, we advise you to watch this video first - it explains a lot:
It is important to indicate how tightly the roof itself will be connected to the glazing. After all, if there is none, it can be installed both at the beginning of the balcony glazing, and in the process itself. Each of these methods has advantages and disadvantages, and therefore let's figure out what types of balcony roofs are in this regard.
The first type is an independent roof... This is installed using a console and brackets. Among the advantages, we note simple installation, high functionality and reliability. An independent system is good in that it does not impose special requirements on the parameters of the balcony. At the same time, any materials can be used as a roof covering, because such a roof is installed independently and does not create a load on the glazing.
In other words, the dependent roof type presupposes the presence of special supporting structures, while the independent roof, on the contrary, allows it to take significant loads on itself. Those. if there is a roof above the balcony of the last floor in the form of the same slab, this is an independent system, because all the profiles are attached to it, but if there is no roof, then there are also two options for arrangement: a dependent and an independent system.
So, if you install strong corners and calculate the exact load, then the roof will turn out to be strong enough to also attach even frameless glazing to it (this is an independent roof). But if you lean the new roof on the new glazing as a support, then such roof - dependent, and it is impossible to distribute additional loads on it, and it will be necessary to be careful with the choice of roofing.
By themselves, dependent systems are intended to be used only for a narrow balcony. Among the minuses, we note the considerable load on the glazing, which increases in winter, and among the pluses - the economy and ease of installation. But the dependent structure cannot be used in old houses, where it is forbidden to unnecessarily overload the walls!
Finally, note the third view of the roof of the balcony - support-post... Here the roof rests not on the glazing and not only on the wall, but is supported by a special frame made of steel racks, similar to the upper and lower strapping. Moreover, they not only play the role of a support, but also create openings for glazing. True, due to the fact that such a design creates an additional load on the parapet or balcony slab, it should be strengthened. And the order of work here is also slightly different: we make the roof, and then the windows.
Another interesting case, which occurs quite often in Russian houses, when there is a roof over half of the balcony, but not on the second. Then it needs to be completed, or additionally expanded, or install another one with an extension, and simultaneously with the glazing of the balcony.
Installation of an independent system
So, first of all, in order to make an independent roof that will not rest on the glazing with its weight, you will need to build a supporting frame for it. Usually it is a simple truss made of rolled metal or wooden frames. These need to be fastened to metal anchors or a facade dowel with a screw, directly to the wall.
Why do farms have to look like this? The fact is that due to such a direct stop, they provide 100% resistance to stalling from strong winds. Here, the reverse wind loads will be compensated by connecting the roof to the trusses using steel plates with a thickness of 3 mm, and the side posts receive their resistance to wind gusts due to the direct attachment to the wall.
Today, wooden trusses for the roof of the balcony are rarely made due to the fact that under such a roof it is not always possible to achieve complete protection from moisture.But if they do, then in the form of ordinary triangles like metal ones, they are treated with an antiseptic and attached to the wall with anchor bolts or special plates.
Of course, since we are talking about the last floor, then it is much more rational to attach the balcony roof to metal trusses.
- Step 1. For this venture, you will need 35x35 mm steel profiles, from which you will make the supporting brackets. individually for the size of your balcony.
- Step 2. Next, fix them with anchor bolts directly to the wall, and make a cut above the consoles in it, where later insert the valley.
- Step 3. On the valley, put a roof made of profiled sheet or ondulin, and seal the joints.
Rainwater or melt water will flow down the roof and fall onto the valley, and from there it will be discharged outside the balcony. Here is the process of making these trusses in detail:
It is customary to make a lathing for a balcony roof from a wooden bar 20x40 mm or 40x40 mm. It is made from dry quality material. When such a bar is located between the same corrugated sheet and metal corners, to some extent it takes over the main noise and shocks from rain drops, they are slightly amortized at the same time, and the roar is no longer so strong.
Usually, the length of the roof slope of a standard balcony does not exceed two meters, and therefore there are only three such slats. The wire will help you to temporarily fix the lathing on the trusses, and then connect the lathing to the trusses with bolts. This is how it looks:
Consider another such common case when there is a slab on top, but it is very dilapidated. That is, it cannot be additionally loaded at all, and sometimes it is scary to touch it. What to do then? Go for tricks! For example, install a new, independent roof directly under the slab, and glaze the balcony to it:

Installation of a dependent system
In the case of a dependent roof system, the balcony glazing is first installed, and only then the roof itself, which in most cases sits directly on the frames:
The roof is placed on foam, which, after drying, is cut and covered with sealants on both sides. Then the ceiling is insulated and hemmed. As you can see from the step-by-step master class, there are no trusses here, only support for the roofing sheets, which itself rests on the window profiles. In this version, it is impossible to install frameless glazing, which always travels along the top guides.
Installation of support-post system
And, finally, consider another such popular option as a support-post system. Here, both for glazing and for installing the roof, one integral frame is created, more often a wooden one:
In short, neither the roof lies on the frames here, nor the frames hang directly from it. Here's a step-by-step process for doing this:
- Step 1. Install vertical posts around the entire perimeter of the balcony and cut them to the desired height. If the roof of the balcony is flat, the racks will be the same; if with a slope, those that are closer to the street are trimmed.
- Step 2. Using the building level, check how vertically the supports are mounted - there should be no deviation.
- Step 3. Now screw the posts to the railing or directly to the concrete slab using special anchors.
- Step 4. Attach the roof base - beams or metal rods at an angle. Fix those to the wall with dowels and anchor bolts, and to the uprights with self-tapping screws. The fasteners should be as reliable as possible, the entire racks will take all the load from the structure.
- Step 5. Additionally, connect the edges of the crossbeams with a profile pipe at the top.
- Step 6. Now place the timber batten and optionally timber deck under the roofing. We, of course, recommend making the flooring anyway, so that even the same metal sheet does not then bend from the snow. For this purpose, ordinary chipboard or thick plywood, and even a few additional boards are suitable.
- Step 7. Be sure to cover all wooden parts of the structure with an antiseptic.
But now you can proceed to the selection and installation of roofing sheets.
How to mount a roof with a dependent frame on a balcony
Roof frame drawing
Next, consider the option of installing a dependent roof frame on the balcony of the last floor. Independent work requires high-altitude work skills, as well as the ability to use construction tools. A big plus is experience in roofing.
In the same case, if you have never tried to engage in such a construction, seek the help of professional workers.
Inappropriate actions at high altitude can lead to dire consequences.
Frame and roofing materials
The base of the roof frame can contain both metal profiles and wooden beams. The first option is much stronger and more durable, but the manufacture of parts from shaped pipes is a laborious process.
And in order to use wooden beams as supports, it is necessary to accurately calculate the load and bearing capacity. In addition, the tree will have to be treated with antiseptics and painted.
Timber roof frame
For arranging the roof in the case of a dependent frame, you can choose any material. For example, one of the most popular in the construction market:
Polycarbonate. Lightweight, moisture resistant material
It should be used with caution in the case of snow accumulation on roofs - you will have to increase the number of rafters for sufficient rigidity of the structure;
Ondulin - lightweight and durable due to its own stiffening ribs;
Flexible shingles with a sticky bituminous layer. Good option for a solidly fortified balcony converted into a living space
The material is heavy and must be attached to the base in the form of chipboard or fiberboard;
Decking. Due to its low weight and uniform distribution of the load due to undulation, it can spread on the roofs of small glazed balconies.
The main thing in the choice of materials is to take into account the load on the balcony floors.
Corrugated roof
Price from 2000 rubles per 1 sq. m
The easiest and cheapest option. The balcony is more comfortable. Any color of your choice. Galvanizing and painting will ensure a long service life of the roof.
The corrugated roof is the most popular solution for the renovation of most Moscow balconies.