Assembly and installation of an interior door frame made of MDF is a complex process consisting of several stages. In order for the installation on our own to be carried out efficiently and without errors, it is necessary to carry out all the work in the correct sequence.
It is recommended to assemble the door frame made of MDF on a flat surface.
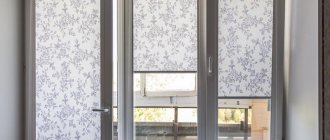
Door selection rules
If you decide to do the door installation with your own hands, the first thing to do is to make accurate measurements of the doorway, preferably without the old box. The main parameters are its depth, width and height.
- The depth of the opening is the thickness of the wall, according to which the door cut (box) is selected;
- The width of the opening is the width of the door + approximately 8-9 cm for installing a loot.
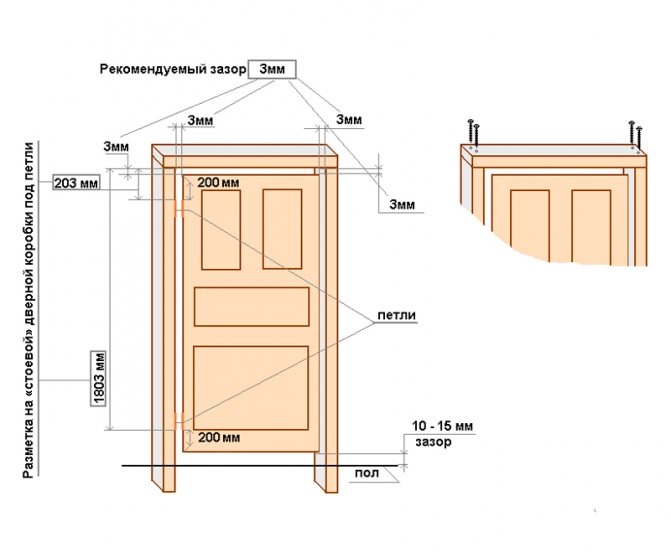
The standard door size for a bathroom is 60 cm, for a kitchen - 70 cm and for interior doors - 80 cm.Therefore, to install, for example, a kitchen door, the opening width should be about 80 cm.
The MDF box itself has a standard thickness of 2.5 cm, multiply by 2, it turns out 5 cm.Add the necessary allowance for the free movement of the door - about 3 mm on each side. The remaining distance of 3-4 cm will be needed to adjust the correct position of the trap in space and to additionally fix it with the help of polyurethane foam;
- Opening height. This parameter plays a role not so much when choosing a door height (the standard height of modern door leaves is 2 meters), but when choosing a frame design. It can be with or without a threshold. The calculation of the height of the trap with a threshold is carried out according to the same scheme as the calculation of the width of the door. And if the door is installed without a threshold, then another 1-2 cm will be added to the 3-millimeter margin for free movement of the door at the top (depending on the thickness of the floor covering).
Based on the data obtained, the choice of the door and accessories for it is carried out. Ultimately, the set should look like this:
- Door leaf;
- a box (2 vertical beams and one or two (if a threshold is provided) horizontal beams;
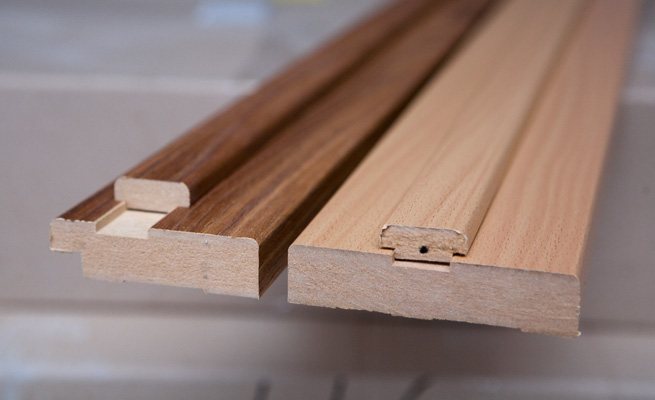
- narthex slats (vertical and horizontal);
- additional strips (in the case of a non-standard opening width);
- fittings (handle, hinges, lock (if necessary).
A set of necessary tools
Do-it-yourself installation of interior doors is, although not particularly difficult, but a responsible and painstaking process that will be very difficult to carry out without the appropriate tools. For the accurate and fast execution of all work you will need:
- an electric drill or hammer drill (depending on the material from which the walls are made);
- drills or drills for 4 and 6 mm;
- hand saw with fine teeth;
- drill for wood with a diameter of 4 mm;
- chisel;
- screwdriver or Phillips screwdriver;
- tape measure and building level;
- miter box;
- quick-assembly dowels with a length of at least 75 mm and wood screws 3.5x60mm;
- polyurethane foam.
What the room should look like
In order for the installation of interior doors to be successful, it is necessary to carry out preliminary preparation of the premises. For this, the following operations are performed:
"Pie" of MDF panels.
- alignment of walls;
- puttying;
- applying plaster.
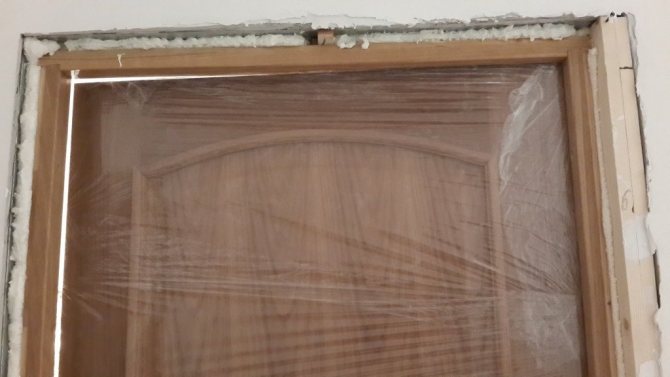
After the end of the wet work, the room is thoroughly dried. Drying must be done without fail. Otherwise, the door can lead. The future thickness of the base floor must be known exactly.Do-it-yourself installation of interior doors will be done taking into account the dimensions of the threshold, its height. If only the replacement of doors is carried out, then the work can be performed immediately, since these conditions will not have any effect on the installation of the door. Most of the designs are subdivided according to the principle of operation:
Swing doors are most commonly used. They are very easy to install, but some of the usable area is lost. Today there are several types of sliding doors:
Doors made of MDF can be either single-leaf or double-leaf.
- single-leaf;
- bivalve;
- right-sided;
- left-sided;
- directed along the wall;
- inwardly directed walls.
These models save space as much as possible. The disadvantage is the need to install the door frame, the doors have poor sound insulation. The presence of several leaves is characteristic of a folding door that moves along the rails. Such doors are divided into several types:
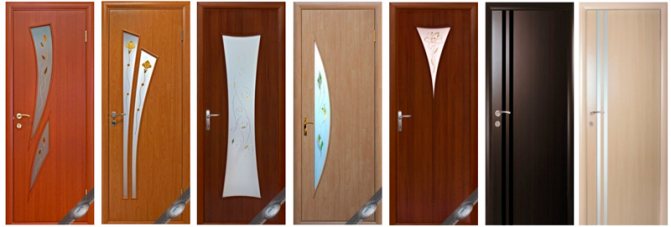
You can replace the screen with accordions. The book is distinguished from the accordion by two sections, higher strength. A typical drawback is the quick breakdown of the fastening hardware under heavy loads. In the modern construction market, there are a lot of various proposals for interior doors. Each model has individual technical characteristics, differs in its shape and dimensions. The main materials from which interior doors are made are:
The hinges should be cut to a depth in the same plane with the end surface of the door leaf and door frame.
- wood;
- plastic;
- metal;
- glass;
- MDF panels;
- various combinations of materials.
When choosing a model, it is advisable to take into account the interior of the room and the functionality of the door. To make the right choice, you must first measure the dimensions of the doorway. Based on this data, you can choose the right door, but you need to know a few nuances. The installation of interior doors is carried out in such a way as to maintain a gap between the door block and the base of the opening. It is usually 10 mm. To prevent the door from jamming, especially when a change in humidity occurs, you need to create an additional gap between the door leaf and the block parts. The gap should be no more than 5 mm. The future door should not interfere with the finishing work of the flooring. Be sure, when choosing an interior door, you need to make sure of its quality. Must not be:
DIY door installation: step by step instructions
The complexity of the do-it-yourself door installation process will depend on the initially selected model. The more expensive options are already supplied with hinges and a handle and have ready-to-mount part sizes. Their assembly resembles a constructor, since structural elements do not require adjustment, it is enough just to fasten them in a certain sequence, install the box in the opening, put the door on the hinges and refine the finished structure with platbands.
We will consider a more complex option, when the door leaf is completed only with blanks for future loot and has no hinges or handles. The first thing to do is to dismantle the old door and door frame.
Build a new loot
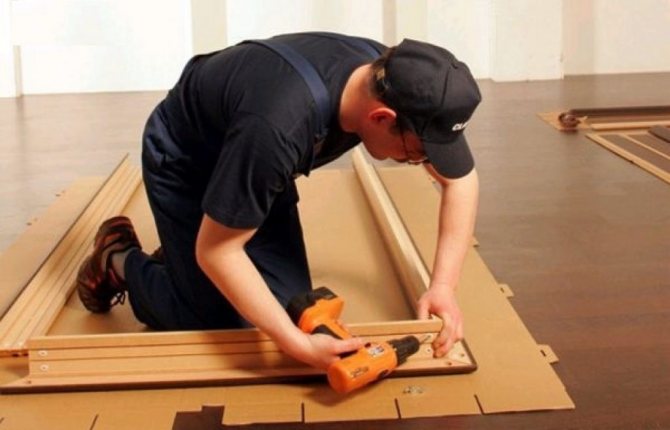
This process is performed on a flat horizontal surface, i.e. on the floor (in order to avoid damage to the elements of the box, it is recommended to lay a soft substrate first).
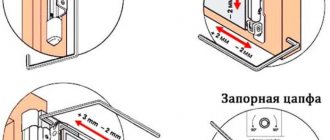
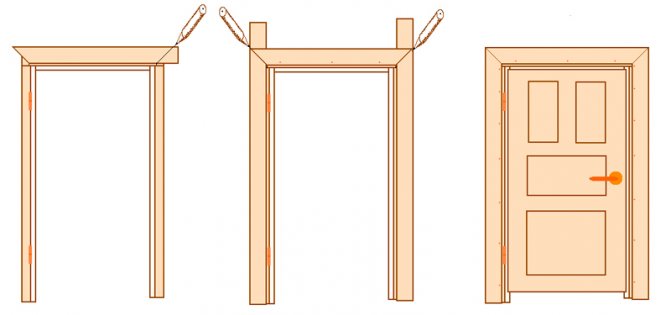
First of all, the upper crossbar of the box is sawn off, taking into account the width of the door, allowances for its freedom of movement (in total ≈ 6 mm) and the thickness of the strip (2.5 x 2 = 5 cm). Next, the vertical elements of the loot are mounted. They are laid out on the floor perpendicular to the top bar. All elements are in the "on edge" position. When joining horizontal and vertical parts, a right angle should be obtained.
The recessed strips are temporarily inserted into the mounting grooves, on which the door is placed. Spacers with a thickness of ≈ 3 mm are inserted between the door leaf and the frame around the perimeter (for example, even strips of cardboard).
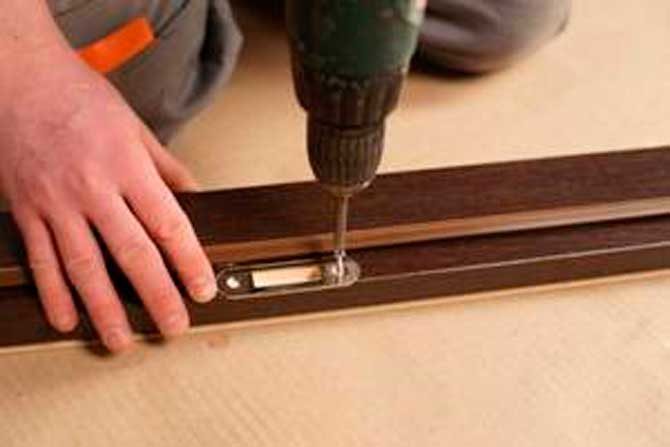
Taking into account the possibility of splitting MDF elements, it is strongly recommended to pre-drill the places of future screwing in of self-tapping screws with a wood drill of a slightly smaller diameter.
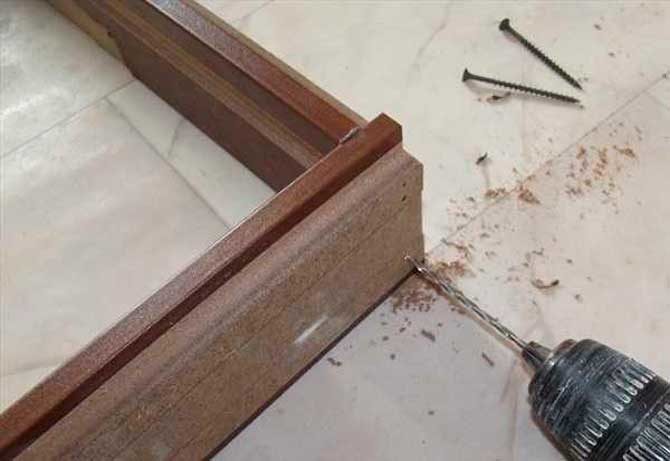
The attachment points should be closer to the center of the parts. Two self-tapping screws are enough to connect each side of the box.
Having received the U-shaped base, it is necessary to cut off the excess vertical elements along the length. At the same time, one should not forget about the threshold (if it is planned) or the required distance from the floor (taking into account the thickness of the floor covering). Having measured the required length and cut off the excess, the lower part of the box is fastened with a threshold part of the same width and in a similar manner with the installation of the upper crossbar, or a mounting plate for temporarily fixing the correct contour of the loot (attached to the lower end sections of the vertical racks). This completes the assembly of the box.
Inserting loops
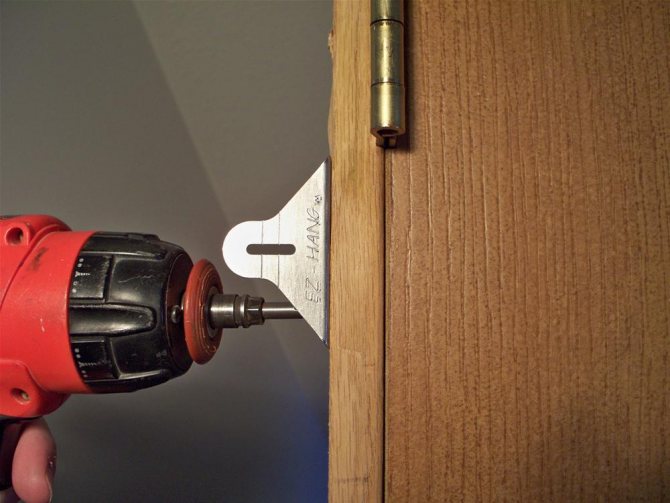
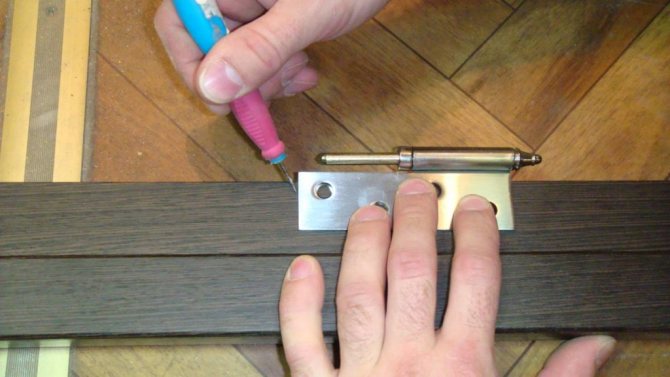
This process requires maximum precision and accuracy in work. The easiest way to do it is with a manual milling machine, but if there is none, then you will have to use a hammer and a carpentry chisel.
Having inserted the folded hinges into the gap between the door and the frame, and placing them at a height of ≈ 250 mm from the upper and lower edges of the door, it is necessary to make the appropriate markings on the door sill and end of the door on the side where the hinges will be located (taking into account the right or left door opening) ...
After removing the door from the assembled structure, using the available tools, it is necessary to cut out recesses in the boot and the end of the door, corresponding to the thickness and contour of the hinge plates. Next, the hinges are installed into the prepared "nests" using self-tapping screws (usually they are included with the hinges).
DIY installation of a loot
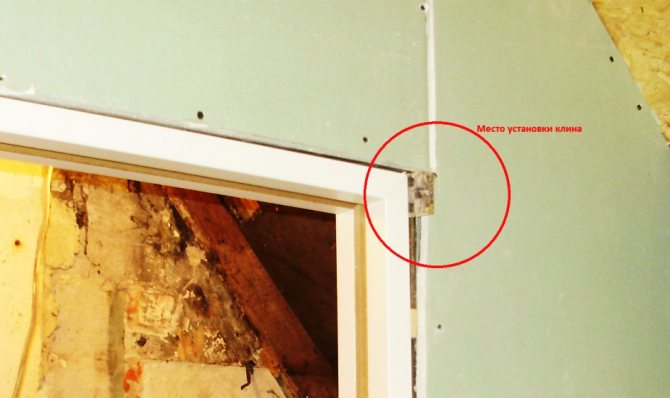
The assembled structure must be inserted into the doorway, controlling its correct horizontal and vertical position using a building level. The box is fixed by means of wooden wedges and self-tapping screws.
Door leaf installation
The next step is to install the door leaf with embedded hinges on the inserted frame. This checks the correctness of the vertical and horizontal clearances. If the door opens and closes without interference, and all the gaps are the same, then the installation is correct.
Final fixation of the box
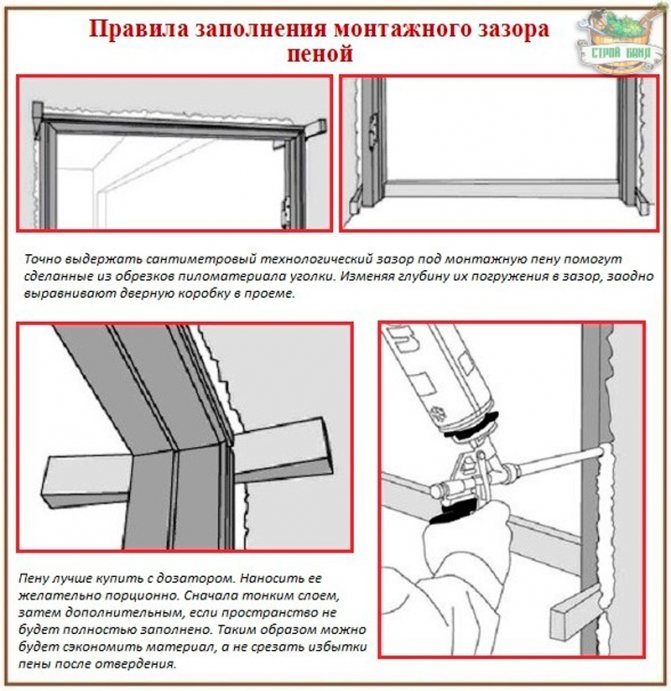
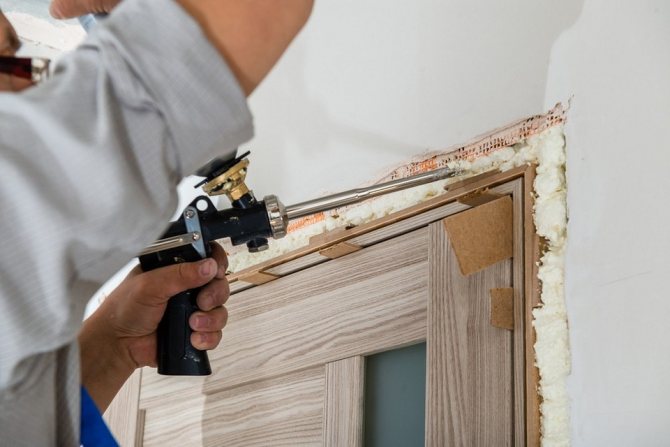
In the gap between the door and the frame around the entire perimeter of the structure, it is necessary to insert spacers (for example, strips of cardboard of the appropriate thickness (≈ 3 mm). The next procedure is to fill the remaining space between the doorway and the frame with foam.
After the foam has completely dried (≈ 12 hours), the excess foam is cut off and the lower fastening strip is dismantled.
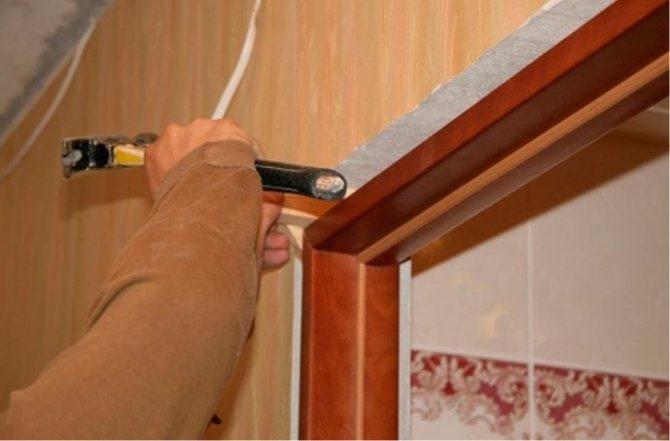
Installation of platbands
The easiest and best way to carry out this procedure is with a carpenter's miter box and a saw with fine teeth. Having measured the required dimensions of the horizontal and vertical platbands, they must be carefully sawed off at an angle of 45º.
Installation is carried out by means of thin self-tapping screws, followed by decorating their caps with special overlays in color with cash, nails without caps or mounting glue.
Last but not least, handles and locks are installed on the door leaf. For a detailed video on installing interior doors, see below:
Installation, namely, assembly and is a rather painstaking process that must be thought out in advance and each stage must be approached responsibly. A person with minimal knowledge of installing interior doors can also carry out the installation of such a product. However, there is no room for error.Otherwise, you will have to either redo everything or correct, which can lead to the unsuitability of the assembled door structure in the hands of a beginner - you will have to re-install the door product. Therefore, the master must stock up on a sufficient amount of time and nerves. The whole process should proceed in stages.
- At the very beginning of the work, before the assembly is carried out, it is necessary to determine the dimensions of the MDF product. It is necessary to make an accurate calculation, down to a millimeter, of the length of the racks of the loot and the upper lintel.
- In order for the measurement to be the most accurate, after dismantling the old box, you need to remove excess building materials - the remains of foam, plaster, etc. Measurements must not be made without floor covering. Installation begins on the finished floor.
- It is worth considering the distance from the wall to the box: the platband should fit entirely - when cut, it can ruin a positive impression of the interior. When making measurements, it should be borne in mind that there must be gaps between the door itself and the frame. If the gap is large, the door will lose its attractiveness, and if it is not enough, the door simply will not close.
- To measure the racks, you need to measure. The racks should be equal to the height of the entire product. The standard height is 2000 mm. Leave a 4 mm gap between the patch and the MDF sheet. At the bottom, add a gap of 1 cm so that the floor does not interfere with the use of the canvas.
- As a result, the following indicators should come out: the height of the doors and pillars will be 2000 mm + 4 mm of the gap between the leaf and the patch + 10 mm of the gap from the floor = 2014 mm.
- from MDF
- In order for the assembly of all components to be done correctly, first of all, you need to saw down the door frame to the size of the opening. Features of the cut - the top is at 45 degrees, the bottom remains flat - it will be installed on the floor. You can use a saw for wood, but for a smoother and more accurate work, it is better to file the corners with a circular saw.
- The sides sawn at 45 degrees must be pulled together. To assemble, you will need self-tapping screws for wood with a length of at least 55 mm and a drill with a drill. To prevent the MDF from cracking, you first need to make holes of a slightly smaller diameter than the screwed-in self-tapping screw, by about 2-3 mm. Self-tapping screws are screwed from two outer sides of each corner - from the top 2 and from the side in the center 1.
- If, when trying on the screwed parts, the height of the opening does not allow you to accurately put the structure, you can do this - knock down the plaster from the top of the opening and saw down the beam located in the middle of the opening.
- Before fixing the door structure in the opening, you need to check the horizontal and vertical with the building level.
- So that the installation does not subsequently disappoint the owners and, by negligence, does not violate the aesthetics of the box when fastening in the opening, you need to make holes for self-tapping screws in those places where the hinges will be attached and the latch will adjoin.
- Inserting loops
- The inset of hinges begins with the choice of the side on which it will be decided to install the handle, and in which direction the door is planned to open. Both of these factors determine the location of the hinges.
- Two loops for the MDF product on the top and bottom will be enough.
- When measuring and marking, you will need a goniometer. We apply a loop on the end side, outline it with a pencil. Next, we make a recess with a chisel along the resulting contour to a depth equal to the thickness of the loop.
- Ideally, the hinge markings should be set at a distance of 200 - 250 mm from the bottom edge of the door and 150 - 200 mm from the top edge.
- After finishing the marking of the hinges, we fasten them with self-tapping screws to the door.
- Installation
- The next step is to level the structure horizontally and vertically.
Use a drill to drill the required holes for the anchors.To securely fix, make three holes on the left and right, as an option, you can also drill another hole at the top and bottom.
- The most crucial moment is securing the box in the opening.
When trying to install, you may encounter a problem - if there is a thick layer of plaster in the opening, the screws may not get into the wooden part of the wall. To avoid this, you need to make a lining - a wooden block so that the self-tapping screw is fixed, while it does not damage the plaster. A plank of the required size is carefully drilled into the problem areas, on which the stand will subsequently be planted. After this manipulation, we install and fix the structure in the wall. Now it's important to level the vertical. To do this, we take the building level and adjust the first and second sides. Next, you need to wedge the door frame: take ordinary wooden wedges and hammer under the top of the wall. Check again the level on both sides for slope.
- Installing the door leaf
- After making sure that the assembled "frame" is installed firmly, you can start hanging the canvas. In order not to keep it suspended when fastening, place a small wooden bar under it, it should be 1 cm long. And so this trick will help to neatly fix the canvas.
- If the door is assembled and installed correctly and evenly, then the canvas in any position will stand as needed, as well as open and close without hindrance.
- After finishing the installation of the entire assembly, you need to fix it - eliminate the gaps and cover it with polyurethane foam. In this case, the gaps for the MDF door frame should be 4 mm, since the coating of this material absorbs moisture and can expand. In order for the door to close anyway when it dries, you need to leave at least 4 mm. Liners need to be placed in them, because when foaming, the foam begins to expand and the gap may decrease.
- Before this, the dusty surface must be moistened with water so that the PMF adheres better. Then let it dry for 30-45 minutes.
- Installation at the final stage -. They are fixed with self-tapping screws or decorative nails. The assembly and installation is complete.
Renovation is a costly undertaking, so apartment owners do everything to reduce costs by doing the work on their own. For many, the installation of a MDF door frame is not difficult. Having prepared a standard tool, you can complete the installation in the shortest possible time.
Box and canvas
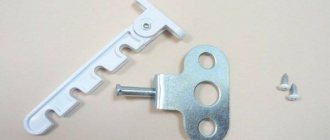
Installation of hinges
detachable or one-piece hinges; chisel; carpentry hammer; drill; self-tapping screws.
Assembling the door frame.
Before starting work, they choose in which direction the door from MDF will open, i.e. towards or out of the room. Then door hinges are purchased, which have different types and, because of this, their own characteristics when inserting. To install interior doors, 2 hinges are required. And if this is an entrance structure, then to increase its strength, 3 hinges are used. In this case, the additional element is mounted just above the middle of the door to distribute the load.
Further from the lower and upper edges of the structure, 20 cm are measured, and marks are made at these places. After that, the products are applied to the end of the MDF door, aligned with their beginning and outlined along the contour. Then, using a sharp knife, cuts are made along the marked lines. The place for installing the hinge is cut out using a chisel and a carpenter's hammer. To do this, a notch is carefully made in the marked area with tools, the depth of which should be equal to the thickness of the loop, i.e. on average 3-5 mm. This is necessary so that the loop is securely fixed and does not protrude beyond the structure.
The work of installing the loop is carried out in stages. First, small notches are made around the perimeter of the structure, of which there should be several pieces. Then excess material is removed from them.Cutting is not carried out in 1 approach. It is necessary to apply a loop to the structure each time for verification, with the help of this it is easier to achieve a perfect depression. After that, markings are applied in those places where the hinges will be fixed with self-tapping screws. Then, in a similar way, the second side of the hinges is fixed on the door frame. At the end, the MDF box is laid horizontally on the floor, and the door leaf with already embedded hinges is inserted into it. Further, using a school ruler with a thickness of 3 mm, the canvas is leveled inside the box so that the same gap is obtained on all sides.
Back to the table of contents

Preparatory stage
Before starting, the parameters of the opening are carefully measured, which are determined after the old box has been completely dismantled.
Attention! The quality of the installation depends on how correctly the dimensions are taken.
Determination of geometric parameters
You will need to know:
- Depth. This parameter is equal to the wall thickness. The thickness of the box directly depends on it;
- The width on which the dimensions of the box and the canvas depend. 8-9 cm are allotted for the installation of the trap.A standard MDF box has an average thickness of 2.5 cm.Taking into account that it is mounted on both sides, it turns out 5 cm.A minimum allowance is provided to ensure free movement of the sash (about 3 mm on each side ). The width of the door leaf depends on the dimensions of the opening. A 60 cm wide door is purchased for the bathroom, and 90 cm for residential ones;
- Height. This is the distance from the floor surface to the top of the doorway. This parameter affects the dimensions of the structure (standard height 2 m) and the design features of the box itself. The box is mounted with or without a threshold. In the first case, the calculation of the dimensions is carried out by analogy with the calculation of the width of the box. In the absence of a threshold, a 3 mm gap is provided between the upper end of the sash and the frame and 1 mm from the bottom.
When determining the dimensions, first check the verticality of the walls. Given that the thickness of the wall can vary in height, measurements are taken at several points. Focusing on the dimensions obtained, they make a choice in favor of one or another door structure and suitable fittings.
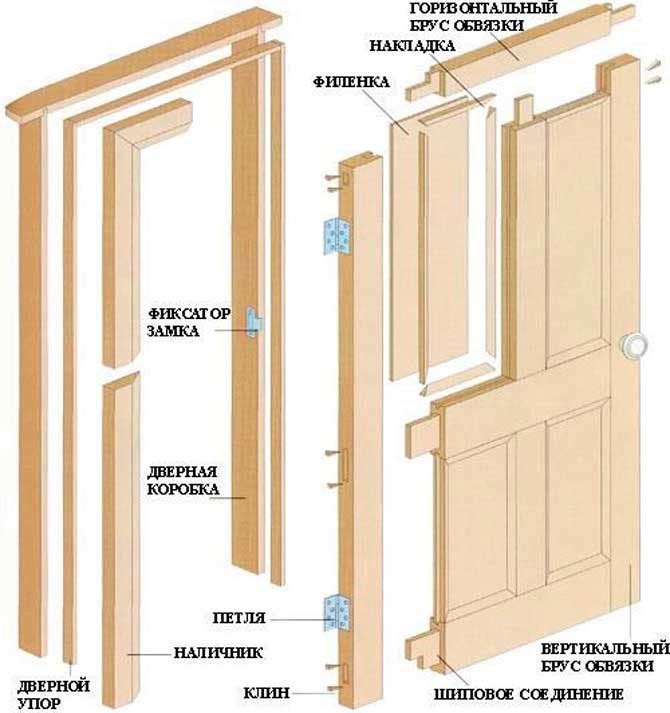
In the most general case, a MDF door frame consists of two vertical beams and at least one horizontal one. If a threshold is mounted, then two horizontal bars are provided.
The structure consists of the following elements:
- Door leaf;
- Boxes;
- Rack of the vestibule;
- Additional planks;
- Fittings.
How to take measurements
To assemble a high-quality structure, it is important to correctly measure the dimensions, otherwise, the door will not fit in the box. There are several rules for taking measurements at home:
- First of all, the doorway is measured, the external parameters of the box should exceed it by 70 mm. As for the internal parameters, a gap of 3 mm around the perimeter must be maintained between the door leaf and the edge of the frame.
- There is a separate rule for the gap located at the bottom, its height can be from 10 to 15 mm. This is necessary to ensure air circulation in the room, which is especially important for closed rooms like a bathroom or a closet. When installing sliding doors, it is necessary to take into account that profiles will be installed.
- Often, during the construction of baths, the owners do not make a large gap at the bottom of the door, this is permissible, but, in this case, it is necessary to carefully measure the threshold of the door with a level at the corners.
These parameters are mandatory, if a discrepancy is found, the doorway must be expanded or reduced. It is easier to work with artificial openings made of drywall.
How to install the box?
Before proceeding with the installation of the structure, a tool for installation is prepared:
- Roulette;
- Laser level;
- Pencil;
- Square;
- Chisel;
- Hacksaw.
In addition to the tool, materials will be required, including polyurethane foam and a bar for the box itself.
How to assemble a door frame?
To assemble the box correctly, prepare a flat horizontal surface. It is preferable to carry out the work on the floor, with a soft substrate underneath to avoid damage to the elements of the box during assembly.
When assembling an MDF structure with your own hands, first saw off the upper crossbar, depending on the selected door width. Be sure to provide an allowance for the free movement of the sash. Then all the elements of the box are cut off.
To make the design perfectly flat, all the elements from which the MDF box is made are laid out on the floor. First, the vertical elements of the sack are placed, next to them is the upper crossbar. There must be a right angle between the top bar and the vertical bars. All elements are laid on the edge. If the angle differs from the straight one in a larger or smaller direction, it will not work to install an MDF door frame in the opening.
To prevent accidental displacement of the elements relative to each other, false strips are inserted into the mounting grooves. After all the planks take their place, the door leaf is laid. So that there is a uniform gap between the frame and the door leaf, cardboard of the same thickness is placed in it.
After the box has been given the required shape, the upper crossbar is connected to the uprights. For this purpose, special self-tapping screws are used, designed for fastening wooden elements. When choosing an attachment point, you should choose points as close to the center as possible. Two screws are enough to connect two adjacent elements.
Advice! Considering that in the process of fastening individual elements, MDF can crack, pre-drilled holes of small diameter, into which the screws are then tightened.
Having assembled the U-shaped base, the width of the structure is controlled. After that, the excess material is cut off to ensure that the height of the structure to be installed is matched. When determining the height of the box, the presence or absence of a threshold is taken into account. Having cut off the vertical posts of the required height, they fix the spatial position of the box elements relative to each other.
Assembling the box
If a structure with a threshold is mounted, it is placed in the right place and fastened to the vertical posts. In the absence of a threshold, when assembling the box, a mounting plate is used, which will help temporarily fix the relative position of the elements. The box assembled in this way should ideally fit the doorway. Having securely fixed all the elements, you can install it in place.
Methods for connecting elements
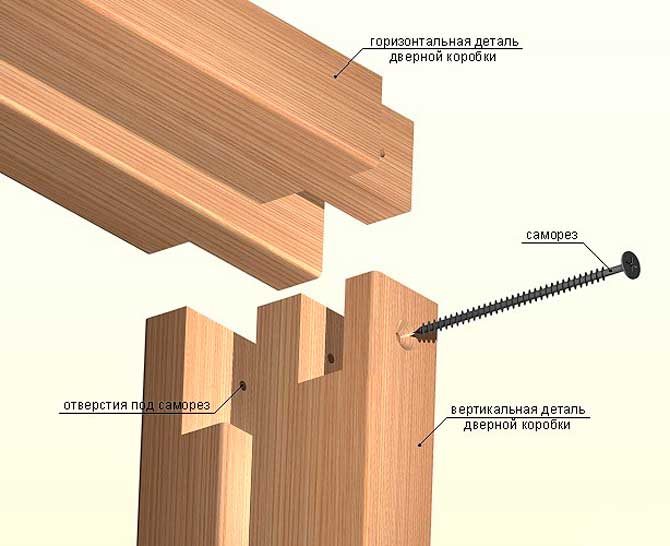
The vertical and horizontal bar are interconnected in three different ways:
- On a thorn;
- At an angle of 45 degrees;
- At right angles.
The tenon connection method is the most laborious option of all. To implement it, you will need special equipment, with the help of which a groove of the desired shape is milled. But in terms of strength characteristics, the formed connection is the most reliable. Before assembly, spikes and depressions are cut out at the ends of the mating parts, with which you can ensure their snug fit to each other.
Thorn connection
The assembly of the elements on the spike is performed using glue. To ensure rigidity and strength, fasteners are additionally used, screwing self-tapping screws into both parts at the same time. When choosing this connection method, keep in mind that after connecting the vertical and horizontal parts, their linear parameters will decrease by the thickness of the panel. This nuance is important when fitting elements.
The variant with the connection of the cross member and the vertical plank at an angle of 45 degrees is a little easier.To ensure a snug fit of the horizontal and vertical strips, at the place of their connection, a part of the material is removed at an angle of 45 degrees. For work, it is better to use a breadboard knife, which allows you to cut off even thin layers. The crossbar and the vertical stand are placed at right angles and connected with self-tapping screws. As an additional method of connection, glue is used, which makes it possible to more reliably fasten the elements of the box to each other.
45 degree joint
The option of connecting the crossbar and vertical slats at a right angle is the simplest. For those who are assembling their box for the first time, this method of connection is best suited. In this case, the horizontal bar is attached to the ends of the vertical posts with two or three through self-tapping screws, after having drilled holes.
Right angle connection
Advantages and disadvantages of a MDF door frame
MDF panel is the most practical and inexpensive option for the door construction of interior doors that are light in weight. MDF is a material made of pressed and dried wood fibers with a reliable top layer, which is processed using a special technology.
Advantages of the MDF box:
- Simple assembly, installation and assembly.
- MDF frames are smoother and more stable than wooden frames.
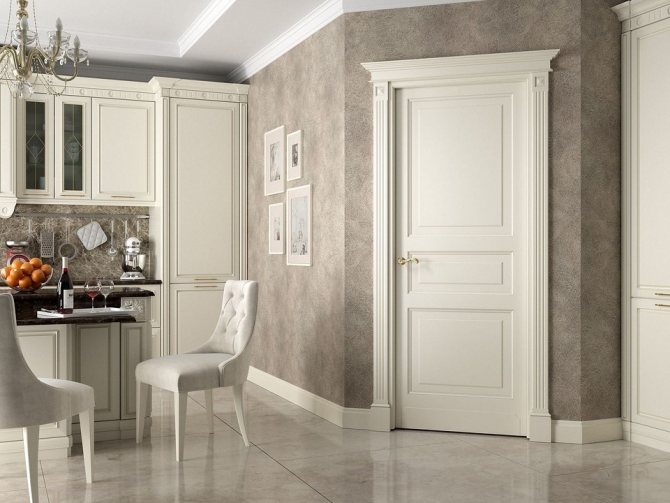
- Nice aesthetically pleasing appearance. MDF boards have a very wide palette of wood-like shades, which makes it possible to choose the right option for a harmonious combination with the color of the door.
- Assembling and installing a box made of MDF is affordable and can cost an order of magnitude cheaper than similar work for a box made of natural solid wood.
- MDF is an environmentally friendly material, since the binding element of the fibers is a natural component that is formed when wood is heated.
- Hygiene, safety at home and resistance to the appearance of microorganisms. Mold and mildew does not form on MDF products.
Disadvantages of the MDF box:
- MDF door frame installation is only suitable for light doors. Installation of massive wooden doors requires the assembly of a frame from a more durable material.
- It is not recommended to install an MDF frame in a kitchen or bathroom. MDF material can swell and deform when a large amount of moisture enters, which will cause problems with the movement of the door leaf.
- MDF does not tolerate repeated twisting of self-tapping screws in the same hole. The material has a layered structure and work with it requires special care. When screwing into the layered structure of the material, efforts must be made so as not to fold the self-tapping screw. Nails are also poorly hammered - there is a high probability of damage to the surface of the material and curvature of the nail.
- Relatively short service life - if you need to replace the door, you will need to replace and install a new door frame.
Door installation
After the box is ready, proceed with the installation. If this is a swing door, then hinges are screwed to the canvas. The insert is performed as accurately and accurately as possible, otherwise the operation of the installed door will be difficult.
Determination of the position of the loops
It is advisable to make the inset using a special tool. To do this, the folded loops are applied to the canvas, stepping back from its ends about 25 cm, and circle them along the contour. At this point, the excess material is removed to a depth sufficient for the hinges to be flush. When determining the location of the hinges, the direction of opening of the sash and the type of fittings used are taken into account. Loops are inserted into the prepared nests and screwed with self-tapping screws.
The prepared box is inserted into the doorway, while monitoring its spatial position without fail. Even a slight deviation in the vertical or horizontal plane is unacceptable.This will cause the sash to open or close spontaneously. Having decided on the position of the box, it is temporarily fixed with wooden wedges.
Fixation with polyurethane foam
Next, the canvas is hung. They control the size of the vertical and horizontal gaps between the canvas and the box. If everything is done correctly, there should be no problems when opening or closing the sash. To prevent accidental displacement of structural elements relative to each other, cardboard of the same thickness is inserted between the canvas and the box. After that, the space between the box and the wall is foamed, and when the foam dries, it is fixed with special hardware. After that, all that remains is to install the platbands.
Installation of MDF doors can be done in-house. It is enough to prepare the tool, familiarize yourself with the sequence of work, and then complete the installation in accordance with all the rules. In this case, the installed structure will turn out to be beautiful and durable.
The key question in the process of self-arrangement of a doorway is how to install a door frame with your own hands. With the right skill, this work is done fairly quickly. If you are doing this for the first time, first you need to familiarize yourself in more detail with the device of this design and its main types.
For self-assembly of the door frame, you need to know all the nuances of this process
Types of boxes
What is a door frame and why is it so important to install it correctly in the opening? The door frame is a supporting element of the door structure that holds the leaf and consists of two vertical and one horizontal strip with projections. It is fixed directly in the opening itself, adjacent to the wall. Such a structure forms a smooth portal and ensures the reliability of the door fastening. Hinges are cut into one part of the frame, onto which the canvas is hung. On the opposite side, a hole for the lock is drilled and the counter plate is fixed.
Since the position of the curtain depends on this element, correctly placing the door with the frame is a priority during installation. In the presence of the slightest skew, the parts will be overwritten and prevent the door from moving freely. If you do not calculate the weight of the canvas in relation to the strength of the box, more serious problems may arise.
What types of door frames are there? A classification can be made according to several criteria. For example, assembly might be the determining factor. In this case, the most popular boxes are:
- Straight
- the elements are connected perpendicularly. The safest way is thorn-groove. - Diagonal
- the edges of the planks are cut at an angle of 45 degrees.
Two types of connection of door frame parts
Also, the types of door frames are distinguished by the material of manufacture:
- wood,
- plastic,
- metal.
In apartments, metal structures are mainly used for entrance doors, and metal-plastic boxes are used for balcony systems.
Methods for connecting load-bearing elements
- Direct docking - the bars are placed at right angles. The edge of one is abutted against the butt of the other. To connect the planks with a complex relief, you need to cut off the protruding parts on the sidewall, to which the butt is applied.
- Diagonal docking - The edges are trimmed at a 45 degree angle using a miter saw or a miter saw. When they are put together, they form a right angle.
Methods for fixing elements
- Screws - you should use products with a galvanized surface that protects the metal from corrosion.
- Tongue-groove connection - this option is only suitable for installing wooden blanks, as well as plywood and MDF products. The method provides a rigid docking and is the most reliable. Only an experienced craftsman can make a thorn and cut a groove that matches it in size.
Preparatory work
Before installing a new door frame, it is necessary to check that all the necessary tools and auxiliary materials are present. Depending on the material of the product, their list may vary. In most cases, do-it-yourself door frame installation is done using the following tools:
- roulette,
- corner,
- pencil,
- level and plumb line,
- wooden wedges,
- auxiliary bars,
- spacers,
- nails, screws and screws,
- screwdriver,
- jigsaw, hacksaw or file,
- polyurethane foam,
- chisel,
- miter box.
The necessary set of tools for installing the door frame
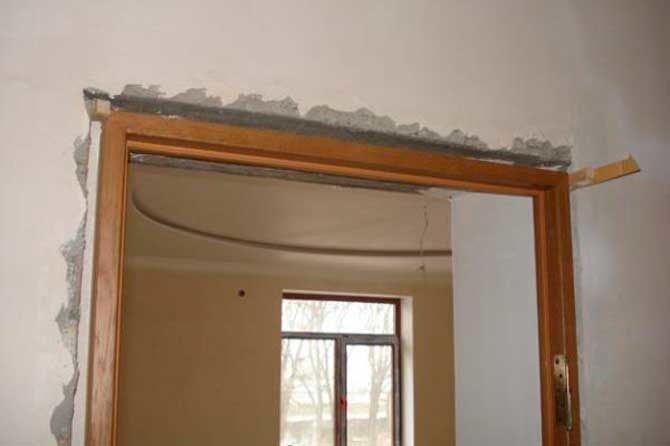
Do-it-yourself installation of a new door frame begins with surface preparation. First you need to free the opening from the old door and frame. In case of significant irregularities or deviations from the dimensions of the new box, the walls must be adjusted. For this, plaster is used, and the protrusions are cut off with a grinder.
In order to correctly install a new box, it is recommended to make it for the specific dimensions of a previously prepared opening.
Before you start assembling the door with the frame, clear the floor surface, since the preliminary assembly must be done in a horizontal plane. Installation takes place in several stages. Let's take a look at each step in order.
Assembly
At the second stage, you need to correctly adjust the dimensions of the parts. To do this, you need to measure the height of each side and the width of the opening. For a visual assessment of the situation, you can put the planks against the wall and mark the places where you need to shorten them.
If the installation of the box is carried out by means of a diagonal connection, you need to cut the edges of the strips. Since it is quite difficult to correctly determine the degree and saw down the door frame, be sure to use a miter box, then the assembly will not be difficult.
Before putting the door frame into the opening, it is necessary to check its dimensions with the dimensions of the canvas. To do this, you need to fix all the parts on the floor.
Since the door frame can be assembled as correctly as possible only in a horizontal position, lay the slats and canvas on the floor. The assembly begins with evaluating the size match. To do this, lay out the details around the perimeter of the door. If everything fits together, you can start bonding the elements.
Door frame assembly requires precision and care
How to assemble the door frame depends on the type of connection. If a straight line is used, you need to dock the protrusions with the grooves. With a simple diagonal, the planks are connected using nails. If you know how to correctly and quickly assemble a door frame with your own hands, there should be no problems with the rest of the work. Check the correctness of the dimensions and the presence of a small clearance for the free movement of the blade. Only then can the installation of the box itself be carried out directly.
Inner frame materials
- Natural solid wood - its properties depend on the quality of the wood. In the absence of defects, it has high strength and durability. On the surface there should be no resin smudges, chips, cracks, mold spots, knots falling out. Products change shape and size with changes in humidity and temperature. In a residential area, temperature fluctuations are insignificant. To protect the workpiece from moisture, it is impregnated with antiseptics and covered with a layer of varnish.
- MDF panels - do not deform and do not dry out over time, provided that their ends are hermetically sealed. The external groan differs little from the natural massif. Sidewalls without a decorative layer must be hidden in the seams or under the platbands.
- Plastic is not afraid of water and retains its size and shape in any conditions. It can melt at temperatures from 70 degrees, so it is better to keep it at a great distance from the stove and heating appliances.
- Steel - used in private construction or with additional reinforcement of the opening.The metal profile has high strength, but quickly rusts. To protect against corrosion, use a primer and paint. They only delay rusting for a few years. Moreover, they are easily damaged. The most reliable means is galvanizing and copper plating in the factory. The frame is welded or assembled with screws. The use of a welding machine in an apartment is highly undesirable.
Installation
After preliminary control, you can put the box in place. Installation is carried out with bolts and foam.
Wedges are used to adjust the height of the door frame
How to properly install a new door frame with your own hands:
- So that in the future you can quickly it is recommended to cut the hinges into the frame in advance.
- Then you need to carefully put the U-shaped structure into the opening.
- Use bolts and wooden blocks to secure its position.
- Insert pegs into the gap between the wall and the frame and adjust the level.
- After the position has been fixed, you can foam the gaps between the wall and the planks. In this case, it is necessary to secure the structure with spacers, since the elements may be displaced. Simply foaming a door frame is not allowed by technology.
- When dry, remove the spacers.
The main stages of door frame installation
Prefabricated frame elements
The frame consists of four main parts. They are beams with an L-shaped section, laid along the perimeter of the opening and fixed in it with screws. The flap fits into the inner corner of the letter "G". Parts differ in shape, size and purpose.
- Threshold - it is installed flush with the floor or made voluminous. In the first case, the canvas does not fit tightly to the bottom. In the second, the connection is more tight, especially when using seals. There are U-shaped designs without a threshold.
- Hinged racks - they hold the sash.
- Mock racks - they stand opposite the hinged ones. Models are available with a smooth surface and a hole for the lock cylinder.
- Upper support.
For normal closing and opening, 3 mm gaps are left on each side. If there is no threshold, 10-15 mm are left below the floor. Inside, under the outer cladding, you can put a layer of hydro and sound insulation.
When assembling the door frame of the interior door, the top and sides are closed with platbands - decorative strips. In the case when there is free space between the platband and the frame, it is filled with an additional board - an additional decorative strip inside the opening. There are telescopic extensions that can be adjusted to any width.
Opening without box
Installation of the box is not necessary in every case. For example, you can do without it if you install a sliding system or an accordion door. But how do you put a door without a box? All parts are attached directly to the wall in the opening or above it, depending on the mechanism used.
When installing the door frame, special mounting spacers are used
To make the passage look neat, it is necessary to level its surface in advance. Usually, plaster is used for this or combined with drywall sheets. Instead of a box, you can install decorative panels. They look almost the same, and the installation method is practically the same. Another option is to mount the lamellas on a rack frame.
Which finishing method to choose is up to you. If you decide to follow the traditional approach and install a swing door with a frame, follow the technology carefully to avoid significant flaws.