You can install windows in a sandwich panel from a thermoprofile yourself if you have confidence and knowledge in the construction business. Unprofessional hands and lack of skill can undermine all efforts to create a comfortable environment.
At the same time, the installation and installation of window blocks in a house built from sandwich panels is not difficult compared to brick or concrete structures. Warming of window slopes in a low-rise building with ready-made insulating materials can be performed by anyone who has ever held a construction tool in his hands.
How to install sandwich panels for windows - the secrets of warm and beautiful slopes
Window sandwich panels are a special three-layer material for mounting slopes. With their help, you can not only beautifully design a window opening, but also make it as warm and dry as possible, the only thing for this is to follow a certain installation technology. Therefore, below I will tell you in detail how to make window slopes from sandwich panels with your own hands.
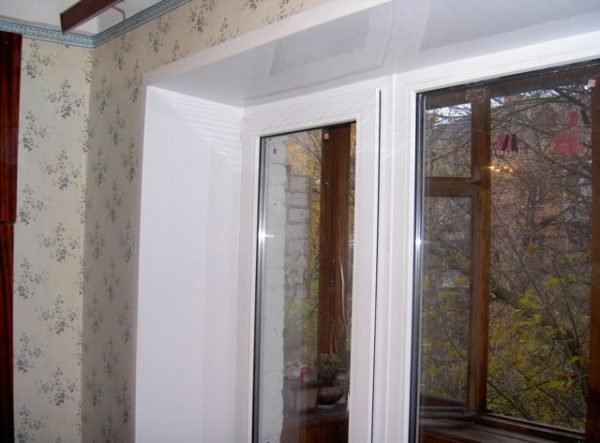
Sandwich panel slopes
Helpful hints
When making slopes from sandwich panels, you must adhere to the following recommendations:
- For hot climates, it is better to choose a material with a renolith coating. Such a film will protect the slopes from high temperatures and deformation.
- When working, it is important to take into account the coefficient of linear expansion.
- To prevent cracking of the top layer of the panels during cutting, it is worth using a circular saw with a small tooth pitch.
- Do not cut parts at a low room temperature (below +5). Such conditions lead to brittleness and cracking of the material.
- When choosing a starting profile, it is necessary to take into account the recommendations of the panel manufacturer.
- Before installation, wooden slats must be dried and treated with antiseptic impregnation.
- The joint sealant must match the color of the panels exactly. Once dry, the difference in shade will be striking.
Finishing window slopes with sandwich panels is an easy option to complete the installation of new windows. This material is characterized by high performance, ease of installation and ease of maintenance.
A few words about sandwich panels
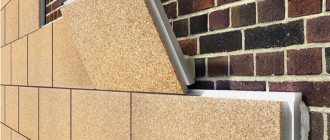
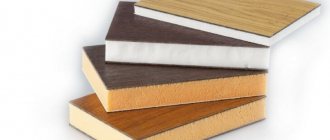
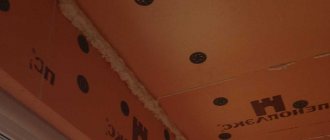
Sandwich panels for window slopes consist of two plastic sheets, between which the insulation is located. The latter can be used:
- polyurethane foam;
- extruded polystyrene foam;
- free foam plastic.
Due to the presence of insulation, the amount of heat loss through the window opening is reduced. As for the plastic itself, it comes in a variety of colors. This allows panels to be matched to any window.
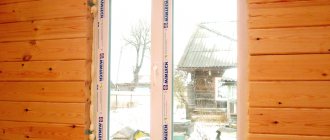
Many people believe that a sandwich panel is intended for plastic windows, however, they can also be used for wooden double-glazed windows as well. Thanks to this finish, they will not freeze.
Another advantage of this solution is that the windows in the sandwich panels do not fog up (provided that the humidity inside the room is normal). In addition, the material is easy to assemble, as you can see below, and also does not require additional finishing, which is also its big plus.
Thus, finishing with sandwich window panels is one of the best solutions.
I note that there are also metal sandwich panels, which are often used for the construction of all kinds of cabins, hangars, etc.Installation of PVC windows in a sandwich panel is fraught with a number of difficulties.
Most often, for this, the opening is sheathed with a profile or board (if the room is heated), and only after that the windows are installed in the sandwich panel. However, this is already a topic for another article, which we will talk about next time.
To simplify the installation of windows in a sandwich panel, use special fasteners
After the installation of the window into a sandwich panel is completed, the foamed area from the outside must be immediately hidden by the platbands, otherwise the foam will quickly turn into dust under the influence of sunlight.
Sandwich - on wooden and plastic windows
The panels are very resistant to ultraviolet radiation, which is important for outdoor decor. To decorate facades, manufacturers today offer many options for panels, different in texture and color, sandwich panels are widely used for equipping temporary structures, billboards.
Another important advantage is compatibility with PVC windows. The window opening will look complete and noble. External slopes will last for a very long time, the material without consequences for the appearance and functionality tolerates the action of bad weather, harmful chemicals. Operation is greatly simplified by easy maintenance, it is enough to wipe the panels with soap and water and they will be like new.
Remember, if you do not make the external decoration of the facade, troubles may arise in the form of condensation in the room, a draft. Fungus may appear in the rooms, which is very difficult to remove, so it is not worth delaying the finishing. Window configurations can be absolutely any, the panels are suitable for balconies, loggias, open verandas, cafes, restaurants, hotels.
Installation technology
The installation of slopes consists of several stages:
The main stages of installation
It should be noted that the finishing of the slopes of plastic windows with sandwich panels and wood panels is carried out in the same way. Next, I will tell you in detail. how the work is carried out at each of these stages.
An example of aligning a window opening with wooden slats
Surface preparation
Before. how to install sandwich panels on windows, it is imperative to prepare the surface. This is done as follows:
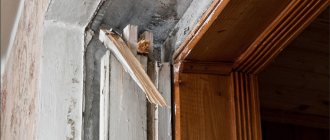
- align the window opening first. To do this, remove old pieces of plaster and other irregularities. In some cases, to level the opening, wooden slats are installed around the perimeter using self-tapping screws or even a dowel of nails. In the process of installing the slats, be sure to use the building level so that the window opening turns out to be even;
- you also need to trim the foam between the glass unit and the window opening, which can interfere with further work;
- then the opening must be cleaned of dust. To do this, vacuum the surface or wipe with a damp cloth.
Now that the opening is prepared, you can proceed directly to the installation.
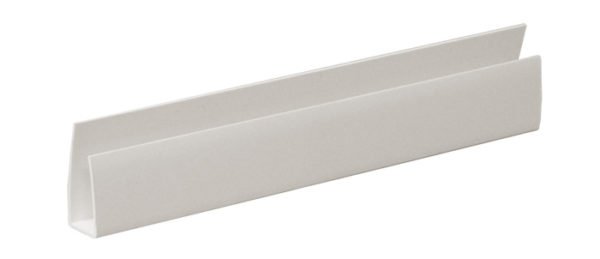
Installation of the starter profile
Installation of window slopes from sandwich panels involves the installation of a U-shaped profile along the perimeter of the window. This work is carried out in the following sequence:
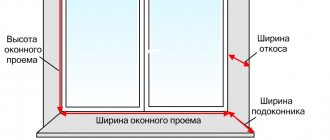
- first of all, measure the window frame around the perimeter;
- then cut the profile into strips of the required length. To do this, you can use a mounting knife or special scissors;
- Now using a building level, mark the location of the profile on the window frame... This is necessary so that the vertical guides are located strictly vertically, and the horizontal, respectively, horizontally;

An example of fastening a starting profile
- now attach the guides to the window frame along the markings using self-tapping screws. The latter should be spaced in increments of about 20 centimeters.
This completes the installation of the guides.
Cutting
Cutting is a very important stage, so the work must be done carefully and carefully.... The instruction looks like this:
- first of all, measure the outer sides of the window opening;
- after that, measure the depth of the opening on each side in several places;

- now, according to the data obtained, it is necessary to apply a marking on the panels, taking into account the fact that their inner ends, i.e. adjacent to the glass unit must correspond to the length of the guides. To simplify this task, you can use a special goniometer (small), which will allow you to measure the angles of the opening, so that you can then use it as a template for marking;
- now, according to the marking, you need to cut the blanks. To do this, you can use a jigsaw, an assembly knife, or even a hacksaw for metal.
There is a substandard material on the market that quickly turns yellow in the sun and even cracks. Therefore, it is advisable to make a purchase in a large hardware store. However, keep in mind that the price of the panel starts from
600 rubles per m2.
Related article: How to determine how many chamber plastic windows
When all three blanks are ready, you can start installing them.
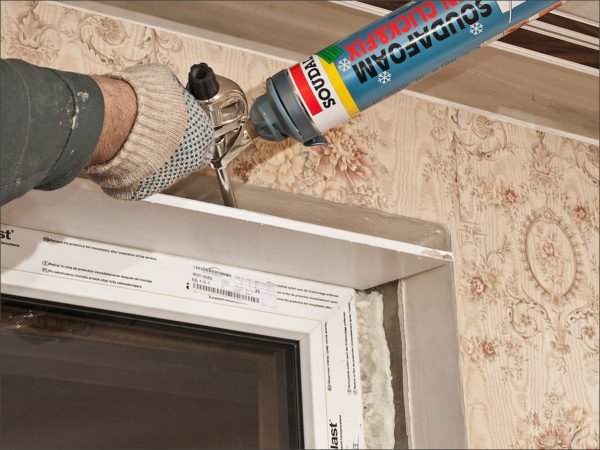
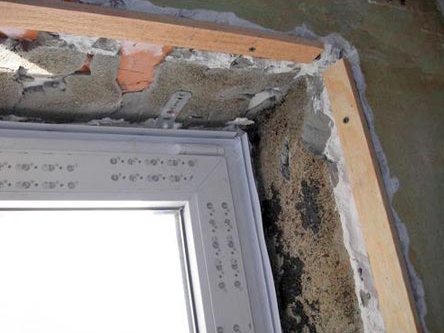
Foaming the space between the workpiece and the opening
Installation of slopes
At the final stage, sandwich panel slopes are installed on the windows. This is done as follows:
- start the installation with the installation of the upper slope. To do this, insert the workpiece into the guide;
- now fill the space between the panel and the window opening with foam, as shown in the photo above;
- then you need to fix the part in a horizontal position. To do this, use masking tape, which should be glued onto it with strips with a curl on the walls;
- further, vertical slopes are installed according to the same scheme;
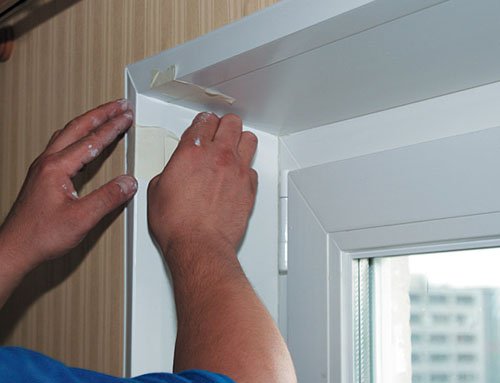
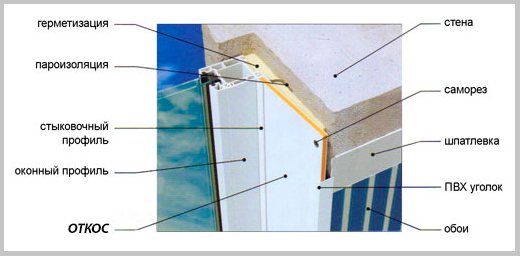
In the photo - gluing corners
- then PVC corners should be installed along the perimeter of the window opening, which will give the slopes a complete look and hide the cracks.
Material thickness ranges from 6 to 32 mm. The thicker they are, the correspondingly higher their thermal insulation qualities.
It should be noted that there is another way to mount slopes. It consists in the use of an F-shaped profile, which is attached to the walls along the perimeter of the opening.... In this case, the slope is inserted between the two tails of the profile, otherwise the work is carried out according to the scheme described above.
Here, perhaps, and all the information regarding the installation of slopes, which I wanted to share with you.
How to cut to the correct size
Starting repair work, every builder is faced with the main task - the correct measurement measures. Indeed, the integrity of the structure and its attractive appearance will depend on the quality of the selected dimensions and finished cut sheets. Therefore, the preparation of SIP plates should be done as follows:
- First you need to prepare the surface for the installation of slopes, level the walls, cut off excess assembly materials after installing the window or doors;
- Then the stage of measurements and data transfer to the layers of construction products is carried out.
- It is necessary to carry out measuring work in stages, first at the top, from corner to corner and depth, then with the help of devices for cutting SIP panels (a jigsaw is quite suitable), cut off the desired size of the plate.
- Using the building level, it is necessary to attach the finished sandwich panel to the future slope and see if the product fits snugly against the wall, at the right angle or not.
- If everything is done correctly, the same manipulations are made with the side walls and the bottom (if necessary) of the opening.
- When transferring the data of the width of the slope to a multi-layer building sheet, 10mm must be added to this indicator. This is necessary for high-quality pairing of the product with the window frame.
Important to remember! In order for the design of the slopes to have a beautiful integral appearance, the plates of sandwich panels of strictly measured width should be cut so that the plates do not protrude beyond the edges of the walls. In this case, after finishing, the wall will smoothly transition into the constructed slope. Also, when carrying out measuring measures, the possible unevenness of the walls should be taken into account, therefore, measurements must be taken from the top, middle and bottom of the wall (or, respectively, in several sections of the upper and lower slats of the window and doorway).
Installation of sandwich panels
Hello, friends, in the article sandwich panel installation, you will learn how and on what sandwich panels are mounted, what tools are used, installation rules, my story is how we mounted panels for the first time at a construction site. I will provide a technological album for download on the installation of sandwich panels with assemblies of windows, doors, a ridge on the roof and much more.
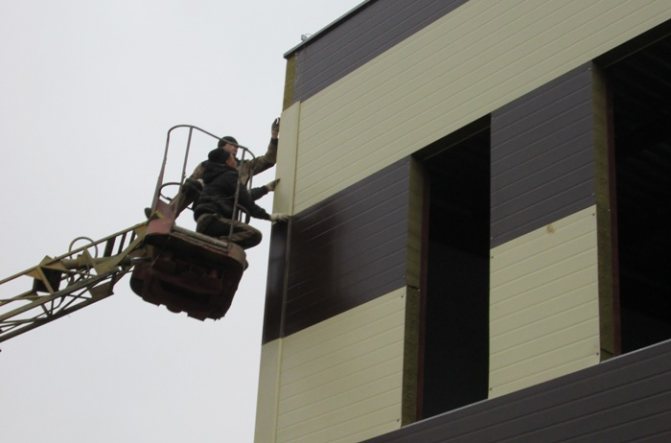
installation of sandwich panels
In the article, the installation of metal structures, I promised that I would write an article on this topic and provide an album for download at the panel mounting nodes.
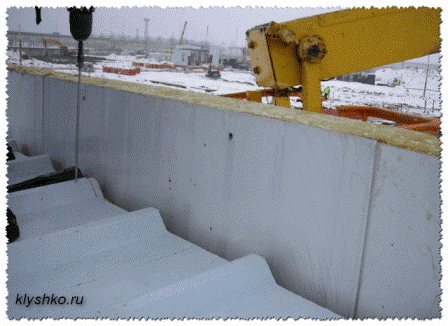
Work on the installation of sandwich panels begins, after the installation of the building's metal structures, a plinth is laid out along the entire perimeter, complete with panels, fasteners (delivery and acceptance to the construction site) for the entire building. What the base should be and how it is made can be read in the article "Base device".
Work on the installation of metal structures is completed by installing an anti-corrosion coating (cleaning and painting) of all welding joints and checking the geometric dimensions, verticality, flatness of the frame. The device of the basement ends with the laying of waterproofing on it.
The supply of sandwich panels begins long before their installation, during the installation of metal structures and the installation of the basement. The main thing is to prepare a storage place; on an uneven platform, the panels sag under their weight and become unusable.
The panels are ordered at the factory based on the drawings of the architectural part of the AR according to the layout, which indicates the dimensions, location of each panel and their color. Panels are delivered to the construction site on pallets with insert sheets, which indicate the object, volume in square meters, type (wall or roof) and information about the manufacturers.
Layout drawing of sandwich panels
Start of sandwich panel installation.
When everything is ready and completed, the order of installation will be determined. Depending on the size of the building, the panels can be mounted horizontally or vertically.
Sandwich panel tape
Before installing the panel on the columns and crossbars, in the places of contact, special self-adhesive tapes are glued. The belts reduce vibration and serve as a tight fit between the panels and the building structure.
The panels are fixed with special self-tapping screws made of carbon or stainless steel with a seal, with a drill for metal, if attached to metal structures.
If the building frame is made of wood, then the panel is pre-drilled and fastened with self-tapping screws on wood. The panels and concrete structures are fixed to the concrete with special dowels. The length of the self-tapping screws is selected based on the thickness of the panels.
If the panel is 50mm thick, use a 75mm screw, or a 200mm panel, then use a 240mm screw.
Related article: The height of the lintel above the window
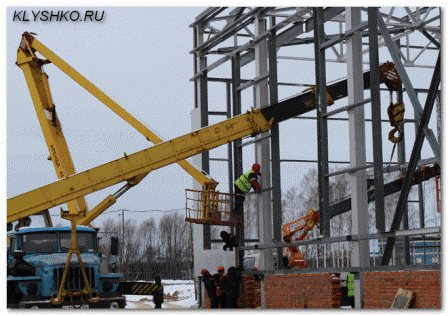
Installation of sandwich panels starts from the corners of the building. The panels are mounted using special clamping devices. The clamp is a special screw grip with rubberized jaws, with loops for lifting by a crane.
Traverses with a vacuum gripper are also used to lift the panels. If the panel is not large and not heavy, it is allowed to lift and fix it by hand. The panels are mounted taking into account all technological openings specified in the project.
Installation of roofing sandwich panels
Holes for windows, doors, engineering networks are marked and cut on the ground. In this case, the proverb "measure seven times and cut once" is very handy, panels cost from 1,500 rubles per 1 m2 and if they were not cut off correctly, then in most cases you cannot put it anywhere.
Holes are marked on the sandwich on both sides and cut off with an electric jigsaw with metal saws. Cutting off with a grinder, with a cutting wheel for metal, the edges on the panel are torn. Screwdrivers are also used to fasten panels with screws to the building structure. Of the technology, a crane and a telescopic tower are used, which work in pairs.
Select the node of interest from the quick menu:
1.1. Base / plinth device
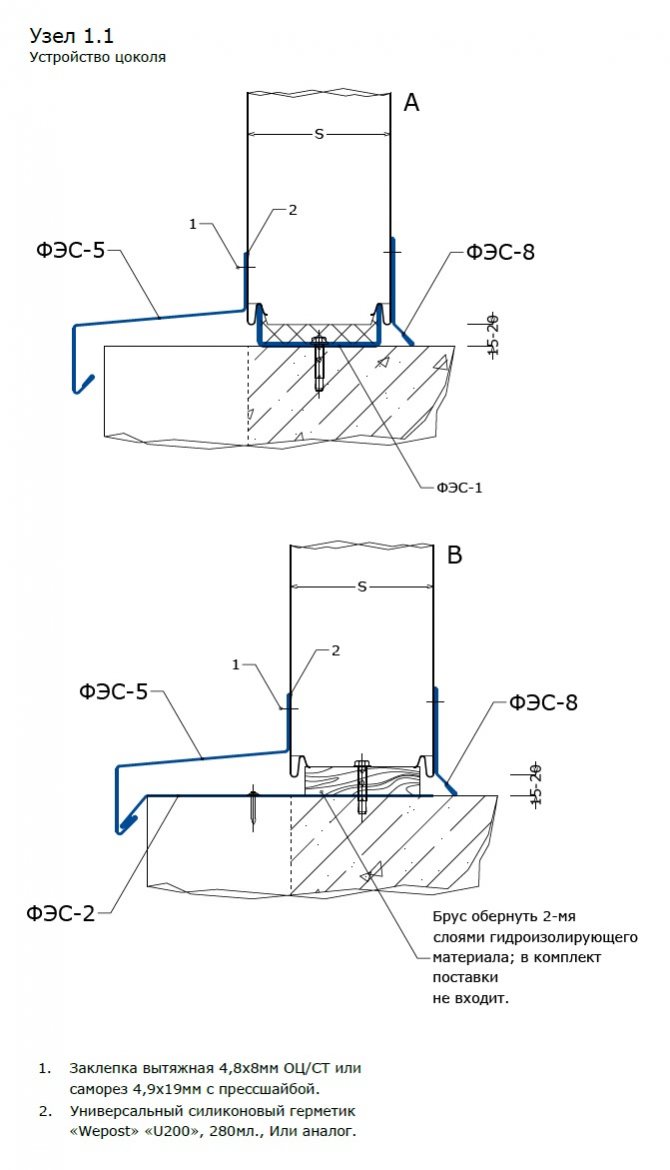
1.2. Base / plinth device
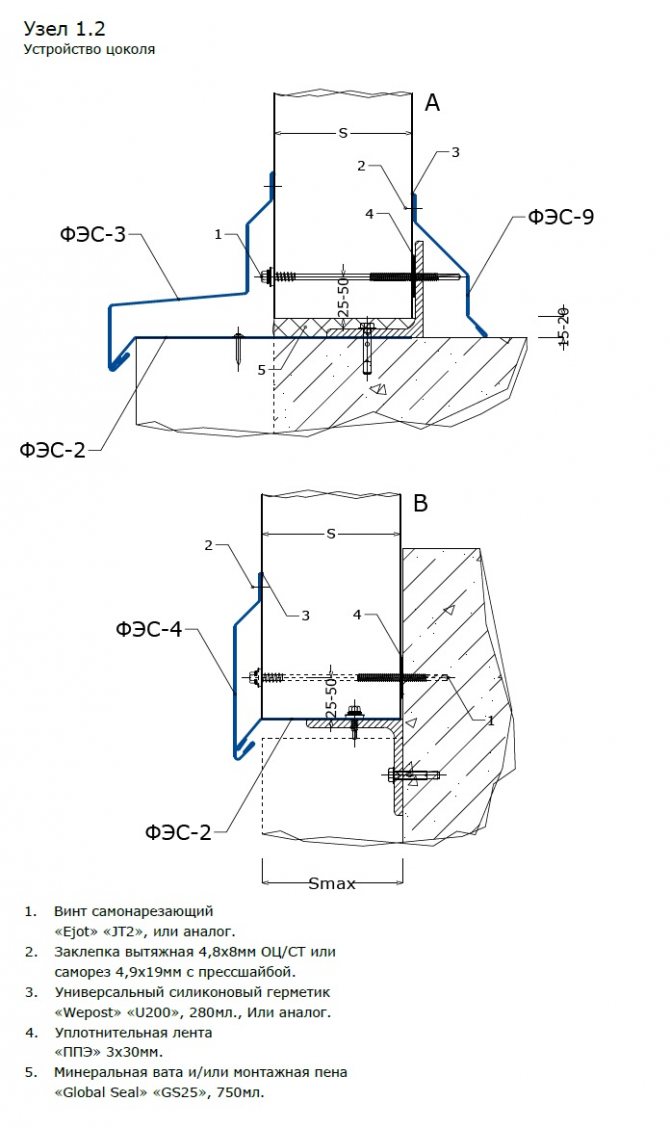
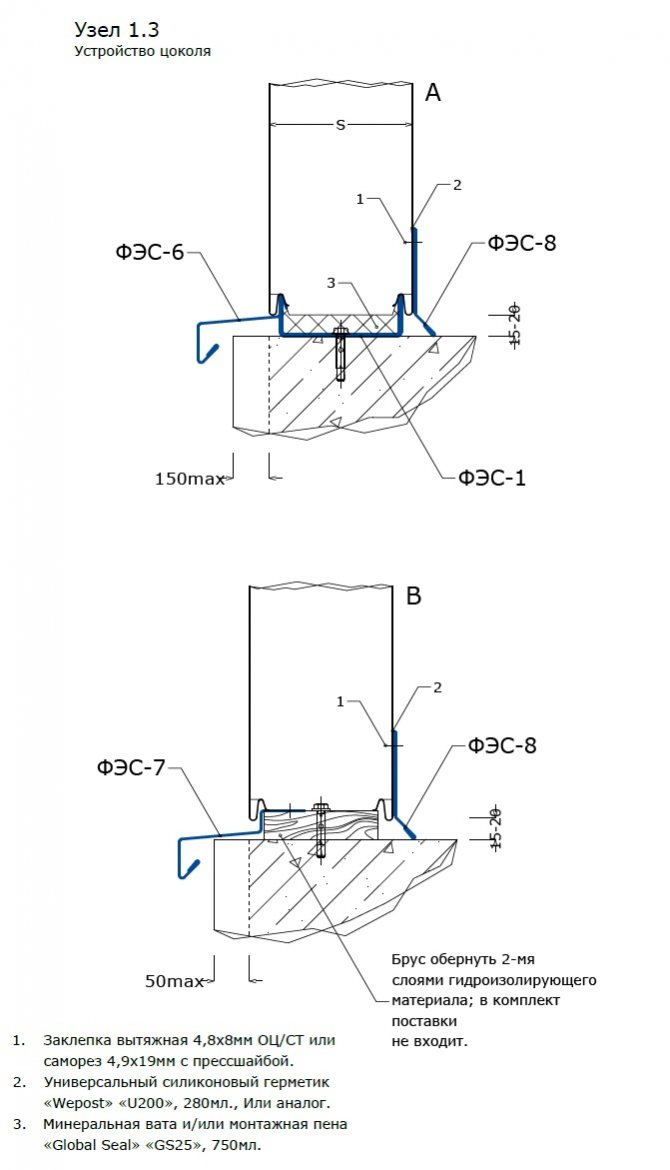
1.3. Base / plinth device
1.4. Base / plinth device

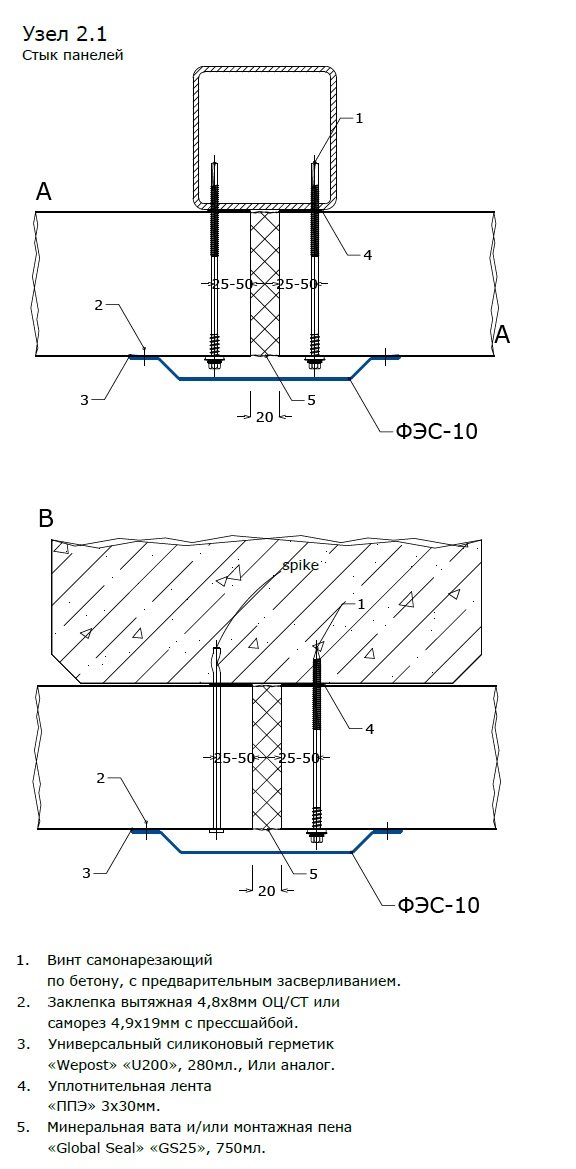
2.1. Panel joint, horizontal installation (on a metal stand and on a reinforced concrete column)
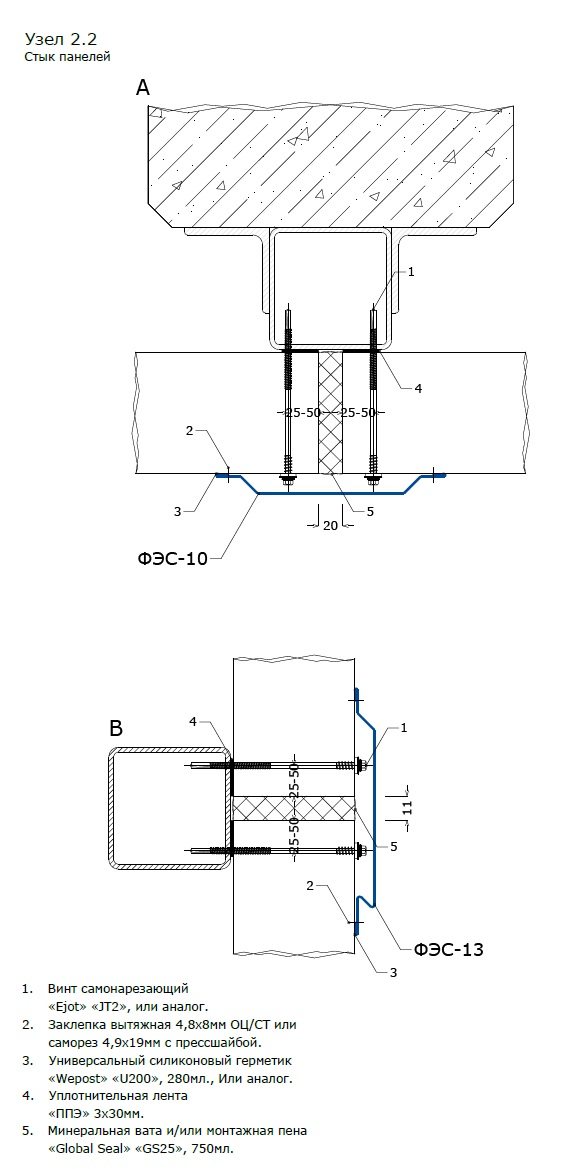
2.2. Panel joint (on a reinforced concrete column through half-timbered timber and with vertical installation)
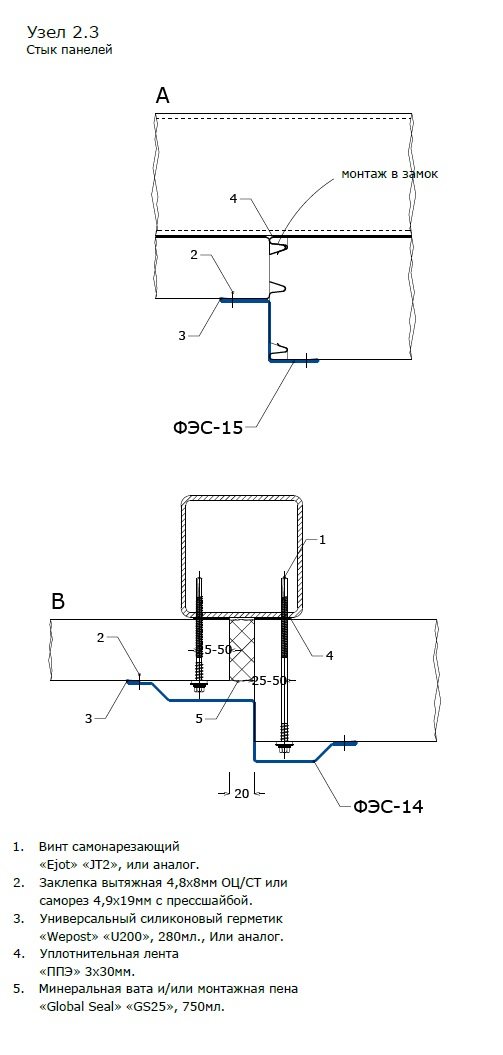
2.3. Panel joint (different thickness)
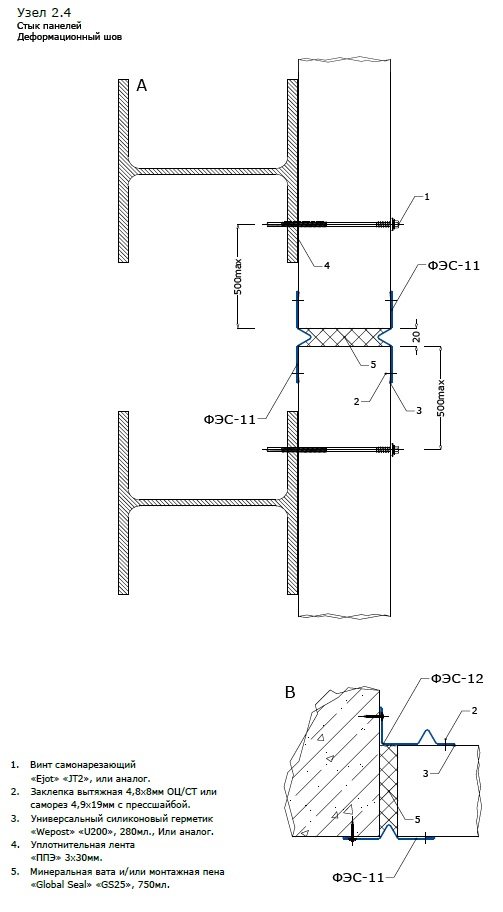
2.4. Panel joint (expansion joint)
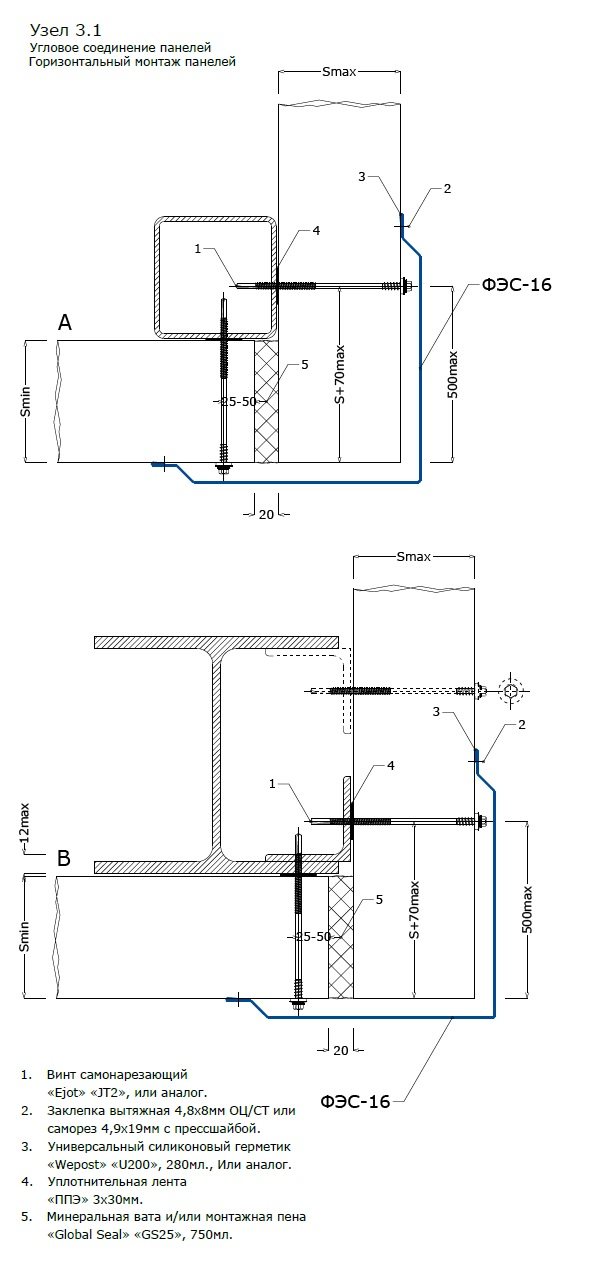
3.1. Corner joint of panels (outer corner, horizontal installation)
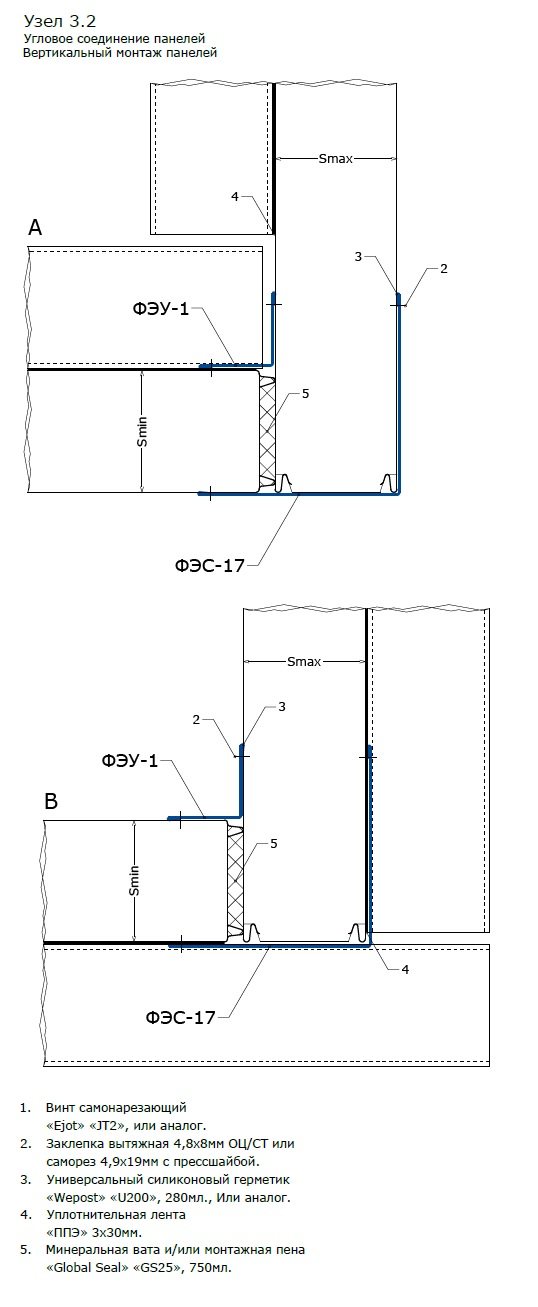
3.2. Corner joint of panels (outer corner, vertical installation)
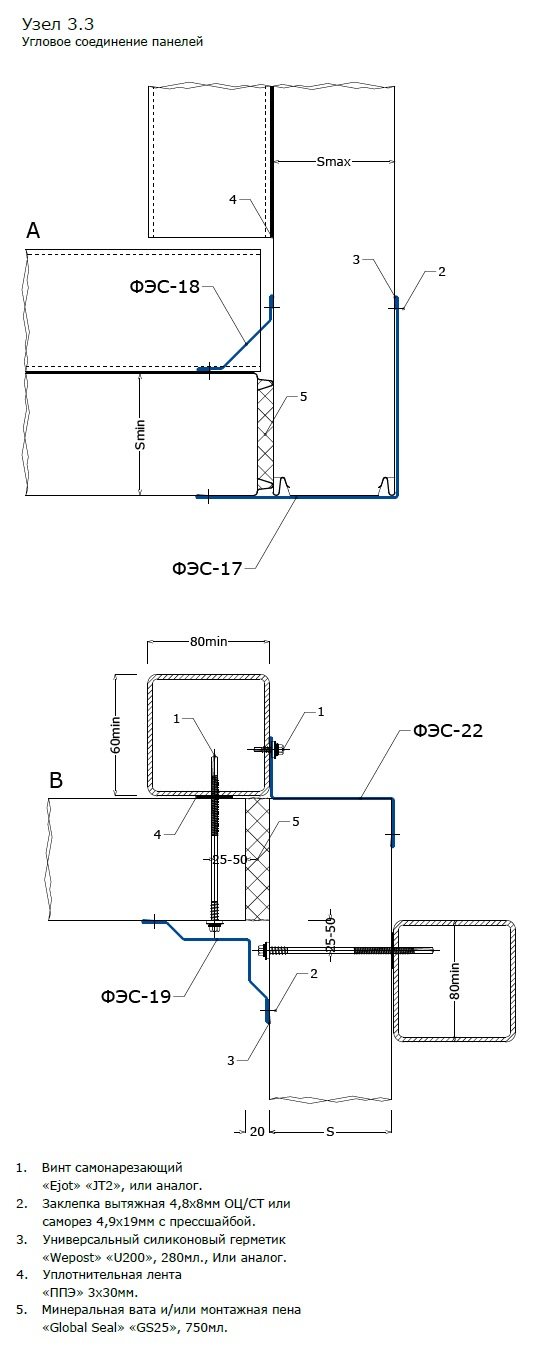
3.3. Corner joint of panels (outer corner, vertical installation)
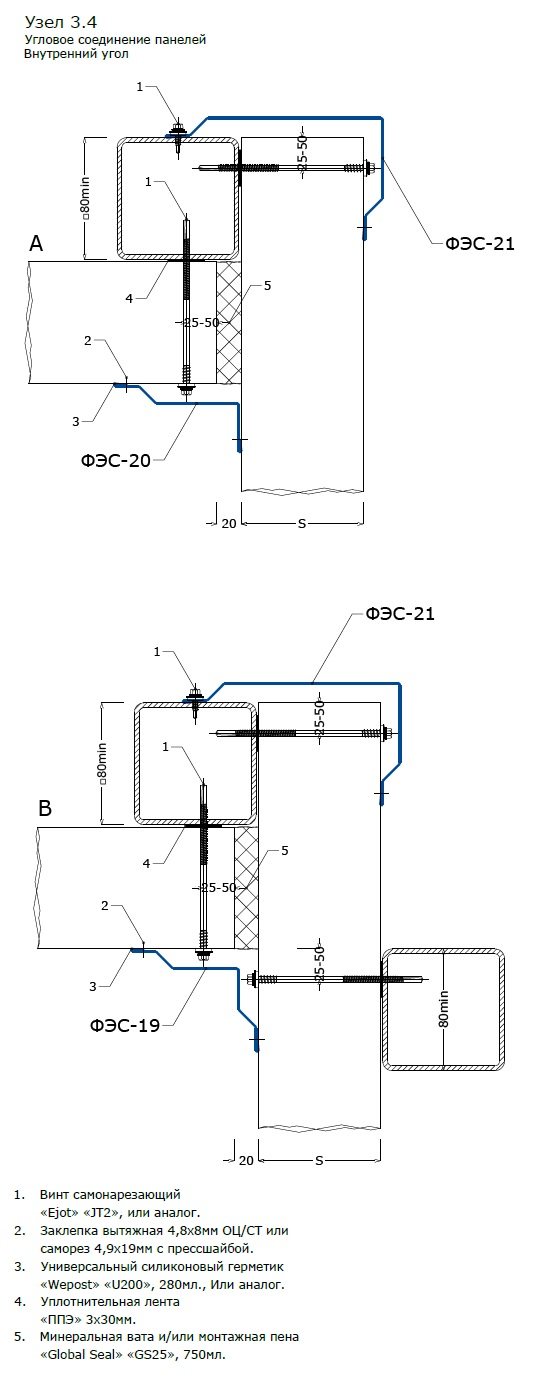
3.4. Corner joint of panels (inner corner)
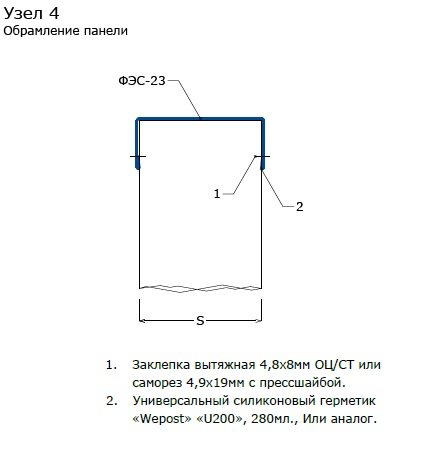
4. Panel framing
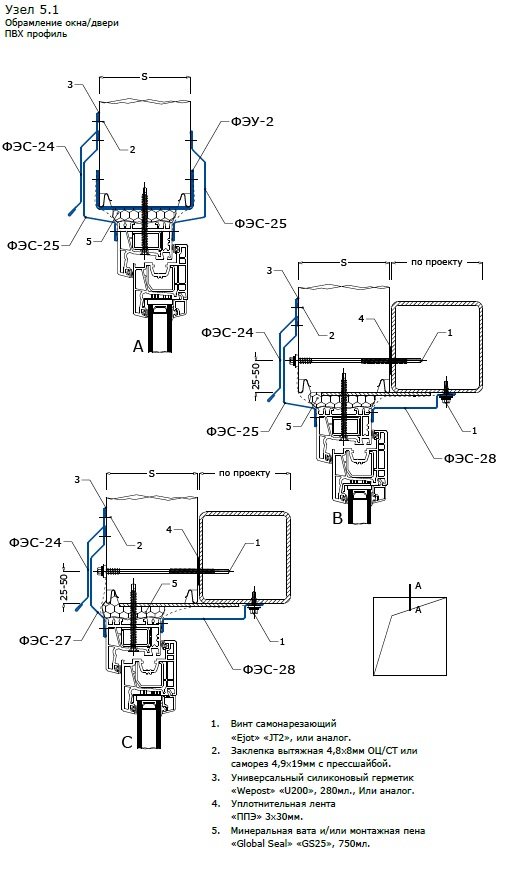
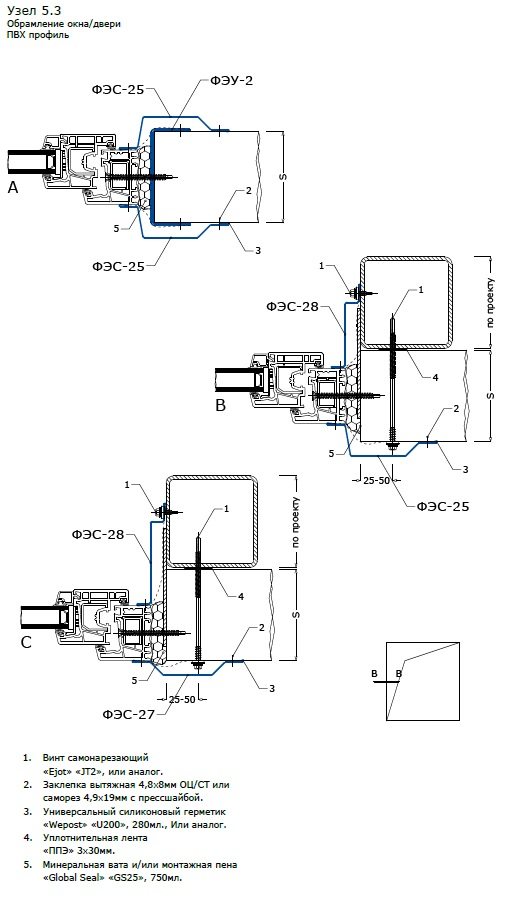
5.1. Window / door framing (top section)
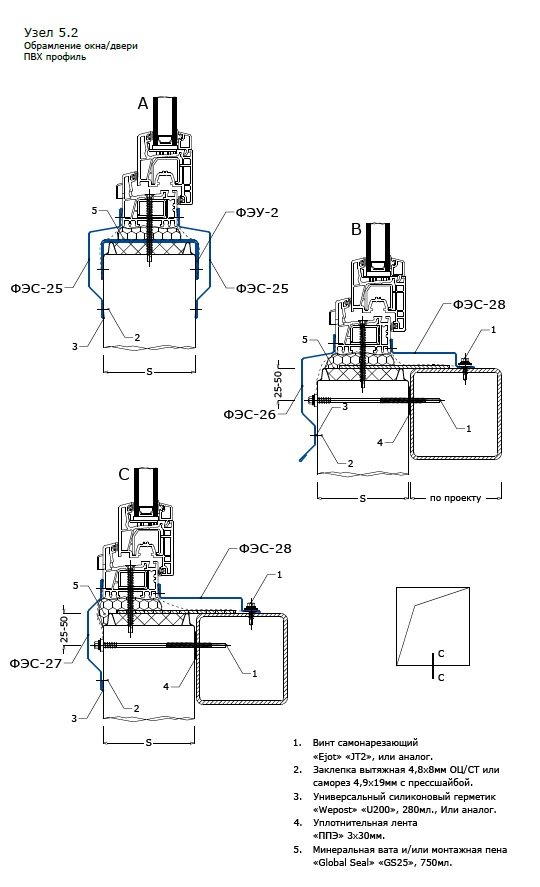
5.2. Window frame (bottom section)
5.3. Window / door framing (side section)
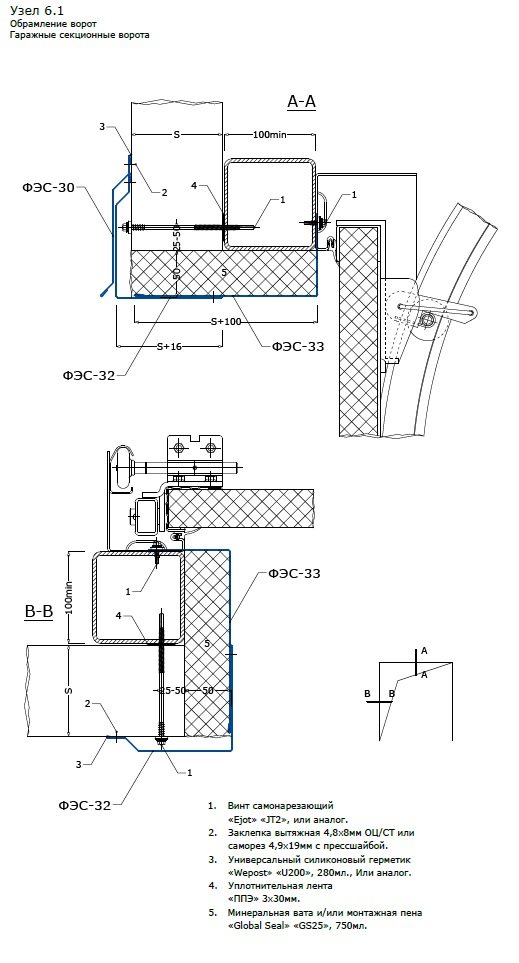
6.1. Framing the door opening (sectional doors)
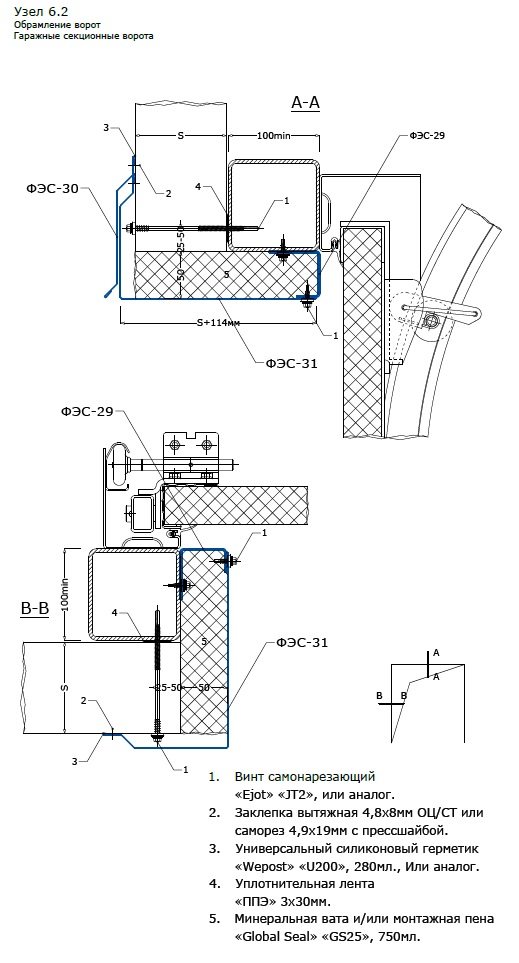
6.2. Framing the door opening (sectional doors)
6.3. Framing the gate opening (swing gates)

Roofing sandwich panel assemblies.
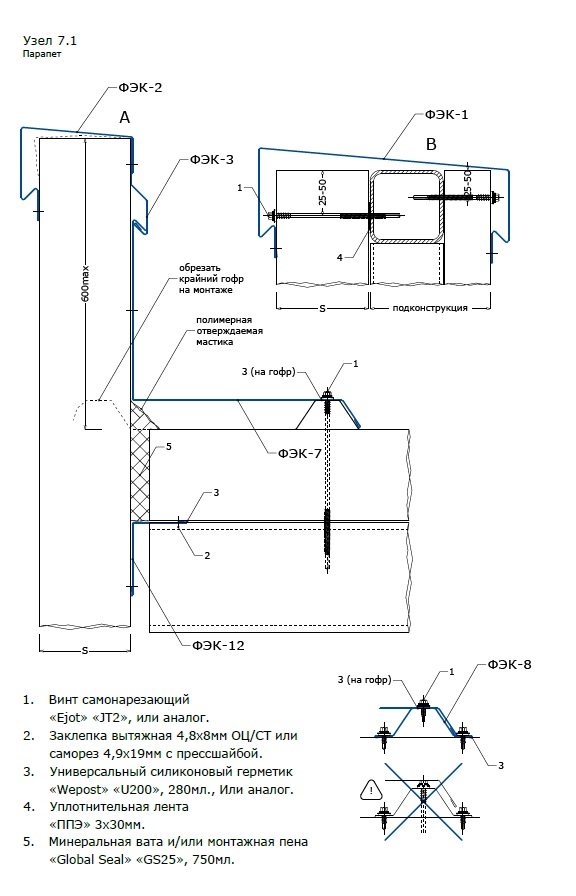
7.1. Parapet (adjacent to wall sandwich panels)
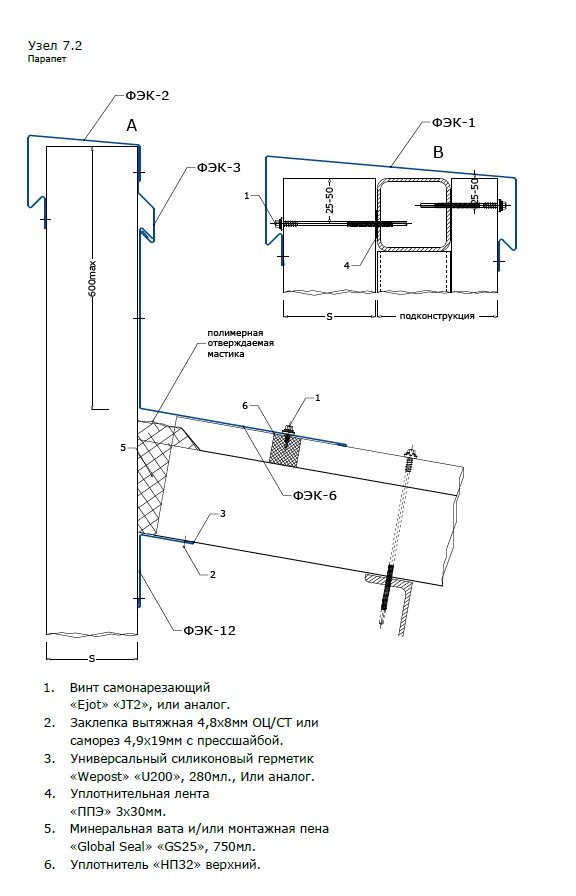
7.2. Parapet (ridge junction of roofing sandwich panels to wall sandwich panels)
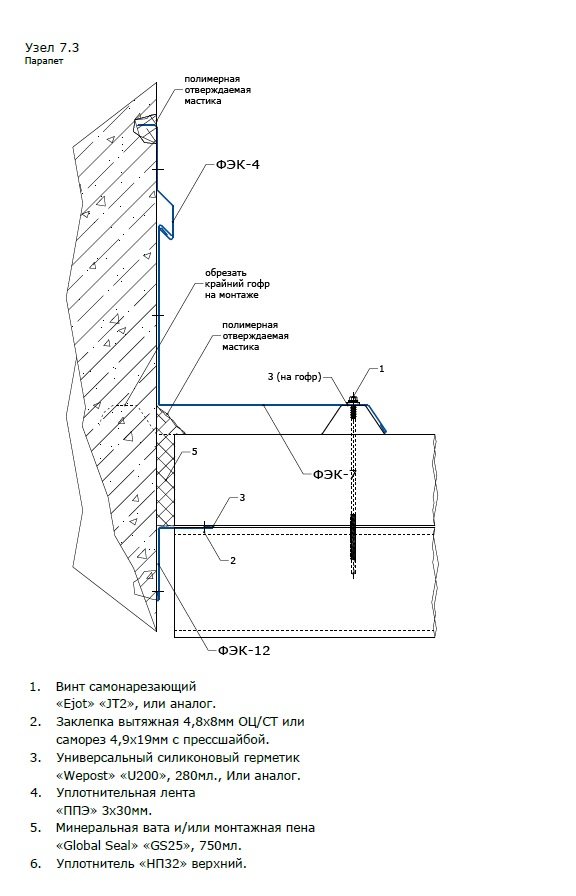
7.3. Parapet (end longitudinal abutment of roofing sandwich panels to an existing wall)
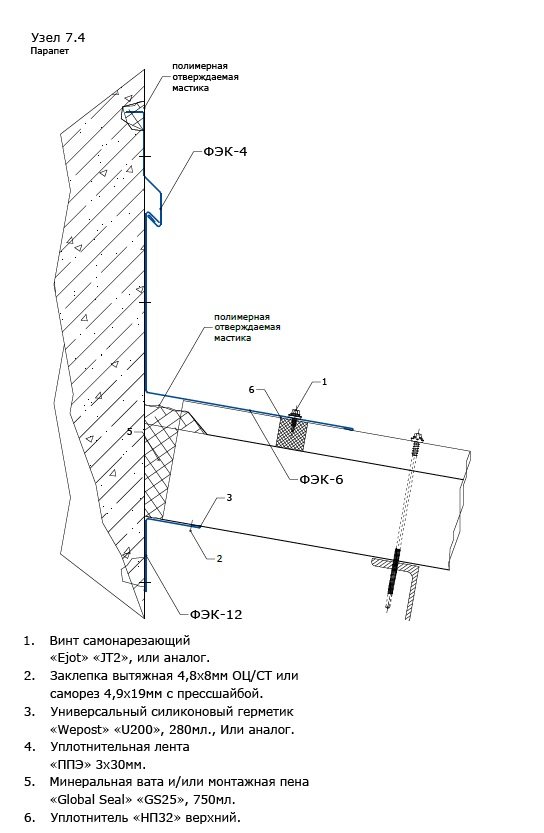
7.4. Parapet (ridge junction of roofing sandwich panels to the existing wall)
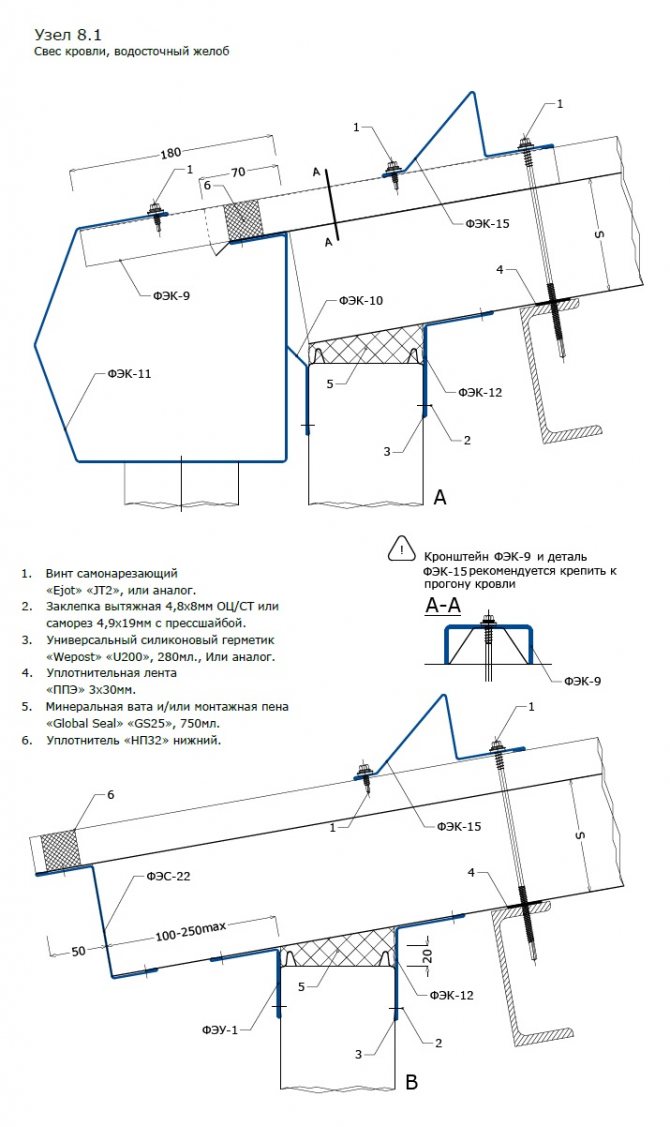
8.1. Eaves overhang, gutter.
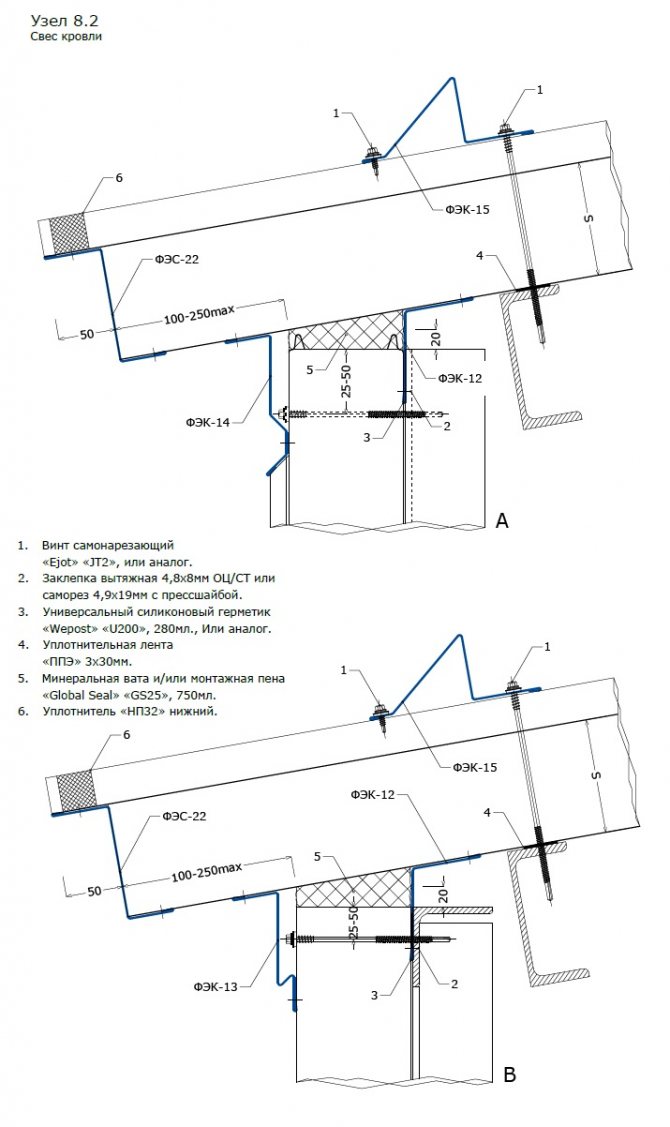
8.2. Eaves overhang of the roof.
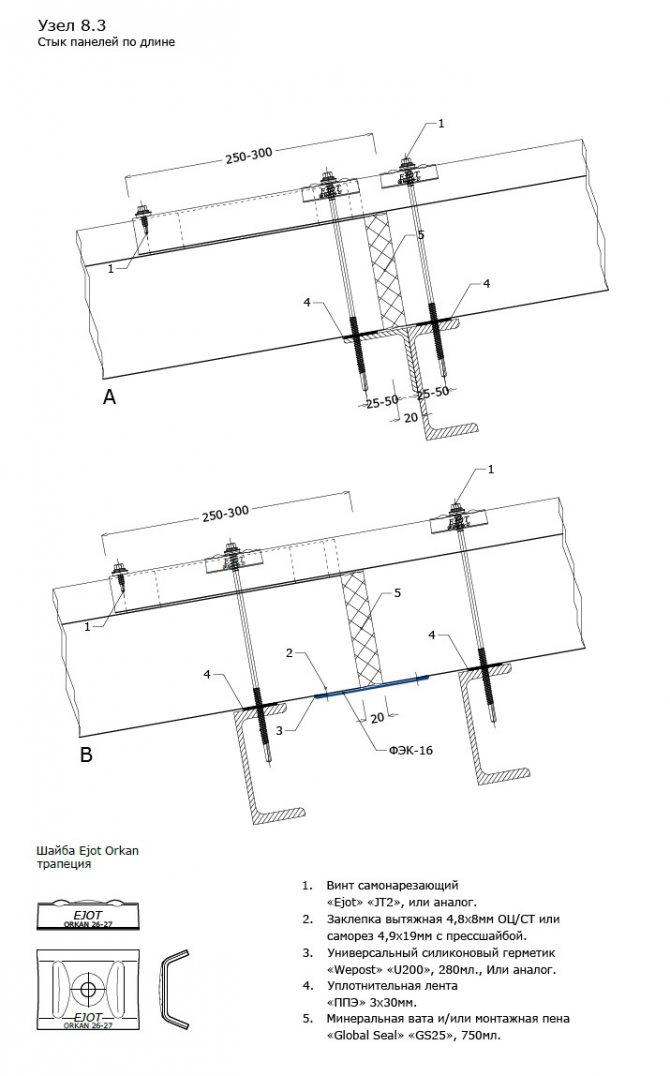
8.3. Lengthwise panel joint (panel extension).
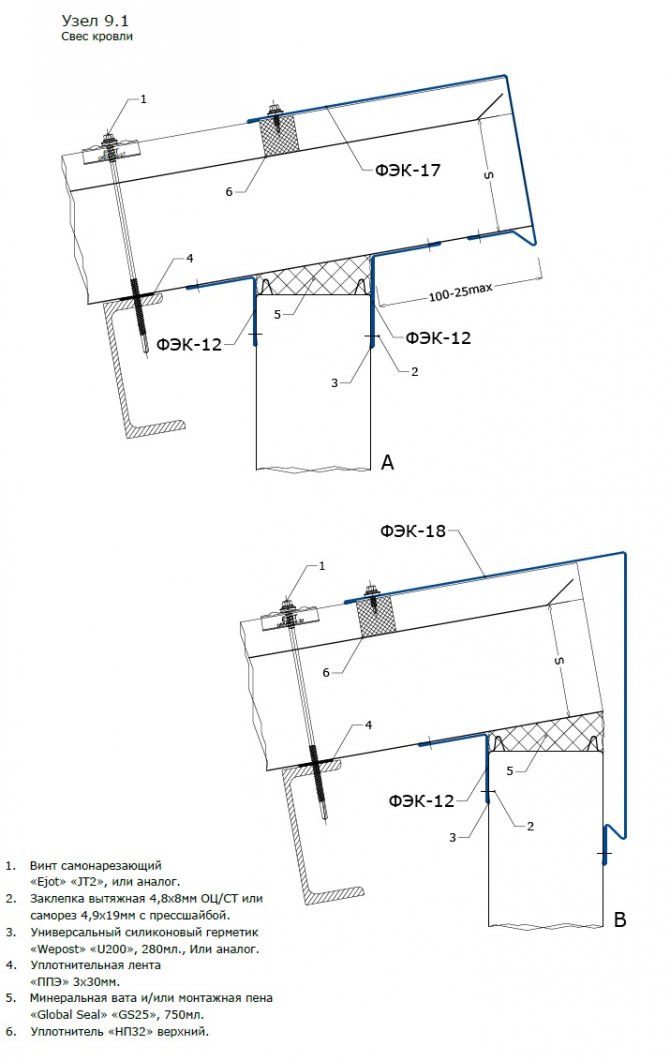
9.1. Roof overhang (pitched roof ridge).
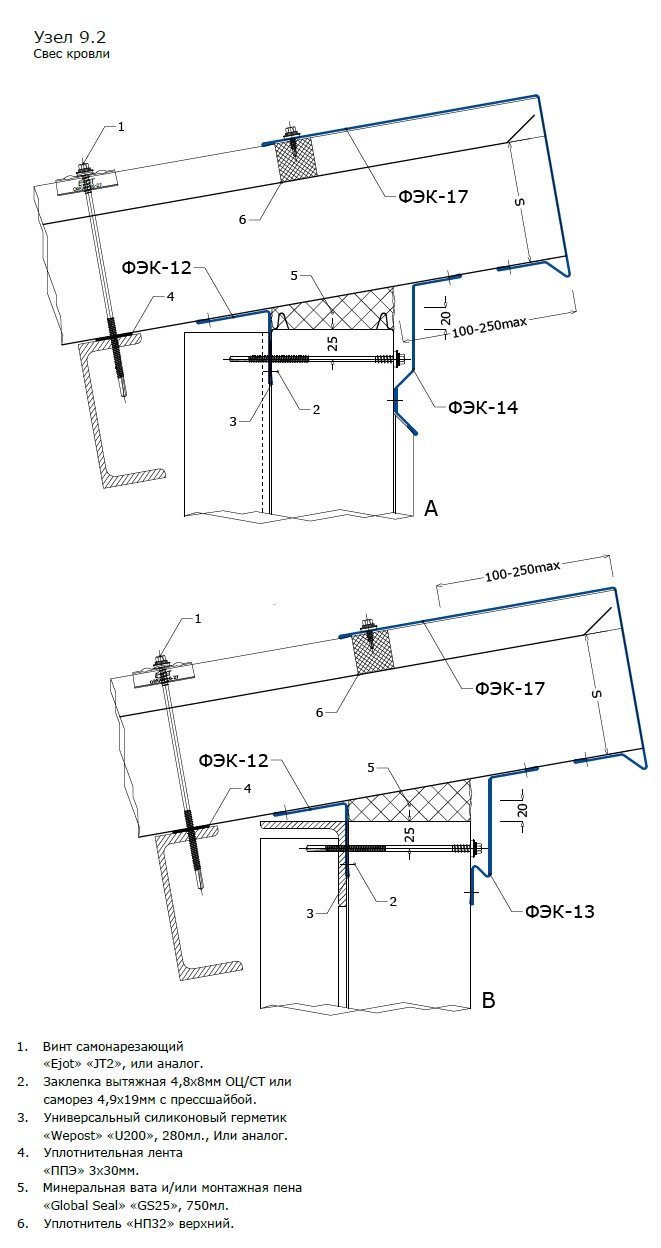
9.2. Roof overhang (pitched roof ridge).
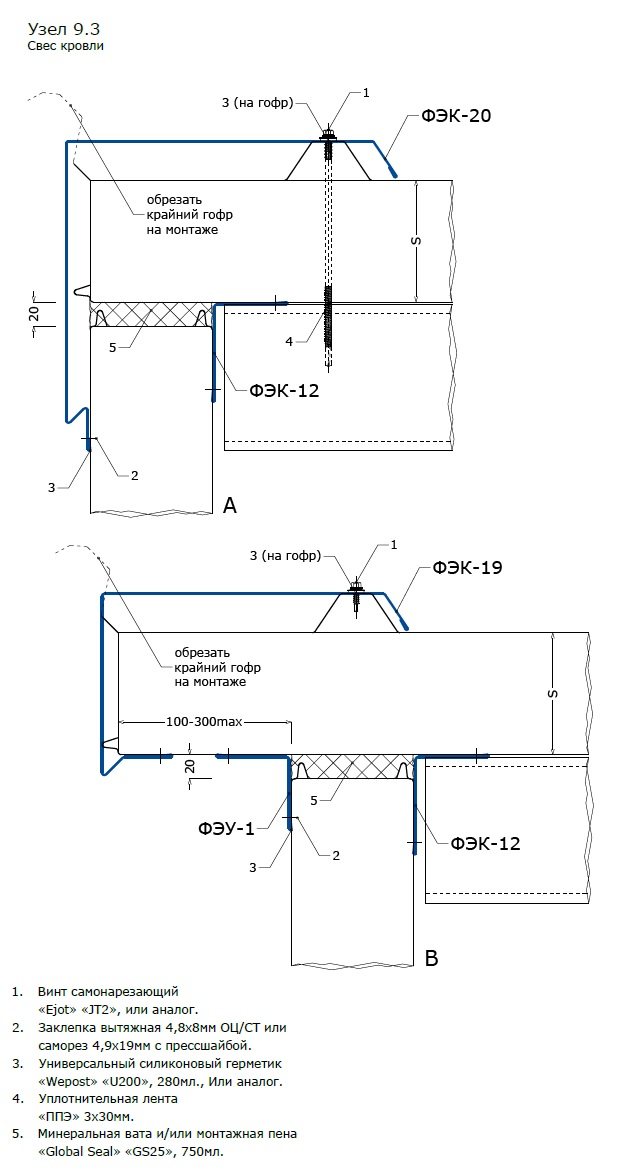
9.3. End overhang of a roof sandwich panel (wind bar).
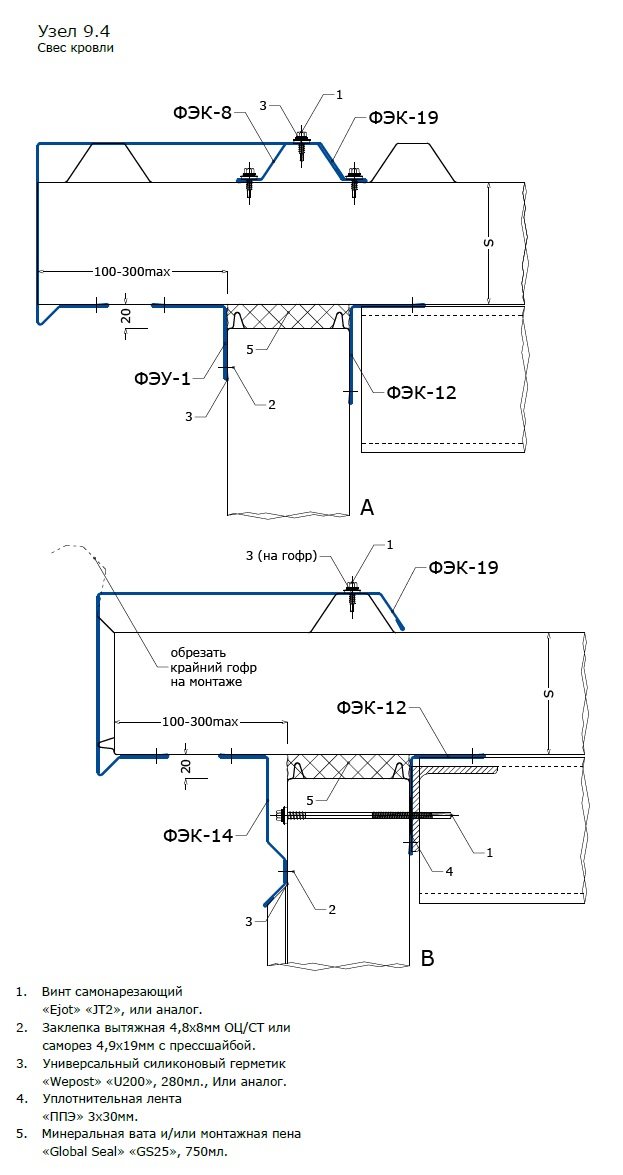
9.4. End overhang of a roofing sandwich panel (wind bar) with a roof panel overhang.
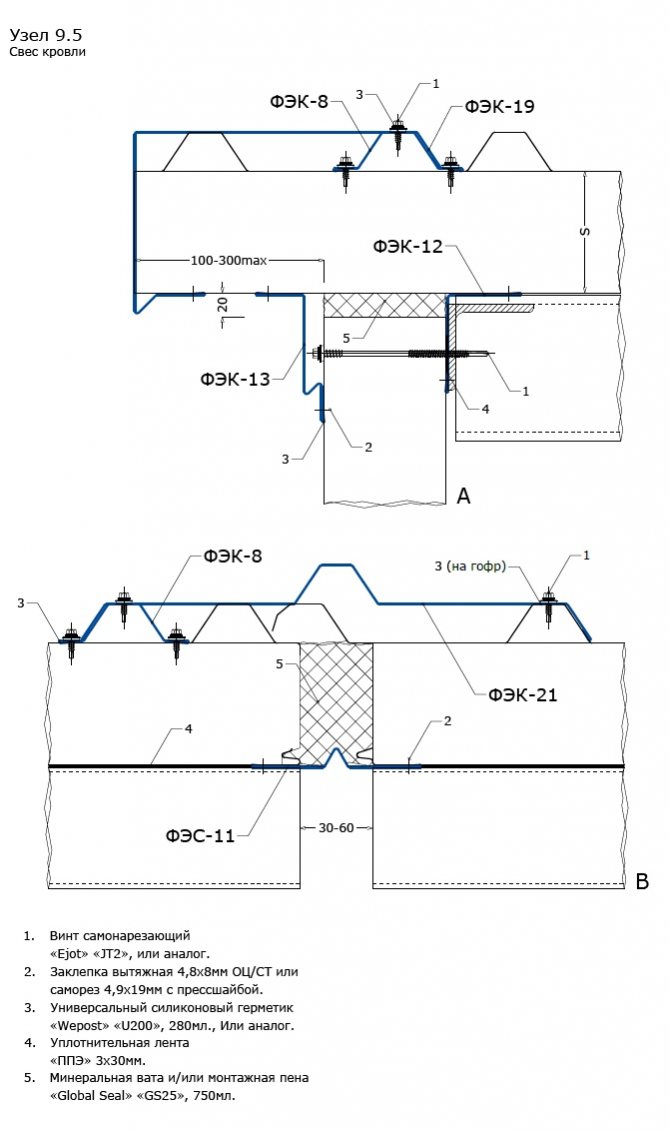
9.5. End overhang of a roofing sandwich panel, expansion joint.
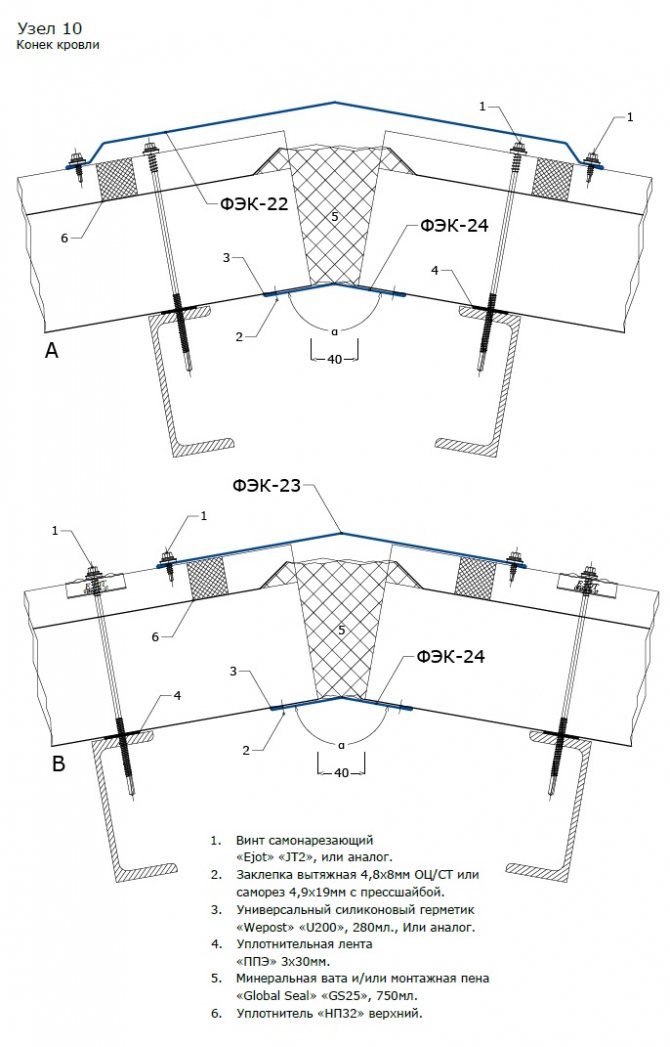
10. Roof ridge.
I hereby, acting freely, of my own free will and in my own interests, agree to the processing by Limited Liability Company TD SteelPanel (website https://steelpan.ru/, INN 7722358616, OGRN 1167746283660, location: 111020, Moscow , Yuryevsky per., House 11, office 45) of my personal data: surname, name, patronymic, place of residence (city, region), phone numbers, e-mail addresses (e-mail), other data received from me, including including electronic copies of documents.
TD SteelPanel LLC complies with appropriate measures to protect confidential information received from persons who sent personal data on the website https://steelpan.ru/, regardless of the existence of a contractual relationship, does not send and does not intend to send advertising materials to such persons.
I am also informed that in addition to the usual due diligence measures for the protection of confidential information, TD SteelPanel LLC is ready to take increased measures to protect confidential information at the request of the applicant.
Completion of works on installation of sandwich panels
After the panels are installed, preparatory work is underway for the installation of windows and doors. Windows and doors are not attached to the panels themselves, but to metal plates welded to the columns or transoms of the building. After that, windows, doors are installed and the final stage is the installation of shaped elements.
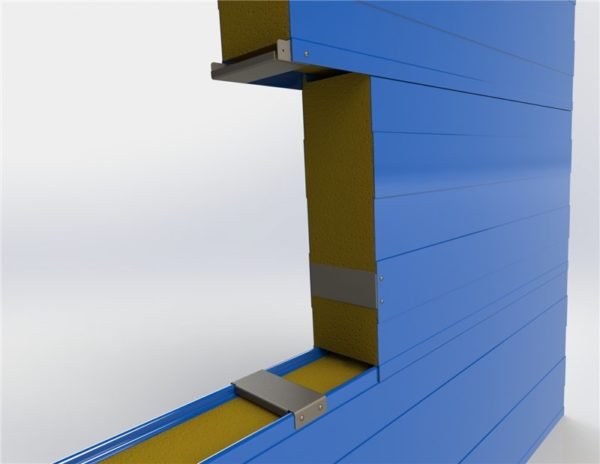
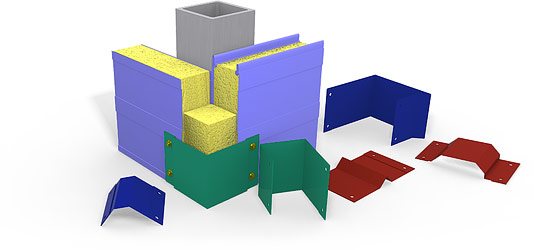
Assembly for fastening the window to the sandwich panels
Before assembling the fittings, fill all empty slots with polyurethane foam. Shaped elements consist of cover strips, window sills, ebbs, outer corners, cornices.
Installation of vertical strips is introduced from the bottom up, so that the whips are located along the course of the water flow to avoid getting it inside. The shaped elements are fastened with self-tapping screws and the joints are sealed with sealants.How to properly seal and the consequences of poorly done work can be found in this article.
My experience of sandwich panel installation
Everyone has had to do some kind of work for the first time. So it was with my editing work. It seems that you read all the instructions, study the drawings, and still in the process of work you think whether you are doing the right thing. All because you do not know what result to expect.
The article "My construction site 3" describes the beginning of my next shift at a construction site and my first acquaintance with the installation of sandwich panels from their dismantling. At this checkpoint, sandwich panels were installed and dismantled 5 times.
The panels are mounted once, as they break easily, the insulation peels off. Our view of these panels is very spoiled after repeated installations.
The first errors did not check the geometry of the metal structures. In the process of installing the panels, all this did not come out even corners, it was necessary to cut some panels along and large gaps.
Roof panels had to be cut due to non-observance of the diagonals of the building frame, since the joints and exit along the edges of the building of the panels did not match.
We could not find grips, clamps for installation. Holes were made along the edges of the sandwich panel, a wire was threaded for lifting with a crane and mounted in this way. On several occasions, wires have cut through the thin metal of the panels, causing them to fall and break.
The panels were installed, but the welding joints of the metal frame were not painted over, the customer made them dismantle the tape. After numerous mistakes, the sandwich panel installation work was fine and everything went fine.
There were, however, such mistakes at other objects, the workers cut the opening out of size, they had to order a new panel.
The panels come to the construction site in a film, which serves to protect the coating during transportation. The film on the outside is removed immediately during installation, and on the inside can be removed after completion of work. At some sites, I saw such a picture, workers tore off the film on the sandwich panels in small pieces, since they did not immediately tear it off, it stood for a long time and the glue dried.
Video from the construction site, how the frame of the columns is mounted (children under 16 are not allowed to watch profanity) and at the end of the video the work on the installation of sandwich panels is shown
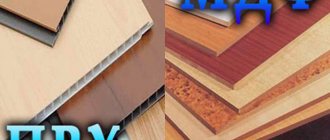
What types of sandwich panels are, you can find out from the article "PVC sandwich panels". After you have installed the sandwich panels, the next operation is the installation of flats, read how pitfalls can be in this matter here.
Related articles:
Your thanks for my article is a click on any button below. Thank you!
Related article: Window valve for plastic windows
Nuances of installation of additional elements of sandwich panels
Today, prefabricated buildings from sandwich panels have become an advanced technology for the construction of various types of pavilions, warehouses and hangars, as well as parking lots and small office buildings. First of all, it is fast, it is the excellent thermal insulation characteristics of buildings, their safety, plus an attractive appearance. But all these positive qualities will be observed only if additional elements are used during the installation of sandwich panels. And their choice should be approached in the same way as with the load-bearing wall and roof panels themselves. That is, they must be of high quality, first of all, and secondly, they must be installed correctly.
The main requirement for the installation of shaped elements is the exact observance of the design and installation documentation, in which the nodes that must be closed with additional profiles are clearly defined. Designers accurately determine the installation location of each type, therefore, their installation location cannot be changed under any conditions.
Of course, who can say that during the installation of the sandwich panels themselves, situations arise that do not affect the geometry of the installation.That is, the mounting holes are displaced relative to each other, which reduces the installation quality of the shaped profiles. But, firstly, improper installation of panels is a purely human factor. Therefore, the advice is to resort to the services of professional assembly teams. Secondly, if the project was made by a designer with extensive experience, then he must take into account some displacements of the panels relative to each other and the load-bearing elements of the building. so there shouldn't be any problems in this regard.
As for the installation of additional elements itself, you can start using them only after all the installation operations associated with the formation of the general structure of the building have been completed. That is, all joints must be thermally insulated, the ends of the sandwich panels must be cut at the corners of the building, the protective film must be completely removed, and so on.
The rest of the nuances of installing the strips:
- The protective film from the additional elements is removed before their direct installation.
- Vertical profiles are laid from bottom to top with a slight overlap. Horizontal, taking into account the wind pressure, that is, so that the overlap goes in the direction of the movement of air masses.
- To prevent precipitation and moisture from getting under the fittings, it is necessary to use silicone sealant or a sealing tape during their installation.
- Be sure to be treated with a sealant and overlaps.
- If the strip closes the junction of the sandwich panels with other building elements, then the trimming of the additional elements is carried out locally, taking into account the configuration of the joint and its dimensions.
- For fastening shaped profiles, you must use special screws or rivets. The fastening step is 40 cm. But in each project, the developers must indicate the step for each element separately.
- The tightening of the additional profile must be carried out taking into account the screwing force. That is, the fastener should not be loosely screwed in or twisted. In the first case, moisture can fall under the additional profile, between which a decent gap remains and the panel, in the second case, the part will bend, which causes a decrease in the quality of the appearance.
- Vertical strips are installed on a plumb line, horizontal on horizontally stretched threads
When installing additional elements of sandwich panels, you may need galvanized self-tapping screws 240 mm.
Similar articles