Home / Design
Back to
Published: 06.02.
0
15
- 1 What does a bathroom faucet consist of?
- 2 How much does it cost to install a mixer?
- 3 Criteria for choosing a bathroom faucet
- 4 Installation of an expensive crane
- 5 Dismantling the old mixer
- 6 Methods for installing a faucet in a bathroom
- 7 Installation Tricks
- 8 Installing a wall-mounted bath mixer
- 9 Installation and connection diagram
- 10 Nuances of installation
- 11 Required tools
- 12 Preparatory work
- 13 Installation details
- 14 Some helpful tips
What does a bathroom faucet consist of?
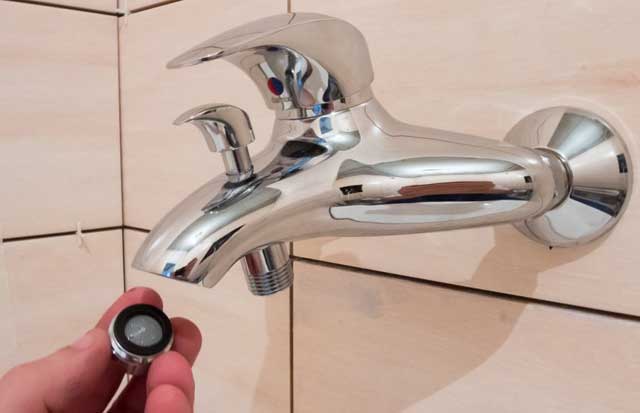
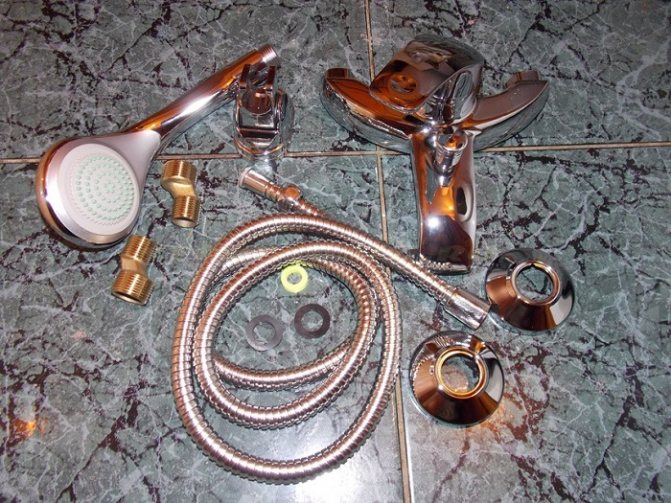
Before dismantling and installing the mixer in the bathroom, you need to figure out how it looks and what parts it consists of. In addition, knowing how it is staffed can help avoid unscrupulous sellers. Packaged sanitary ware consists of the following items:
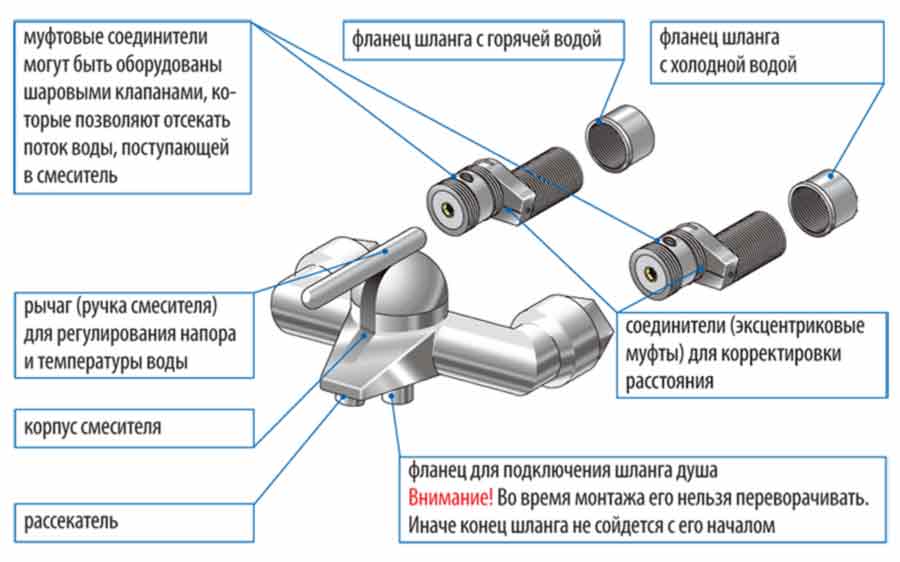
- Housing. Its standard scheme is as follows: two nozzles for supplying hot and cold water, two sockets and a spout;
- Shower hose. This is the part of the system that connects the mixer body to the shower head. Since this part is the most frequently out of order, it is not recommended to save on it.
Before installing the faucet in the bathroom, let's figure out what types of shower hoses there are, because their choice is huge: from plastic products with metal wrapping, to advanced models with anti-twist protection and a silicone layer on a metal braid.
- Shower head (also called shower head). Shower heads from the simplest ones with two or three standard modes, to half a dozen functions for creating a soft aerated, massage or jet stream, "economy" mode and many other pleasant shower options.
- Eccentric. This type of shower adapter is elongated, rounded, one edge of which is attached to the mixer, and the other to the pipe. The length and size of the eccentrics is individual for each model.
- A gander called a spout or curl. The most common goose models are J, C and L-shaped.
- Decorative shades.
- Rubber or silicone gaskets.
The nuances of installing a mixer in the bathroom with your own hands video
However, checking the equipment is not always enough, since to be completely sure that there is no defect in the purchased product, it is necessary to make sure that the threads of the eccentrics and fastening nuts are intact. Assembly instructions are included with the plumbing. Assembling and disassembling it is quite simple, you can see this by watching the video tutorial on assembly.
How can a mixer be installed in the bathroom?
Do-it-yourself installation of a mixer in the bathroom begins with the acquisition of new plumbing. Bathroom faucets can vary in length of the gooseneck, the presence or absence of a shower head, the opening mechanism (lever mixers or classic) and many other characteristics. The question of which crane to choose, it is better to first clarify with a specialist or seek advice from the seller - he will advise the best manufacturer and help you choose a model for the budget.
- open installation;
- concealed installation.
The first type of mixers is recommended for novice plumbers. It is much easier to mount such a faucet on the wall due to the fact that the connection to the water supply does not require additional operations for wall slitting or complex calculations when installing supply pipes.
Installing a concealed mixer in the bathroom yourself is more difficult, but also possible.The main problem when working with such cranes is that it is more difficult for the master to gain access to communications.
Ultimately, how to connect the mixer - hiding the pipes or not - is decided by the homeowners based on their own preferences. The main thing is to adequately assess your plumbing skills and not take on overwhelming tasks.
How much does it cost to install a mixer?
Firstly, there are different mixers: for concealed installation, open installation, with levers, valves, thermostatic, non-contact. When installing the mixer in the bathroom, it is necessary to take into account all the nuances of the equipment and the original piping in the bathroom.
Old and new houses differ from each other: different water supply systems, different pipes, different conditions of the sewerage system. Our specialists serve dozens of houses in different districts of Moscow and are well acquainted with the peculiarities of Khrushchev, new buildings, Stalin-era buildings.
The cost of installing a mixer in the bathroom depends on the type of bath, the type of mixer, the availability of supplied communications, the need for additional equipment. Call our specialists and briefly describe the task, then we can name the approximate cost of the service.
To determine the cost of installing a faucet in a bathroom, plumbers need to know:
- mixer type;
- type of mounting (hidden on the wall, on board, hidden on the rack);
- your plans (current renovation, complete renovation, renovation in a new building);
- mixer brand.
The master will be able to give the most accurate and objective assessment of the cost after determining the scope of work.
Criteria for choosing a bathroom faucet
How to install a faucet on the wall, what are the most common methods? Firstly, this is the replacement of the old one, and secondly, the installation during the repair.
In order to replace the old plumbing with a new one, first of all, you need to choose the right one. It is not difficult to do this, since the current assortment of products offered by plumbing stores makes it possible, taking into account financial possibilities, to choose a mixer, both domestic and foreign. Below are the characteristics to look out for when buying:
- Weight. Even if you are not an expert, and are not able to distinguish stainless steel from brass, the quality of a product can be determined by its mass. Too lightweight product indicates its small thickness and fragility of the device.
- Metal. If the consultant in the store offers a choice of silumin and brass mixer models, give preference to the second one. Silumin is not very durable, its composition is an alloy of silicon with aluminum, products made from it have a minimum weight and can be deformed during installation.
Many novice craftsmen make a standard mistake when choosing products from it due to the low price. The highest viscosity of the alloy is possessed by brass models, which do not allow the clamping nut to burst with light deformations and installation. In addition, brass fixtures are less susceptible to corrosion.
- Dimensions. This characteristic concerns not so much the size of the mixer as its correspondence to the place of installation to the bathroom wall. In the case of an incorrect selection of a model (excessively long or short, massive or, conversely, a miniature crane and other inconsistencies) or does not correspond to the installation site, it can not only look ridiculous, but also quickly fail.
Choosing a bathroom faucet
The need to install or replace a mixer may arise for a number of reasons - for example, during a major overhaul of a room, as a result of a breakdown of an old tap, or, if desired, simply change it by installing a different model. In any case, if the matter does not concern a complete renovation of the room, which requires a whole range of repair and finishing work, installing the mixer will be a fairly simple task.
The first step is to purchase a new mixer.The difference between the mixer and traditional taps is that it is not required to draw separate conclusions from the cold and hot water supply. In addition to convenience, faucets are also distinguished by good visual qualities - you just need to choose the model that best suits the style of the room.
In plumbing stores you can find a lot of different models of faucets in the widest range of prices, and the selection process is largely complicated by this variety. To narrow down the range of searches, you need to decide exactly what requirements are imposed on a particular model, and build on them when choosing.
Depending on the installation method, there are three main types of mixers:
- Horizontal, which are mounted on horizontal surfaces;
- Vertical, located in a vertical plane;
- Recessed, which are installed directly into the wall.
Horizontal faucets are usually mounted on the edge of a bathtub or sink. Vertical products are attached directly to the wall at the point where the pipes exit. Built-in mixers are practically not found in private construction due to the complexity of installation and impracticality, therefore, it is practically pointless to consider them.
For bathrooms, you usually have to choose at least two taps, one of which will be located in the bath / shower, and the other on the sink. When choosing, you need to take into account the characteristics of the room. If a major overhaul is not planned, then it is best to take the same model that was mounted before - it will be easier to install it in the same place.
The design of mixers may differ, depending on what the following types of devices are distinguished:
- Two-valve;
- Lever;
- Thermostats;
- Contactless.
The first option is the most popular among users. The design of the two-valve mixer includes two valves, one of which is designed to regulate the flow of hot water, and the other is responsible for cold water. Also, the design provides for the presence of seals, which can be made of rubber or ceramics.
Installation of an expensive crane
To install the faucet in the bathroom correctly, you need to understand the design of products from different manufacturers and know the intricacies of installing taps of a particular brand. Especially if you have chosen a good European option - many of them are now equipped with a water saving system.
An incorrect installation will reduce all the advantages of an expensive purchase to zero. With improper installation, you can pinch rubber gaskets, poorly insulate pipe joints and assemble the crane incorrectly. Professional installation of a faucet in the bathroom will extend its life.
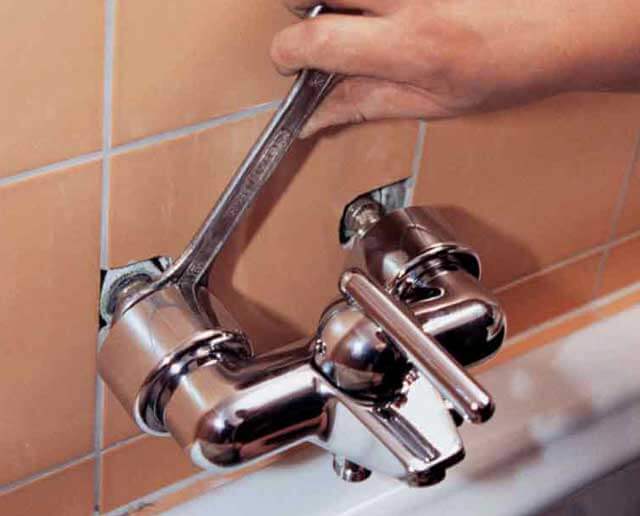
Dismantling the old mixer
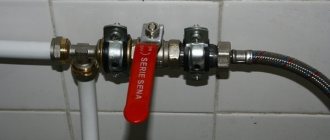
Removing an old faucet in a bathroom is a fairly straightforward task. To do this, you will need pliers and wrenches - gas and adjustable. Dismantling is carried out in several steps:
- Shut off the water supplied both through the main line and from the electric boiler or gas water heater;
- Drain the water remaining in the system;
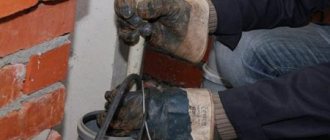
- Remove the tap from the wall. Do this very carefully, taking care not to break the thread of the fitting in the wall;
- Clean the threads on the reinforced-plastic pipes in the wall from the winding.
Methods for installing a tap in a bathroom
There are several options for installing the crane:
- hidden installation on the wall - the crane is placed on the wall, the pipes are covered with tiles or plasterboard;
- wall mounting with a special rack;
- installation of a tap on a bath.
Concealed installation is more difficult to make, since it is more difficult for a plumber to get to communications. If you have enough free space in the bathroom, then you can make a separate stand, connect the mixer and close the communications with ceramic tiles.
Installation tricks
How to install a mixer in the bathroom if the pipes on the wall are crooked video
- It is not difficult to use tow correctly; for this, wrap it tightly around the thread in the direction of twisting. Be careful not to twist the tow into bundles.
- When installing plumbing along with water pipes, you will need to mark the height. It is 15 to 20 cm above the top of the bathtub.
We suggest that you familiarize yourself with How to choose the right toothpaste by strips
How to correctly install the mixer in the bathroom on the wall, which does not require a call to the master and financial costs. In addition to invaluable experience, this process will help you grow in your own eyes. Remember: if you want to do something with high quality, do it yourself!
Installing a wall-mounted bathroom faucet
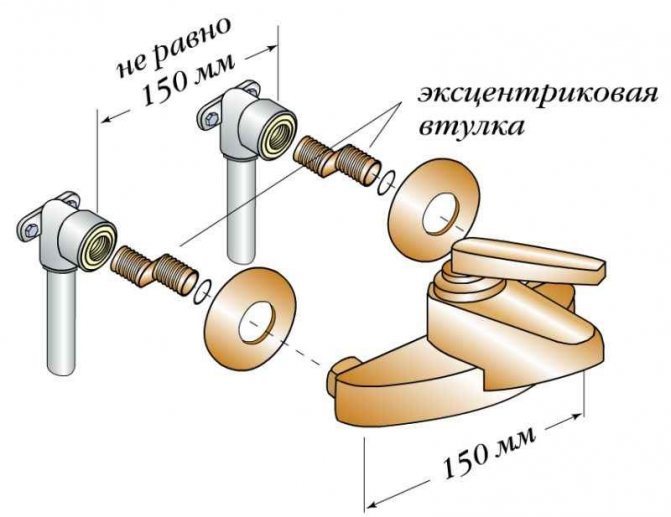
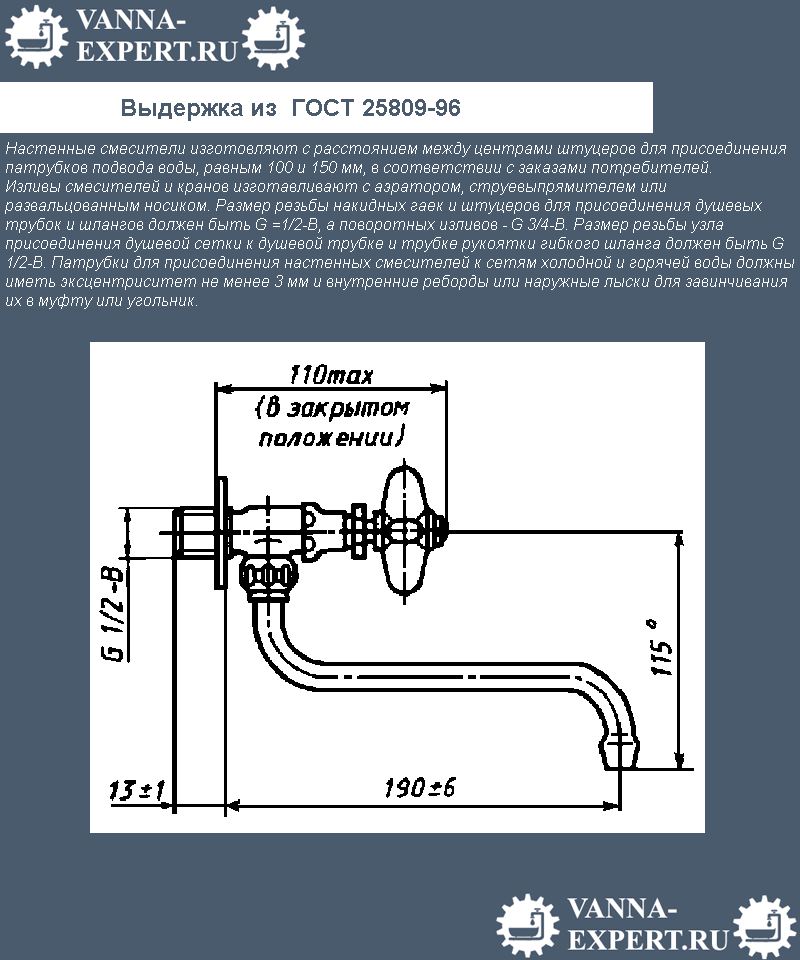
The height above the level of the bath should be within 30 cm, chosen taking into account the size of the mixer and the preferences of the owner. The standard distance between the centers of the two fittings is 150 mm, the eccentrics make it possible to correct errors in the horizontal and vertical direction up to 5 mm.
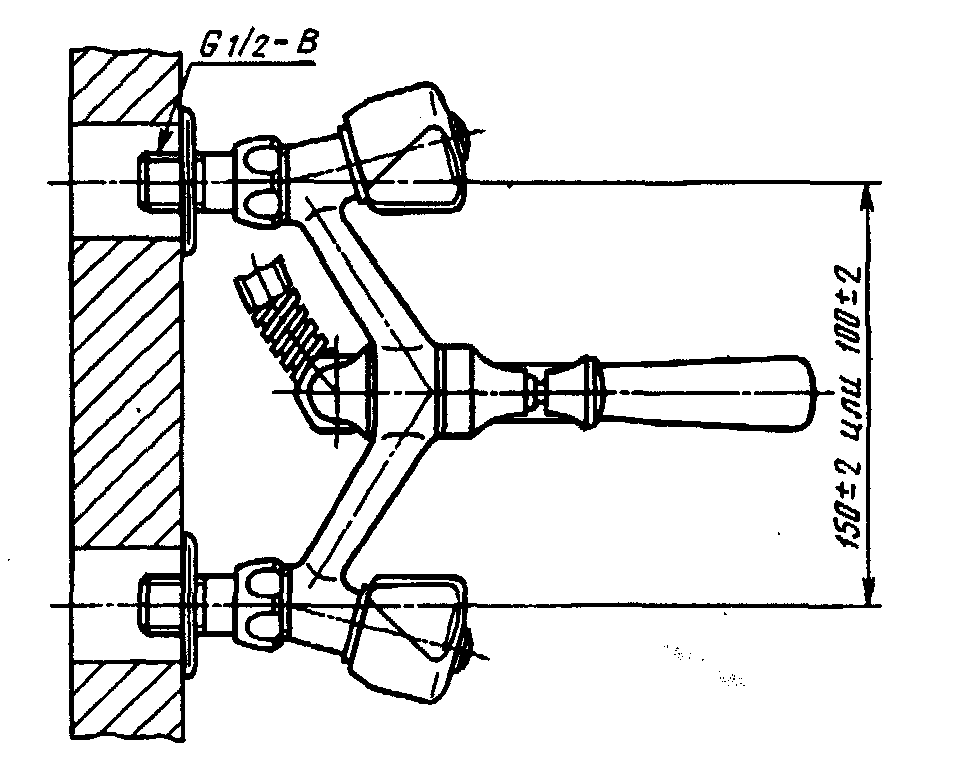
Extract from GOST 25809-96
Single-handle bath mixer with separate connections, wall-mounted with a shower net on a flexible hose, spout with aerator
The mixer is common for a bath and a washbasin, two-handle with connections in separate holes, wall-mounted with a shower net on a flexible hose
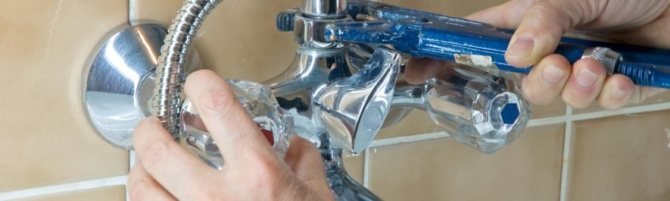
Working with fum tape
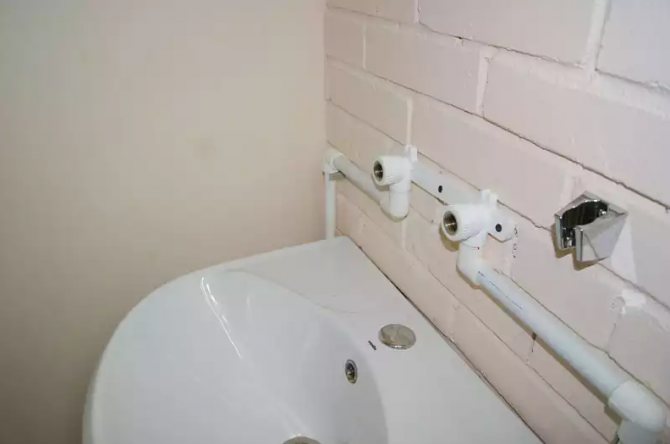
For example, consider installing a mixer on a new wall. The pipelines have already been installed, plastered and tiled.
Step 1. Study the instructions of the mixer manufacturer, check its completeness and the presence of all rubber gaskets. The pipe outlets must have an internal thread.
Single-lever wall mixer
If this is not the case, then several problems arise.
- First. We'll have to buy and screw in couplings. These are additional jobs and new places in which a leak may appear.
- Second. The mixer will move away from the wall, will not fit snugly to it, the fittings will be visible. This is a major cosmetic defect.
- Third. Due to the increase in the length of the threaded connecting fittings, the risk of cracking in them increases. The shoulder increases, due to which the mechanical stress increases.
Step 2. Clean the pipes from residual materials. To do this, it is better to open the taps on the hot and cold water pipes for a few seconds. A strong pressure will wash away all the dirt. Such an operation is much easier to do right away than to dismantle the mixer later in case of clogging.
Pipes prepared for mixer installation
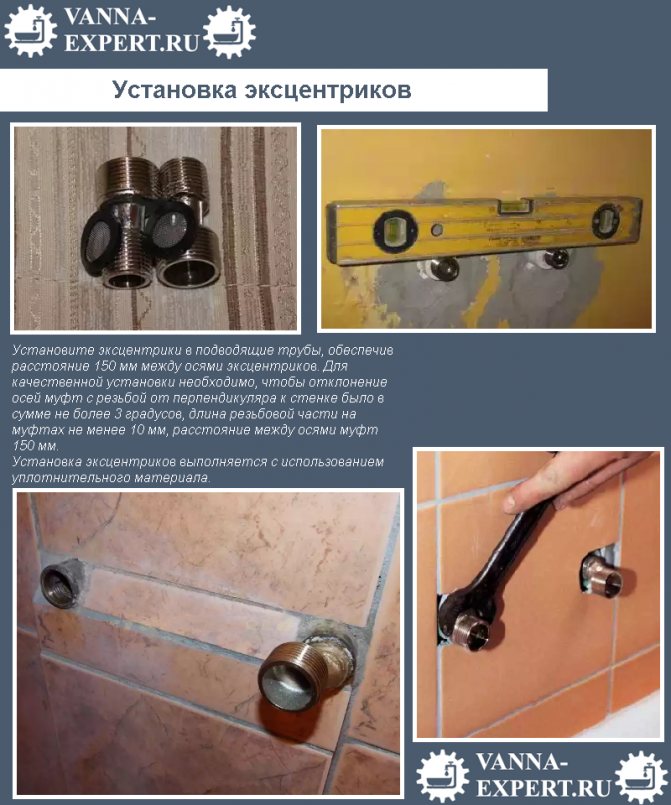
Step 3. Take out two eccentrics. They have a ø1 / 2 ″ thread on one side and ø3 / 4 ″ on the other. Different manufacturers have different attitudes towards the accuracy of the manufacture of eccentrics. We advise you to check its dimensions. To do this, screw the eccentrics into the threaded outlets without a seal, pay attention to the ease of screwing.
Valve installation using eccentric adapter sleeves
Installation of eccentrics

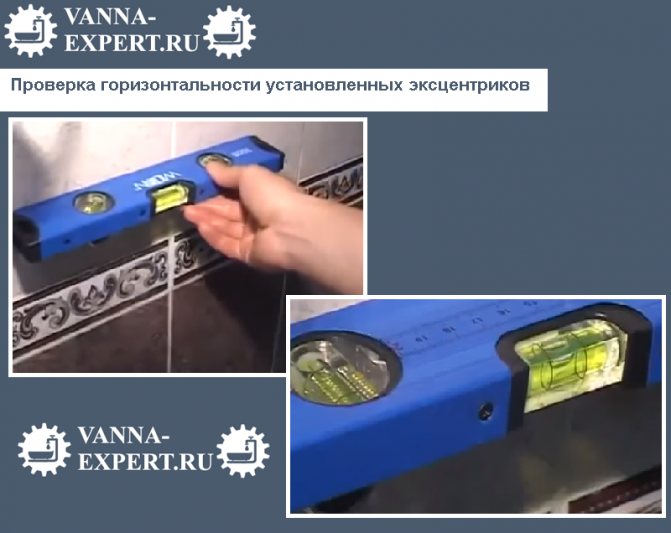
At the same time, notice the correct position of the eccentrics. After you screw them in without a seal, attach the mixer. Pay attention to whether the clamping nuts coincide with the thread and the horizontal position of their position, if necessary, tighten / unscrew a little, depending on whether it is necessary to increase or decrease the distance between them.
Checking the horizontal position of the installed eccentrics
Keep in mind that eccentrics with already wound seals should only be screwed in, twisting will cause leaks. Once again, we remind you that during the fitting you need to roughly remember the position of the eccentrics.
After winding, press the tape along the entire diameter of the eccentric with your fingers until the thread protrusions appear.
Step 4. Screw one cam into the pipe fitting. The eccentric position is the same as in the trial assembly. Don't try too hard.If the eccentric is screwed in very easily, then you need to unscrew it, remove the old seal and apply a new one, but in an increased amount.
Step 5. Screw in the second eccentric. Don't screw it up to the end. When there is about one turn left, try on the mixer several times, pay attention to whether the clamping nuts fit exactly. Repeat the operations until the axes of the mixer nuts coincide with the axes of the eccentrics. The nuts should be easy to profit by hand.
Screwed eccentrics
Step 6. Replace the decorative cups. They are threaded and screwed onto the protruding thread of the eccentrics. Screw them all the way to the wall.
After installing the eccentrics, we wind the cups
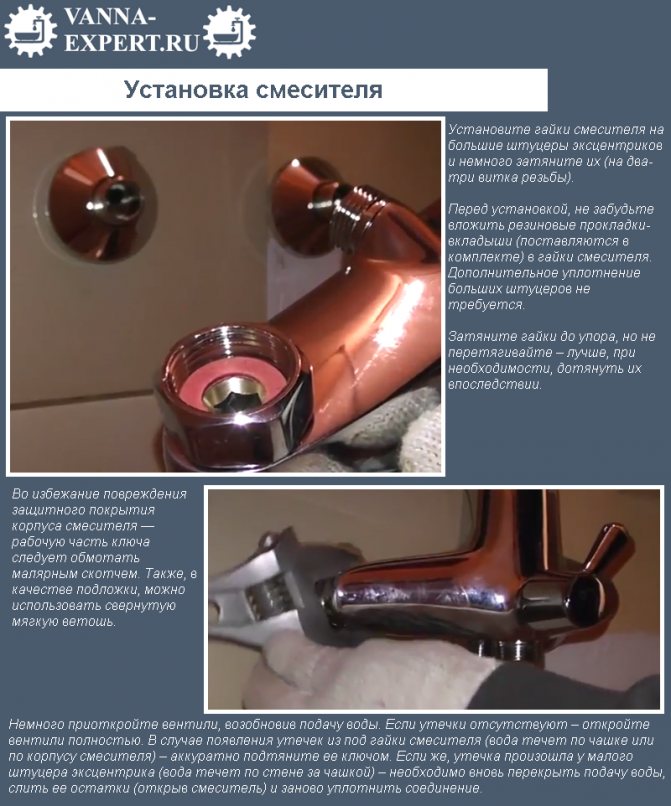
Step 7. Insert rubber seals into the tightening nuts; they are supplied with the mixer. Screw the nuts on the eccentrics with your hands until they stop. Tighten them with a wrench to completely seal.
Mixer installation
Step 8. Check the tightness of all connections, open the cold and hot water supply taps. Leaks can be so slight that they can't be noticed right away. Place a piece of paper under the joints and wait a few minutes. If wet spots appear on it - a problem.
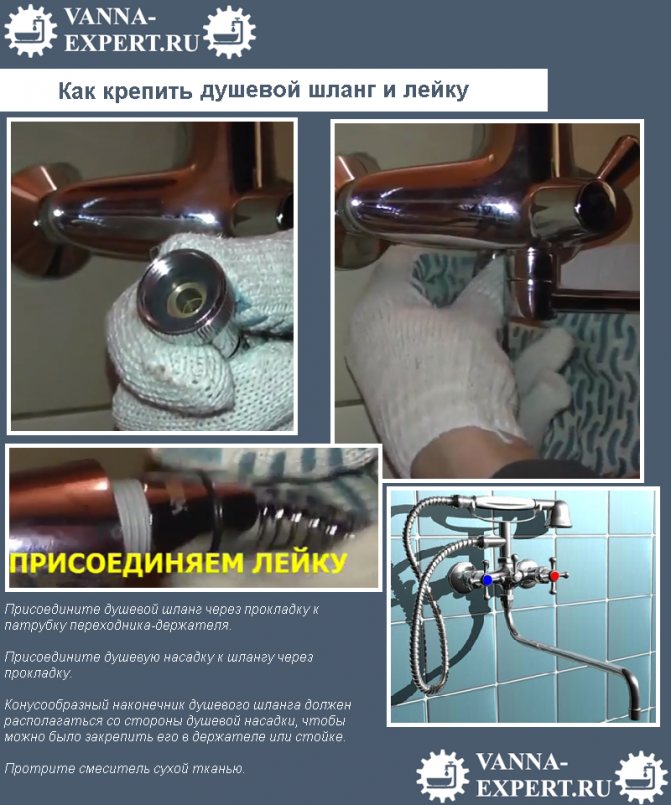
Step 9. Assemble the spout, flexible hose and shower head on the mixer. They also have rubber gaskets, do not use too much force when tightening the nuts.
How to attach the shower hose and hand shower
During the final assembly of the mixer work carefully, do not damage the decorative outer coating of the mixer.
Watering can connected to the hose
Check if the mixer and shower are working
Installing a tap on a bath is only possible if it has holes for pipes and a mixer. If there are holes, then you need to choose an eyeliner - flexible hoses that connect the pipes and the outlet of the mixer.
Submarine hoses differ in material, hole diameters, length. If you haven't bought them yet, our plumber will bring everything you need with him and connect the mixer without any extra hassle for you.
Dismantling and installation of a faucet in the bathroom
Over time, even the most reliable faucets begin to leak and rust. It is advisable to change the old plumbing in time, without waiting for a critical moment. It is quite possible to change the faucet in the bathroom with your own hands. Many modern mixer models are designed in such a way that it is not difficult to unscrew them.
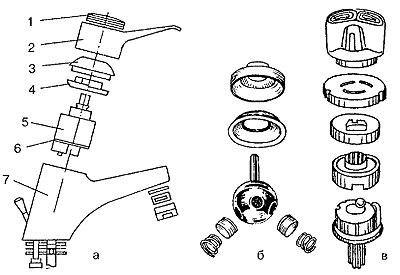
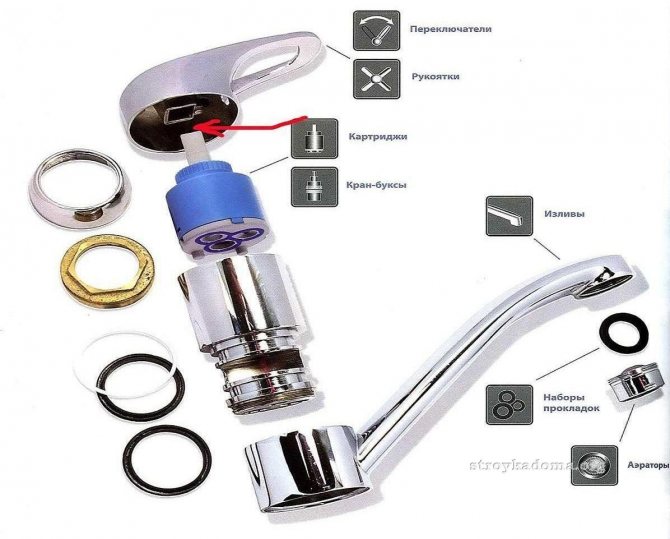
The device of a single-lever mixer with an aerator and a built-in filter: a - disassembled mixer: 1 - fixing element, 2 - rotary handle (joystick), 3 - housing cover, 4 - circular nut, 5 - replaceable cartridge for mechanical cleaning, 6 - gasket, 7 - body, b - disassembled ball cartridge, c - disassembled ceramic cartridge.
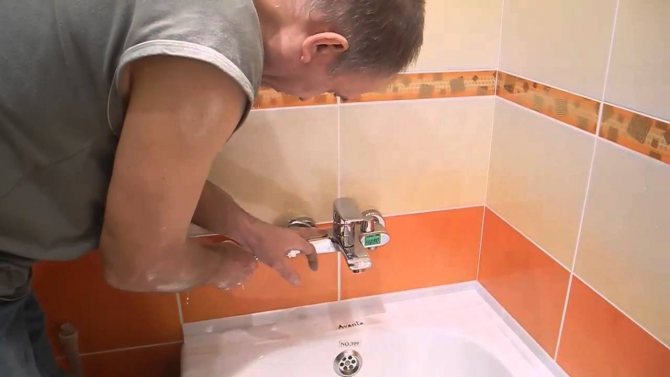
Before dismantling the mixer, it is necessary to shut off the water supply on the riser. It is advisable to line the bottom of the bathroom with old newspapers and rags in order to soften the blow from a possible fall of the faucet elements. So, if any of the tools or parts falls on the surface of the bathroom, deep scratches in this case will be inevitable.
A mandatory measure is to block the drain hole. It's a shame, but this is where important small parts and fasteners often end up. It is possible that some of the parts of the old crane will come in handy in the future.
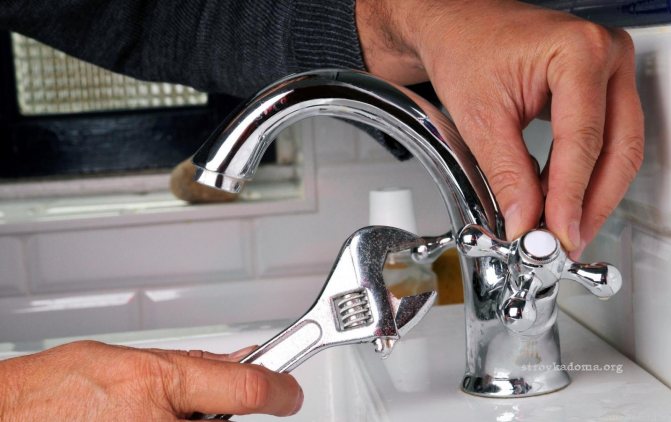
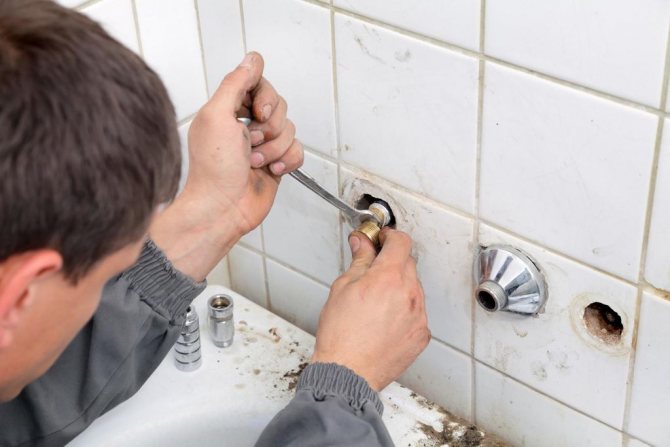
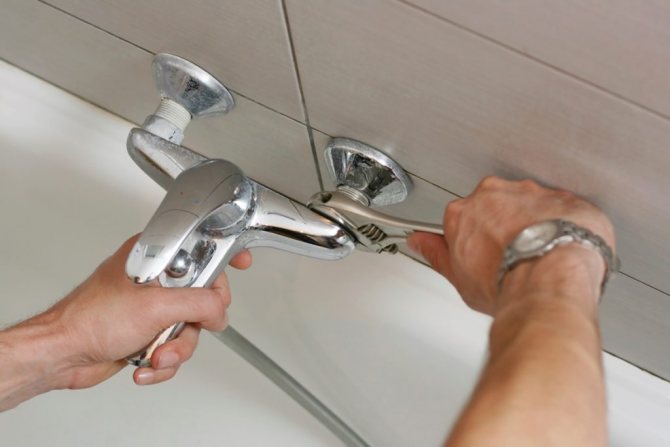
In general, the crane should be removed as a whole, without prior disassembly. In order to unscrew the tap, you need to use only one key (adjustable or locksmith). The dismantling process consists in unscrewing the nuts, with the help of which the tap is attached to the pipes of cold and hot water. In the event that you have to replace the plastic pipes, you should carry out the work as carefully as possible and do not tug strongly with the key, otherwise the pipes can be damaged. Also, during operation, you should hold the pipes with your hands.
The nuts that are used to fix the valve with the pipes are always included with the mixer, so it should be taken into account whether they can still function or they should be replaced with new ones. In order to unscrew rusted, damaged nuts, you should use a special tool - a liquid wrench (WD-40). Its action is aimed at corroding the formed layer of rust, salt deposits and hardened paint. The tool acts quite quickly, after a few minutes even the most ancient nut can be removed.
Mixer repair stages.
Before installing a new valve, the pipe thread should be sealed with a sanitary insulating FUM tape. Before winding the tape around the bathroom faucet thread, you should put a shiny washer on it. It is designed to mask areas that serve as a junction.
When using an insulating tape, there are some nuances: it should be wound strictly in the direction in which the nut will be tightened in the future. If you do everything correctly, the nut will tighten smoothly, easily, without the use of additional tools. If there is a suspicion that the nut has lay down incorrectly and is not twisted along the thread, you should start all over again, and not try to tighten the nut forcibly.
It is strictly forbidden to overtighten the nuts. Thus, you can spoil the gaskets or break the nuts.
After the old crane is dismantled, you can start installing a new one. Plumbing is supplied as standard and all necessary parts must be included.
The main element of the mixer is the eccentric. Thanks to him, the transition from the liner to the nut of different diameters is carried out, and they also allow installation in the event of a mismatch in the center-to-center distance. The eccentrics are mainly made of brass. They must be installed between the mixer and the pipe coupling or water outlet.
It is easy to attach various decorative caps to the wide side of the eccentric thread, which serve as a disguise against blemishes when installing a water-dispensing outlet in a bathroom.
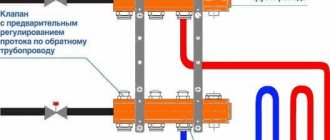
Installation and connection diagram
So, you have selected the model you need, now you can get to work. Any of the models, regardless of price and quality, must be accompanied by instructions with an installation diagram. Having carefully studied it, you can independently connect the mixer. It should already be assembled, so you just have to check the seal in the spout, the fit of the oil seals, the operation of the valve head, inspect the gaskets and seals, and the valve turns.
We invite you to familiarize yourself with How to cut ceramic tiles with a manual glass cutter?
Next, unpack all the boxes and packages that come with the kit. There is a standard set: gaskets, nuts, eccentrics, wall reflectors, bushings, a faucet spout and a shower head. All this you will need to connect to the tap.
Strict adherence to the instructions will not create any problems. But do not forget about the standards: the installation height must be at least 1 meter from the floor.
Install the water sockets in the appropriate places, when removing the fittings, calculate the distance between the pipes with water - it should be 15 cm. It is very important that the fittings are mounted strictly horizontally to each other and are not too long. Having finished with the conclusions of the fittings, proceed to the main part of the work.
A set of tools and accessories
- two adjustable wrenches (32 mm);
- gas wrench;
- pliers;
- screwdriver with nozzles;
- hexagons;
- open-end wrench 12/14;
- vinyl-based electrical tape.
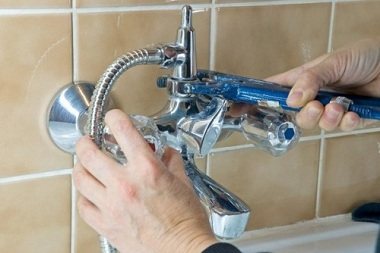
You should start by dismantling the old tap, having previously prepared the place and turning off the main tap on the water supply. You can change the faucet in the bath, which leaks without disassembly, unscrew the fastening nuts and remove.If you think that the parts of the old mixer will be useful to you, you can disassemble it. If the nuts cannot be twisted, a rust converter should be used. Try to replace all worn fasteners to avoid possible leaks and rusting. To seal the contacting metal substrates, silicone-based gaskets must be used.
It is necessary to connect all the parts that come with the valve packaging. If it is a shower hose, you can attach it by hand without much effort. The spout must be firmly inserted into the mounting hole and the lock nut must be tightened. It is imperative to change the gaskets in the bathroom faucet with new ones, which also come in the kit. While tightening the fastening nuts, glue the contacting surfaces with electrical tape in several layers so as not to scratch the faucet coating.
Installation nuances
Special attention should be paid to the installation of the mixer on the side of the acrylic bathtub - in this case, you can drill holes for installation in a convenient place and mount any mixer. It also has its own peculiarities:
- holes must be drilled with a special tungsten-coated drill;
- you need to install the mixer before installing the bath itself;
- the side of the bathtub must be reinforced with a special gasket so that it does not bend during operation;
- the tap must be located next to the open side in order to easily and without unnecessary problems get to the pipes and valves.
Mixer installation
Next, we install a bath mixer. Fiber pads must be included with the mixer. They need to be soaked for 10 minutes in cool water. If the gaskets are made of rubber or silicone, they do not need to be soaked. Now we push eccentric mixer... It is best to do this with flare nuts.
- Put on the spacers at the attachment point.
- Start screwing on the mixer with your hands.
- When it gets tough, use an adjustable wrench.
- Tighten the nuts in turn, slowly, without distortions.
- After installation, check the mixer for strength - it should not wobble and for evenness.
Required tools
You need to immediately prepare all the necessary tools: the mixer itself and all its components, pliers, building level, tape measure, adjustable wrench, open-end wrenches. Also prepare linseed tow, silicone, sealing tape. You will definitely need a piece of soft cloth, a bucket, wet wipes, and even toilet paper.
A great option is tools without teeth, but if they are not, don't be discouraged, just cover the parts with a rag or towel. This will protect them from damage to the coating. Paper is needed in order to wipe everything and check for leaks. And if there is a leak, then you will have to disassemble and reassemble the structure, and this is unlikely to give you pleasure.
Installation subtleties
It is necessary to screw the gander to the main unit, then turn the hose with a watering can. You do not need to use the keys and tighten the nuts too. Having assembled the model, you can start the installation, which consists of the following steps: wrap the eccentrics with sealing tape, then insert the fittings located in the wall, which remained from the previous tap.
This must be done very carefully. If there is no tape at hand, tow can be a substitute. Next, we screw in the eccentrics, strictly measuring the distance between the inputs on the mixer and using a level. This is done for a reason - the distance should be strictly 15 centimeters. After that, we wind the main block on the eccentrics. This should be done slowly, since it must be secured carefully.
Try not to rush, and if something does not work out, it is better to take a short break and calm down. If the block on both sides is screwed up calmly, then everything can be put correctly.Then the block must be removed and decorative shades must be screwed onto the eccentrics, which must necessarily fit snugly against the wall and close the insertion points of the mixer to the wire. If everything is exactly like that, then your work is done perfectly well. Next, we screw the block back using the reel. In order for the shrinkage to be tight, gaskets from pressure nuts must be used. The nuts need to be tightened with a wrench, but not very tightly.
We open the hot water tap and check how the mixer works. Start the test with a low pressure, gradually increasing the power of the water supply. Be sure to check how the shower works. If everything is in order, then you did it the first time. But if there is a leak, you need to find its source, turn off the water again and repeat all over again. There is a good chance that you have overtightened the nut or some fastener.
You already understood how to install a new mixer instead of a worn-out one, now let's deal with a more difficult task - installing a mixer on a new wall. First, pipes are replaced, the walls are tiled. Further, plumbing pipes are laid out, beacons for plaster are installed.
You must calculate the notches in the wall so that they exactly coincide with the distance from the lighthouse to the tiled plane.This is about 17 centimeters. If you are not sure that you can carry out all these work, then it is better to invite a specialist after all, so that later there will be no problems when installing the mixer.
After all the work done, you can start installing the fittings. In order to install them, you need to postpone the distance between the centers of the fittings - 15 centimeters. The centers should be on the same parallel, the end point should protrude beyond the wall, and the fittings should be flush with a suitable height. Once the fittings have been installed, the mixer can be attached. This is done in the same way as in the previous version.
Now let's consider another option for installing the mixer - on a horizontal surface. Such a need arises when installing a mixer on the side of the bath. Before embarking on such an installation, it is imperative to clarify whether the bearing side of the side can withstand the increased load. To mount this type of mixer, you will need a drill with a set of cutters, wrenches and screwdrivers.
At the beginning of the installation, you need to make a markup in order to then strengthen the plates along it. After marking, holes are drilled in the side of the bath. Carefully study the instructions on how to connect the mixer to the pipeline using the connecting hoses and other components included in the kit. Next, we glue the horizontal surface with masking tape to protect the surface from chips and damage, apply the markings and start drilling the holes that are necessary to install the mixer. After the holes are ready, remove it and process the edges with a special tool.
We suggest that you familiarize yourself with Installing a screen under a bath: how to install a screen with your own hands under an acrylic model, installation instructions
The next step is to collect all the parts and fix them without using keys. If the connecting hoses freely took their places, then everything was done as needed and you can proceed to the final fixing of all parts of the mixer. The next step is to check the mixer for leaks.
The last method of installing the mixer, recognized as the most difficult and expensive, is to install the mixer in the floor. Before any renovation is done in your bathroom, you need to start laying two pipes for cold and hot water. In the floor, recesses are made in the size of the diameter of the pipes, pipes are laid along these recesses to the place where the bathtub will be located. After this, the grooves are closed up, the floor screed is made and the tiles are laid. Then we act according to the technology described above - we mount the mixer, check for leaks, etc.
Installing a new bathroom faucet on the wall
The height above the level of the bath should be within 30 cm, chosen taking into account the size of the mixer and the preferences of the owner. The standard distance between the centers of two fittings is 150 mm, eccentrics make it possible to correct errors in horizontal and vertical direction up to 5 mm.
Extract from GOST 25809-96
Single-handle bath mixer with separate connections, wall-mounted with a shower net on a flexible hose, spout with aerator
Mixer for bathtub and washbasin, two-handled with inlets in separate holes, wall-mounted with a shower net on a flexible hose
Working with fum tape
As an example, consider installing a faucet on a new wall. The pipelines have already been installed, plastered and tiled.
Step 1. Study the instructions of the mixer manufacturer, check its completeness and the presence of all rubber gaskets. The pipe outlets must have an internal thread.
Single-lever wall mixer
If this is not the case, then several problems arise.
- First. We'll have to buy and screw in couplings. These are additional jobs and new places where a leak may appear.
- Second. The mixer will move away from the wall, will not fit snugly against it, the fittings will be visible. This is a major cosmetic defect.
- Third. Due to the increase in the length of the threaded connecting fittings, the risk of cracking in them increases. The shoulder increases, due to which the mechanical stress increases.
We suggest that you familiarize yourself with How to clean a kitchen faucet
Step 2. Clean the pipes from residual materials. To do this, it is better to open the taps on the pipes with hot and cold water for a few seconds. A strong pressure will wash away all the dirt. Such an operation is much easier to do right away than to dismantle the mixer later in case of clogging.
Pipes prepared for mixer installation
Step 3. Take out two eccentrics. On the one hand, they have a ø1 / 2 ″ thread, and on the other - ø3 / 4 ″. Different manufacturers have different attitudes towards the accuracy of the manufacture of eccentrics. We advise you to check its dimensions. To do this, screw the eccentrics into the threaded outlets without a seal, pay attention to the ease of screwing.
Valve installation using eccentric adapter sleeves
Installation of eccentrics
At the same time, notice the correct position of the eccentrics. After you screw them in without a seal, attach the mixer. Pay attention to whether the clamping nuts coincide with the thread and the horizontal position of their position, if necessary, tighten / unscrew a little, depending on whether it is necessary to increase or decrease the distance between them.
Checking the horizontal position of the installed eccentrics
Keep in mind that eccentrics with already wound seals should only be screwed in, twisting will cause leaks. Once again, we remind you that during the fitting you need to roughly remember the position of the eccentrics.
After winding, press the tape along the entire diameter of the eccentric with your fingers until the thread protrusions appear.
Step 4. Screw one cam into the pipe fitting. The eccentric position is the same as in the trial assembly. Don't try too hard. If the eccentric is screwed in very easily, then you need to unscrew it, remove the old seal and apply a new one, but in an increased amount.
Step 5. Screw in the second eccentric. Don't screw it up to the end. When there is about one turn left, try on the mixer several times, pay attention to whether the clamping nuts fit exactly. Repeat the operations until the axes of the mixer nuts coincide with the axes of the eccentrics. The nuts should be easy to profit by hand.
Screwed eccentrics
Step 6. Replace the decorative cups. They are threaded and screwed onto the protruding thread of the eccentrics. Screw them all the way to the wall.
After installing the eccentrics, we wind the cups
Step 7.Insert rubber seals into the tightening nuts, they are supplied with the mixer. Screw the nuts on the eccentrics with your hands until they stop. Tighten with a wrench to completely seal.
Mixer installation
Step 8. Check the tightness of all connections, open the cold and hot water supply taps. Leaks can be so slight that they can't be noticed right away. Place a piece of paper under the joints and wait a few minutes. If wet spots appear on it - a problem.
Step 9. Assemble the spout, flexible hose and shower head on the mixer. They also have rubber gaskets, do not use too much force when tightening the nuts.
How to attach the shower hose and hand shower
During the final assembly of the mixer work carefully, do not damage the decorative outer coating of the mixer.
Watering can connected to the hose
Check if the mixer and shower are working
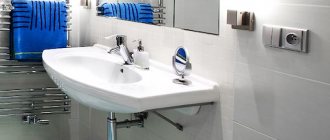
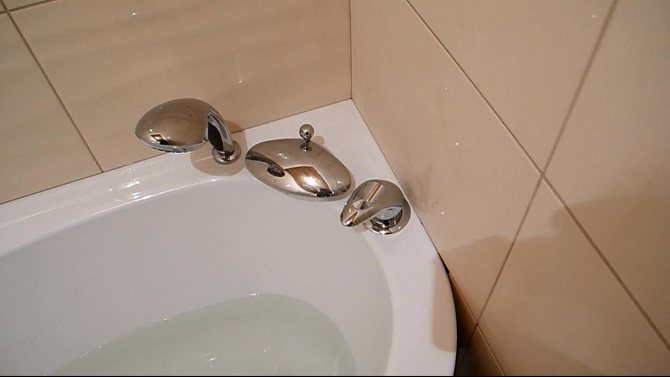
On-board mixer
Very convenient position of the mixers, facilitates the process of adjusting the water temperature, looks spectacular. It can be installed not only in sinks, but also in bathtubs. The only prerequisite is the presence of special technological holes. As far as ceramic sinks are concerned, they all already have factory holes. How to make holes in an enamel and acrylic bathtub?
The work is quite complex and requires certain skills and care. To make holes, you need to have a marker, a feather drill for ceramics and glass, a screwdriver or drill, tape and plasticine.
Step 1. Mark the place for the hole. Seal it tightly with tape, preferably transparent.
Step 2. Make a small collar of plasticine about 0.5 cm high and twice the diameter of the hole. Glue the plasticine firmly to the bathroom, pour water into the resulting container.
Step 3. Drill a Ø 5–6 mm hole in the center of the mark with a metal drill. The rotations of the drill or screwdriver are small, maximum 500 rpm. Do not press down hard on the drill. Drill carefully, the thickness of the bath is small, do not allow a situation where the drill falls sharply and the chuck hits the bath.
Step 4. After the through hole is formed, the water will go away. Clean the surface at the drilling site. Make a small cap out of plasticine and fix it under the hole on the back of the tub. The fixation must be airtight and retain water.
Drilling a hole for a mixer
Step 5. Insert a Ø 10–12 mm drill bit and enlarge the hole diameter. Remove the tape with a shoulder, clean the surface from chips. Remove the bottom cap.
Finished hole
The main hole is ready, now you need to work with a rubber and emery cloth nozzle, the revolutions of the chuck are maximum, the pressure is minimal. Make markings for the mixer elements, cover the surface with transparent tape. It will minimize the risks of enamel chipping. The slower you work, the better the edge of the hole. If there are small chips, it doesn't matter, they are covered by the mixer surfaces and become invisible. All work will take approximately 2-2.5 hours.
Let's start with the simplest option: the water sockets are made, the distance between them is standard 15 centimeters. Horizontally, the pins are approximately at the same level. All small errors can be eliminated by adjusting the eccentrics.
Step 1. Check the completeness of the mixer. All elements of the device, eccentrics and seals must be present.
Mixer kit in a box
Eccentrics from the kit
Wall-mounted mixer
Step 2. Turn off the water, remove the plugs from the sockets. Clean thread, remove dirt. If plumbing has not been previously connected to the pipes, then it is advisable to rinse them. To do this, place a container at the bottom to collect water, cover the sockets with a cloth to prevent a strong horizontal stream and open the water tap fully.
Prepared Outputs
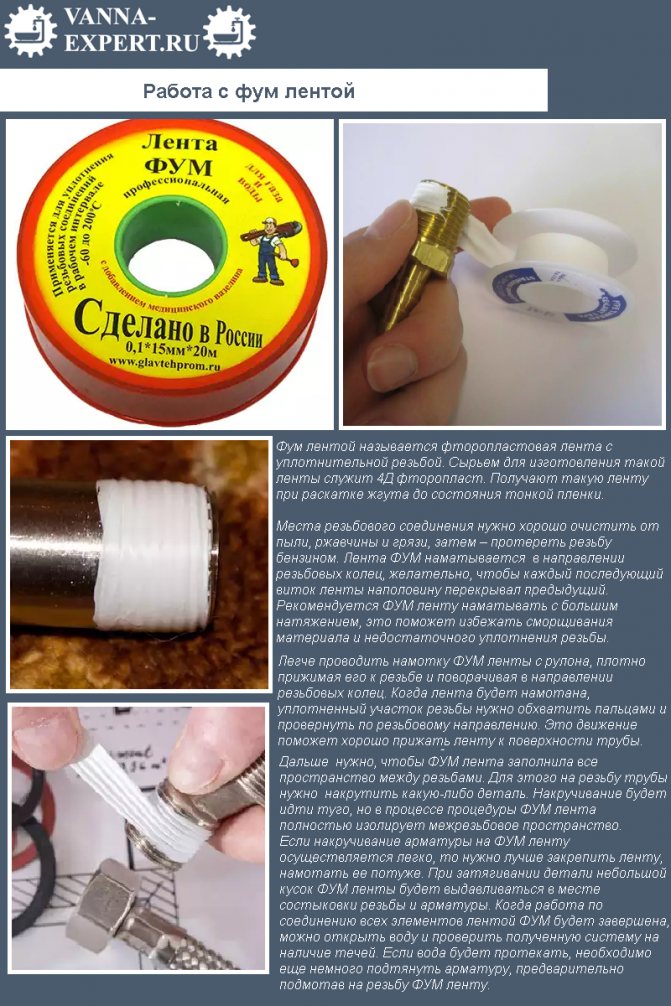
Step 3. Wind FUM tape on the eccentrics.
It looks like an eccentric, on the thread of which a fum tape is wound
We strongly recommend using tape rather than traditional tow. It holds water perfectly, for reliable sealing of threaded connections there is no need to tighten them too much. We have already mentioned above that eccentrics from silumin react negatively to great efforts. But the tape has one unpleasant property - it can only be used once. If you have not wrapped enough sealant, then you cannot overwhelm the old one. It is completely removed and new material is used for sealing.
Winding flax onto thread
Applying sanitary paste to linen
The paste protects the flax from rotting
Instead of a paste, you can apply a sealant to the flax
To find out the approximate amount of tape to be wound, screw the eccentrics into the thread without a seal. See if there is a large gap between them, if they are very loose. If the screwing is normal, then you need to wind 5-6 rows of tape, if the eccentrics are noticeably loose, then rows of 10-12 are required.
We suggest that you familiarize yourself with the water from the washing machine