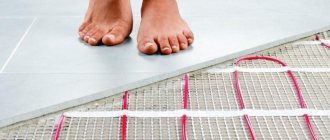
Optimum temperature parameters
Setting up a water floor heating is carried out depending on individual needs. Someone likes it when the room is warm, while someone prefers invigorating freshness, even in the most severe frosts. But despite this, there are general standards that were developed taking into account sanitary standards, these include:
- floor heating up to 28 degrees;
- in the presence of another source of heat or when living in the room all the time, the ideal level from 22 to 26 is the optimal conditions for a person;
- if this type of heat source is the only one, or it is in the bathroom, corridor, on the balcony, or in a house where they do not live permanently, it is permissible to raise the degree to 32.
Therefore, when regulating water floors, in addition to your preferences, so that the microclimate in the apartment is healthy, these standards should be taken into account.
Water floor control sensors
Depending on the monitored environment, thermostat sensors are:
- underfloor heating temperature control;
- air temperature control.
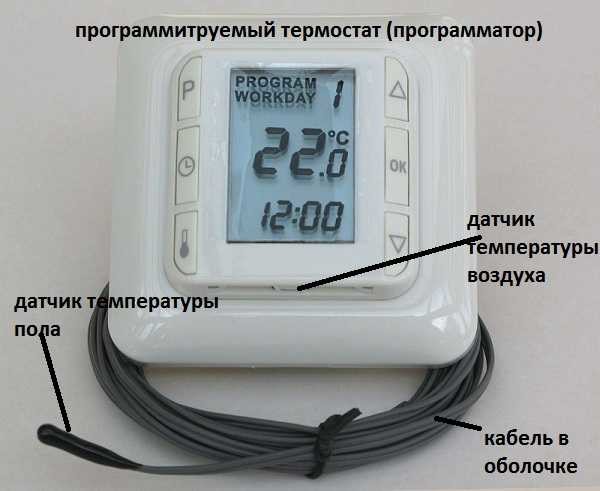
Air condition sensors are usually located in the thermostat housing. On the one hand, it is convenient - there is no hassle with the installation, and on the other hand, it creates certain difficulties. In the sense that the thermostat must be positioned subject to a number of conditions:
- there should be no sources of heat or cold nearby;
- sunlight should not fall on it, and there should not be a draft nearby either;
- you need to put the thermostat so that the air sensor displays the temperature in the room as accurately as possible, therefore it is advisable to place them at a height of 1-1.5 meters.

Some thermostat models can control both the floor temperature and the room temperature.
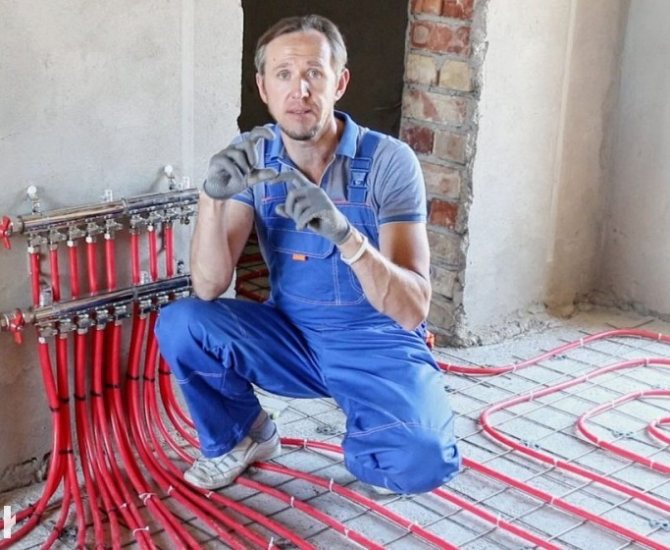
Remote floor temperature sensors. It is a small device that is attached to the end of a long cable. This appliance must be fixed in the floor at a distance of at least 0.5 m from the wall. It is placed at an equal distance from the nearest pipes with a coolant. The other end is wound on the thermostat and connected to the corresponding terminals.
The floor sensor is installed during the installation of pipes, before the screed is poured. In order to be able to replace (they sometimes fail), it makes sense to lay the corrugated hose. The end of the sleeve, which is in the screed, must be insulated so that the solution does not get into it. Place the other end in a groove on the wall and lead it to the thermostat junction box. This installation of the water floor temperature sensor is troublesome, but it allows you to change the failed device during the operation of the floor without any problems.
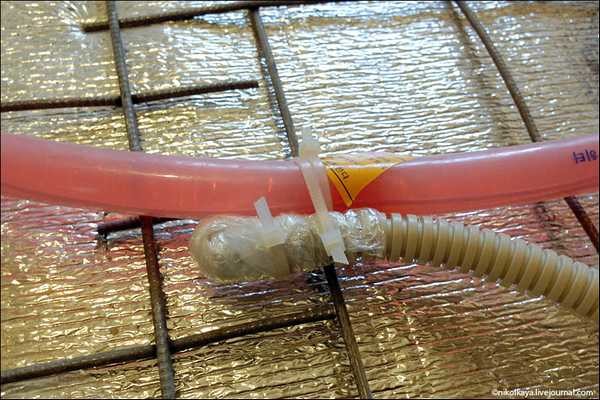
It is better to install the sensor in a corrugated hose, then it can be changed
When using a flooring system, the installation principle remains the same, but then the corrugated sleeve will need to be attached to the structure and make sure that it is not pinched.
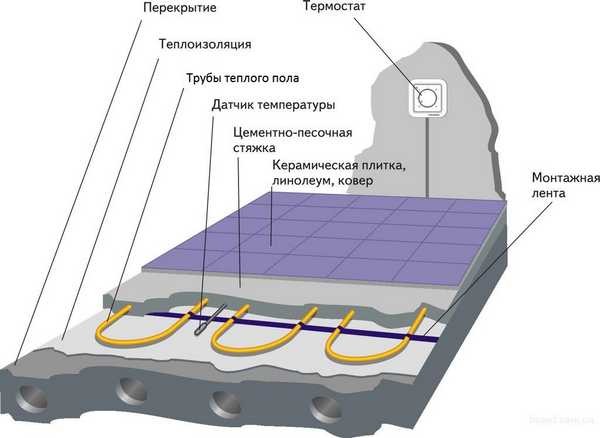
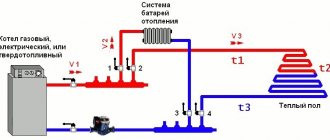
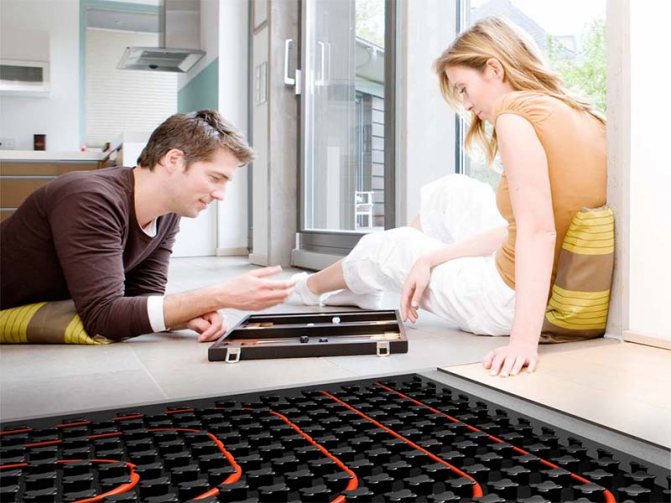
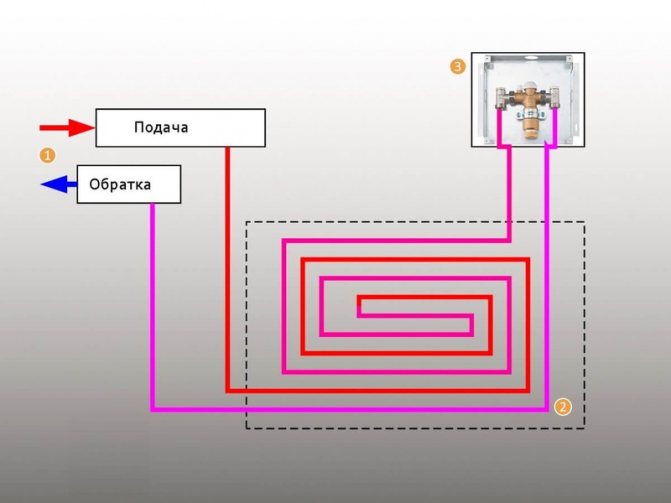
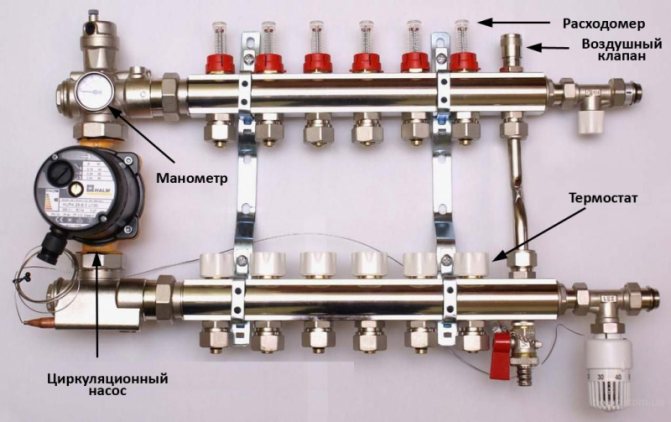
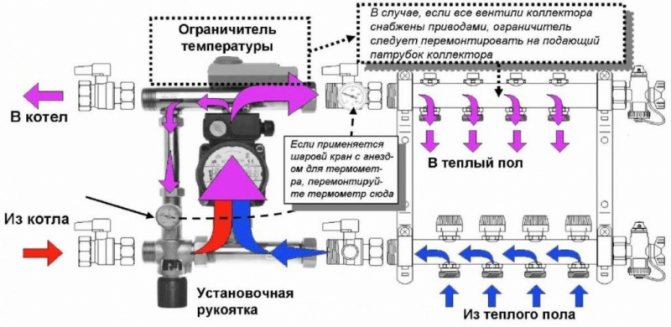
An example diagram of a water floor device with a temperature controller and a sensor
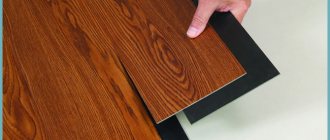
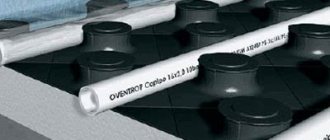
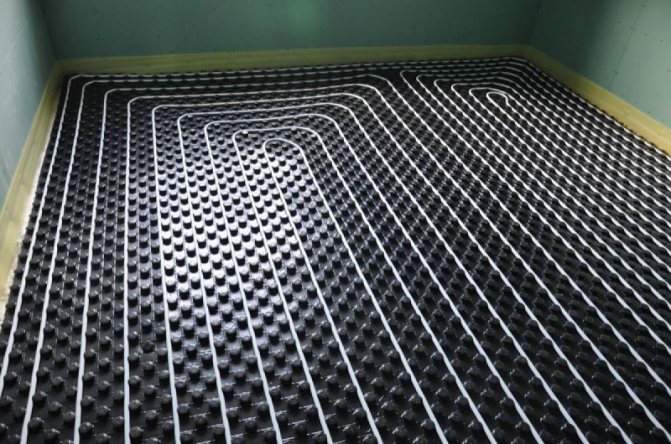
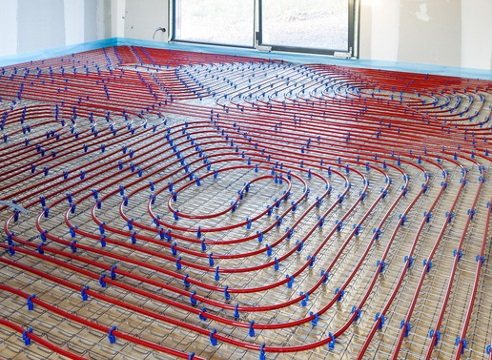
Depending on the thickness of the screed and the type of flooring you are planning (hard or soft), different wire densities may be required. There are both soft and hard wires. For installation under the tiles, there are modifications that are resistant to aggressive environments (needed if you will not use the hoop arm).
Connection diagrams
A water-heated floor often acts as an additional source of heat.It is mainly combined with a general heating system or hot water supply. It is on the connection method that the features of adjusting warm floors depend.
There are several schemes for connecting water heating devices.
Combined
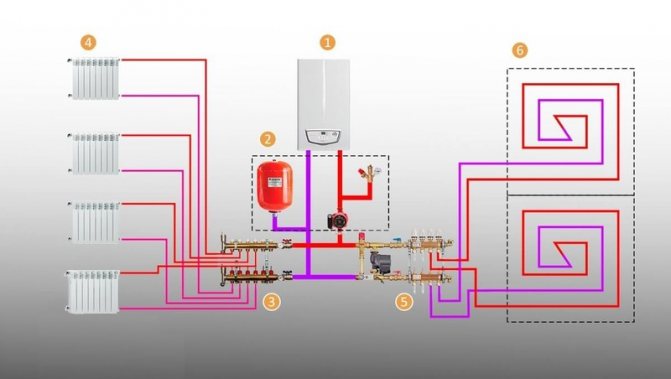
A popular and technologically justified method is combined heating, which includes a radiator and underfloor heating system. However, to equip this structure, we need:
- boiler;
- pump;
- expansion tank;
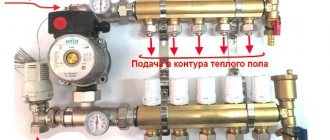
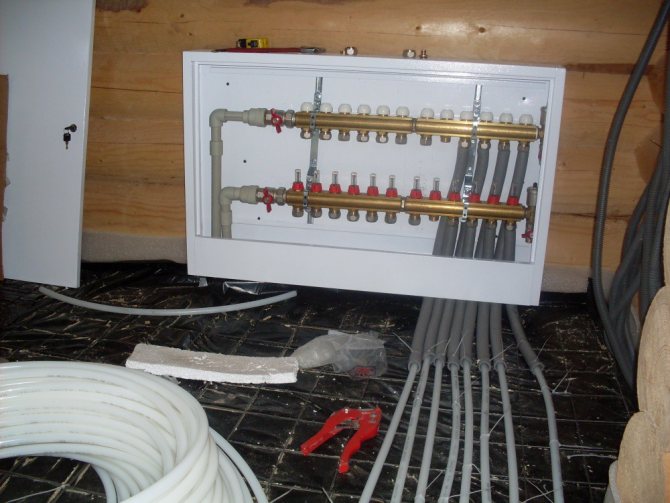
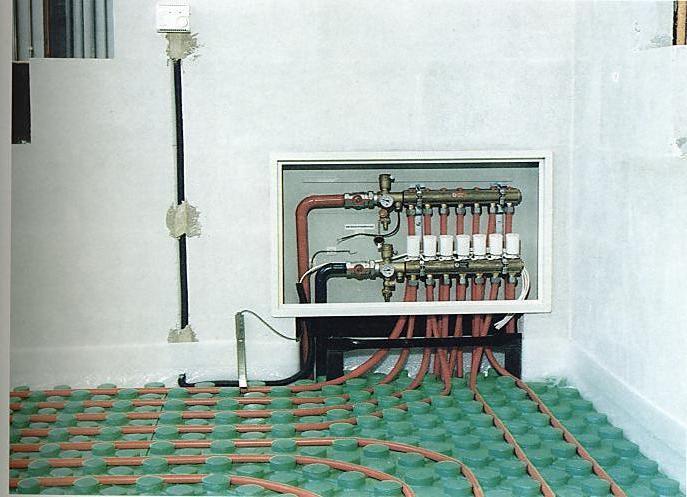
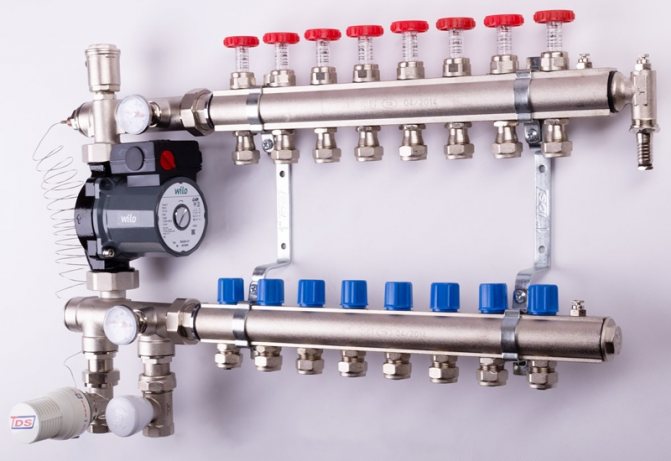
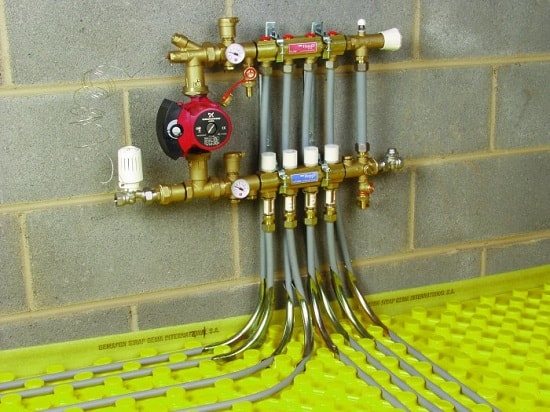
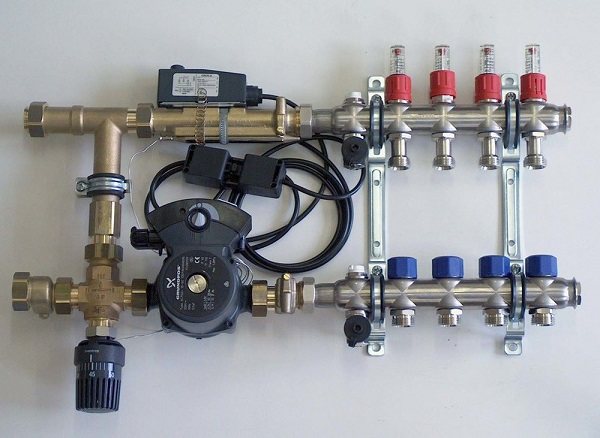
- collectors for radiators and underfloor heating;
- radiators;
- pipes.
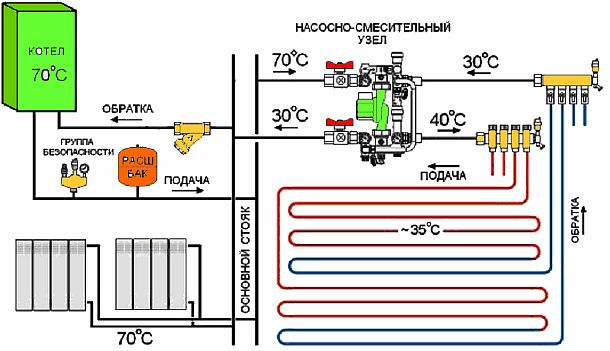
It is important to combine different heating devices correctly in order for them to function effectively. The main ways of connecting radiators with warm water floors into a single structure:
- Parallel connection of the manifold unit to the heating system. The circuits are cut into the line to the batteries. The circulation of the liquid is provided by a pump.
- Connection by rings, primary or secondary. The pipeline, when laid, forms rings, they cut into the supply system in several places. The coolant temperature depends on the distance between the coil and the heat source.
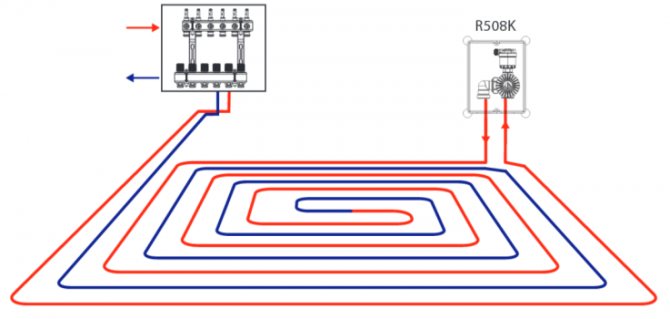
- Connection to the coplanar collector, to its extreme point. Water moves in the circuit due to the operation of a common house pump located in the generator room. In this case, the underfloor heating has priority when supplying hot heat carrier.
- Using a hydraulic distribution unit is a great option: if there are several heating devices, with a difference in the length of the floor loops and the water consumption in them. In this scheme, you also cannot do without a coplanar collector.
- Local connection of the circuit through a unibox in a parallel circuit. Suitable for rooms with a small area: bathroom, corridor.
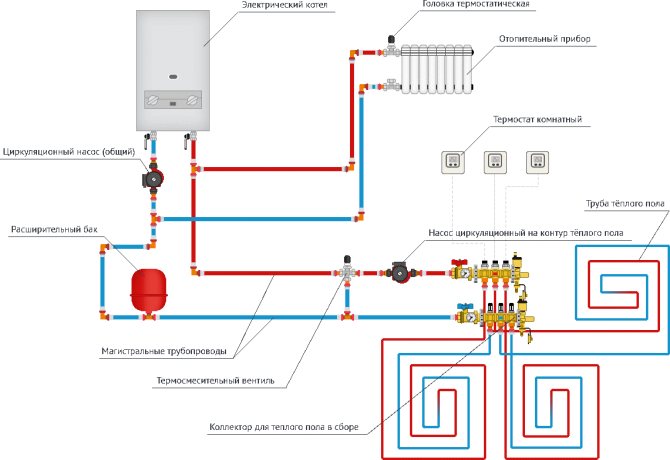
Radiator connection
A common way to feed underfloor heating from radiators. With this scheme, the temperature of the liquid in the water floor is directly related to the degree of its heating in the radiator.
For the construction of this system, a line is needed that has a supply with a return flow, as well as floor pipes and a unibox. Since the water in the batteries heats up to 80 degrees, it is recommended to connect the floor loops to the return line.
From the boiler
This is a simple option - the installed boiler is designed only for heating water for a warm floor, so no regulators are needed.
In the presence of a modern gas boiler, it is able to regulate the temperature itself, it is enough to set the required indicator on the panel. Even with a two-contact system, when the boiler is heating water for batteries and underfloor heating, the values for each device can be easily adjusted by the boiler automation.
When using a boiler that runs on solid fuel, a compensating barrel is required. The level of temperature and pressure is regulated by installing a safety unit on the barrel, which consists of a pressure gauge, an air release valve and a thermostat.
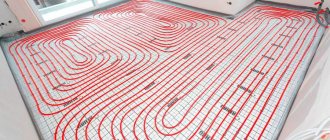
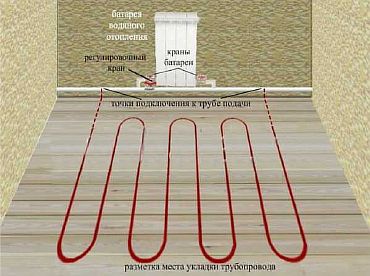
For your information! The functioning of the water heated floor is influenced by the pipe laying scheme - find out what the laying schemes are, as well as how to connect the heated floors. With a "snake", the heating will not be uniform, with cold and hot areas. When placing the contour according to the "snail" scheme, uniform heating is ensured.
Step-by-step instructions for adjusting the temperature
To ensure a comfortable stay in the room, you need to perform some basic steps.
Connection diagrams
- Initially, on each battery, it is necessary to bleed air before water flows out of the tap in a trickle.
- Then it is necessary to adjust the pressure in the batteries.
- To do this, in the first battery from the boiler, you need to open the valve by two turns, on the second - by three, and then in the same way, increasing the number of turns of the valve to be opened on each radiator.Thus, the coolant pressure is evenly distributed over all radiators. This will provide it with normal passage through the pipes and better heating of the batteries.
- In a forced heating system, the circulation of the coolant, the control of rational heat consumption will be helped by control valves.
- In a flow-through system, the temperature is well regulated, thermostats built into each battery.
- In a two-pipe heating system, it is possible to control not only the temperature of the coolant, but also its amount in the batteries using both manual and automatic control systems.
Temperature regime
The principle of operation of a water underfloor heating is different from the functioning of other heating devices. The main difference is in the level of heating of the coolant. The radiators are supplied with water heated to 80 degrees, for water floor circuits a maximum of 42 degrees. At this temperature, the heating of the floor covering will reach 26 degrees.
There are two methods for adjusting the temperature of water underfloor heating:
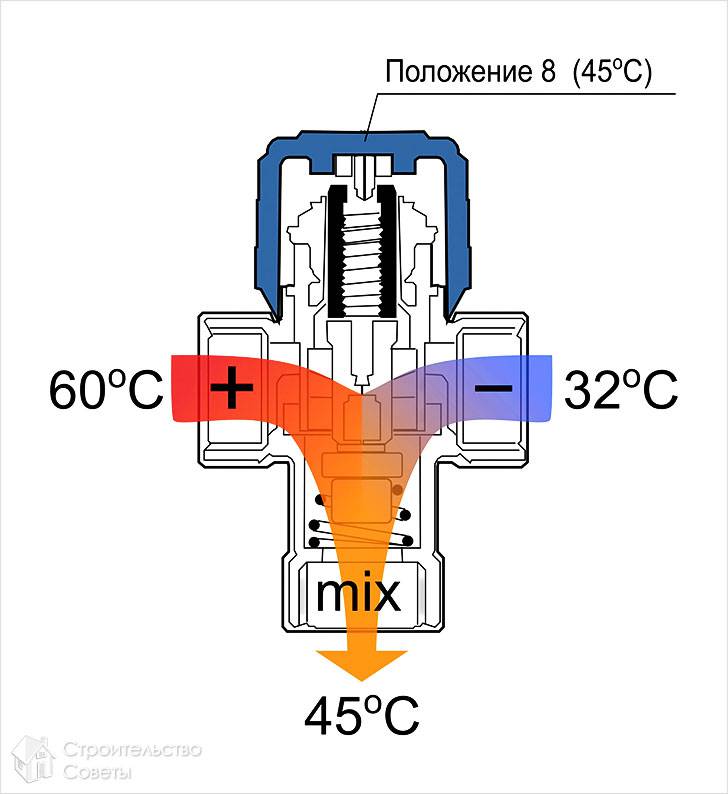
- Exercising control in the collector supply unit, by mixing waste water. This is achieved by equipping a three-way valve with a thermostatic head. When working, the temperature of the water, not the air, is taken into account, and a constant volume of consumed liquid is provided, with a slight fluctuation in its temperature.
- Restricting the flow of heated coolant into the pipes. This also requires a thermal head, which is placed on the 3-way valve and is used to shut off the return flow. In this case, the supply and return taps are connected to the bypass, through which the flow is regulated by a restricting valve. Since underfloor heating is inert, water is supplied to the pipes at a nominal temperature, and only its consumption changes.
In both methods, the thermostatic head is repelled in operation from the return temperature.

System refueling rules
It is impossible to properly adjust the functioning of the water structure if the volume of liquid in the pipeline changes independently. This can happen if there is air in the system - see the instructions on how to bleed the air from the heated floor yourself. Therefore, it is important to both professionally assemble the structure and fill it in correctly.
For high-quality filling of the system, both collector branches should be equipped with automatic air vents. The filling of the floor hinges should be carried out separately from other heating devices. The generator and radiators are pre-filled. The manifold inlet valves are closed before refueling.
In order to properly start the floor, you need to connect a hose from a water supply source or pump to the supply tap, and an air outlet hose to the return.
It is necessary to start filling the water floor from the collector and its distribution units. To do this, the flow meters of the supply valve open to full, at this moment the taps on the return line should be turned off.
The loops are filled one by one, the water is started up from the bleed hose until it comes out clean and without air bubbles. The water should be started with a small pressure, this will make the process of air exit from the pipes more even. After threading all the loops, the device can be turned on.
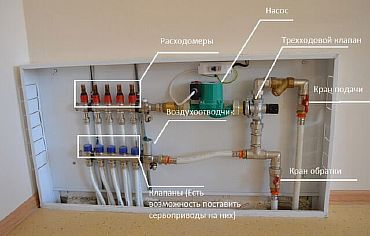
Working with collector flow meters
Underfloor heating balancing means the definition of norms for each loop. Indeed, from the size of the floor branch, so that in the process of passing through it the coolant cools down according to the calculated value, the amount of water is different. The volume of fluid that the loop passes through is the heat load on it.
Not infrequently, it is recommended to determine the flow rate of the coolant, starting from the power of the pump, that is, the volume of the incoming fluid is divided proportionally by the length of the loops.However, it is worth abandoning this method, since it is not easy to accurately calculate the size of each coil using this method.
In addition, calculations in this way lead to a discrepancy between the pressure in the hinges and the calculated value, which makes it impossible to customize the structure.
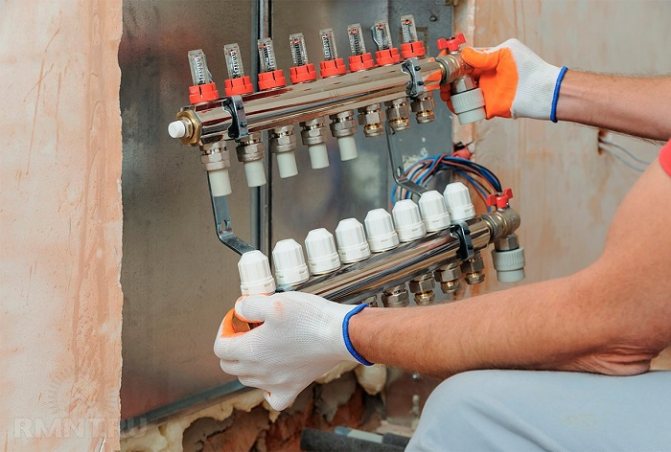
The very same regulation process with flow meters is simple - an article with step-by-step instructions. The throughput of the device is adjusted taking into account the model, either by turning the body, or by the stem using a key. The device displays the amount of water in liters passed per minute, you just need to set the desired value.
Basically, always, when adjusting the throughput of one loop, there is a change in others. Therefore, the process should be repeated sequentially with each flowmeter. Significant failures indicate that the valve has poor flow capacity, or that the circulating pump has poor performance.
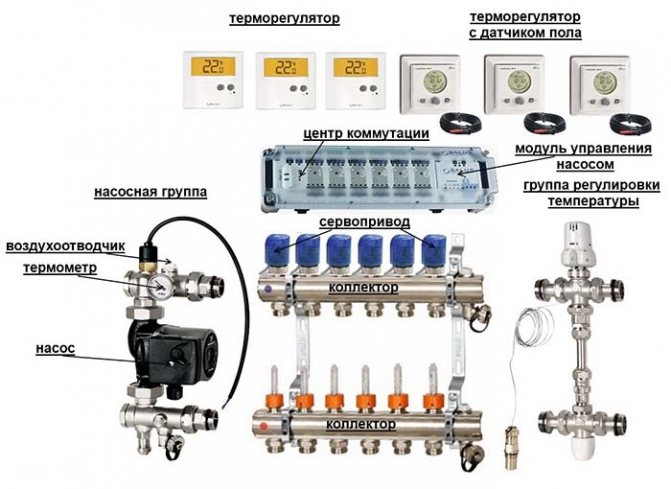
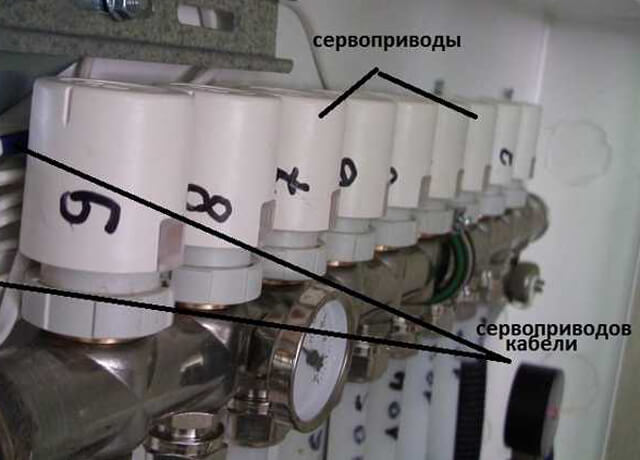
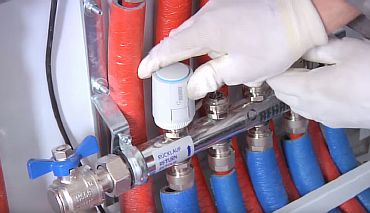
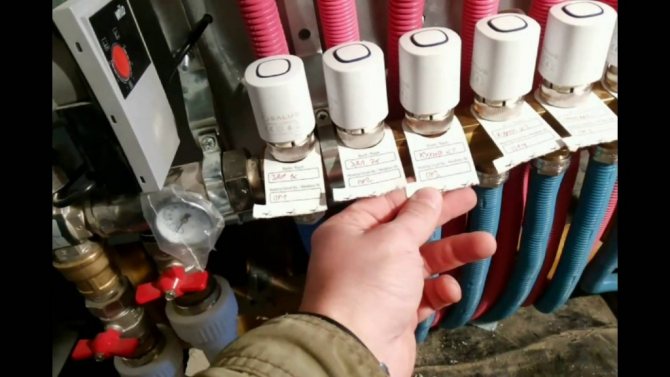
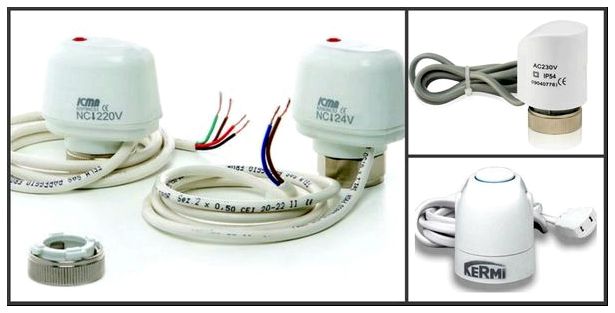
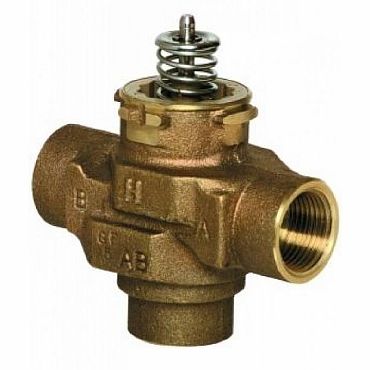
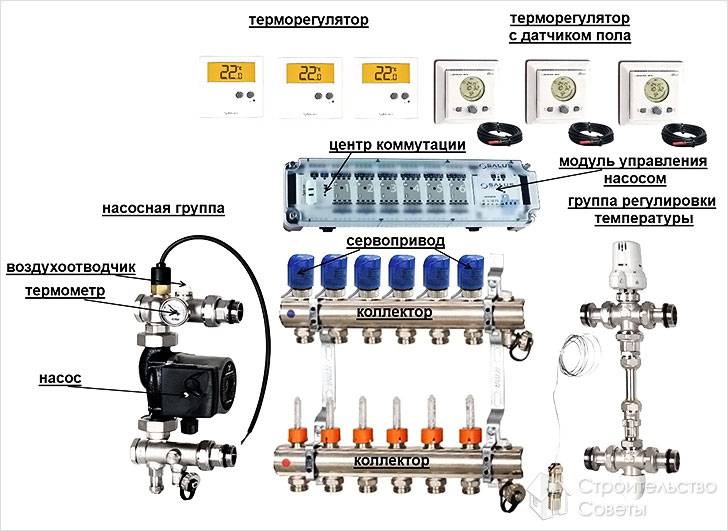
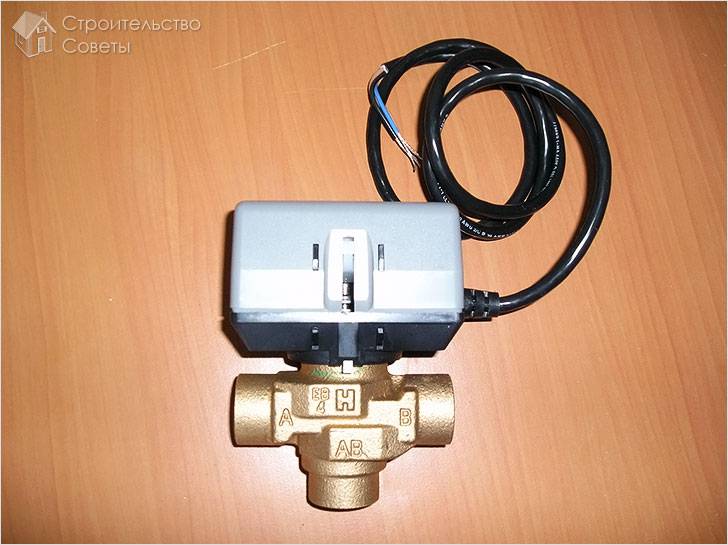
Servo drives for underfloor heating systems
There is no way how to adjust underfloor heating in automatic mode without a servo drive (another name for a servo motor). This is an electrothermal device, the main purpose of which is to open and close the supply of hot coolant.
The main element of the servo is an elastic bellows, which is in the form of a sealed cylinder. It is filled with a substance that can change its volume depending on temperature.
There is an electrical heating element around the bellows, which is energized after a signal from the thermostat. When it starts working, the substance in the cylinder begins to heat up and expand. The bellows, which has increased in size, exerts pressure on the stem located below, which shuts off the coolant supply. Since these devices use only thermal energy and electricity, they are usually called thermoelectric.
There are servos normally closed and normally open. Their name indicates the position of the valve during a power outage. In the first case, the valve in the normal position is open, and after receiving a signal, it closes. In the second case, everything happens the other way around, first it closes and then opens.
Experts recommend using normally open servomotors in domestic operating conditions. This choice is explained by the fact that in the event of a breakdown of the device, the coolant will not stop circulating through the system, and it will not defrost.
Ways to adjust the temperature of underfloor heating
To achieve the required temperature values that meet the standard specifications, you need to configure the device.
Correct adjustment of underfloor heating is possible depending on the type of room. A suitable temperature level for residential premises is 20 to 28 degrees. For a kitchen, corridor or bathroom, heating from 19 to 24 degrees is suitable.
For your information! The permissible humidity in the room is 60%, but the optimal indicator is 40 - 50%.
The main purpose of the regulation is to maintain a constant temperature difference when entering and leaving. To determine the temperature difference, the thickness and material of the screed, and the laying spacing of the pipes, are taken into account.
The installed equipment affects the methods of adjusting the structure; it can be mechanical and automatic. The device responsible for the water flow is configured; this can be done by mixing the hot and cooled coolant, or by limiting it.
Automatic adjustment
If the underfloor heating is adjusted automatically, then the main adjustment elements are the RTL thermal head or the unibox valve. The level of floor heating depends on the set indicator, the more it is, the hotter the liquid going through the pipes will be, and therefore the flooring will warm up more.
How to automatically adjust the water heating floor - this can be done in two ways:
- Using a thermostatic self-regulating device, it is adjusted by valves or a valve with heads.
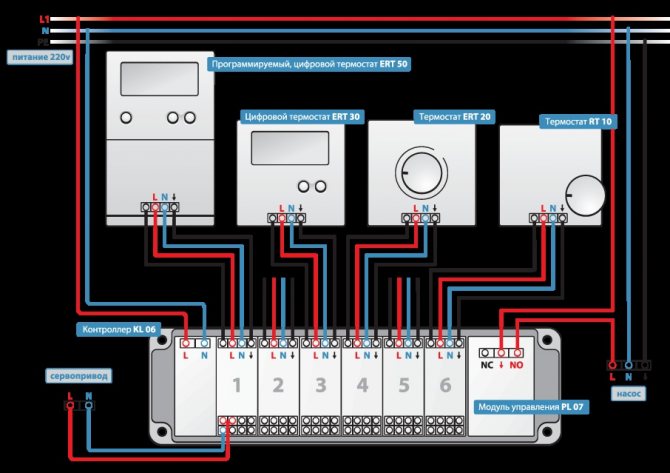
- With the help of an electronic system, it includes an electrothermometer, a controller, and electric drives.
Electronic control devices are expensive, but they can be used to program floor heating and adjust it for optimal and efficient operation.
Electronic regulators are represented on the market by many companies, the most popular are "Uponor" products.
Manual temperature equalization
The manual configuration process is simple but time consuming. The water heating temperature is adjusted by opening or closing the valves. The procedure becomes much easier with a device that doses the feed into each branch.
For your information! Underfloor heating will function effectively when manually adjusted - with intensive water circulation in the pipeline, this can be achieved using a separate heat pump.
Before you start adjusting the temperature level in the water floor, you need to make sure that the system is full and that there are no air locks. Adjustment is the supply of coolant to each coil, and the setting of the level of its flow. The control is carried out taking into account the difference in flow temperature, at the inlet and outlet. This procedure must be carried out annually.
Important! The temperature of the incoming and outgoing heat carrier in all loops should be approximately the same, the permissible difference is 5 - 15 degrees.
Control over the adjustment process of the water floor will facilitate the use of a thermometer, laser or electric. Its presence will significantly reduce the setup time.
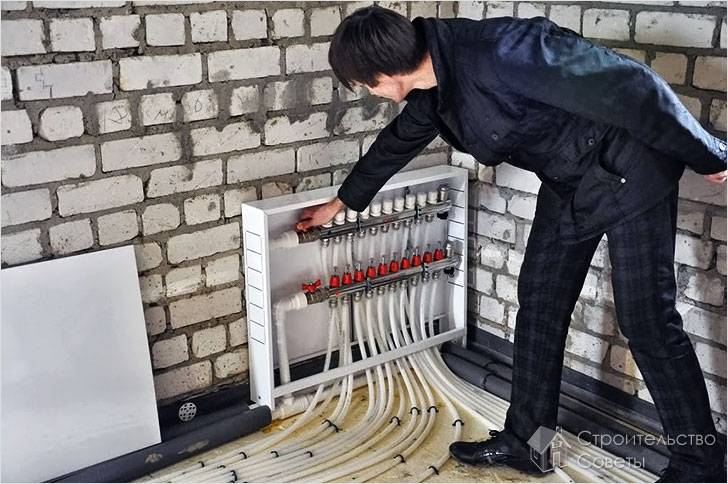
Adjustable underfloor heating: the basics of starting and setting
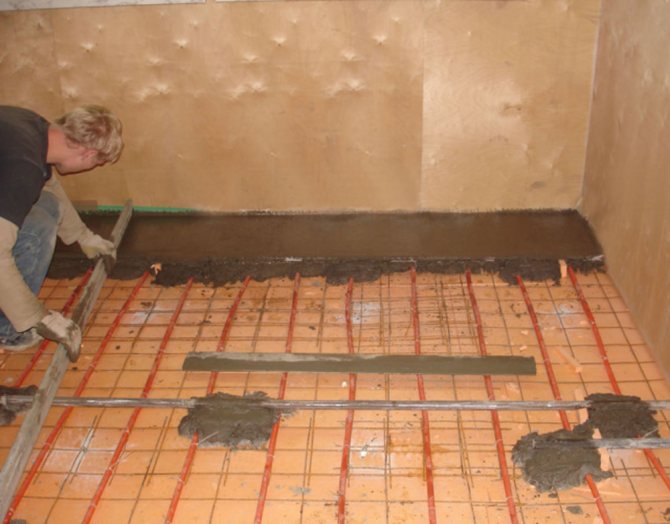
For the first time put into operation after installation, an adjustable underfloor heating needs to be adjusted, the quality of which determines the service life of the unit. It is not just the heating system that is configured, but also the floor itself: the screed, the topcoat to which heat is transferred from the pipes.
The heating system must be started before you apply the topcoat to the floor to ensure that the concrete is completely dry.
Follow these tips:
- It is important to start the system for the first time with a dry concrete screed. Such a cement-concrete mixture hardens within 17-28 days.
- In the case when the repair lasts a long time and the autumn-winter period has already begun, you can gradually start the system, increasing the temperature by 1 ° C per day. It is important to maintain a period of 2 weeks, starting from pouring the screed to turning on the system for a gradual warm-up. By doing so, you will completely dry the finished screed without the risk of heat shock, stress or cracking of the cement.
- Make sure the screed is completely dry before laying the topcoat. Materials such as laminate and parquet are highly sensitive to moisture.
The first step is the preparation stage. How to regulate the underfloor heating so that the efficiency is as high as possible and the system is reliable? This question arises both at the first start of the system, and annually before the next start.
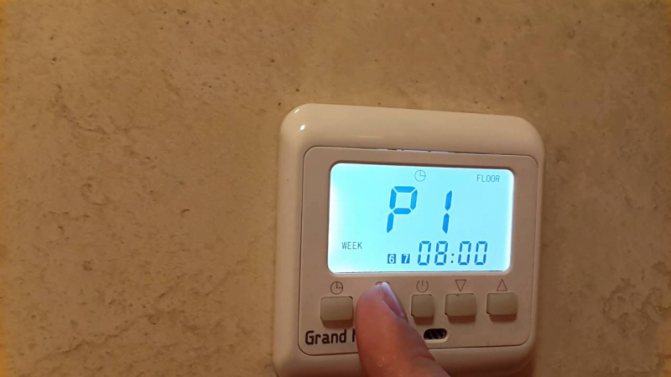
How does the system start? Air is started up and pipes are filled with coolant. Despite the fact that many adjustable warm floors are equipped with special sensors, as well as programmers (electronic or radio-controlled), you still have to take part in the launch.
We can say that this is the primary manual adjustment of a warm water floor.

Even if your adjustable underfloor heating heats the entire room or acts as an auxiliary heating element, before starting the system, you must make sure that the valves and valves on the distribution manifold are closed - both for supply and return.
When an adjustable underfloor heating acts as a supplement to heating radiators, you first close the loops of the water floor, then fill the main heating system with coolant.
After that, we open the supply and return on one loop and turn on the circulation pump at minimum speed. So the circuit will be filled with water in stages, and air locks will not form.This is the main principle of operation of an adjustable water-type underfloor heating. In this case, the air is removed through the air vent located on the manifold.
The next step is to start the boiler for heating, while the temperature regime is 30-40 ° C. You will need to track the supply of warm water to the open loop, and then its return in the return. Is that all right? This means that the circuit is functioning properly, and the supply and return valves overlap; then the same is repeated with another contour. This happens until the moment when the entire system is filled and de-aerated.
Further, before setting up an adjustable underfloor heating, open all the valves, and then wait (this point is important when fully manual regulation is performed, without the use of automation: controllers, regulators, servos). Do not forget that such a floor is an inertial system that is not able to react to changes immediately. The system should warm up, then you can check the temperature of each circuit.
So, you make some changes, for example, you perform heating or cooling by controlling the heating temperature of the coolant in the boiler, or you adjust the volume of the coolant that enters the circuit.
Many factors affect the responsiveness of a system. Among the main ones: the length of the contour, the laying pattern, the type and diameter of the pipes, the thickness of the screed. Based on these parameters, the response speed can range from several hours to several days.

Adjustment of a warm water floor is:
Manual
Congratulations, you have a warm floor! You guessed it how to regulate the temperature: it is done manually using a manifold.
Next, we start the loops of the adjustable underfloor heating (at the entrance and at the return) to the distribution manifold. In this case, the temperature of the coolant that enters the collector and the loops is the same.
However, at the exit of each loop, the temperature can be different, depending on the length of the loops and other conditions.
What temperature do you need? What kind of home heating and heat transfer will be optimal for you? Depending on the requirements, you can adjust the water floor comb. As a result, the volume of water entering the loop, heat transfer, and, accordingly, the floor temperature will change.
There are two ways to manually regulate the temperature regimes of the water floor:
- Using control valves. In this case, you yourself determine what temperature to set. For example, if it gets colder outside, you will have to manipulate them more often.
- Using a flow meter. Here you will also need to adjust the taps, but in this case it is much easier to set up the system. Flowmeters are located on the manifold at the inlet to each loop. The difference between the flow meters should be 0.3-0.5 liters.
Automatic
How to regulate the warm floor so that it is as comfortable as possible? Since manual adjustment does not meet this requirement, it is possible to automate the work.
To do this, we will use the following equipment:
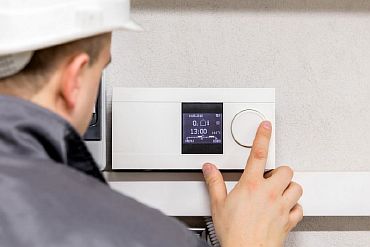
- thermostats and thermostats (control units) that control the temperature based on the readings of floor and air temperature sensors;
- servo drives - executive installations for reducing or increasing the volume of the coolant entering the loop.
Thermostats (thermostats) are divided into mechanical and electronic. A budgetary, but most reliable option is mechanical thermostats. To use them, you will have to manually set the required temperature range.
If you have an electronic regulator, then it monitors many parameters, allows you to program the heating system - it depends on the capabilities of the model, the permissible temperature in a certain zone, time of day, etc.However, the cost of such a unit will be much higher.
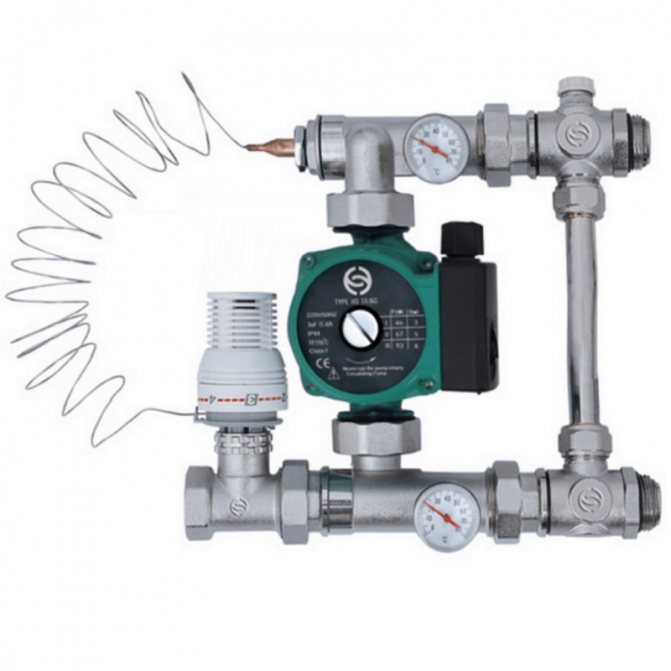
Hydraulic leveling system
Warm water floors are a reliable and safe construction. But for it to really be that way, it needs to be set up correctly. How to regulate water underfloor heating in a private house - for this it is better to equip a collector group equipped with flow meters with a working pressure of 6 bar. If the house is equipped with central heating, then this capacity is not enough.
If there are servo drives on the manifold, the water flow is automatically adjusted as needed. However, the preliminary configuration still needs to be done. In the absence of this drive, one cannot do without such an adjustment.
You can calculate the flow rate of the coolant using the formula:
Gsp = Q / (1.163 * Δt), in which
- Gud is the specific volume of water per m2;
- Q - floor power indicator;
- Δt is the difference between the temperature of the heating agent during supply and output;
- 1.163 is the correction factor.
In the future, to calculate the volume of fluid that passes through the loop, the specific flow rate should be multiplied by the surface area.
The simplest option for hydraulic alignment:
- calculate the volume of water for each loop by multiplying the floor area where this contour is laid by 8.6 (average);
- start the pump at first speed;
- set the thermal head to 30 degrees;
- check that the liquid passes freely through the loops, and all the air has escaped;
- adjust the flow device on each circuit so that a value is obtained equal to the water flow rate that you calculated.
These actions are pre-adjustment, that is, in fact, during the operation of the warm floor, additional adjustment will be required, taking into account personal preferences for comfort.
How to properly run underfloor heating
To put into operation underfloor heating, you must wait until the screed is completely dry. This can take up to three weeks. If time is running out, you can speed up the drying process by adding 1 degree of heat every day. This can be done only after 14 days.
Moisture should come out of the concrete evenly. Otherwise, the screed will begin to crack, and this will violate the integrity of the heating cake.
All heating circuit valves on the manifold must be fully open immediately before starting. The 3-way valve also opens to maximum. At the end, turn on the circulation pump. After this stage, you can start adjusting the temperature of the coolant.
Three-way valve capabilities
If the manifold has a three-way valve, then the adjustment is done using the servo. In this case, the control over the indicators will be carried out by the mixing valve. In the process, the three-way valve can be turned as desired, and as many times as needed. Setting up the mixing valve, however, is more difficult.
Why do you need a comb for a warm floor, we will analyze its structure and principle of operation, how to choose, instructions with photos and videos, how to install and configure or do it yourself.
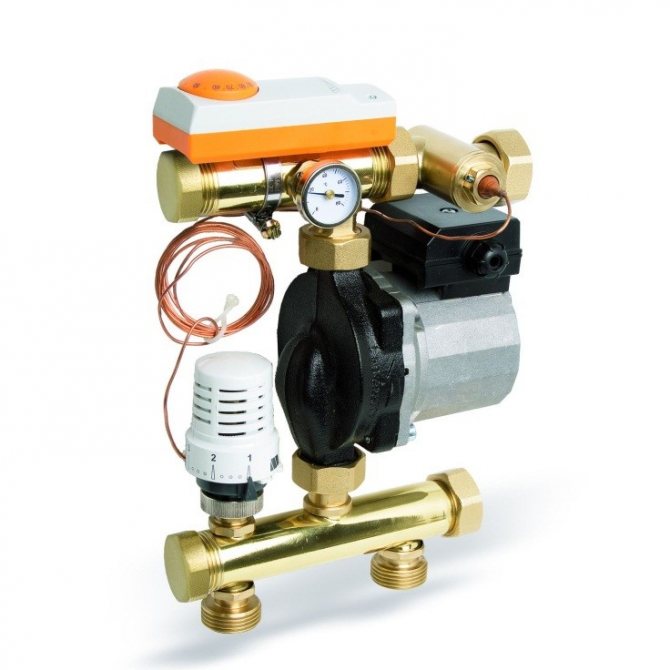
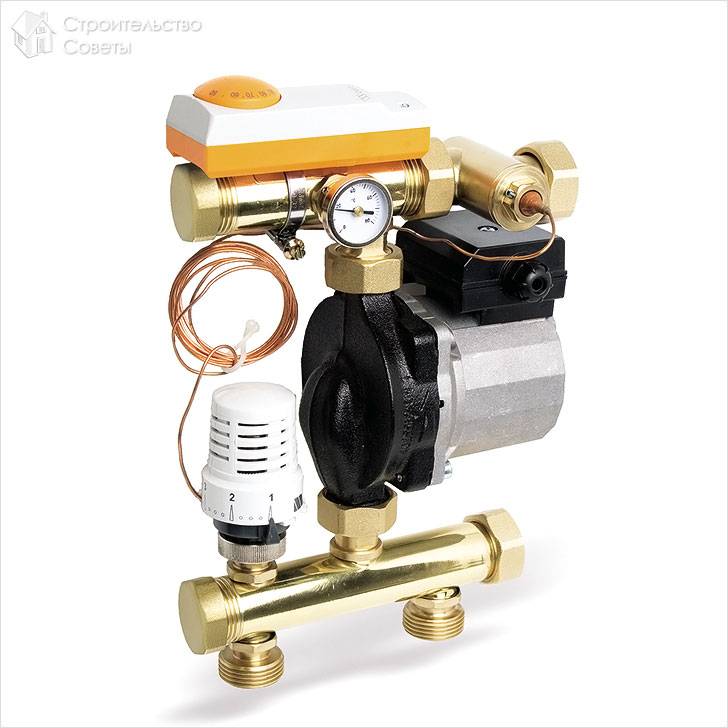
There is another possibility to adjust the heating floors - using a modular mixer, it consists of:
- three-way crane;
- thermometer;
- bypass;
- pump for circulation of liquid;
- thermostatic head;
- relay.
This set costs a lot, but its efficiency is high. There is a prerequisite for the functioning of this module - the European assembly.
Another method of regulating warm floors is to install a servo drive and a thermostat. The thermostat notifies the servo drive about a decrease in the room temperature, and about the need to supply a heated coolant. This method works even when assembling the collector with your own hands.
A warm water floor is a complex structure, and deciding to build it in your home, you need to be aware that it is not enough to mount the system, it is necessary to periodically adjust it according to the instructions. And it is important to understand this process, otherwise the floor will not meet your expectations.
Methods for adjusting heating radiators
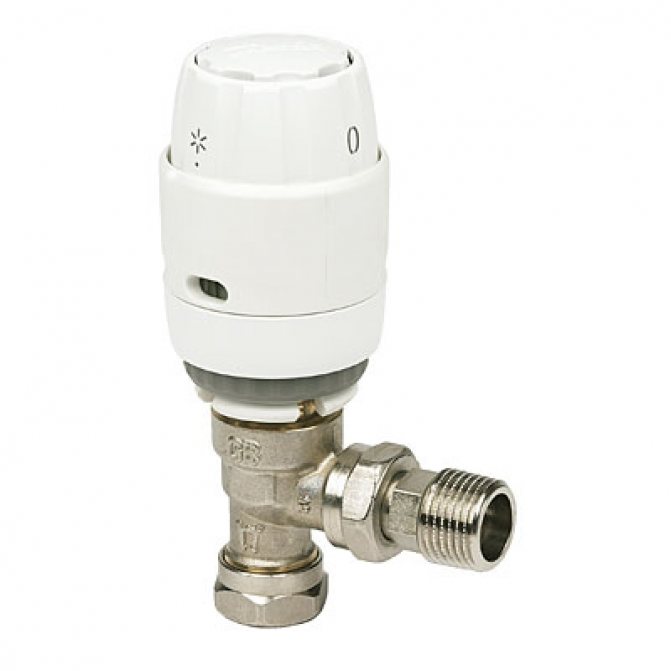
The easiest way to adjust the temperature of radiator heating systems is to mount directly on the radiator.
The principle of operation of the thermal head is as follows: The head is filled with liquid.The volume of the liquid directly depends on the temperature of the coolant. When heated, the volume of liquid increases and the valve of the thermal head closes. When it cools down, the opposite process takes place.
This adjustment method is quite simple and reliable. The disadvantages include manual adjustment of the thermal head on each radiator.
A more advanced method is installation instead of a thermal head, followed by installation of a thermostat in the room and connecting all nodes into a single system.
Sounds complicated at first glance. But in fact, everything is quite simple to implement. Throw two cables onto the servo. One for power supply, the other for connecting the thermostat. Set the required temperature on the thermostat and the servo drive automatically adjusts it.