
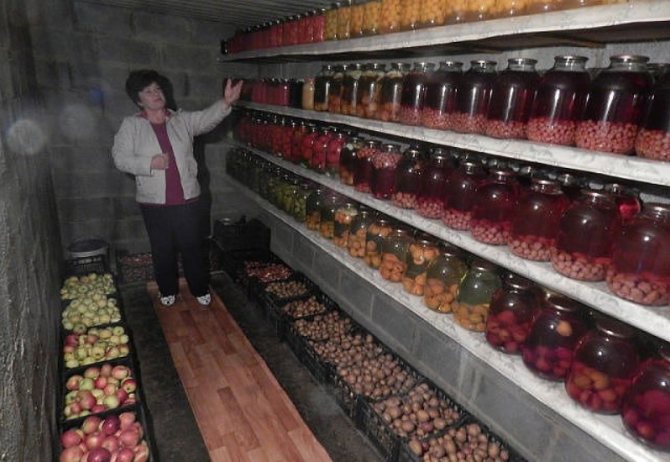
Setting up a basement in a garage is common. It is very convenient, practical, while a fairly decent volume is formed, which can be used as a place for storing things, crops, conservation. As a rule, it is a basement and is used as a storage for food and vegetables. In this regard, there is an additional need for high-quality ventilation of both the basement itself and the garage space as a whole. Ventilation in the basement of the garage is a simple, reliable way to organize the microclimate necessary for these premises.
Ventilation and communications
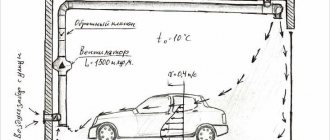
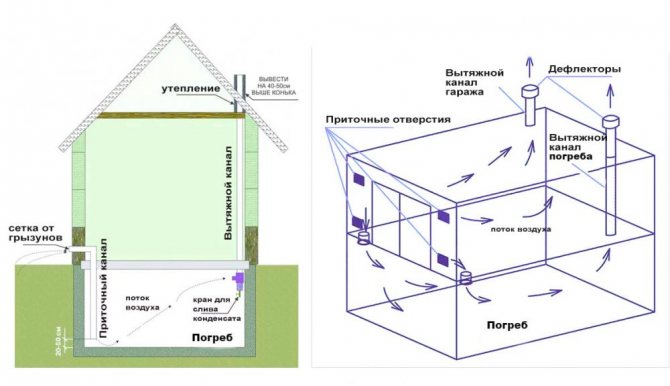
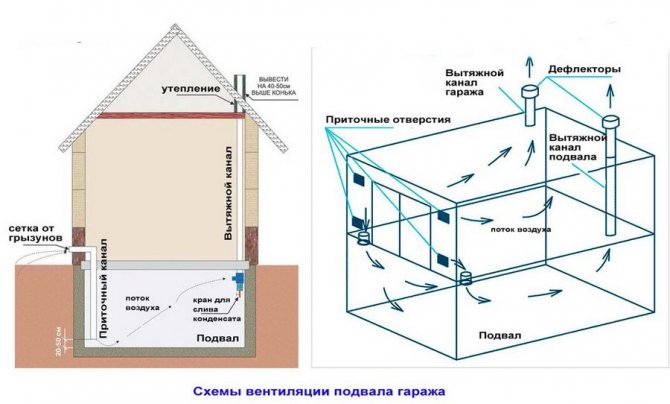
To create an optimal microclimate in the basement of the garage, a natural ventilation system must be provided. It is most correct to use two different ventilation ducts, which will be mounted in different corners of the cellar, this will allow you to quickly ventilate the basement due to intensive air exchange. If you need to create good traction, then we install one of the ventilation pipes 1 meter above the roof of the garage, and at the same time we bring out the second pipe in the lower part near one of the walls.
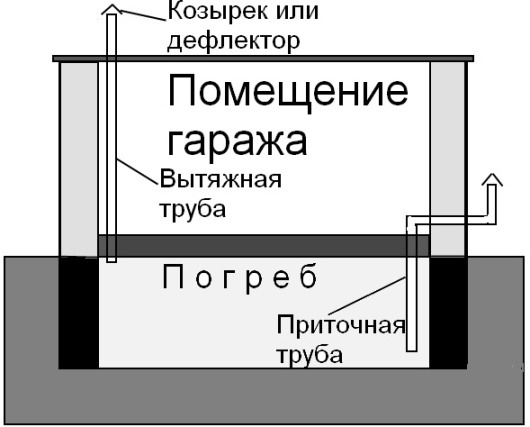
Cellar ventilation scheme in the garage
Due to the difference in height, good natural traction will be ensured. Even if the cellar in the garage is heated, with natural ventilation, all hot air will simply rise up to the ceiling, and the floor and space above it will remain cold.
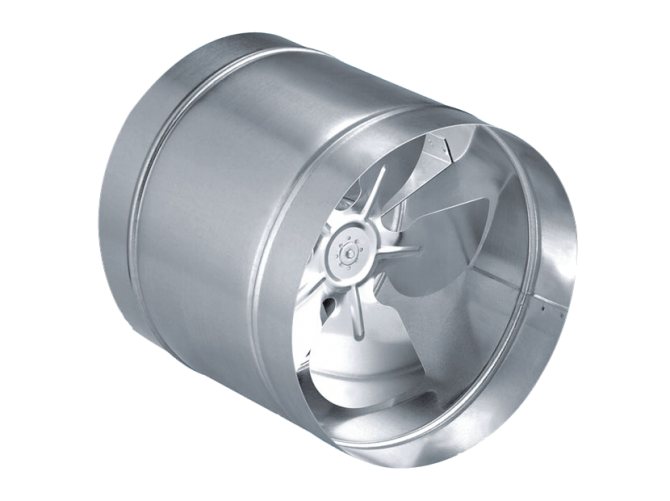
Recommendation! Installation of special fans allows you to increase air circulation in the cellar.
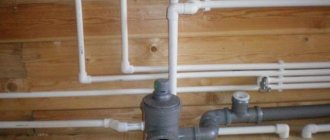
Communications (electricity, heating, water) must be securely mounted before starting work on the insulation of the cellar. The electrical wiring must pass in a protective corrugation, the wire commutation points must be in an easily accessible place using junction boxes. Also, all joints of heating or water pipes must be accessible for maintenance.
Recommendation! It is best to use a safe voltage for lighting the cellar of 12 or 24 volts.
How to properly ventilate the basement
Consider several options for how to make ventilation in a basement storage with your own hands. The methods given below are the installation of a natural ventilation system, which can easily become forced or combined after the additional installation of exhaust / supply fans.
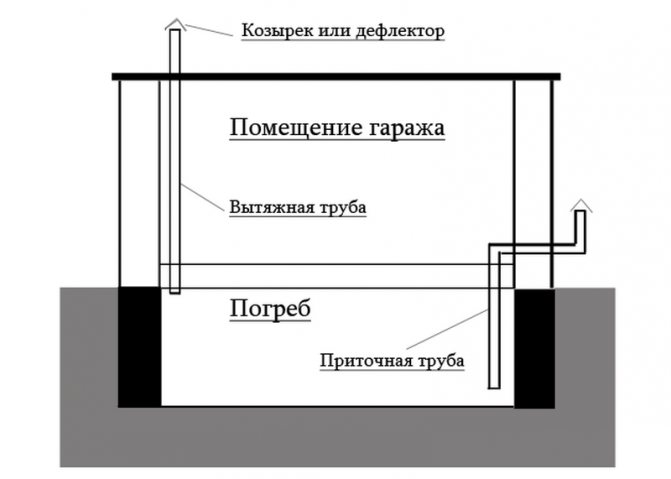
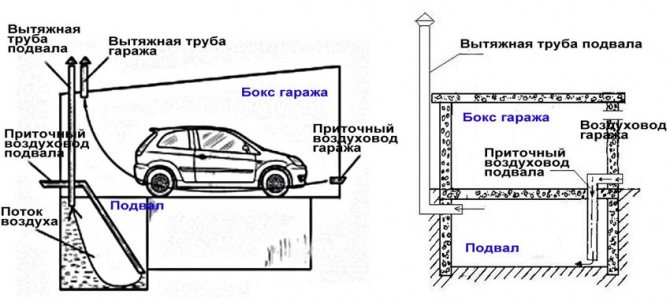
Garage + basement Very often, the ventilation ducts from the storage pass through the garage and are taken out of it. There are two options for placing the air ducts here.
Option 1. Do-it-yourself direct air supply outside the garage.
- Determine where the ventilation ducts will be located. The most effective option is opposite corners so that the incoming air covers the entire volume of the space as much as possible. In the outer wall of the building, the opening of the pipe outlet for the incoming air is marked strictly vertically above the supply basement opening.
- Calculate the required pipe diameter based on 1.5 cm of diameter per 1 m² of the room.
- Make openings inside the walls for the exhaust / supply air ducts of the appropriate size. It is important that the supply opening is located at a height of no more than 20 cm from the floor, and the exhaust opening is not lower than 10 cm from the ceiling, and preferably inside the ceiling. This will increase the difference in temperature, which means that the thrust will increase.
- Install air ducts (plastic, asbestos-cement, stainless steel, etc.).The chimney is led out through the garage as high as possible (to enhance air exchange). Minimum 50 cm above the garage roof.
- The supply channel is small; it is led through the garage to the outer wall of the building. The distance from the inlet opening to the end of the hood is from 250-300 cm.
- The main thing is that the diameter of the pipes retains its value along the entire length. Use as few folds as possible.
- After installing the air ducts, it is necessary to eliminate the gaps near the pipes using polyurethane foam, cement mortar.
- Outside, the supply outlet is closed by a grate protecting it from small animals and debris.
- The hood is equipped with a metal cover to protect it from atmospheric precipitation. A deflector can be installed to increase the draft of the duct.
- Dampers can be installed to regulate the air flow. Especially important in winter, with severe frosts. When it is necessary to maintain the temperature inside the basement, the supply duct is blocked by such a damper.
This is a general installation diagram for a natural ventilation system for a basement space. To organize forced (mechanical) or mixed ventilation, it is enough to install fans inside the ducts, which will increase the circulation of air flows.
Option 2. Indirect air flow from the garage ventilation system.
The installation scheme is identical to the first option with the only difference that the supply duct goes inside the garage building. Fresh air is taken not from the street, but from the room itself, where it enters through general ventilation. The supply air duct is located next to the ventilation grilles inside the door, or the supply opening inside the garage wall.
The disadvantage of this option is that toxic chemicals and fuel vapors enter the basement space together with fresh air. With effective air circulation, they are discharged to the outside. If the ventilation is poorly established, they can settle inside the storage.
Basement + observation pit
The device of the air exchange system, when there is an inspection pit next to the basement:
- For the basement, an exhaust duct is mounted, it is displayed above the garage roof (see option 1).
- An exhaust pipe is also installed for the garage.
- Ventilation openings are made inside the garage door / outer wall, and air grilles are installed.
- Inside the pit, next to the ventilation opening of the gate, a supply pipe is installed through which fresh air will flow into the inspection compartment.
- In the opposite corner of the pit, another supply air duct is mounted through the wall, but for the basement.
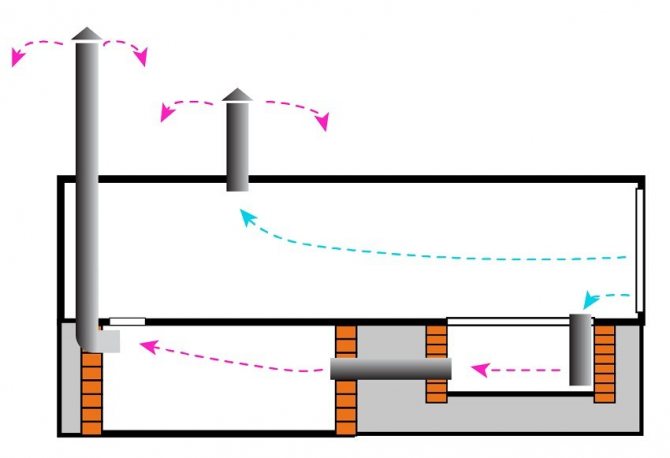
Air exchange is as follows. Through the ventilation grilles of the garage door / outside wall, the air flow enters the interior of the building, as well as into the inlet pipe of the inspection pit. Further, moving forward through the intermediate duct, it is inside the basement storage. After that, the exhaust air is removed by the exhaust duct. In parallel, stagnant air is removed from the garage room.
This method of organizing ventilation is good in that all rooms of the building are ventilated at once.
Choosing a heater
We decided to insulate the cellar, but we don't know how to do it, and most importantly what material to use.
Let's look at how to insulate a cellar in a garage using modern materials that experts use to insulate basements:
- foam or extruded polystyrene foam;
- mineral wool;
- "Warm" plaster;
- glass wool;
- reflective insulation.
Warming the cellar in the garage with the above materials allows you to achieve good thermal insulation properties and exclude the appearance of fungus in the room, but each of the materials has its own advantages and disadvantages.
Extruded polystyrene foam or foam
Advantages:
- easy installation;
- environmental friendliness;
- you can use extruded polystyrene foam for floor insulation;
- service life up to 40 years and more;
- excellent water resistance;
- low cost;
- perfectly tolerates sudden changes in temperature.
Disadvantages:
- possesses flammability;
- does not allow air to pass through.
Helpful information! Extruded polystyrene foam differs from polystyrene in its increased density and strength. Thus, the coefficient of thermal conductivity of the extruded polystyrene foam will be higher than that of the foam with the same material thickness. In addition, only extruded polystyrene foam is used to insulate the flooring.
| Characteristics | Expanded polystyrene PSB-30 | Polyfoam PSB-35 |
| Density (kg / m3) | 30−32 | 27−29 |
| Thermal conductivity coefficient (W / mK) | 0,032 | 0,038 |
| Compressive strength (MPA) | 0,25 | 0,08 |
Important! When using foam or extruded polystyrene foam as thermal insulation, it will be necessary to treat all surfaces with a primer before starting work and, upon completion, additionally plaster the walls using reinforced, and make a cement and sand screed on the floor.
Mineral wool
Advantages:
- allows air to pass through, allows the room to "breathe";
- excellent sound insulation;
- excellent thermal insulation;
- affordable cost;
- long service life of 30 years or more.
Disadvantages:
- an additional frame is required for installation;
- allows moisture to pass through;
- work is carried out in special clothing and gloves.
Important! If mineral wool is chosen as a heater, then it will be necessary to additionally make a vapor barrier in the basement in order to exclude the absorption of moisture by the wool itself and the deterioration of its thermal insulation properties.
"Warm" plaster
Advantages:
- excellent thermal insulation;
- affordable cost;
- excellent sound insulation.
Disadvantages:
- it is necessary to apply a thick layer for good thermal insulation;
- difficulty in installation.
Recommendation! It is optimal to use "warm" plaster for coating surfaces together with other thermal insulation materials in order to achieve good thermal insulation.
Glass wool
Advantages:
- low cost;
- good thermal insulation properties;
- good sound insulation properties.
Disadvantages:
- work is performed in special clothing and gloves;
- an additional frame is required for installation;
- allows moisture to pass through;
- may give off an unpleasant odor if exposed to moisture.
Important! If mineral wool is chosen as a heater, then it will be necessary to additionally make a vapor barrier in the basement in order to exclude the absorption of moisture by the wool itself and the deterioration of its thermal insulation properties. In addition to the vapor barrier material, it is necessary to use a film or foil to insulate glass wool.
Reflective insulation
Advantages:
- high thermal insulation properties;
- material thickness is only 2 to 5 mm;
- easy installation;
- the ability to use facing material.
Disadvantages:
- cost;
- possible heat loss
Important! Reflective insulation is thin enough and like a mirror will reflect infrared heat when reflected. As a result, it is not efficient enough for convection or induction of reflected heat, which leads to its loss.
Correct air exchange device
For the most competent ventilation device in the basement of the garage, the following points must be taken into account:
The most effective is the exhaust system, which circulates air masses even in summer. When using a fan in the circuit, care should be taken to isolate it and protect the wiring from moisture that forms in the process. If the area of the room is less than 40 squares, and food is stored inside, it is necessary to arrange a hood.When choosing equipment, it is important to understand which fan to take: a too powerful device consumes more energy, and an overly weak model does not allow all moisture to be removed to the end.
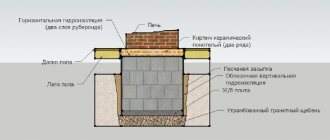
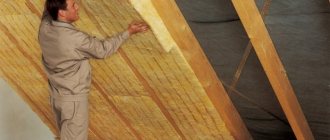
We insulate the ceiling of the cellar
Before starting work on insulation, we check the entire surface of the ceiling in the basement for cracks, potholes, etc. Carefully clean all these defects and seal them up with a solution or blow them out gently with foam. After that, we treat the entire surface of the ceiling with antifungal solutions (quicklime or copper sulfate).
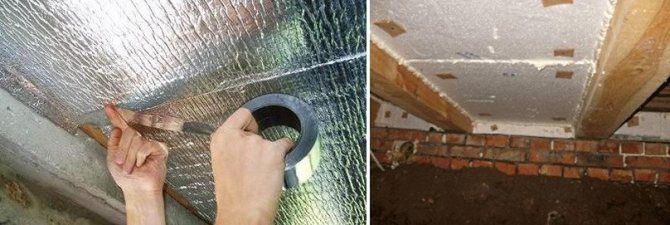
There are a lot of options for insulation of the basement ceiling in the garage - from foam to reflective insulation
You can insulate the ceiling with any of the above materials, for insulation with mineral wool or glass wool you will need a special frame, which is then sheathed with sheets of GK, plastic, plywood, etc. Installation of polystyrene or expanded polystyrene can be performed on parachutes with the preliminary application of a special solution, then a mesh is applied surface and paint, you can also use facing material (decorative tiles, panels, etc.). A decorative facing material can also be used for reflective thermal insulation.
Recommendation! Before insulating the ceiling, all electrical wiring for lighting should be done, while the wires should be laid in a non-combustible corrugation.
We insulate the manhole cover
The cellar lid, like the ceiling, must also be insulated, since through it there will be a large heat leak and the possibility of moisture getting from the main garage into the basement.
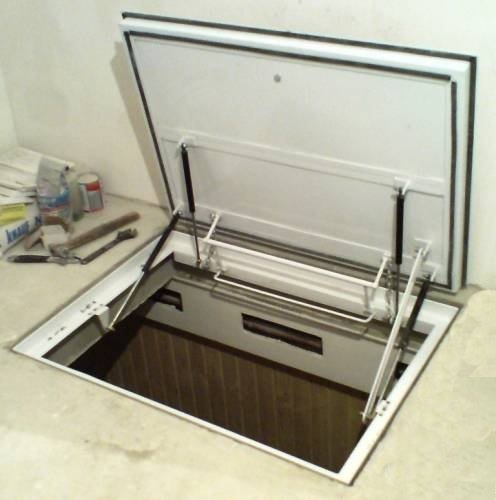
Do-it-yourself cellar lid, insulated with foam
It is most correct to use expanded polystyrene for insulating the hatch cover, it is better to choose the highest density of 100 or 150 kg / m³. We pre-treat the lid with antifungal solutions (quicklime or copper sulfate). Cut out a piece of expanded polystyrene to the size of the lid and fix it with special glue or foam. To make a decorative surface for the insulated cover, you can use plywood, which is fixed with self-tapping screws to the hatch cover itself. Previously, you can make a wooden frame around the perimeter of the lid to cover the visible parts of the expanded polystyrene. Once the plywood has been fixed, it can be painted to protect it from moisture.
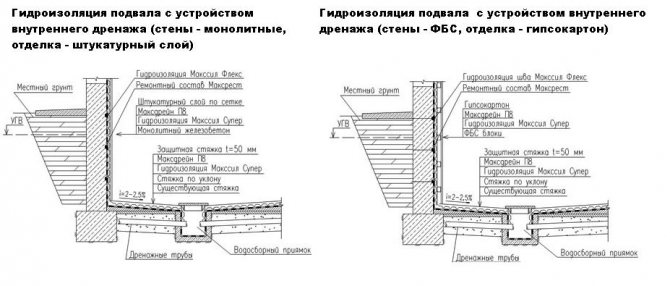
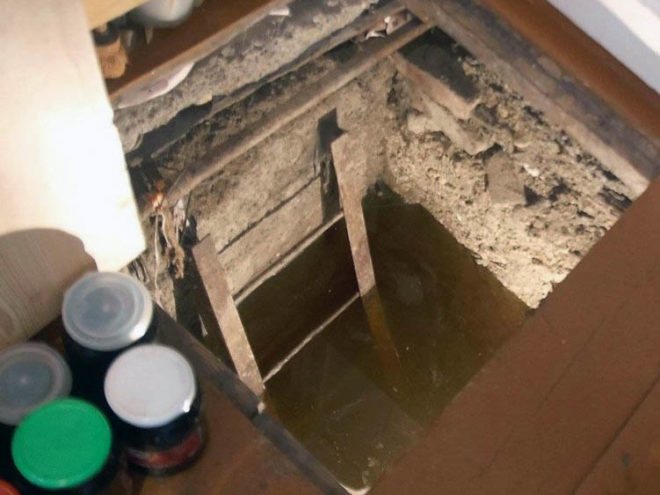
Garage Basement Water - Why
When designing a garage, it is important that the highest possible level of groundwater does not rise more than half a meter below the cellar floor.
It is also advised to make a cellar on the hillside.
But often, you don't have much choice where the garage will be.
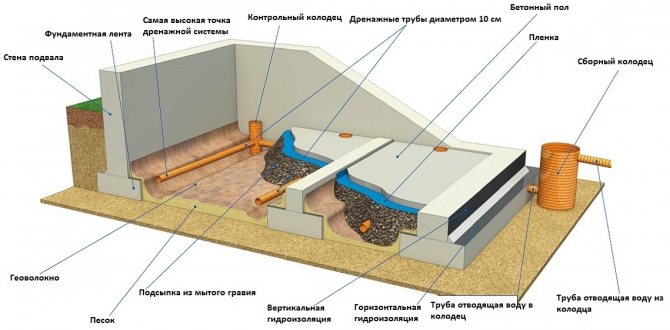
In this case, you need to think about the drainage system.
Lowering the groundwater level will also protect the garage from heaving of soils in winter (clay, loam, sandy loam). It is better to excavate the heaving soil under the building and replace it with a sand mixture.
Clay and loam have poor water permeability. This reduces the efficiency of drainage and leads to stagnation of water in the ground and, often, it penetrates into the cellar. Another plus of soil replacement.
The drainage of the garage from the outside should have 2 functions:
- Diverting flood and surface water from the garage;
- Lower the water table.
In the first case, you need to take care of surface drainage. In its simplest form, it is an annular ditch with access to the storm sewer. Make sure that no water stagnates in the drainage ditch. Observing the slope towards the storm sewer collector will help to avoid this.
A blind area or a layer of plastic clay around the perimeter of the garage will be protected from water flowing along the wall of the foundation.
But often, there is no way to carry out serious drainage work. In this case, it is necessary to strengthen the waterproofing. It is important to understand that it will not be possible to make a basement absolutely impervious to water.But there will probably not be a lot of moisture that has got in and the ventilation will successfully cope with the humidity, and during the flood period, you will have to pump out water from the drainage pit.
Except through the soil, water penetrates into the cellar in moist air. If the ceiling of the cellar has weak thermal insulation, then condensation forms on the ceiling in cold weather. When the soil at the level of the cellar floor is still warm, it is not frozen, and the air is already cold.
The third and final path through which water enters the garage is the roof. Any action to drain the basement is pointless if the roof is leaking.
It is recommended to solve the issues of protecting the basement from moisture at the design and construction level, because correcting the situation is often many times more expensive than a prudent decision.
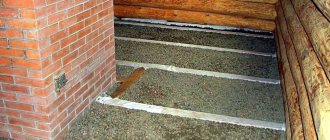
We insulate the floor in the cellar
Answering the question of how to insulate a basement in a garage, we go directly to the insulation process and start with insulating the floor covering.
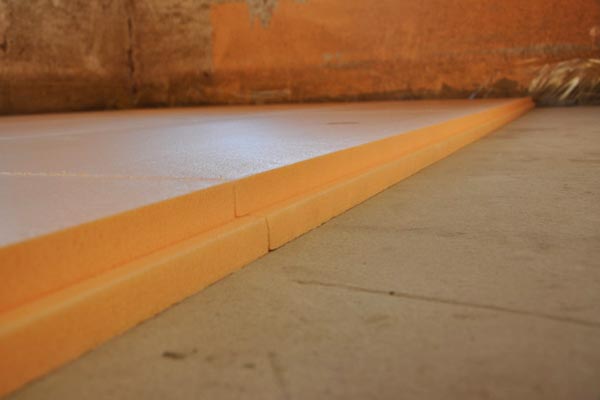
Rigid polystyrene foam is effective for thermal insulation of the floor
To insulate the floor, you will need to perform preparatory operations:
- we deepen the floor, digging a hole about 30 centimeters deep around the entire perimeter, and level the entire surface of the floor;
- we make a bed with fine gravel about 10 centimeters deep around the entire perimeter of the floor;
- then we apply a layer of sand approximately 5 centimeters thick (this will avoid the formation of moisture on the floor);
- apply a layer of insulation - it is best to choose extruded polystyrene foam, at least 5 centimeters thick;
- we reinforce the floor with a mesh and fill it with a concrete screed.
Recommendation! Do not use sawdust or wooden scaffoldings made of boards for floor insulation, as wood tends to absorb moisture. Within a short time, an unpleasant odor will appear and the wood will start to rot, which will require replacement of the floor covering, and as a result additional costs.
Assembling a potbelly stove
The installation of a stove begins with its purchase or self-assembly. When choosing a purchase option, pay attention to the Soviet-style cast-iron model.
They began to be produced in 1955 and are still stored in army warehouses. We will not delve into where they came from for sale. But let's say that these are excellent ovens. Judge for yourself:
Read more: Wheel pressure in the field
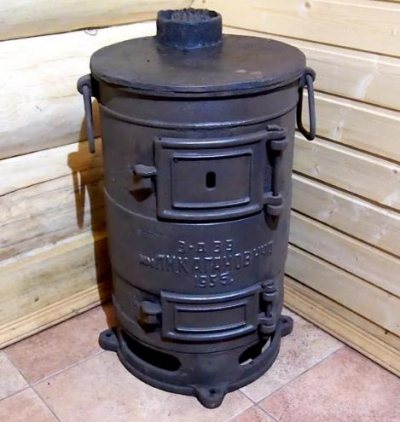
The cast-iron potbelly stove has a very impressive appearance and, due to its thickness, can serve for more than a dozen years.
- Thermal power - about 4-5 kW, which is enough to heat a garage up to 40 sq. m;
- Reliable cast iron - its thickness is 10 mm;
- Soviet assembly - here comments are superfluous, then they knew how to do quality things;
- Omnivorous - works on coal, wood, sawdust;
- Suitable for installing a cauldron instead of the top cover.
The cost of the unit is in the range of 4-5 thousand rubles. The thing is really cool, but hellishly heavy, its weight is about 60 kg.
You can also assemble a potbelly stove for the garage yourself. For example, according to this scheme:
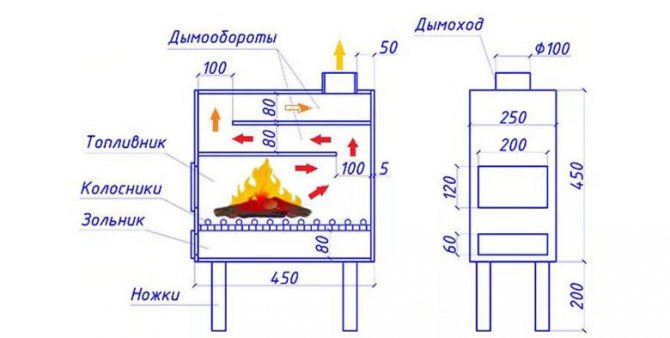
The assembly diagram of one of the simplest and nevertheless quite effective and reliable stoves.
It is assembled from sheet steel. The recommended thickness is 4-5 mm. This is enough to keep the steel from burning out in the next few years. The statement is most relevant when using coal that burns at a higher temperature. For assembly, you need to cut the metal on a machine or using a powerful grinder. Legs can be done, or you can not do it - in this case, the stove is installed on a stone base.
To assemble the furnace, additional materials will be needed - this is a metal pipe, doors and fittings for assembling the grate. The pipe is necessary to create a chimney - the chimney is connected to it. You need two doors - one large, the second small. The large one is welded in front of the combustion chamber (firebox), the small one is welded between the bottom and the grate... If you are making feet for floor installation, use sturdy metal corners or reinforcement at least 15 mm thick.
The chimney diameter according to this scheme is 100 mm - this is quite enough (for this drawing). The potbelly stove is assembled using a welding machine. Special attention is paid to the welds so that they withstand heat and do not let smoke into the garage itself. When assembling the body, do not forget to install the grate and chimneys.
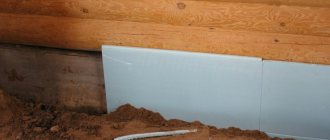
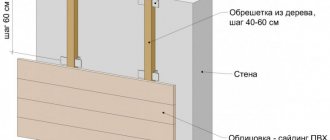
We insulate the walls
Regardless of what material the walls will be insulated with, they must first be carefully sealed up all seams, cracks and all walls must be treated with antifungal solutions (quicklime or copper sulfate).
For wall insulation, with mineral wool or glass wool, a special frame made of wall profiles is used. This is done so that the cotton wool under its own weight does not "flow" down, but is firmly fixed along the entire perimeter of the wall. After that, the frame can be sheathed with sheets of plasterboard, plywood, etc. with finishing subsequent finishing.
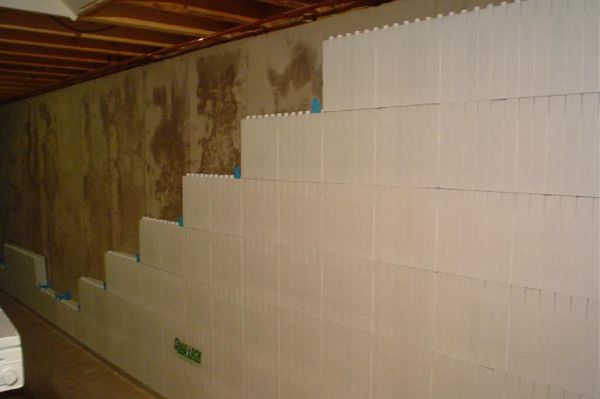
An economical solution - insulation of the basement walls with foam
To fix the polystyrene or expanded polystyrene to the wall, a special solution and "parachutes" (dowels with a wide head) are used. All joints between the foam sheets must be carefully blown out with foam. After that, a special mesh is applied to the entire surface of the wall and plastered. After plastering, the walls can be painted.
Important! Before installing the foam sheets, it is advisable to level all the walls, remove all protruding parts. This is done to ensure that the foam sheets fit snugly against each other and against the wall, providing good thermal insulation.
Reflective insulation is installed quite simply, it is glued to the wall surface along the entire perimeter. From the side of the wall, the base of the material is foamed polyurethane foam, from the outside - polished foil. Reflective insulation can be overlaid with decorative or cladding coatings.
Recommendation! Depending on the type of insulation chosen, carefully study the process of its installation, since some materials may require additional wall processing.