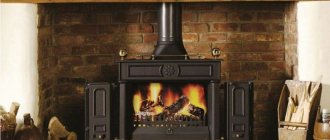
Types of mini ovens
Steel furnaces. This type of mini-oven is inexpensive and easy to install, but the service life of such a model will be short-lived.
Cast iron stoves. The cost of such stoves is quite high, but it can also serve for a very long time, but only if it is not subjected to sudden changes in temperature.
Mini brick oven. This type of furnace is the most popular today and there are reasons for this:
- Keeps warm for a long time
- The ability to do it yourself
- Available fuel
- Possibility to make a stove with a stove or oven
- High reliability
Due to the availability of material and simplicity in execution, even a novice stove-maker can make a mini-oven with his own hands.
Most often, a mini-oven for a summer residence is made with or without a cooking stove. It is the second option that we will consider in more detail.
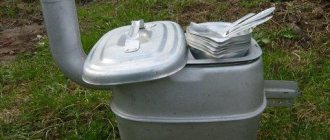
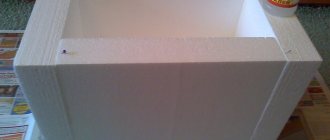
Miniature can oven
This version of the stove is perfect for those who like to relax in nature. The finished product is lightweight and takes up very little space in your backpack. With all the simplicity of the design, the stove from the can is very convenient and productive - a liter of water can be boiled by spending a few small dry branches on it.
At the same time, such a homemade stove can work not only on branches, but also on leaves, cones and even hay. You will definitely not stay hungry!
First stage - preparation of components
Prepare three cans of different sizes in advance. Canned food containers are perfect. From the largest jar, you will make the body of the oven, place the medium-sized jar in the body, and from the small container, make an improvised burner.
In addition, prepare scissors, a block, an electric drill and a felt-tip pen.
The second stage is making a template
The mentioned wooden block will help you to make the right mini oven. You will use it as a template for creating holes and performing other activities.
First step. Insert a block of wood vertically into the largest jar and mark a couple of lines on the wood at a distance of about 8 mm approximately at the level of the lid.
Second step. Saw out a rectangular notch along the markings so that the upper edge of the container can freely enter into it.
Third step. Set the bar so that the can rests steadily on it, and the upper edge of the large can, at the same time, is kept in the previously prepared recess in the bar.
Stage three - preparing a large can
First step. Draw a line over the bottom edge of the largest jar. This line will serve as a markup for creating ventilation holes. The line can be applied with an ordinary felt-tip pen.
Second step. Drill holes along the marking line. The optimal number of holes can only be found empirically. Excessive ventilation will lead to too rapid combustion of fuel, and if there is insufficient draft, the stove will simply not be able to work normally.
Therefore, first make a small number of holes, and then, if necessary, drill them after the initial tests of the furnace.
The fourth stage - preparation of the average bank
For the second can, do the same as for the first, with the only difference - the vents should be under the top edge, not above the bottom.
Drill many holes in the bottom of a medium-sized container. Select the size and number of these holes so that the loaded fuel will not fall out in the future.As a result, the bottom of the can will look like a sieve.
The fifth stage - assembling the stove
Insert a medium-sized jar into the largest container. The pairing should be quite tight, but not tight - between the walls of the two cans, a small gap is required for air circulation.
The sixth stage - making the burner
Use the smallest tin can to create the hotplate.
First step. Prepare holes in the side of the can in the same way as you did with the previous containers.
Second step. Cut out the bottom of the can using a metal-cutting scissors.
Step three. Align the edges of the burner carefully and clean them with a file.
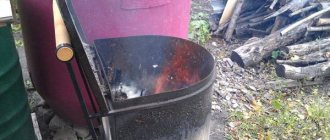
Seventh stage - checking the stove
Take the main part of the stove (medium container inserted into a large one) and load fuel (cones, wood chips, leaves, small twigs, etc.) into it. If possible, load dry twigs directly from the trees into the oven, as fuel from the ground may be damp.
Light the load and let it warm up. At first, you may not be very good at it, but very soon you will learn how to light the stove with literally a couple of matches.
Allow the fuel to heat up intensively, place a burner on the stove, and a saucepan, kettle or other container on it.
Video - DIY mini oven
Advantages and disadvantages of mini ovens
Like other stoves, the brick mini stove has positive and negative sides. Of the positive aspects, one can single out:
- The stove will last a very long time if it is used correctly.
- Such a structure heats up quickly and retains heat for a long time, giving it to the room.
- You can make a mini brick oven with your own hands.
- During manufacturing, the structure can be made in any size and shape.
- If desired, you can add a stove or oven to the structure.
- A mini-oven made of bricks is safe, since it does not heat up very much, unlike ovens made of other material, therefore the likelihood of getting burned is minimal.
There are also disadvantages to this design:
- Due to the large weight, a foundation is needed for the furnace, which will take time to fill.
- During operation, it is necessary to take into account all the nuances of safety and clearly follow the drawings in order to make the oven correctly. Otherwise, it can be dangerous to use the oven.
Calculation and manufacturing of the foundation
Even a small-sized Russian stove needs a solid foundation. Simple reinforcement of the floor will not be enough, it is necessary to build a structure from small reinforced concrete blocks, stone or pour a reinforced concrete slab. It should be detached from the foundation of the house. To determine the depth of the support, it is necessary to assess the type of soil, the level of its freezing and the height of the soil water.
Thus, for a small Russian stove of this model, the dimensions of the foundation will be as follows:
- width - 130 cm;
- length - 150 cm;
- height - 160 cm.
Accordingly, for the construction of a monolithic slab, 3.0 m3 of concrete will be required. It can be bought at a factory with a BRU or made independently by purchasing for these purposes:
- cement M400 - 0.97 t;
- sand - 1.6 m³;
- crushed stone - 3.2 m³.
The work itself is carried out in the following sequence:
- digging a pit 1.75 - 1.8 m deep;
- compact the bottom and pour a 15 cm layer of crushed stone;
- install a formwork from an unedged board with a waterproofing material laying on its inner surfaces;
- a reinforcing cage is mounted from two rows of metal mesh with a mesh size of 15x15 mm, which are interconnected by vertical reinforcement segments;
- the concrete mixture is poured into the formwork with layer-by-layer compaction by tamping or bayonetting to remove air bubbles;
- align the upper plane of the structure.
The formwork can be dismantled after about a week, and further waterproofing work is carried out after 25 - 28 days, when the concrete will gain full strength.
DIY materials for making a mini-oven
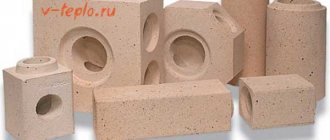
In order to make a do-it-yourself mini-brick oven, you will need the following materials:
- Two types of bricks (fireproof and red)
- Building and fireclay clay
- Fine sand (well sieved)
- Roofing material
- Doors for the furnace, blower and for the hole through which the furnace will be cleaned
- Grate
- Gate valve
- Trumpet
From the tools it will be necessary to prepare a trowel, a level, a plumb line and a tape measure. After everything you need is prepared, we move on to laying the stove.
How to build a stove correctly?
For a small structure, an asbestos sheet can serve as the basis.
The manufacture of the structure begins with the formation of the base. The second stage is brick laying. The creation of the base begins with determining the place where the heating stove will stand. The place is selected safe and accessible at the same time. Accurate calculations are carried out, which are applied to the structure diagram. If the dimensions of the structure are large, then the floor covering is removed and construction begins with the formation of the foundation. Stove-makers recommend that a place for a heating element be foreseen in the foundation of the house in advance. If the stove is planned to be compact and will be fired exclusively with wood, then a metal sheet with asbestos is used as the base.
When the foundation is ready, roofing material and sand are laid on it, and then proceed to the construction of the box itself. Procedure:
- The formation of the order is carried out from the first row. This process uses 12 bricks. They are securely fastened and adjusted to the level.
- The first row is covered with a solution and the second is laid. A blower door is installed above it, wrapped in asbestos.
- At this stage, the next row of mortar bricks is laid.
- The grate is being installed.
- The next row is laid on the edge, and the back wall is formed with a protrusion of bricks without using clay mortar.
- A firebox door is mounted on top.
- The subsequent rows of bricks are laid flat and alternating on the edge.
- Next, the furnace space is covered with bricks, and a beveled row is laid above them.
- The next order is formed so that you can easily open the firebox door.
- The last step will be the formation of the chimney.
To avoid the destruction of the structure, only 1 row of clay bricks is allowed.
The shape and dimensions of the pipe are provided in advance. Distinguish between horizontal and vertical chimneys, straight, bell-type. Each of them will help remove smoke from the chimney and leave heat in the house. If everything is done correctly, then wood stoves give maximum efficiency. Folding brick stoves is not that difficult. After studying the instructions and creating a diagram, the stove-maker will build an airtight and stable structure.
etokirpichi.ru
The foundation for the furnace and the dimensions of the furnace
Before starting work, you need to choose a place so that the walls of the furnace are at least 50 cm away from the walls of the room. You should also think about the foundation: you can make a regular foundation from sand and cement. To do this, it is necessary to mix cement and sand in a ratio of 1: 3. The sand must be of good quality, and if you take ordinary sand, then it must be sieved well. The dimensions of the foundation depend on the size of the furnace plus 10 cm for a stock on each side, but the height of the foundation should be about 1 m.It is worth remembering that such a foundation dries for a long time.
For a mini-oven, you can make a foundation of clay and brick. To do this, we dig a hole, the depth of which should be at least 5 rows of bricks. Then we fill it with clay to a height of a couple of rows of bricks and tamp it well. Then we put roofing material on the clay, and on it bricks, which must be coated with clay. The last row of bricks must be level with the floor, and it must also be covered with roofing material. Only after that do we start making the oven itself.This option of the foundation is preferable in that it requires less time and effort than the previous option, and you can start manufacturing the structure right away.
Considering that the stove will be smaller than the usual ones, the dimensions of the furnaces for mini-stoves will be smaller, but they can be of the usual sizes if desired. If the firebox is small, then it will be inconvenient to put firewood, therefore we will consider the option of a mini-brick oven made of bricks with our own hands with the dimensions of fireboxes for a conventional oven.
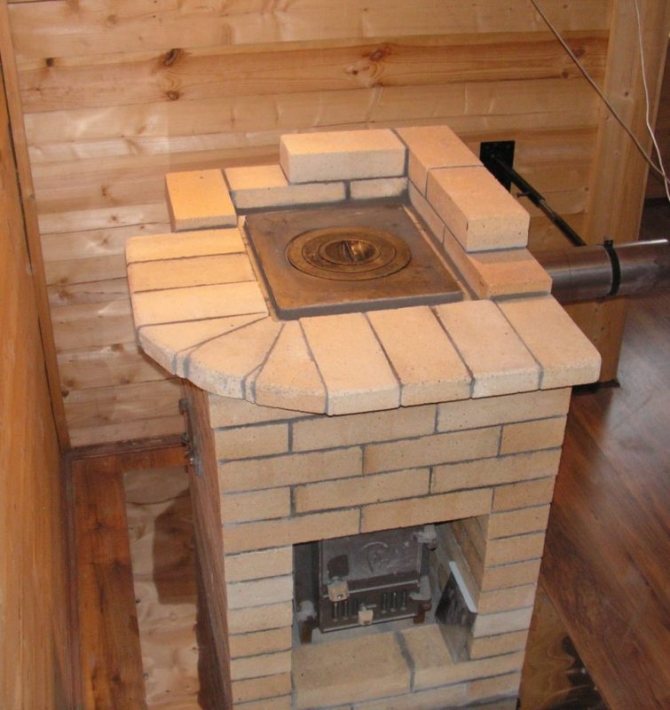
Features of the mini Russian oven
The mini Russian stove is really small in size, the dimensions of such a standard model are not more than 1x1.3 m, and therefore there is a place for it even in a one-room building of a small area. This device does not have a bed, but it has two fireboxes:
- the first - a large firebox is located closer to the front wall. It is used for heating in the autumn-winter period and for baking various dishes;
- the second is small, located behind the first, closer to the back. It is used for cooking food during warm seasons. In this case, less fuel is consumed, and easier cleaning and maintenance of the device.
Furnace chambers are needed not only for cooking various dishes, but also for heating the room. During the heating season, only one of them or both chambers can work at the same time. Fuel filling is possible directly through the brewhouse.
Internal channels also have their own peculiarity in such a furnace, which are designed to supply hot gas to the fuel chambers and remove carbon monoxide gases to the street. During the heating of the furnace, all flue gases flow from the firebox, which is larger in size, into the 1st compartment of the heating chamber.
Then they pass through the 2nd compartment and, bypassing underneath, move to the rear wall of the cooking compartment, burn there and heat the stove at the same time. The smoke formed during this process, through four passes located at the top of the brewing section, enters the collecting channel, and from it into the chimney.
A small firebox does not have special channels for removing smoke, from which gaseous substances pass into the main combustion chamber, and only then go outside.
The small Russian stove also includes a ventilation duct, which, as necessary, is closed with a valve.
Step-by-step instructions for making a mini oven
Considering the layout of the mini-oven for the summer cottage, let's get to work.
Stages 1 to 12
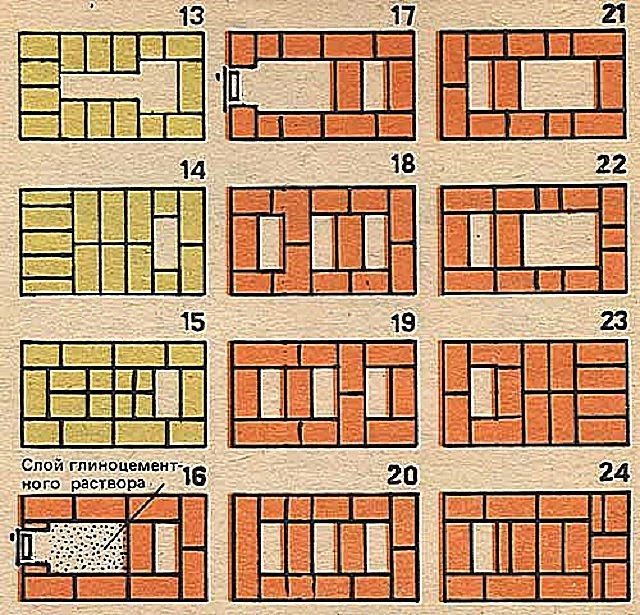
Steps 13 to 24
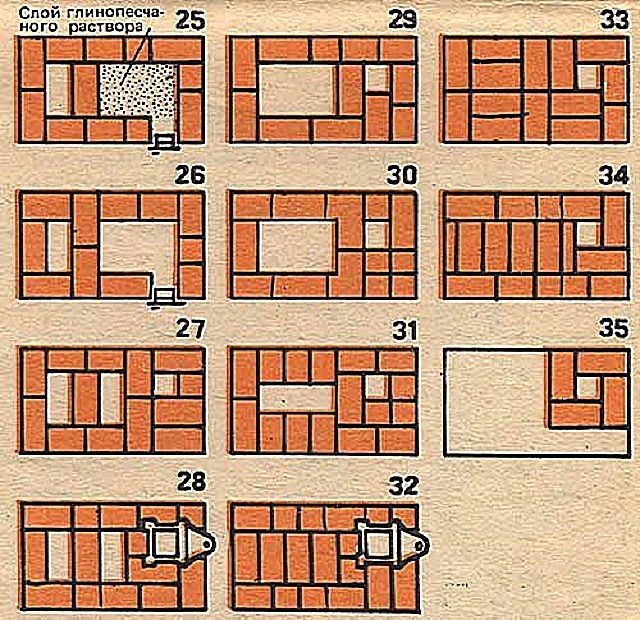
Stages 25 to 35
Laying from 1 to 12 rows
The first row is laid out, and in the second it is necessary to provide a place for the blower door. The rows must be coated with a solution. Before installing the blower door, it must be wrapped in asbestos, and the door will be fastened with wire.
Next, the 3rd row is laid out, in which refractory bricks and a mixture of refractory clay are used.
During the laying of the 5th row, a grate is installed. Starting from this row, up to the 15th, masonry should be made with refractory bricks.
In the 6th row, a firebox door should be installed, with which the same work should be done as with the blower door (wrap with asbestos, secure with wire).
Lay out the 7th row according to the layout. Each layer must be coated with a solution. Lay out the 8, 9, 10, 11 and 12th rows in accordance with the layout.
Laying from 13 to 24 rows
From the 13th row, we begin to form the combustion chamber and vertical channels. The main thing here is to carefully follow the orders, otherwise you can violate the correctness of the design.
On the 15th row, it is necessary to lay out a layer of clay-cement mortar. It will strengthen the bottom of the cleaning chamber, after which you can install the door itself.
Installing a mini stove
Brick is a traditional stove material that has been used for centuries. A mini brick oven is made of bricks, but it is best to use two types of them during construction.
- It is often worth using refractory material to build a workbench. He will be able to withstand the firebox even with coal.
- The front material is also quite suitable for decoration.
Attention: You can use just one ordinary brick in a building. Only in this case it will be possible to heat only with wood.
We do the masonry
Having prepared the required amount of bricks, you can start work, the instructions are set out below:
- First of all, you should decide on a place for a mini-oven. Its effectiveness largely depends on this.
- A mini brick oven for a bath will take an area of about 800x550 mm. You just need to lay a fire protection layer, as well as a layer of waterproofing. Roofing material can be used as a waterproofing layer, and sheet asbestos can be used as a fireproof layer if the base is wooden.
- A layer of sand, about 10 mm thick, is poured onto the waterproofing layer.
- The first row of bricks is laid on top of the sand, without the use of mortar. This row is aligned strictly horizontally, hammering in the peeking bricks with a rubber mallet.
- A thin layer of clay mortar is applied to this brick row and the blower door is immediately installed. The door is exposed strictly horizontally and strictly vertically, after which it is securely fixed. After fixing it, you can start laying out the second row.
- The 3rd and subsequent rows are laid out with refractory bricks (chamotte). After laying out the 3rd row, a grate should be installed, which should be in the center of the blower.
- The 4th row is laid out in a quarter of a brick (on the edge), regardless of how the previous rows were laid. The back wall is laid out without mortar. In the future, these bricks will be removed.
- After the 4th row, they begin to install the firebox door. It is installed in such a way that it opens upwards. It is attached in the same way as the blower one, with the help of wire, the ends of which are embedded between the bricks that form the rows of masonry. The door is exposed and securely fixed.
- The 5th row of bricks is laid out according to the 4th row, but the bricks are flat.
- Then the last row of the 6th is laid out, which lies on the edge. The walls of the chimney and the inner surface of the bricks are cleaned of mortar and wiped with a damp cloth.
- The next row lies flat, while the back wall is laid out on the edge in two bricks.
- This row closes the level of the firebox and in this row a brick is installed at an angle so that it hangs over the firebox, shifting the flame closer to the center of the stove. This operation is performed on the eighth row. This brick is effective when the stove is used as a fireplace, working with the firebox door open.
- The 9th row is shifted back a little to keep the door open. To ensure the tightness of the joints of the slab and brick, an asbestos cord is used. It is not recommended to lay a cast iron plate on clay.
- On the 10th row, a place for installing the pipe is formed. In this case, an attached metal pipe made of light iron is used. A brick pipe for such a mini-stove will be heavy.
- The valve, sealed with an asbestos cord, is installed on the 11th row.
- With the help of the following rows, a part of the pipe is formed, which is joined to a metal pipe - a chimney.
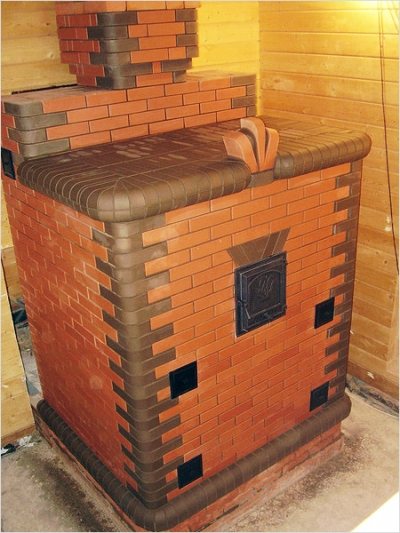
- The final stage in the construction of mini-ovens is whitewashing it, but you can make decorative tiling with tiles. Unfortunately, whitewashing is not practical: the whitewashing will have to be repeated approximately once a year, and the tile will not only decorate the stove, but also save you from constant whitening.
- Before whitewashing, it is advisable to clean the stove from debris and make a test ignition. If the stove is working and there are no problems, you can start whitewashing or facing, after which you need to give time to completely dry. This is very important and you should not rush to light up the mini-stove, so as not to harm.You should prepare for the heating season in advance, then the winter will seem not so cold.
Features of the device
The operation of the structure is carried out according to the channel principle, when the distance of passage of heated gases is deliberately lengthened. For this reason, they give the body of the structure more heat. There are simply no special physicochemical and thermodynamic nuances, so it is almost impossible to break something in the system. (See also the article Heaters for summer cottages: features.)
Modern small-sized stoves for a summer residence of this type are the predecessors of the medieval counterparts that appeared on the territory of the present Netherlands. The small size is explained by the cramped rooms of that time. It was necessary to create a relatively small but efficient heating system.

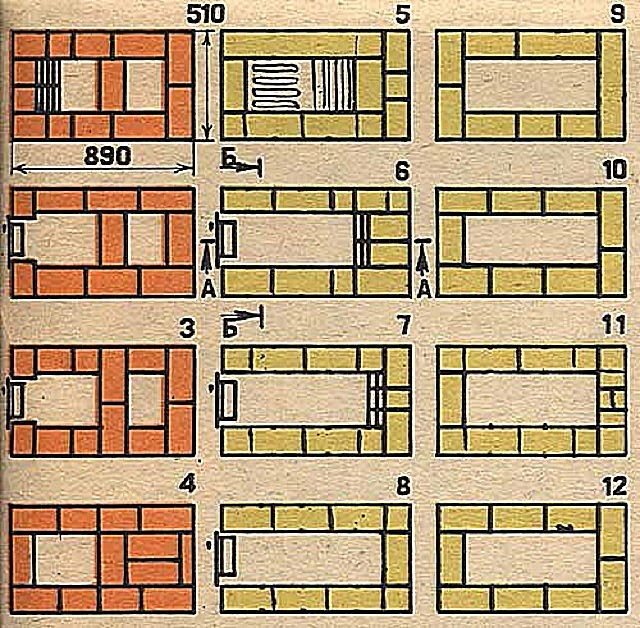
Furnace device measuring 89 × 63.5 cm.
Initially, constructions were made with a firebox, which had a blank bottom, but over time, a blower was added downward. A grate began to separate individual chambers. When arched vaults fell out of use, even craftsmen with low qualifications began to build systems.
How to make a small oven: recommendations and step-by-step instructions
Before proceeding with the laying, preparatory work is carried out. They include the following steps:
- the choice the project;
- selection and purchase materials;
- purchase of metal stove parts;
- preparation instrument, containers for solution;
- preparation places for building a stove;
- building mini ovens.
Project selection
On the Internet and in textbooks on stove business, there are ordinal schemes-drawings of a dozen mini-ovens.
The choice is great, but if the home craftsman has no experience at all, it is worth consulting with local professionals or with people who have successfully built such stoves. Choosing a device that you plan to build with your own hands, take into account several factors:
- area heated room;
- quantity heated rooms;
- temperature air in winter;
- frequency of use heating structure;
- appointment mini ovens;
- experience furnace construction and repair;
- material expenses.
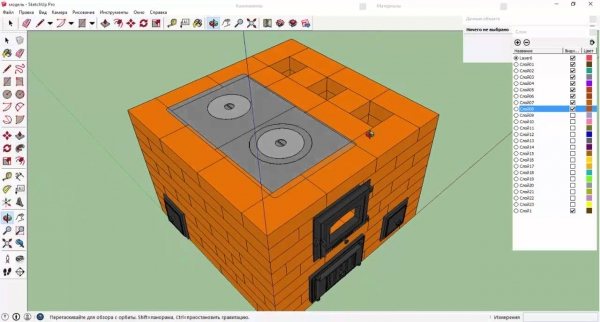
Photo 1. Before starting construction, it is very useful to model the appearance, dimensions and order of the future stove.
If planned Cook, the preferred option will be with a hob and oven. Need in hot water in winter and in the off-season, it will close the water tank in the niche. In it, removing the removable tank, you can dry shoes and other things... If the house always has electricity or a gas stove, choose the option of a stove without a hob and an oven niche.
For regions where winter temperatures drop below 20 degrees and keeps at this level for weeks, it will do large oven with heat shields... Mini stove Not recommended heat continuously more than two hours in a row.
The procedure for laying a brick oven with your own hands
The next stage is the construction of the stove itself:
- In the first row, the solution is not applied. 12 pieces are laid out strictly horizontally on the sand. A blower is placed on the clay-sand mortar. The door is wrapped with asbestos cardboard, wrapped with a cord. Fastening is done with wire.
- Then the laying of the second row is made.
- In the third row, lined with refractory bricks, strictly above the blower, a grate is placed.
- The bricks in the fourth row go to the edge.
- In the chimney, a support for the partition is provided. The back wall is laid out without the use of mortar. These bricks will then need to be removed. Then they put the fire door, wrapping it with an asbestos cord. A couple of bricks are temporarily used for fastening. Secure with wire.
- The fifth row is laid out flat, like the fourth.
- The bricks of the sixth row go to the edge.
- The bricks in the seventh row are laid flat again. For inter-row bundling, you need to start with a brick chipped off three-quarters in size.Having placed two bricks with an edge, they begin to build the back wall.
- The eighth row will close the firebox door. To direct the fire towards the center of the hob, the brick is placed at an angle. Tightness is ensured with a wetted asbestos cord.
- The ninth row is also laid using an asbestos cord. The peculiarity of this row is that it is slightly shifted back so that the door remains open.
The beginning of the chimney is formed in the tenth row. There will be a place to attach the iron pipe. In the eleventh row, a chimney valve is installed. At this stage, step-by-step instructions will come in handy - how to fold the stove with your own hands, which will help you not to get confused in the details.