
When laying around a metal stove in a bath, it is forbidden to use ordinary silicate or red building bricks. It must be refractory. The presence of cavities is not necessary, decorative texture is allowed. Mixtures serve as an astringent:
- cement and fireclay aggregates;
- clayey;
- cement-glue (glue designed for fastening porcelain stoneware panels is used).
The use of other materials will lead to cracking of the masonry. Now let's look at how to impose a brick on an iron stove, avoiding the consequences. You can see what types of ovens exist by following the link.
Foundation base for lining
The blocks used must have a weight of 3.8-4.2 kg. The total mass of the structure, together with the metal firebox, will require a solid foundation. After completion, the weight will be about a ton.
The procedure for arranging a strip foundation is as follows:
- Cut a square hole in the floor.
- Dig a pit up to half a meter deep into the ground.
- Fill the bottom with a layer of crushed stone (fraction 10-20 mm, thickness of the filling - 10-15 cm).
- Lay waterproofing film (thick polyethylene or roofing felt).
- Install (unfasten) the formwork along the perimeter.
- Install a reinforcement frame (steel or fiberglass) inside.
- Fill the cavity with concrete, the grade of which must be at least M200, class B15.

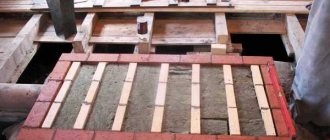
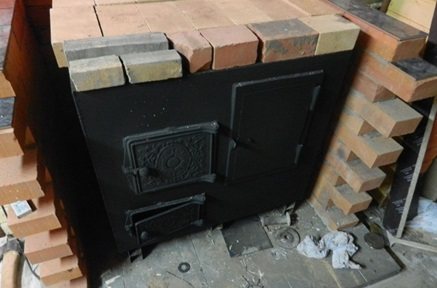
The height of the foundation, protruding above the ground surface, is 20 cm. It is “taken out” under the floor level with the help of a thermal insulation layer. It is laid out of heat-resistant bricks "solid". The solution is the same composition that will be applied later.
When to start
The concrete curing period is 27 days. The thermal insulation layer is mounted a week after pouring, when the foundation has gained 60% of the prescribed indicator. You can load it on the 28th day. During this time, the base will acquire the ability to withstand the load, it will shrink, which will exclude distortion, cracking. Installation begins with putting the firebox in place.
Choice of cover material
Among the recommended types of bricks, the best are red ceramic or hollow fireclay. The latter is more expensive, but its use is mandatory if the gap between the walls of the firebox and the masonry is 2-4 cm, which will warm up to 400 C.
To use ceramic, a gap of 7-10 cm is required. Then it will warm up to 200, which is uncritical. The ventilation holes will solve the problem of overheating. This will reduce the cost of the design and speed up the heating of the bath when firing up. The ideal option is still fireclay, which was originally developed for high temperatures.
Solution manufacturing technology
Ready-made dry mixes for stoves and fireplaces are on sale. The packaging contains recommendations for preparation (mixing with water). To make your own masonry mixture for lining, you need to purchase:
- refractory chamotte clay;
- construction sand (fineness module 1-1.2);
- cement without slag content (M500 D0).
Sand and clay are sieved and exclude the ingress of crushed stone, clay impurities. The proportion of aggregates is 1: 1. The introduction of cement is optional, but desirable. It will be enough 0.5 kg for a 10-liter container of dry chamotte-sand mixture. After mixing the aggregates, pour in water. The volume is determined by the consistency of the finished solution (thick, plastic, does not stick to the trowel).
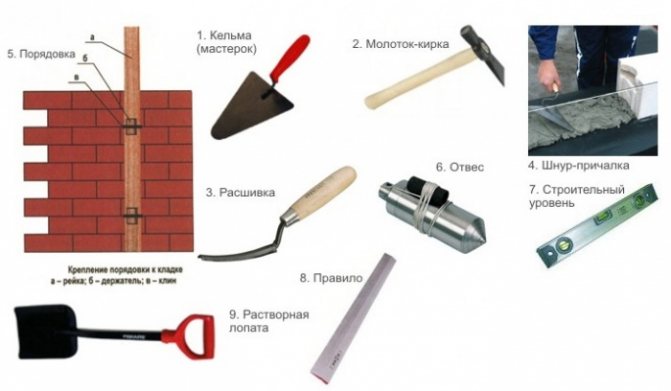
Required materials and tools
For work, prepare the following tools:
- bubble level 90 cm long;
- plumb line;
- steel square with sides 40 × 60 cm;
- mason's hammer and small trowel;
- pencil, tape measure and line for marking;
- Master OK;
- container for mixing masonry mortar;
- a grinder with a circle for a stone, it will be needed to adjust the brick to size.
What is needed to build a stove
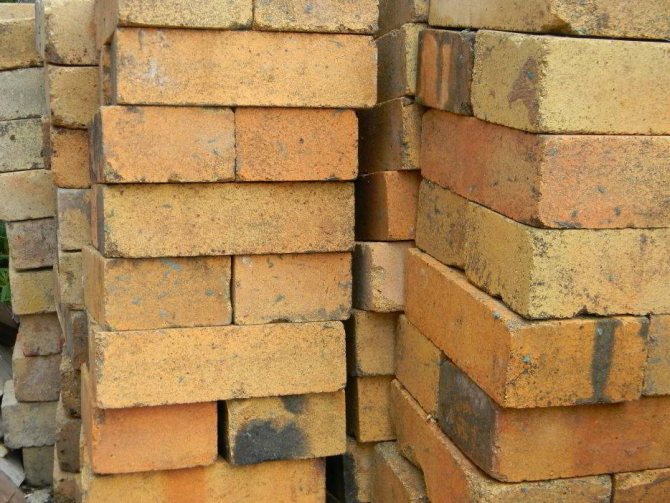
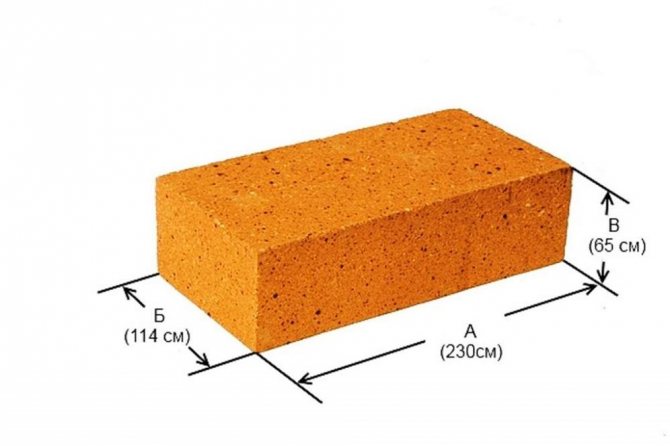
For the construction of the kiln, ordinary red fired clay refractory bricks should be used. According to the standard, their dimensions are 12.5 × 25 × 6.5 cm. However, different brick factories can produce batches of material that differ in size. Based on this, before work, you should carefully select the bricks in size.
Full information about the brick can be found here.
You should choose high-quality material. The bricks must be flat, without cracks or chips. You need to buy well-fired blocks. On impact, they should scatter into several large fragments. If the brick crumbles into small pieces, then it is unsuitable for laying the stove.
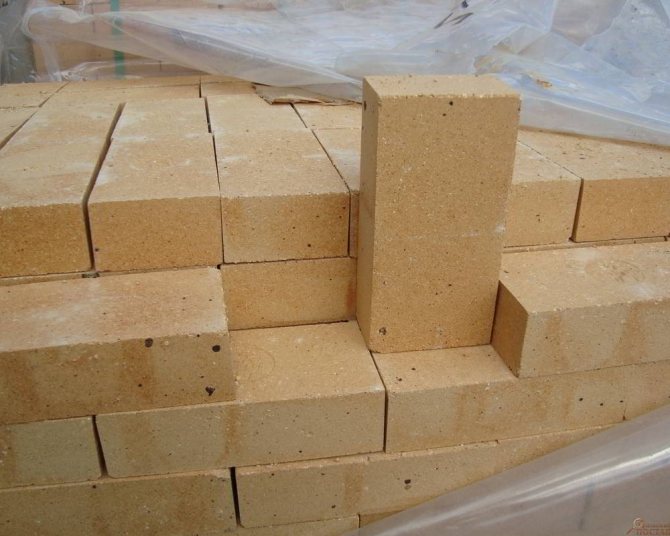
For the construction of the firebox, fireclay bricks of the Sh-5 brand are needed. They can be light yellow, pinkish, or white. This material is fireproof and can withstand exposure to open flames.
The sizes of fireclay bricks may vary slightly. There is nothing wrong with that. Usually, the fuel chamber in a sauna stove is not connected to its body. Therefore, there is no need to adjust brick rows to a single level.
It is not worth laying out the stove completely from fireclay material:
- firstly, it is expensive;
- secondly, fireclay brick cools faster than its ceramic counterpart.
Mortar for masonry oven
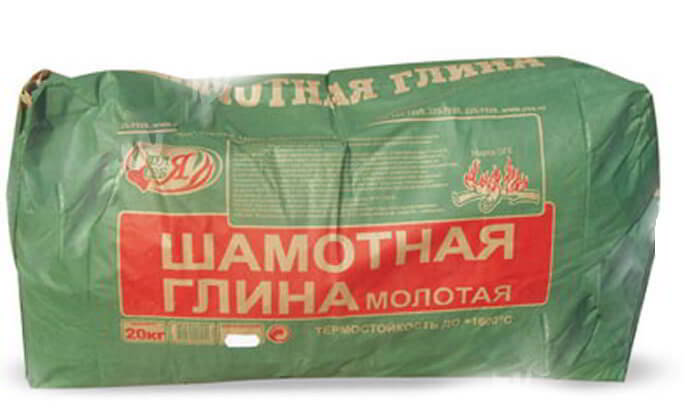
The mortar for the furnace is made of chamotte (white fire-resistant clay).
You should not completely build a stove on such a mixture. At a temperature mode of + 700-800º such a solution is baked to a monolithic state. There will be no such temperatures in the outer part of the structure. Therefore, chamotte will gradually crack and spill out of the masonry.
For the masonry of the stove body, a clay-sand mortar is used in a ratio of 1: 5. The sand should be quartz - river or quarry. The quality of the first variety is slightly worse. The grains of river sand are round, so the solution from it has the worst properties.
How to knead the mortar yourself, read the article Mortar for laying a brick oven.
Clay must be taken from a quarry, raised from a depth of at least two meters. How to check its quality:
- Soak some clay (300 g) in water for one day.
- Then make a ball out of it and let it dry.
- After a couple of days, drop the bun onto a hard surface. If the ball breaks up into large pieces, the material is therefore suitable for oven mortar.
Also prepare a 3 mm steel wire. It will fix the doors of the firebox and blower. For the installation of the casting, you will need an asbestos cord. This heat insulator wraps around the edges of the grating, which are walled up in the masonry. Thanks to this, the brick does not crack due to the high temperature.
How to make reinforced brickwork yourself, read this article.
Types of masonry
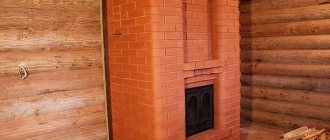
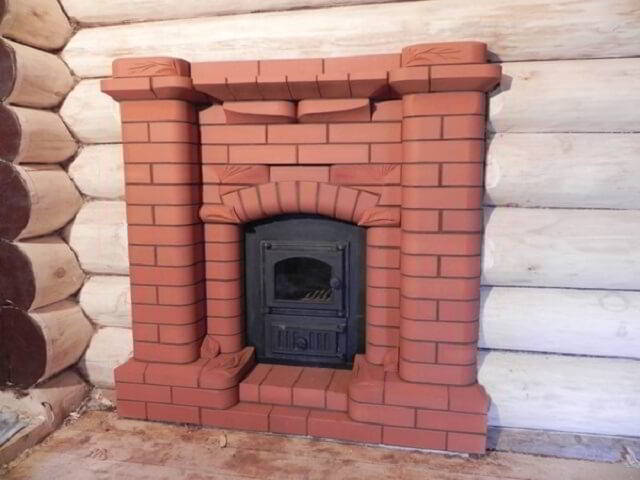
In order to impose brick on the iron stove in the bath, people who do not have the skills of a bricklayer are advised to resort to laying in a "half brick" (flat).
The “quarter brick” technology, which involves laying blocks on a side edge, is suitable for those who have already encountered such work. There are two main clutches:
- Solid. Does not include air circulation holes. Suitable for the subsequent decorative cladding of the stove with facing materials.
- "In detente". Provides ventilation holes.
Walls "in brick" are unprofitable for two reasons - excessive consumption of materials and fuel.
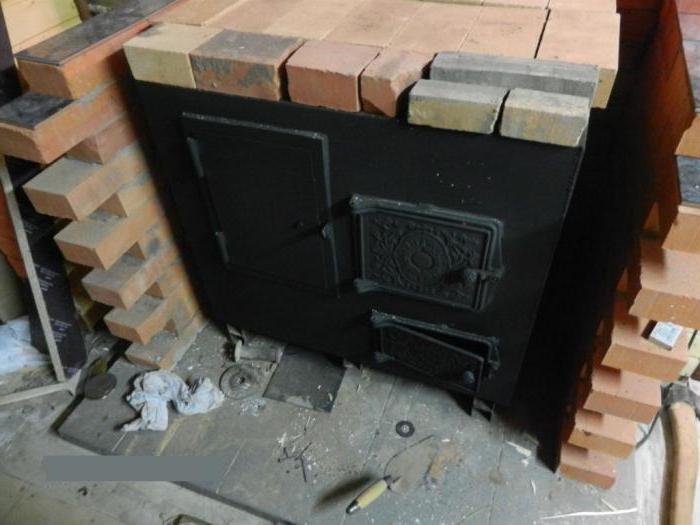
The presence of holes leads to the earliest heating of the bath when the iron stove is kindled, but it threatens with increased heat, burns from the outgoing air. An alternative is the installation of metal, cast-iron doors (hatches) in the second or third row.The measure will allow you to control and manage the heating.


Stages of brick lining of a sauna stove
The process itself is divided into two stages: preparation and covering.
Stage number 1 - preparatory
It is necessary to prepare tools and materials.
Of the tools you will need:
- Trowel (trowel) or spatula.
- Plumb line and level.
- Hammer and jointing.
- Construction mixer or drill with a special attachment to mix the bonding solution.
- Ordering.
Solution container.
- The brick itself.
- Clay and sand for making mortar (it is better to purchase a ready-made dry mix for laying bricks in ovens for a bath).
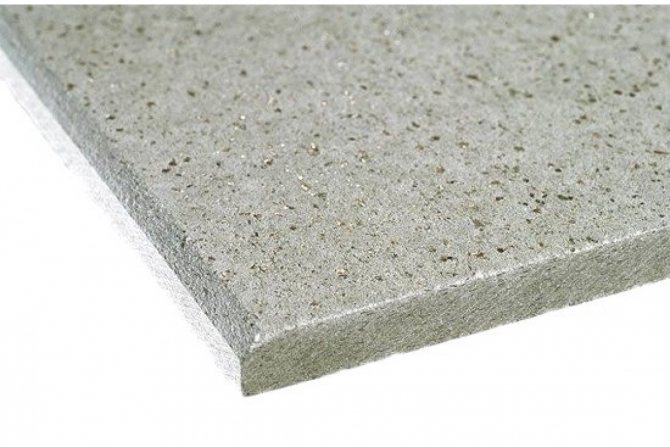
- Asbestos cardboard 10 mm thick.
- Sheet metal and corner.
- Metal mesh with cells 10x10 mm.

But then the question arises, how much material is needed to overlay a metal furnace? This mainly applies to bricks. Everything will depend on the size of the enclosed stove. To do this, we measure each side of the unit and add 10 cm to the dimensions obtained for the gap between the masonry and the oven. The same goes for height. Now, according to these indicators, the masonry area is calculated: the height is multiplied by the width. The resulting indicators are added. This is the total area of brickwork.
Now it must be divided by the area of the spoon side of the block, that is, the longitudinal one. For a standard brick, it is equal to: 25 cm length multiplied by 6.5 cm height, it turns out 162.5 cm² or 0.016 m². Next, you need to divide the total area of the masonry by the area of a spoonful of bricks, the result is the number of bricks required. To it must be added 5-10% for the thickness of the masonry mortar and waste.
As for the preparation of the bonding solution, the technology for its preparation must be followed exactly according to the instructions written on the packaging of the dry mix.
- Firstly, it concerns the proportions of water and the mixture itself.
- Secondly, the mixture is poured in portions into a container with water, and not vice versa. Thorough mixing with a mixer until a homogeneous mass is obtained until the consistency of sour cream.
Stage 2 - lining the stove in the bath
To begin with, manufacturers today offer stoves of different designs. We will be interested in the tunnel into the furnace. It can be standard short or long. The second option is usually offered for stoves that are fired from another room. For example, the entire stove is located in the steam bath, and the door from the firebox is in the changing room. This is convenient from the position that the steam room and the furnace are separated, in which the firewood will be in a dry state.
It is the second option with a long tunnel that is easier to brick. If you carry out the lining process of the short version, then it will be necessary to build an additional tunnel between the brickwork and the furnace furnace. In addition, you will have to install a metal door on the outside of the masonry wall. Therefore, when you come to the store for the sauna stove, pay attention to the length of its tunnel. Consider the fact that the distance between the unit and the bricks is a maximum of 10 cm, and the thickness of the block itself is 12 cm, here you also need to add the thickness of the door, somewhere 2-3 cm, then we get that the furnace tunnel should be at least 25 cm long. Although there is nothing difficult in the process of lining and the traditional stove of a bath with a short tunnel.
To overlay the stove with your own hands correctly, you need to start this process before installing the bath unit itself, because there is a requirement regarding a safe distance to the wall, plus the correct finish of its surface with non-combustible material. Therefore, it is recommended that the wall, near which the sauna stove will be mounted, be faced with bricks. That is, the process starts from the back wall.
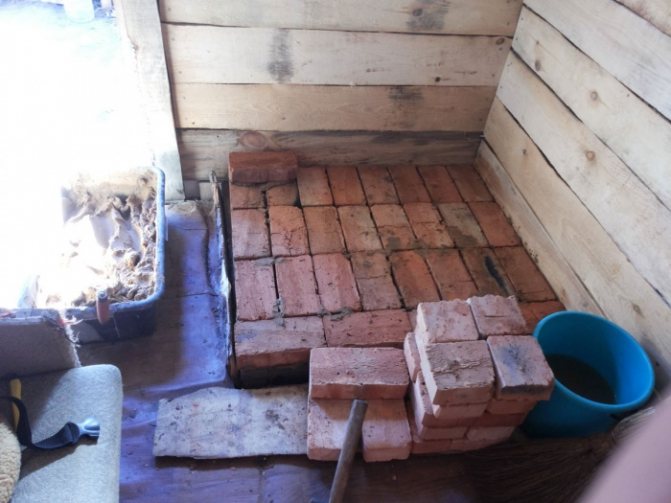
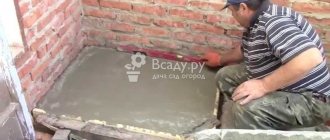
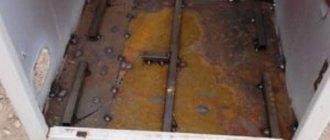
But even earlier, you will have to take care of the floor base. A metal stove is a heavy unit, therefore either a strong concrete base with a thickness of at least 10 cm, or a brick base on a concrete screed with a thickness of at least a brick, preferably two.If the floor in the bath has already been built, and it is wooden, then you will have to cover it with a metal sheet, and on top with asbestos cardboard, which were prepared in advance.
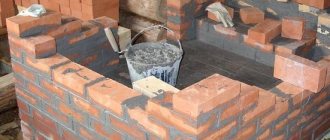
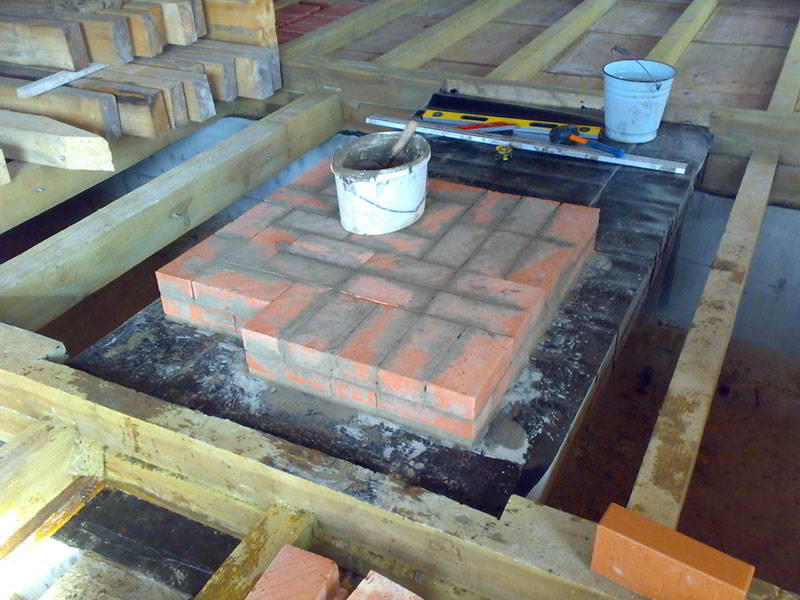
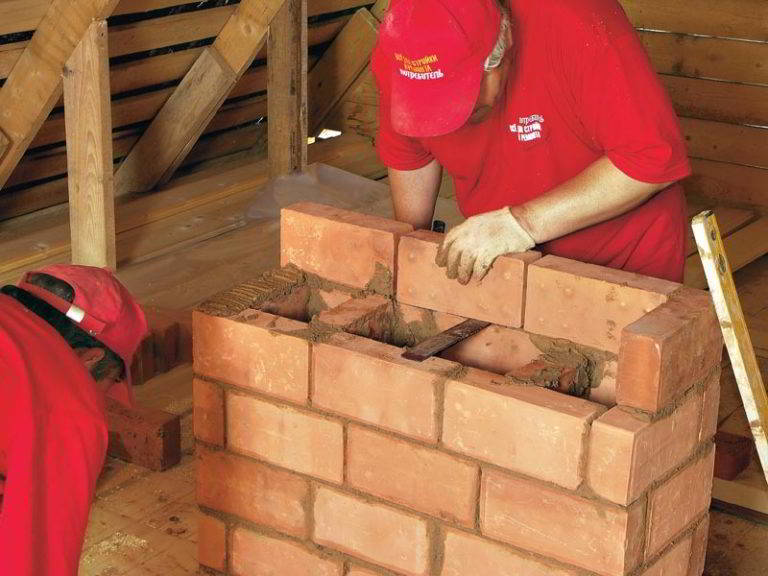
Bricklaying
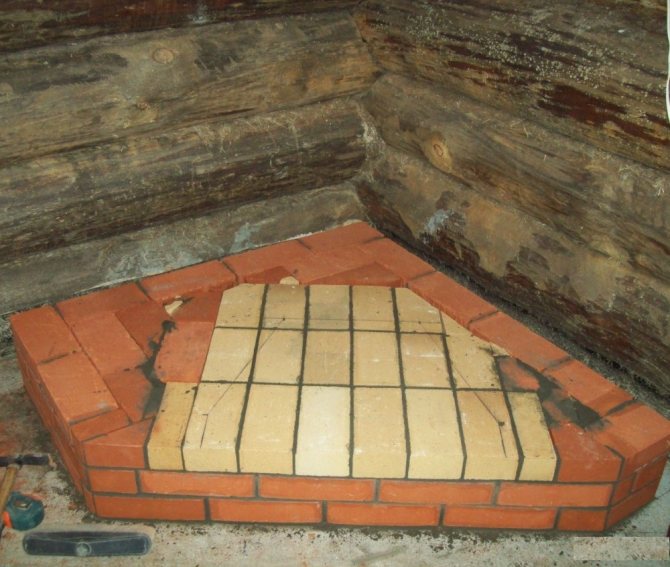
The masonry process is carried out according to all the canons of the construction of brick buildings. This is a masonry with a sling, when the joint of two bricks hits the center of a brick located in the lower or upper row. A very important point is the laying of the lower first row. The quality of the entire structure will depend on him. Therefore, the corner of the building always starts with a solid block. Do not forget to lay each brick laid on the level. Here you can use a stretched thread strictly horizontally, or you can make masonry according to the building level or rule.

After laying two rows, a metal mesh is installed on the bricks, which in the masonry will serve as a reinforcing frame. The mesh must be cut into strips no wider than the width of the brick. They lay it on a brick, after which the mortar is applied, it is necessary to achieve such an arrangement of the reinforcing cage so that it is inside the masonry mortar.
There is one more point that will affect the quality of heat transfer from a brick-lined stove. In the second or third row, vents are made. These are special holes through which cold air from the floor will penetrate into the brick structure. Exactly the same vents must be made in the penultimate rows, so that the already heated air through them enters the room. In fact, this whole structure will perform the functions of a kind of ventilation, which is aimed at efficient heat transfer to the bath room.

The vents themselves are performed as follows. After laying a solid brick in a spoon way, a brick is installed next to it with a poke, that is, an end. In this case, a gap of 6.5 cm is left between the two blocks (equal to the width of the brick). The next row completely covers the top of the gap space, as a result, a rectangular through hole is obtained. There should be two or three such vents for the length of the lining.
Cleaning brickwork
It is clear that laying bricks is a dirty business, so the walls of the new structure will be smeared with mortar, which must be disposed of. To do this, you need to wait for it to dry well. Then you can proceed to cleaning.
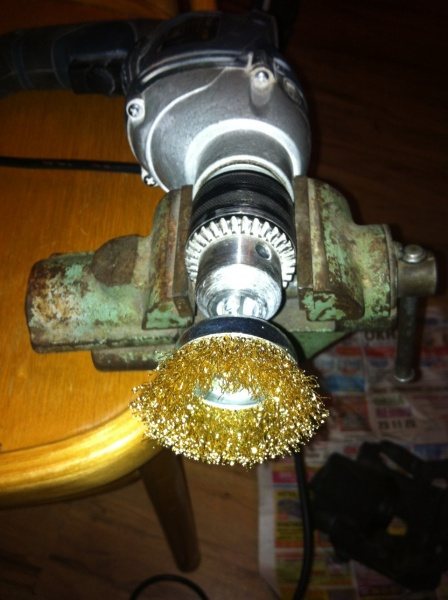
- To do this, you need a drill with a special brush attachment. Gently run it over the brick surface. No effort is needed.
- The metal brush itself usually leaves dark spots on the bricks, which can be removed with a simple soapy solution, which is applied to the wall with a household brush. You can use a hard sponge.
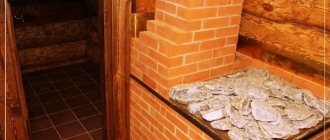
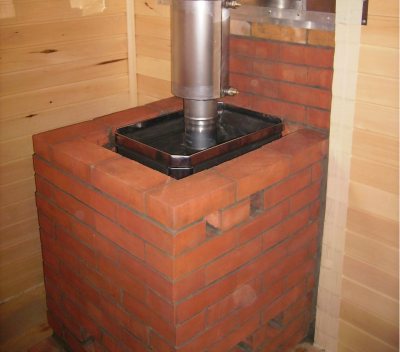
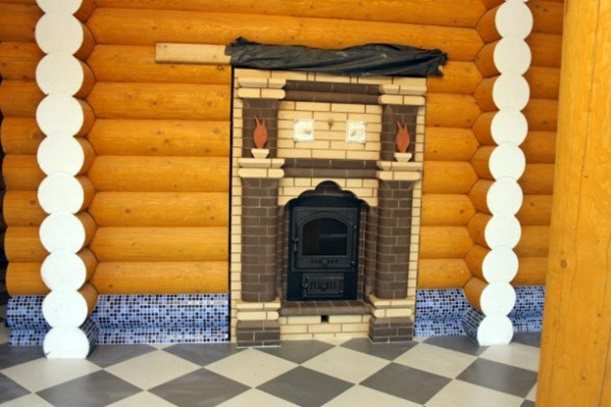
This is how the oven in the bath should look like after bricking it, see the photo below.
Recommendations
To complete you will need:
- Master OK;
- level;
- plumb line;
- container for mixing the solution.
When laying a brick around an iron stove in a bath, you should adhere to the following tips to ensure durability:
- The thickness of the seam (0.5) "in a quarter of a brick" must include a reinforcement mesh or wire 3-4 mm.
- You should adhere to the distance from the masonry to the wall of the metal stove for the bath - 3-10 cm.
- The completion of the laying of each row must be accompanied by a check of the verticality of the structure with a plumb line.
- The rows are laid horizontally in level.
- Excess mortar is removed with a trowel (outside and inside).
- If the firebox is equipped with a convection casing, remove it.
- Stoves with a thin top sheet are lined so that there is access for replacing it in case of burnout.
Brick oven drawing
The construction of complex structures requires preliminary measurements and the creation of a drawing. The furnace diagram must fully depict all dimensions, brick rows and have the necessary explanations.
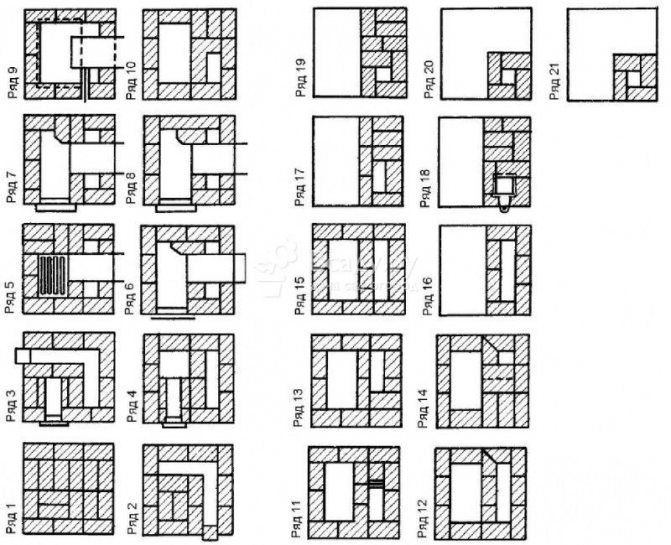
A well-made drawing will make it possible to fold the stove correctly.Before that, he will help to accurately determine the amount of required materials: bricks, masonry mixture, etc.
Individual elements should be marked on the drawing. So it will be possible to calculate how many bricks are needed to build each row. When choosing the location of the stove, you must take into account the following points:
- The fuel chamber door should be positioned exactly opposite the room door.
- The dimensions of the foundation of the structure must be at least 0.7 × 0.7 m, the height - 0.2 m.
- In the doubles compartment, the shelves should be placed near the wall where the heater will be located. Don't make them high. This will hit the ceiling, and too high a temperature will interfere with steaming.
- The oven should not be built close to the walls. A gap of 5-10 cm will protect the building envelope from heat and reduce heat loss.
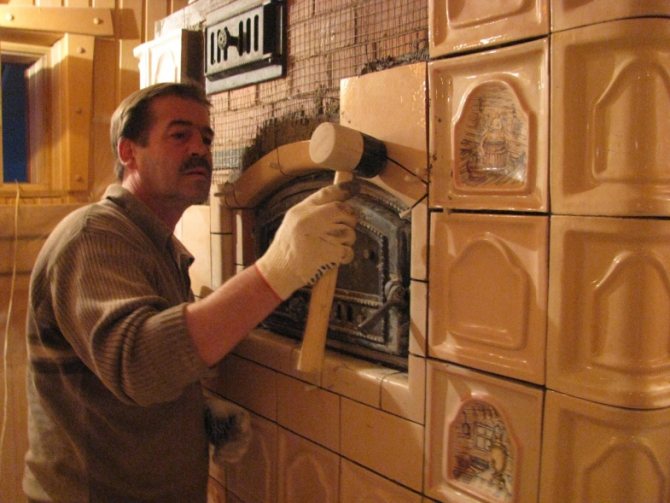
Cover for finishing
Non-cladding design requires perfect geometry.
Before you impose a brick on the iron stove of the bath, you should take care of the spacers. They are objects (thickness 0.5 cm). They are laid between the rows as supports.
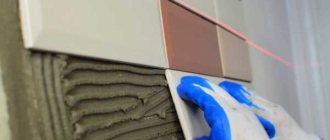
Excess mortar is unacceptable from the outside. It is important that there are indentations.

After hardening, the spacers are removed, and the outer cavities in the seams are rubbed with the same solution. It is allowed to introduce gypsum or dye into its composition, which will shade the joining. The next day, stains from the solution are removed with a stiff brush using a soapy solution or rubbed with a drill with a brush attachment.
Covering process
The brick laying technique to create the heat shield is almost the same as building the brick kiln itself.
Important! The main thing is to perfectly align the first row.
After that, you should start laying the corners, while not forgetting to tie up the rows of bricks.
There is no need to rush, as it is recommended to do the styling for 2 days. This is due to the fact that on the first day it is necessary to level the base and lay only 5 rows. And on the next, after checking the shrinkage in advance, lay out the remaining 8 rows.
Important! For better adhesion of the mortar to the brick, it is necessary to immerse each pebble in salt water for 12-15 minutes.
Do not forget about the control over the horizontal and vertical lines in the laid rows.
It would be nice to use steel wire or mesh as a bandage for corner bricks. You can also reinforce a whole row with reinforcement or fiberglass. In the latter version, a mounting belt can be made on the surface of the row for the purpose of embedding 4 mm plastic. To reinforce fireclay bricks, it is best to use iron materials.

The cover is best done in the form of a well with 2 rows of windows: at the top and in the middle of the structure. The ideal option is to use half a brick placed at an angle to the wall as a lintel. Thanks to this design, the air in the gap begins to move better, which leads to a decrease in the temperature inside the well, excluding, at the same time, excess heating of the air inside the steam room.
Quite popular are designs with finishing inside the well using a bath stone. This option prevents water splashes from stones from entering the gap between the screen and the oven. And this is good, since heated chamotte and, moreover, red brick is easily destroyed by hot water.
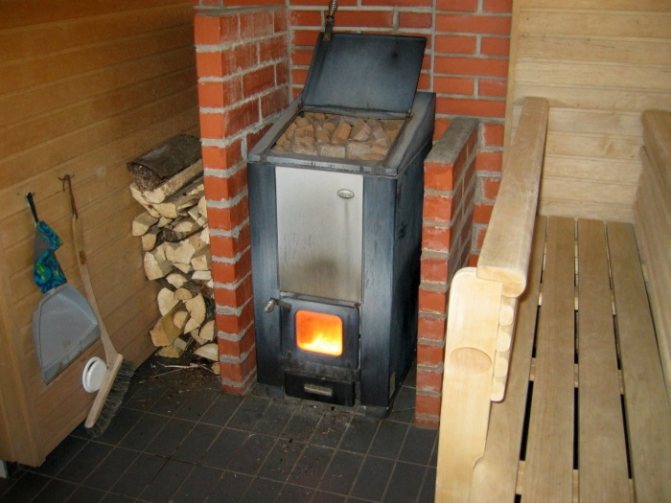
The metal sauna stove is lined not just for beauty. As evidenced by numerous reviews, thanks to such an event, the atmosphere in the steam room is significantly improved. And this despite the fact that every owner of the bath can do the brick lining with his own hands, if there is no opportunity to build a brick oven. Therefore, the work will be carried out with minimal financial costs, with high quality, as a result of which the bath will have not only an attractive appearance, but also an internal thermal environment that is beneficial to health. Good luck!
Features of the lining of the stove installed on a wooden floor
This method is not recommended as the presence of a foundation ensures the strength of the structure.
If this is not possible, then it is required to assess the bearing capacity of the floor. Logs (beams) should be located at a distance of 0.6 m. Length - no more than 3.5 meters. This is if beams (logs) with a section of 200 mm are laid. Boards less than 50 mm thick do not have sufficient flexural strength, so they must be thicker and less than 2 m in length.

When performing work without dismantling the wooden floor and foundation, you must adhere to the following recommendations:
- The gap from the wooden walls of the room (steam room) and the lined stove of at least 10-15 cm will ensure fire safety.
- The gap to the walls of the furnace of 90-120 mm will eliminate the risk of a fire due to the imminent failure of the furnace.
Pros of brick cladding furnaces
Experienced stove-makers advise installing metal stoves in baths for several reasons. The most common ones are as follows:
- the simplicity of making such a furnace in comparison with a stone one;
- a high degree of mobility of such a design, since a metal stove can, if necessary, be moved to another room or building;
- the possibility of autonomous operation, especially when the metal stove is powered by pellets or runs on gas.
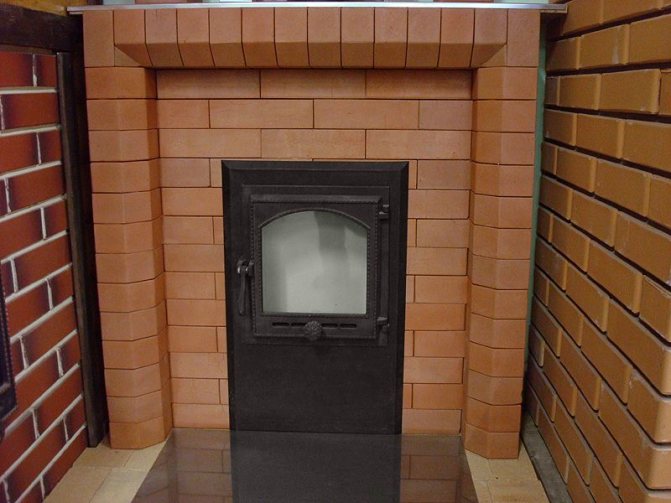
However, as an addition, the same stove-makers propose to supplement metal stoves with a special brick casing. Firstly, thanks to this, you optimize the distribution of heat in the room, since the metal heats up quickly and cools quickly, and the brick keeps the heat for a long time.
Thus, at any point in the steam room, you will feel a pleasant warmth, the stove, not lined with brick, will warm up the room only around itself, and the rest of the area will remain unheated.
Secondly, metal stoves with an increase in temperature in them heat up, resulting in a sharp increase in the risk of fire. Brick, on the other hand, is absolutely not a combustible material, and if the metal is protected with it, such a risk can be reduced to zero. In addition, you cannot burn yourself on it, which is very important in the case when there are small children in your family.
Thirdly, if you know which brick to lay on the stove in the bath, you can achieve a very good design effect. In addition to the fact that a brick stove is in any case more advantageous to be overcame in a bath, at the same time, real paintings or, in extreme cases, geometric shapes that are pleasing to the eye can be laid out of bricks on its facade.
There are other advantages to such a solution, and only an experienced stove-maker can evaluate all of them. Therefore, in any case, before starting the production of work, it is worth contacting him. In addition, it also makes sense to carefully study the architectural and construction project of your bath for the possibility of carrying out the above operation. The fact is that you will most likely have to strengthen the floor and foundation of the building, since a metal stove lined with bricks will significantly add weight.
Calculation of material consumption
The basis can be calculated empirically. The first row of bricks is laid on top of the continuous "dry" layer, their number is determined by height. It is formed by adding the width of the brick block and the masonry joint (5 mm). A column is built, having previously laid five-millimeter objects between the blocks.
It remains to add the number of blocks:
- grounds;
- each row;
- elevation of the front plane (if planned).
The mass is determined by multiplying the resulting quantity by the mass of one block. The calculation assumes the inclusion of the mass of the solution.
The volume is calculated as follows:
- Add two brick lengths and heights.
- The resulting length of the perimeter of contact with the solution is multiplied by the thickness of the solution layer (5 mm).
- The consumption is multiplied by their number.
Having received the volume, you need to calculate its weight. To do this, multiply it by 1.6. This is the bulk density of one cubic meter of solution. Adding all the values will give the required value.Dividing it by the area of the base, the load is obtained in numerical value per square meter. And if it is less than 1.7 t / m2, it is impossible to impose a brick on an iron stove in a bathhouse on a wooden floor without destruction.
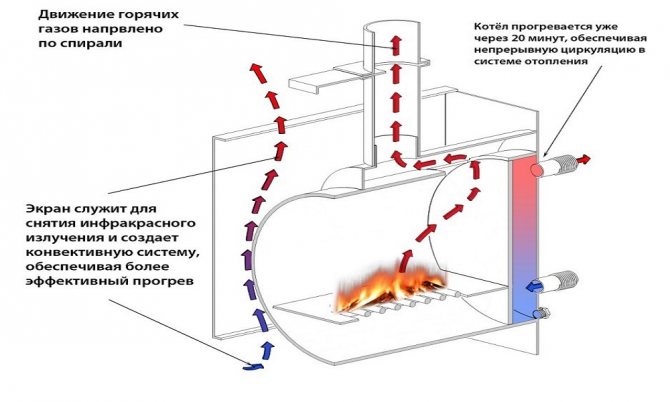
When is a fence required?
The answer to this question lies in the way heat is distributed from any type of oven. There are 2 such ways:
- Direct heating of the air in the steam room.
- Heat transfer to surfaces using infrared radiation.
For a bath, the first method is preferable, when in the process of heating the steam room, the air is first heated, and from it the wooden shelves, walls and floors receive heat. If necessary, the hot dry air in the steam room is humidified, this is called "steam".

Installation diagram of a protective screen for the oven.
Infrared radiation is emitted by all heated surfaces, including the hot walls of the sauna stove. Considering that the burning temperature of firewood reaches + 600 ° С, the outer surface of the metal walls heats up to + 300 ° С. It emits such a powerful stream of infrared radiation that people taking bath procedures can get skin burns.
Sauna stoves of the middle price category are equipped with a steel convection casing, at the same time playing the role of a protective screen. More expensive cast iron products are finished with slabs of natural stone or salt bricks: minerite, soapstone and other rocks. But budget and home-made steel stoves do not have such a screen.
A screen for a sauna stove is required in the following situations:
- when the red-hot firebox body is not closed from the outside with a steel convection casing, and the stove is located in an open place;
- if the stove is equipped with a casing, but stands close to the wooden facing of the wall;
- if the factory screen is made of thin metal and does not protect well from radiant heat.
Not only people need to be protected from hard radiation, but also wooden walls, as evidenced by fire safety rules. Therefore, a heater installed close to a wooden wall must be fenced off from it with a fireproof barrier. Brick is best suited for this purpose.