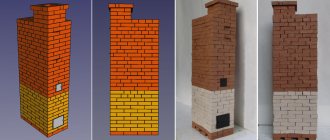
Facing methods of ovens made of bricks
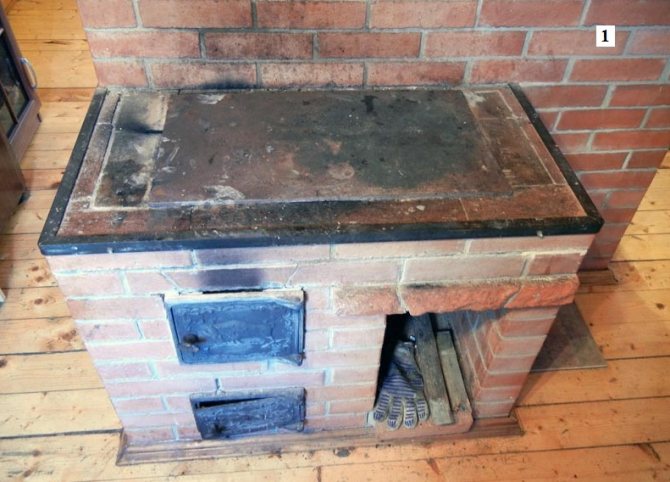
Even if there is the presence of modern heating systems, as before, many homeowners of private houses prefer to keep the classic wood-burning stoves in the house. They are erected even in new buildings - fuel regularly rises in price, and the situation with firewood is somewhat easier.
A wood-burning stove will always remain a very profitable option for heating your cottage.
And since an attractive interior in a house is very important for the good mood of those living in it, a lot of homeowners are also interested in cladding for the stove.
How and with what is it possible to decorate the stove? Facing in most cases appears to be a necessity. Often, stoves are laid out of bricks with good operational properties, but completely unsightly. Furnaces without lining become covered with layers of dust for a certain period of time, and it is very difficult to remove it from a rough surface. Also, due to the additional mass formed by the lining, the heat capacity of the furnace increases. Methods of execution are selected depending on the owners' own desires.

Furnace taxation
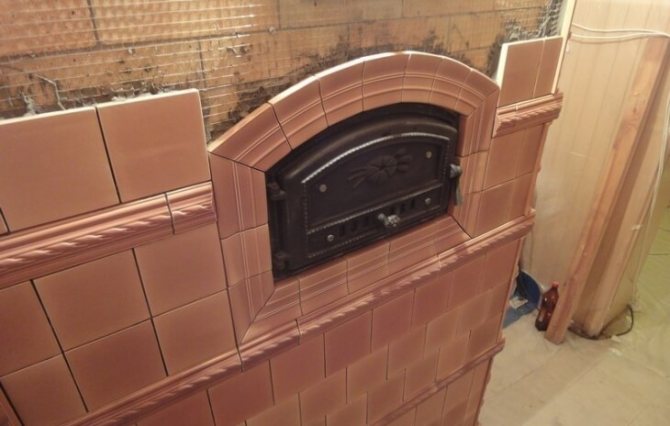
If you have not yet decided how to overlay the stove in the house, then we offer you several ways. For example, the tiles are handmade ceramic tiles. If your money allows you, here's what you can put on the stove in your home.
This version of the tile has a special rear rump designed for installation - this method, in addition to its solidity and effectiveness, has a number of advantages:
- it is very easy to clean and wash, the surface of such a stove is not clogged with dirt and dust;
- increases heat transfer and heat capacity of the furnace.
Step-by-step actions:
each tile is easy to hit, if the sound is clear, high, then the tile is of high quality, without defects and internal cracks. Tiles should be laid out from the corners.
- Grind off the horizontal edges of the glaze inward.
- Place the solution under the assembly tiller.
- Then, while gently holding adjacent tiles, place the mortar between the trowels and press in the crushed brick.
- Reinforce the tiles with vertical wire pins. The pins should be inserted into the horizontal shelves of the tile, and then the ends should be tied together.
- Close up the masonry seam.
- Use iron clamps to fasten the ribs of the box tines.
- The width of the seams must be the same (2 mm.). Rub the seams with alabaster.
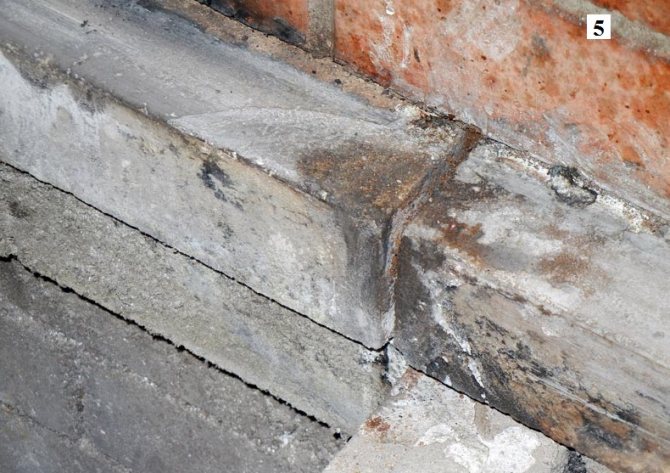
the tiles should not hang on the masonry, but rest against the stove foundation.
Finishing options for stoves made of bricks
Whitewashing and painting
When choosing the classical method, the surface on the outside of the brick oven is rubbed to reduce the roughness and is wetted with water. Treatment with a penetrating primer mixture will not be unnecessary. The stove must be painted with glue-based paint. You can also whitewash with slaked lime with the addition of blue, ocher or red lead. Metal elements such as a cast-iron door can be painted with a fairly heat-resistant black paint.
Plastering
For good adhesion of the plaster to the brick, a metal mesh is used.
The simplest type of cladding is a hut. This is the name of the rural lining of the furnace walls, which is an uneven coating by hand with further whitewashing, on which hair cracks are allowed. At the end of the heating season, the hut requires an "economy class" repair every year - the cracks that have arisen are treated with a mixture of clay, cement and sand with water, and whitewash is applied on top.Most of the manufacturers of dry plastering compounds recommend ready-made dry mixes, but grandma's recipes have not lost their popularity. Such mixtures are based on sand, cement, asbestos.
Good advice: to prepare the mixture, dry components are sieved through a sieve and mix well with each other. The resulting composition is mixed with a thick solution of lime or clay water. Separately from the mixture, gypsum is diluted to be added to the finished lime solution. Since the gypsum solution sets very quickly, you need to prepare a similar amount of the mixture, which can be lubricated in about 5 minutes.
To avoid premature cracking, plastering should be started after the brickwork is completely dry.
You need to start plastering only after the oven masonry is completely dry and settled. The surface of the brick oven is perfectly cleaned of dust and clay with a metal brush, the seams are cleaned to a depth of 5-10 mm. In such seams, plaster mortar can wedge perfectly. A metal mesh is fixed on the surface, the cells of which will be 10-20 mm. The oven must be well heated before plastering. On a hot surface moistened with water, the made solution is applied in two layers, of which the second should be thicker than the first. Each layer should be approximately 4-6 mm thick. Throw the plaster over and rub evenly. After plastering, the brick stove is painted or whitewashed.
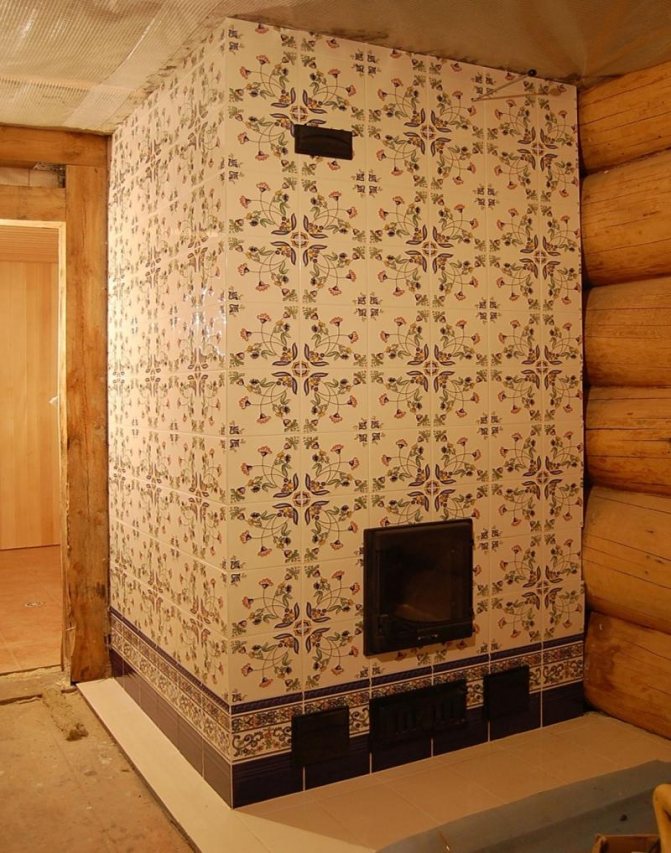
Surface finish with tiles
Decorating the stove with tiles, in addition to increasing the heat capacity, makes it look solid and old.
Tiles - handmade tiles. This finishing material is produced with a tile box on the back. It is necessary in order to make installation in brickwork. Tiled cladding is considered an ancient and respectable type. A surface of this type is quite easy to wash and wipe when dust appears, and the penetration of flue gases into the space of the room is practically excluded. The absence of dust makes more heat dissipated. Since the mass of the finishing furnace is very large, its heat capacity also becomes larger. Because of this, the entire heat supply that accumulates in the furnace will be given off much longer.
Tiles, if done in good faith, must be made, fired and signed by hand. Thanks to this, one should not be amazed that they have a wide spread in shape, color and size. It can even be in the same batch or box.
Selecting and sorting tiles
Tiles for the stove are made by hand, so you must always sort them by shape and shade.
Tile cladding begins with sorting the tiles by shape and shade. Products must be selected so that they do not have noticeable imperfections, and with a slight impact, they would produce a large, clear sound. This confirms that there are no internal cracks in the product. Sort the tiles by color shades. To do this, they are spread directly on the floor or on a wide workbench. The selected products must be processed. Previously, it was done like this: a specialist chopped them off with a knife to the required state, then hewed them and carried out manual grinding. It was necessary to saw through the hard tiles manually using steel wire. Also, by hand, neighboring samples rubbed against each other. At this time, with the help of mechanization, everything has become much very simple. The horizontal edges are slightly grinded inward, so the finished tiles on the wall will not be supported by glaze, but by the edge of the tile edge.
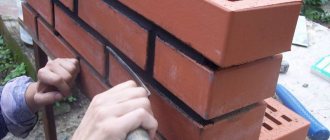
Correct laying of tiles
When laying tiled tiles of any of the rows, you need to start from the corners.They begin to put a row by moistening the corner parts in the water mass and starting laying from them. A thick solution is placed under the tiller. The adjacent tiles must be held with one hand, and the mortar must be placed between the trowels, after which the brick must be pressed in. The tiles are fastened using pins made of knitting wire, the diameter of which is 4 mm. The pins are inserted vertically into the holes on the horizontal shelves of the tiller.
You need to start laying stove tiles with corner pieces.
The pins are tied together with a knitting wire (diameter 2 mm). Additional pieces of wire are tied around the pins, then they need to be hidden in the masonry seam. These pieces are called lobes. The ribs of the box rods are held together by metal clamps. There should not be more than 2 mm joints between the tiles, which are overwritten with stucco. So the tiled stove becomes, as it were, a solid monolith, which is repeatedly reinforced with stove wire. Attention! The tiles should not hang on the brickwork - they rest on the very foundation of the stove.
Facing with tiles, tiles
Facing with tiles, tiles of ovens made of bricks has been used for a long time. Very often, the following options are used to decorate stoves made of brick:
- Terracotta - pressed ceramic unglazed tiles. Famous since antiquity, it is made of special types of clay;
- majolica - pressed tiles, covered with glaze on the front side. It has been used since the Middle Ages;
- brick facade tiles are created from a mixture of highly plastic clays of various types. The product is relatively new; during the manufacturing process, the tiles are fired at high temperatures and pressed.
It is undesirable to handle the stove with tiles of impressive size, as well as the likelihood of cracking it increases.
When decorating stoves, the main problem is the unequal heating of various sections of the stove surface and stove walls at a depth. The geometric dimensions of the oven change all the time - alternating compression and expansion over time can lead to the fact that the tile, glued firmly, will crack, and the one glued loosely, on the contrary, will be able to fall off. Attention! Large-format tiles should not be used - the probability of a crack is very high. Tile cladding should be started only after the combustion chamber has been lined with fireclay bricks. Such an operation is necessary in order to reduce temperature fluctuations on the furnace surface.
External cladding using tiles should be carried out on the plaster applied on the grid. In most cases, a mesh (1 more layer) is attached to the plaster layer specifically for the tile. It is carried out in such a way to communicate good reliability - another layer of mesh precisely in order to strengthen the adhesive for the tile. The mesh is attached with self-tapping screws and washers.
There are a lot of glue mixtures that are designed specifically to decorate stoves with tiles. They stand out for their very high resistance to high temperatures and retain little elasticity throughout their service life. After grinding the seams, it is enough to apply a heat-resistant organosilicon impregnation to them, but it does not protect against subsequent contamination. The same can be attributed to porous terracotta tiles, and to wild stone with porous rock.
Ceramic tiles for the oven: types, how to choose, manufacturers
The stove has long been serving people, creating coziness and comfort in the house. The appearance of the stove is the hallmark of the whole house. Ceramic tiles for a stove can transform any stove, and this one will help in choosing it.
Furnace ceramic tiles have been used in furnace decoration for hundreds of years.Even today, despite the appearance of a variety of materials and technologies, it has not lost its leading position due to quality, reliability and a good price.
- It has high strength indicators, and easily withstands heavy loads during operation. Concrete lags far behind ceramic tiles in terms of performance, it is less durable and loses to ceramics in wear resistance.
- Installation of ceramic tiles is quite simple and requires a minimum of tools and skills.
- The high fire resistance of ceramic tiles is an undoubted advantage when decorating stoves and fireplaces.
- Made from environmentally friendly and safe natural materials. Clay - as the main material for manufacturing, is completely safe, and does not emit any substances harmful to health.
- Tile maintenance is very simple and does not require any special efforts and special measures. It will be enough to simply wipe the ceramic tiles from time to time with a damp cloth.
There are very few disadvantages of ceramic stove tiles. We can only highlight the fact that ceramics is a rather tough material, therefore, when struck with a hard object, it can easily crack.
This small drawback can be ignored, this facing material is very practical and convenient in finishing the stove.
Of course, the choice of oven lining depends on taste and preference. Now we will consider the main types in more detail:
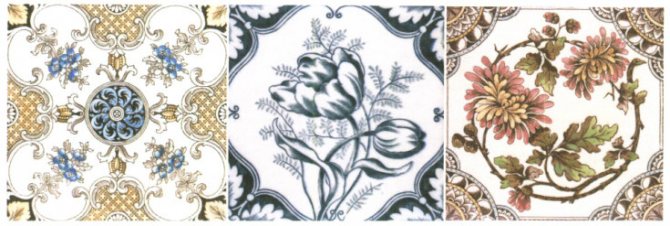
- Majolica is made from baked clay. It is covered with glaze and has various decorative images. Such tiles are made by hand, and this factor affects the cost.
- Terracotta - its surface is rough, it mainly imitates natural stone and brick. It is made of dense types of clay, perfect for any oven.
- Tile is the most popular budget option. It is used quite often, despite the disadvantages. Unstable to temperature extremes, therefore, over time, it becomes covered with cracks. It is better to use small sizes, this will reduce the likelihood of cracking.
- Clinker - made from several types of clay, special chamotte powder and a number of other additives. Their surface is not covered with glaze, and the variety of colors and shades is simply amazing. It is also more durable and dense than others, is not afraid of temperature changes and has good frost resistance.
- Tiled - can have a corrugated and smooth surface, and can be glazed or not. It is mainly made by hand and has a high price. When finished, the individual parts form a very beautiful pattern. Such decoration of the stove has been used for a very long time, and is still in demand.
- Fireclay tiles - this material is quite expensive and is made from special types of clay with the addition of stone powder to impart good strength to the finished product. It is resistant to extreme temperature changes, does not crack, has excellent refractory properties, and is quite thick, does not deteriorate when interacting with alkalis and acids.
- Porcelain stoneware - made from a mixture of granite and marble chips, quartz sand and clay. The color of this tile is given by salts and metal oxides. It has a dense structure without pores and is not afraid of temperature extremes. It is capable of imitating different types of coatings and retains its unchanged appearance for a very long time.
- Marble is a very beautiful and very expensive material for cladding a stove. Cladding from this material is mainly made to order, according to individual sizes and projects.
- Artificial stone - a huge advantage of this material is that it has a different shape and thickness imitating natural stone, thereby hiding the unevenness of the masonry. The variety of colors, shades and shapes is simply amazing.
When choosing a material for cladding, you need to take into account many factors: the budget, what the furnace itself is made of, its characteristics, operating mode and much more.
First of all, you need to choose for aesthetic reasons, the style of the room or the specific design in which the oven is located. According to its purpose and location. Based on the style in which the oven is built, you need to select a specific type of finishing material.
The mode of use of the oven plays a huge role. Different types of tiles have different characteristics, and there is no point in overpaying for unnecessary qualities when the operation will not be constant.
For cladding a stove standing in a house, clinker tiles will be the best choice. The price-quality ratio is the best.
- Pay attention to the product labeling, marking B, means that the tile was made by pressing, and may not have an ideal shape.
- Under the A marking, there are products that are produced by a modern extrusion method. In this case, workpieces are rolled out by machines, and cut with high-precision, new equipment, from this their quality and accuracy are much higher.
What can be used to overlay a brick oven?
- Choosing a finish
- Natural stone
- Ceramic tiles
- Majolica and tile
- Facade tiles for brick and ceramic granite
- Furnace cladding material and tools
- Brick stove decoration
Most owners of private houses and summer cottages put wood-burning stoves to winter comfortably. After completing the work, the owners think about how to overlay the brick oven. After all, it occupies a significant place in the very center of the house, and therefore must have a beautiful appearance and fit the image of the room. But finishing is needed not only as an interior decoration. Brick, as is clear from practice, cools quickly. Thus, so that the expensive heat from the stove is not lost very quickly, and this layer of insulation is needed. Consider several options for insulating and decorating a brick stove using different cladding materials.
Furnishing of the stove is very often done using tiles, real stone or tiles.
Tile
Method 1. Traditional cladding
This method is the usual vertical cladding. Before revealing the stove with ceramic tiles, to prevent cracking of the tiles due to high temperatures, the entire base of the stove must be covered with a regular mesh-netting on dowels and carefully plaster. And the tiles themselves must be laid directly on the plastered surface.
Method 2. Cladding using aluminum corners
For cladding, you can use special aluminum strips with holes, which must be installed in the vertical seams of the brickwork of the sauna stove. Then, to these strips on bolts, you need to fix the T-profile - aluminum corners, between which ceramic tiles will be laid.
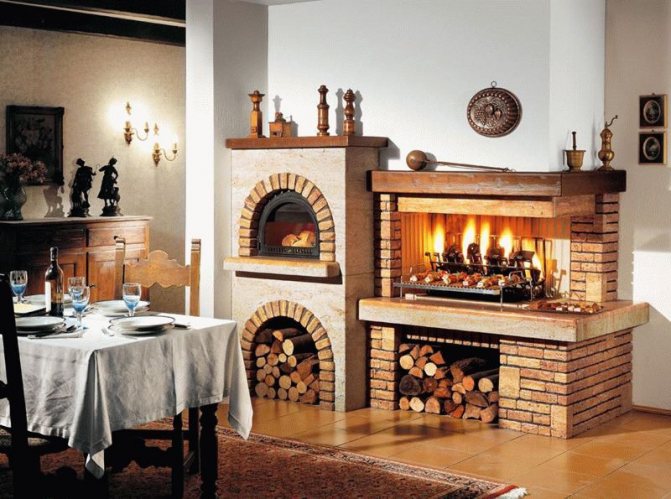
Ceramic clinker tiles are an excellent "imitation". With its help, you can "create" any type of finish: brick, tile, wood, granite or marble.
For those looking for an original and inexpensive solution for cladding a fireplace or stove, we advise you to try a combination of decorative bricks and ceramic tiles.
The combination of smooth and rough texture, dark and light tones will give the hearth a pleasant charm and charm.
Look at the photo of stoves lined with clinker tiles: this type of finish is relatively inexpensive, and looks no worse than lining the stove with tiles.
We invite you to familiarize yourself with River silt as fertilizer
Installation of the frame. Since the sauna stove is always operated in a hard mode, especially when firing quickly, therefore, in order to avoid cracks in the lining, it is necessary to enclose the brick sides of the stove in a frame made of a metal corner.Such a frame protrudes beyond the masonry plane by no more than its thickness, i.e.
Re-plastering and applying a second layer of mesh. After the mesh is fixed, you can level the walls of the stove again using plaster. But at high temperature loads of the sauna stove, it is recommended to add another layer of mesh. It must again be wrapped around the oven and plastered. Thus, it will be guaranteed that the tiles are securely fastened in the most problematic places - in the area where the corners are located.
Facing with tiles. For cladding, it is recommended to use special glue for fireplaces and stoves. You need to be especially careful when laying the first row. To obtain an ideally horizontal row, it is recommended to put sheets of gypsum fiber board (gypsum fiber sheet) under it, and the installation itself should be started from the corners of the furnace. It is best to separate the seams with cut pieces of GVL. Thus, the distance between the tiles will be the same.
Grouting. As soon as the oven is completely tiled with clinker tiles, you can start grouting. But it should be remembered that you cannot start the grouting process until the glue has completely set.
Dry grout must be diluted with water in the ratio indicated on its packaging. For the most complete joint filling, it is recommended to use a special sealant gun.
Heat-resistant impregnation. After finishing the lining of the walls of the sauna stove, it is necessary to thoroughly wash, dry, and then apply a thin layer of heat-resistant silicon-organic impregnation on them. Thanks to its use, neither tiles nor white seams will get dirty.
Choosing a finish
As mentioned above, the stove is considered the center of the house both for its own practical purpose (as a heat source) and in a spiritual project. After all, the whole family gathers near the warm stove, it is so nice to fill the dark evenings in winter! Thanks to this, it has long been customary to decorate the brick stove with a variety of decorative materials. The following materials are classically used:
- natural stone;
- ceramic tiles;
- majolica;
- tiles.
This choice is not accidental, all these materials have refractory qualities and a high level of heat capacity. Now new, modern ones have been added to them, thanks to which you can now incredibly beautifully overlay a brick stove. These are ceramic granite and heat-resistant brick-like facade tiles. Consider any of the furnace facing materials separately. Recall that today they produce tiles with a notch on the other side to strengthen the hitch, and also with grooves and ridges for a lock hitch, in which seams are not noticeable.
to come back to the beginning
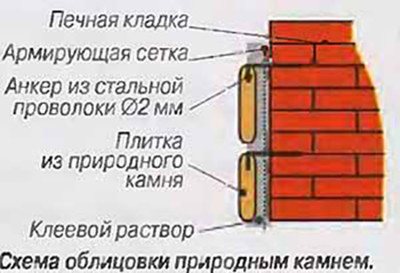
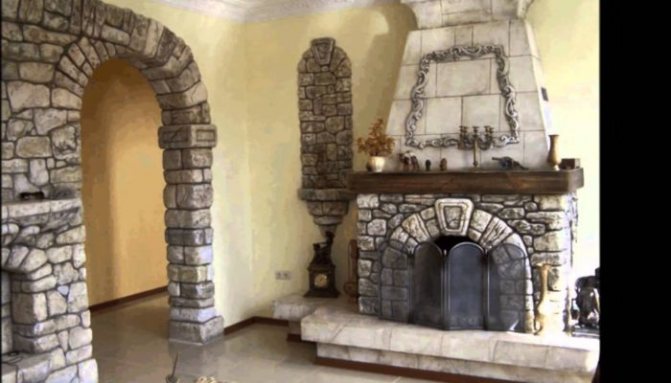
Natural stone
The scheme of finishing the stove with natural stone.
It is the oldest of the materials used for facing brick ovens. For the most part, sandstone and shell rock are used. They are inexpensive materials with good heat storage properties.
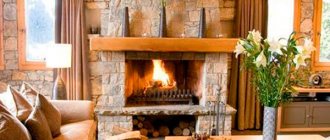
They will give the stove a special, slightly wild look, as if time turned back and outside the window again the Middle Ages with knights, castles and magical stories.
Also, now the decoration of a brick stove with a coil has come into fashion. It is an attractive natural stone of greenish-gray color with a high coefficient of heat capacity.
The more traditional material is marble, a reliable and attractive natural material. This finish will add a noble and representative look to the stove.
to come back to the beginning
Ceramic tiles
Mankind has been using baked clay tiles since ancient times, as well as an insulator. Ceramics are used for the stove, which has a number of specific qualities:
- thermal stability;
- fortress;
- dense structure.
The latter is important due to the fact that through the wide pores, the material quickly loses the heat received from the bricks.
The strength of the tiles is achieved through their thickness.For finishing, experts advise using products with a thickness of at least 8 millimeters. All these requirements are met by a terracotta made of baked clay, not covered with glaze. Terracotta was used to decorate ovens made of bricks back in Greece.
to come back to the beginning
Cladding materials
In general, the stove is considered the most important object in the house, rightfully occupying a special place. As a source of warmth, it serves as the keeper of traditions, creates an indescribable comfort. That is why you need to make every effort so that the stove acquires an attractive appearance, and also does not undergo destruction.
Finishing material is required to be selected with many positive qualities. First of all, it must be heat-resistant and heat-absorbing. That is, keep the surface from heating, but at the same time, evenly distribute the heat inside the room.
The walls of the stove can be refined with various types of materials. It can be elements of a coating made of special types of clay, which have been subjected to long processing, which have been known for a long time. And also more modern materials, which are made on the basis of previously used components, but subject to more substantial training. Let's take a closer look.
A natural stone
It has been known for a long time and has proven itself well as an element for finishing brick ovens. The stone has good performance properties; many of its types are quite cheap. Most often used: shell rock and sandstone. Decorating the stove with decorative stone allows you to refine the heat source. The decorative component is very original. The walls of the stove are very natural looking.
In addition to cheap materials, others are also used. Among them is marble. Lined walls, due to its external properties, acquire an individual and rather respectable look.
Talcochlorite
It has several more names (soap, pot, stove stone). It is a natural material that is formed from a combination of magnesite and talc, which is exposed to high temperatures and pressures for a long time.
According to its external data, talcochlorite is very attractive. The stone does not require additional finishing.
Ceramic tile
This material is a specific type of clay that is processed.
She acquires the following qualities:
- density;
- durability and strength;
- heat resistance.
Ceramic tiles have a significant thickness, which reaches eight millimeters. The most commonly used terracotta variety. It is preferable to choose one that has not been glazed.
Tiles
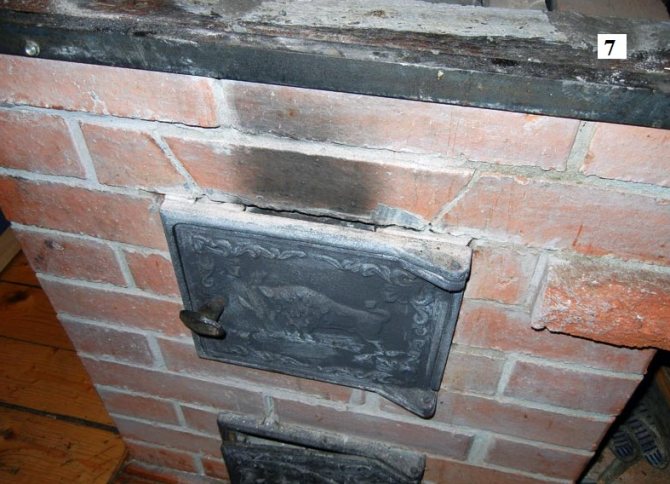
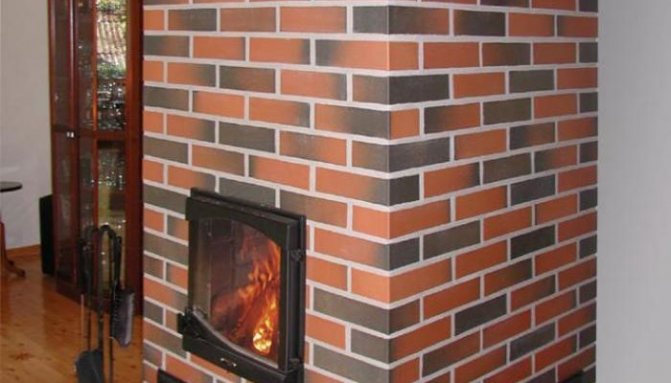
Facing the stove with tiles has been used for quite some time, and in many countries around the world. Tiles can be attributed to ceramic tiles, but they have a significant difference. The fact is that there is a bowl (rumpa) on the seamy side of such material. It is due to this that it is possible to obtain a kind of thermal pillow. It is attached to special points, deliberately left for this. The appearance of tiles for a stove can be very different.
Clinker tiles
It contains chamotte, clay and various natural dyes. This tile is characterized by:
- lack of numerous pores;
- fortress;
- good heat dissipation.
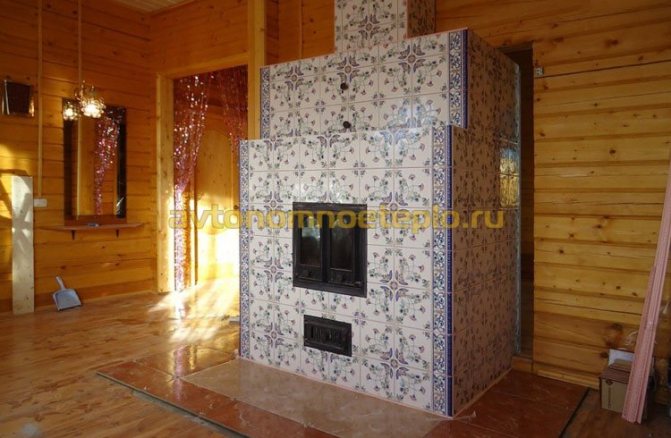
Majolica and tile
Installation diagram of tiles.
Majolica is a bright tile, painted with paints and covered with glaze, which came to us from antiquity. The inhabitants of Rome exported it from the island of Mallorca to the Mediterranean, however, only successful people could afford to finish the oven with majolica.
The glazed layer on the tiles was created for a reason. It is considered to be an additional layer of insulation that retains heat in the middle of the tile. Due to this property, majolica has become a very popular facing material for ovens made of bricks. It gives the stove a bright and festive look.
Tiles have long been used in cold countries.By their own design, the old tiles were quite different from the tiles. They were made in the form of rectangular ceramic boxes attached to the brick wall of the furnace with metal pins.
The void between the brick and the surface of the tile served as an air cushion, which accumulated heat and gave it away little by little. Thanks to this, tiled stoves have gained their popularity in northern Russia, Germany and Holland. It is not just that the stoves laid out with tiles have received the name "Dutch women".
to come back to the beginning
Facade tiles for brick and ceramic granite
Brick facade tiles are made from a mixture of chamotte, clay and mineral dyes. The resulting mass is compressed under high pressure, after which it is fired at high temperatures.
The resulting tile stands out for its strength, heat capacity and low porosity. With the help of various additives, it takes on very, very different shades. Thanks to this, brick-like facade tiles have become a very popular facing material for stoves made of bricks, capable of matching almost any design.
The scheme of finishing the stove with tiles.
Porcelain stoneware is a composite-based material that emerged in the 1980s and immediately became very popular. It was invented in Italy. A mixture of clay, sand, granite and marble with the addition of natural dyes is pressed at high temperatures and under very high pressure.
In the end, a monolithic material without pores is obtained, shock-resistant and excellent heat retention. Ceramic granite can be given any color or shade, as well as texture, which makes it so popular in the field of building materials and finishing works.
Porcelain stoneware tiles copy terracotta tiles, majolica, tiles and natural stone. At the same time, it is much cheaper and more functional.
to come back to the beginning
The technology of cladding the Russian stove with tiles
Scheme of lining the stove with natural stone.
The cladding of the outer surface of the furnace begins with the plaster applied to the mesh. Sometimes an additional layer of mesh is attached to the plaster layer specifically for ceramic tiles. This is for better adhesion to the surface because the mesh further reinforces the tile adhesive. The mesh is fastened with screws and washers. The modern market provides a huge variety of adhesive mixtures that are resistant to high temperatures and retain the necessary plasticity during operation.
Furnace cladding material and tools
The process may require:
- plumb line;
- level;
- roulette;
- Master OK;
- putty knife;
- container for solution;
- paint brush (wide);
- tile cutter (angle grinder);
- iron brush;
- mallet (rubber or wood with a rubber top);
- a hammer.
Also, when facing, you will need nails, self-drilling screws, tile crosses, clean rags.
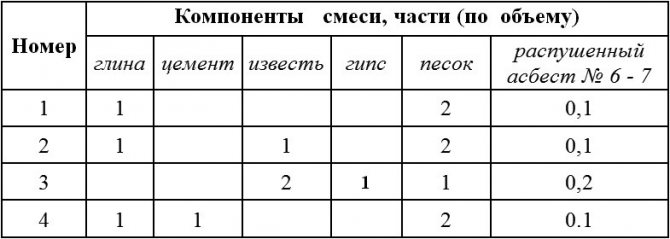
A mortar for plastering brick kilns is prepared from cement (grade not lower than M400), clay and sand. The ratio is recommended to select the following: 1.0 part of cement to 3.0 parts of clay and 0.2 parts of sand. The sand is needed small, but the type of clay does not play a role.
to come back to the beginning
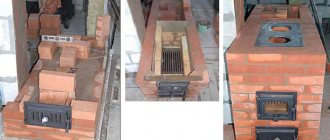
Brick stove decoration
Finishing work of a brick stove is carried out in stages.
Tools for finishing work.
The initial stage is cleaning the surface from dust, dirt, expanding and deepening masonry joints between bricks (up to 1 cm). Cleaning is carried out with an iron brush or an "angle grinder" with a special attachment. Then the bricks are wiped with a wet cloth.
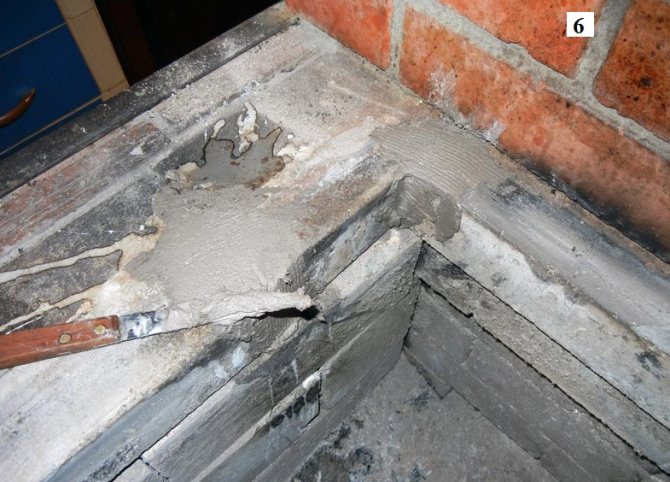
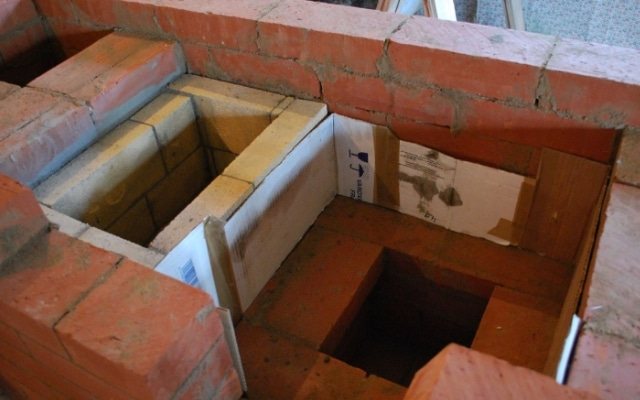
The second stage - the surface of the furnace is covered with a mesh made of metal (the width of the cells is not more than 150 mm).It is fixed with carnations or with self-tapping screws at the discretion of the master in places where the temperature is highest (furnace flap, surface for cooking). A metal corner is fixed in the corners of the furnace. This frame will make it possible to avoid surface deformation during the working period and during the further operation of the brick stove.
3rd stage - application of a plaster layer to the wire frame. Its surface is carefully leveled using a level and a plumb line, so that later you can easily glue the tiles or fix the tiles. A layer of plaster is allowed to dry, after which some masters recommend to flood the stove and warm it up properly.
The fourth stage is the actual gluing of the tiles. It must be said right away: the process of fixing tiles is very peculiar, it is better to entrust it to competent specialists. For gluing, a specialized heat-resistant glue is used, produced for fireplaces and stoves. Before starting work, the tiles should be sorted out so as not to get chipped, cracked or with damaged glaze. They begin to glue the tiles from the bottom, using a level, checking and correcting each row. Masters advise first to glue tiles at the corners and lead each new row from them. To make the distances between the tiles similar, crosses are used.
The fifth stage is grouting and impregnation with a heat-resistant compound. The latter will keep the surfaces of tiles and seams from dirt. Allow the glue to dry for 3 days before grouting. Having prepared the mixture (detailed instructions are placed on the package), it is applied in an even layer. So that the grooves of the seams are filled in the same way, the masters recommend doing this with a pistol used for the sealant. After completing the work, wash the surface and remove the remains of the mixture.
Now you can say everything, the oven is ready. And already a day after the completion of all the work, you can begin to heat it.
More complex repair work
You can save on the services of a stove-maker not only during routine repairs, but also when carrying out major work to eliminate serious problems. Including with your own hands, you can re-lay the firebox, replace the firebox, restore the masonry and solve other problems. In this case, only a specialized solution and refractory materials should be used in order to prevent the appearance of additional problems during the operation of a Russian brick oven.
Partial and complete re-laying of the firebox
Despite the properties of refractory bricks, over time, it becomes unusable, therefore, timely replacement of this component of the structure is also necessary. Do-it-yourself re-laying of the firebox is a rather complicated process and is often trusted by a professional stove-maker, but in order to save money, overhaul of the stove can be carried out on your own.

To get started, purchase a special solution for fireplaces and stoves, for example "Pechnik" or "TerraKot", as well as a certain amount of refractory bricks required for repairs.
If a small damage is revealed in the structure in several bricks, then the complete relocation of the furnace can be omitted, having made only a partial replacement. For this purpose, remove the damaged parts in the masonry and, after cleaning the surfaces, using a special solution, make a new masonry.
Lining re-laying
Relining of the lining is one of the most common types of overhaul. Only fireclay bricks are used in its production. It should be remembered that the refractory masonry must not come into contact with the brickwork of the furnace body.
Fireclay bricks can be laid both flat and on the edge - it all depends on the size of the furnace being repaired.
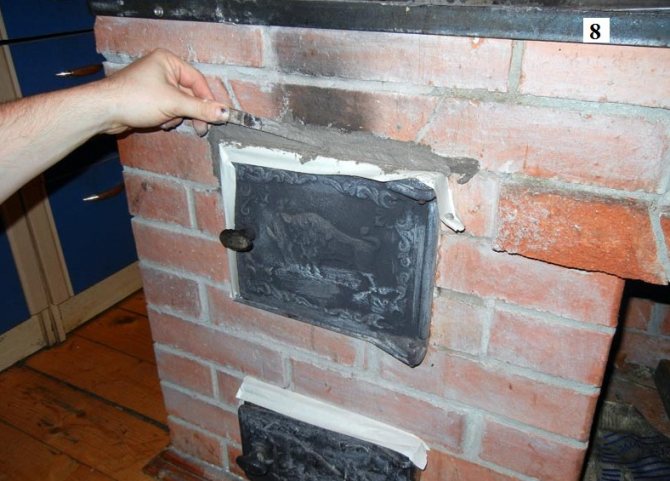
Replacing the furnace door
In order not to reduce the overall efficiency of the structure, you should purchase new parts with the same parameters and dimensions as the old ones.This also applies to the fire door, which is most often made of cast iron material. When buying a door, measure the old one and when purchasing a new one, correlate them in size. Also remember about the need to use an exclusively specialized solution for fireplaces and stoves.
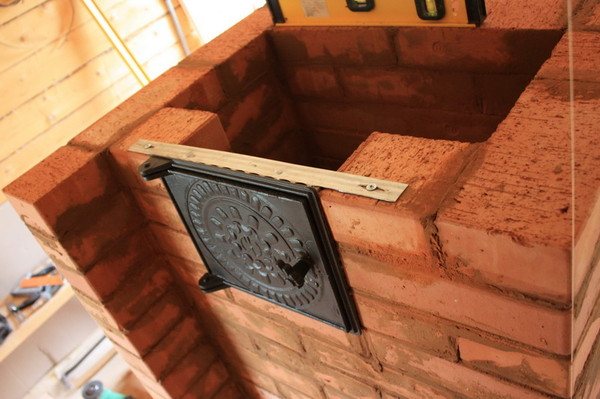
Dismantle the old part together with the frame, clearing as much space as possible for the new door. Then you can start replacing it:
- Clean the old mortar from the masonry;
- Attach the steel tabs to the new cast iron piece and position it so that the strips are inside the masonry joint;
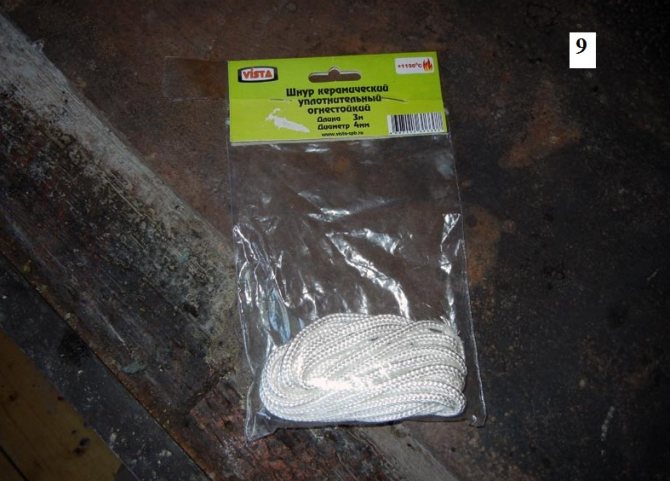
- Between the oven masonry and the door frame, a pre-purchased cord with fire-resistant properties should be laid;
- All gaps are filled with a special solution;
- The composition is allowed to dry for 1-2 days.
When replacing the door, you may need refractory bricks if the old masonry is accidentally damaged. to the content
Brickwork repair
In a Russian stove, frame brickwork is rarely damaged, since by itself it does not come into contact with fire and it does not threaten damage due to temperature extremes. But if the stove-maker incorrectly performed the repair work, then it can also be damaged. The restoration of the frame is a simple type of repair; it does not require specific skills or specialized materials.
Self-lining oven
In this note, the reader can find out the answers to the questions: how to decorate a brick stove, what materials to use for this, and also learns the technological characteristics of one or another type of cladding.
In addition, detailed instructions will be presented here, which will describe how to do the finishing work on the stove in the cottage with your own hands using selected technology.
A simple home oven.
Decoration without cladding
There are many design options for stoves made of brick, but here we will talk about the most popular types of cladding that combine affordability, practicality and a suitable appearance. .
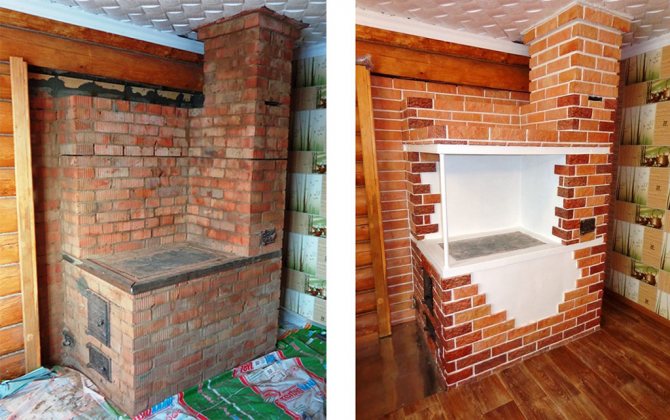
One of the fairly common and cheap methods, which is very often used in the construction of stoves in houses outside the city or in the construction of fireplaces, is considered to be decorative brickwork. In this case, the role of decorative design is played by the surface of the external bricks and the seams between them, in other words, the entire Part, which is visible from the brickwork. (See also the publication How to veneer the basement of a brick house: options.)
When choosing this option, this moment must be provided even at the construction stage and used for the outer row of brickwork if there is a possibility of the most even brick without flaws and cracks. At the same time, great attention must be paid to observance of right angles, to prevent deviations from the vertical and horizon, and also to look at the uniformity of the joints between the bricks.
Decorative brick laying.
Further, certain tips will be offered for decorating the outer rows of brickwork in a decorative style:
- The outer wall surface should be as smooth as possible, without cracks, cracks and empty spaces, otherwise, during a certain time, dust accumulating in them when heated from the stove may emit a fetid odor.
- To give a more dramatic appearance on the corner edges of the outside of the brick, you can remove a small chamfer with a grinder.
- Use a mixture of asbestos powder with cement as a mortar for grouting joints between bricks.
- To give the grout of different colors, finely ground brick flour, black clay powder or other inorganic dyes can be added to the solution.
- After grouting, it is recommended that the joints be routed using a long flat plank and a convex jointing tool. When joining, first of all, it is necessary to process all the vertical seams, and then the horizontal ones.
- If you wish, you can whitewash the oven with a solution of slaked lime and salted water at the rate of 100 grams of sodium chloride per bucket of water.
- Doors, blowers and other metal elements can be painted with heat-resistant silicone enamel.
It must be said that the decoration with brickwork can also be used for metal stoves, for example, facing a stove for a bath with bricks is often used to increase safety and improve its beautiful qualities.
The photo shows a brick for masonry with decorative elements.
Advice! Before finishing the brick stove with whitewash, it is recommended to grind the surface from the outside. To do this, the wall must be carefully sanded with a half of an ordinary red brick soaked in water.
Surface plastering
If, for example, the appearance of unfinished brick does not correspond to the entire style of home decoration, the stove can be plastered with clay lime or gypsum mortar, followed by painting with interior water-dispersion paint. Also, this method is perfect for the restoration of old or decorative design of previously built stoves. (See also the publication Plaster for decorative work from putty: subtleties of design.)
Facing a brick stove with a plaster mortar can only be done after the brickwork has completely dried.
The sequence of actions is as follows:
- It is worth removing the mortar from the external masonry seams to a depth of 10-15 mm, and cleaning the surface of the stove with a metal brush.
- Fix a metal mesh with a mesh size of 10-20 mm on horizontal and vertical planes.
- To fasten the mesh during the construction of the furnace, it is necessary to provide for the laying of a whisker made of soft steel wire. If this is not possible, it can be fixed with nails with a 100 mm step, placing them like in chess.
- Before applying the solution, the oven must be warmed up to a temperature of 50 - 60 ° C.
- A ready-made plaster solution is required to be applied to a moistened heated surface in several layers with a transitional drying of each layer.
- Apply the solution by scattering it with an iron trowel or spatula. and then rubbed with plastic or wood grout.
Plastering on an iron mesh.
Advice! When preparing plaster mortar on your own, all dry important parts (sand, cement, gypsum, etc.) should be carefully sieved with a very small construction sieve.
Tile application
The most of the rather practical options for how to decorate a brick stove is the laying of tiles. Due to the fact that its outer part is covered with glaze, it has a beautiful appearance, and it also becomes much easier to care for its surface.
The main difficulty of a good fixation of the tile is that the surface of the stove, while heating up, then cooling down, regularly changes its own geometric dimensions. In this case, insufficiently securely glued tiles can fall off, and firmly glued tiles can burst in two.
Facing with ceramic tiles for a brick.
As a result, ceramic tiles can only be installed on plastered furnaces with a lined combustion chamber. For lining, the combustion chamber is lined with a layer of fireclay bricks inside, thereby reducing the difference in temperature differences.
Further, certain recommendations will be presented for finishing the stove with ceramic tiles.
- It is better to use small tiles as a cladding material. In this case, the effect of different coefficients of thermal expansion of materials is less pronounced.
- Before tiling on plaster, a metal mesh with a mesh size of 10 mm should be reinforced with screws with wide washers.
- To fix the tiles, use special adhesives that are intended for finishing work on stoves. Despite the fact that their price may be slightly higher, they are specially designed for operation in very high temperatures, and after drying they have sufficient elasticity.
- Grouting of tile joints can be performed using ordinary grouting mixtures, if necessary, adding inorganic pigment dyes.
Refractory tile adhesive.
You need to pay attention! The decorative design of the stove, in addition to its beautiful qualities, also makes a useful role. no matter how to finish the brick oven. plaster or ceramic tiles, the finishing material increases its physical mass, as a result of which its heat capacity increases.
Material requirements
- low porosity structure;
- low coefficient of water absorption;
- increased strength;
- resistance to mechanical damage;
- heat resistance;
- property to accumulate and retain heat.
Constant contact with heat and the risk of mechanical damage determine the characteristics of the cladding. It is important to know what temperature this or that tile can withstand, as well as how well it provides heat exchange with the room.
For finishing stoves and fireplaces are used:
- heat-resistant tiles;
- terracotta;
- porcelain stoneware;
- clinker;
- tiles.
It is worth considering the features of these materials in detail.
Heat-resistant tile
The first thing that comes to mind is ordinary ceramic tiles. But is it possible to overlay it on a fireplace or stove? Here we pay attention to the function of the structure. If you plan to use it to regularly heat the room, it is better to discard this option right away. And if it's more like a decor, all restrictions are lifted.
In any case, it is recommended to pay attention to the strength and heat resistance of the tiles. If it does not withstand high temperatures, you should not risk it, choose a material of a higher class, it is not afraid of heating and has much better resistance to mechanical and chemical influences.
Terracotta
This material has been used for more than one century, and therefore has good recommendations, time-tested.
Terracotta is an unglazed ceramic tile that is easily recognizable due to its characteristic reddish-brown hue. It is made from clay and chamotte, and the color is provided by the addition of metal oxides.
A distinctive feature is the change in properties when adding different amounts of chamotte.
note
The more it is, the better the thermal characteristics of the material become, however, coarse grains reduce the strength indicators, which is undesirable.
A fireplace or stove is covered with a similar tile, since it weighs relatively little, which means that it does not require additional strengthening of the base. During operation, it quickly heats up and slowly cools down, gradually giving off heat to the heated room, and the high temperature is not afraid of it. And the natural design will appeal to lovers of rustic style.
Porcelain stoneware
Porcelain stoneware tiles are better in terms of resistance to high temperatures and sudden changes, moreover, such a material is not afraid of impacts and scratches.
It is made from several types of clay, and high strength values are achieved due to the addition of granite and marble chips to the raw materials. Therefore, porcelain stoneware is used to cover the stove, fireplace, building facades, work surface in the kitchen, floors, etc. It is able to withstand colossal loads without losing useful qualities.
With regard to thermal characteristics, thanks to the properties of the materials used and the one-piece non-porous structure, these tiles provide not the worst, and sometimes even better, heating of the room, in comparison with other types of cladding. Another plus is the ability to imitate any surface, both terracotta and glazed majolica.
Clinker
Clinker tiles are made from natural materials, which, thanks to the technology of pressing and firing, turn into an ultra-strong, heat-resistant and antistatic product.
When using such a cladding, do not worry about the integrity of the coating during operation, clinker tiles perfectly hold back fire and provide heat preservation for full and uniform heating of the room. High temperature is absolutely not terrible for her, as well as mechanical damage during operation. Clinker tiles do not allow moisture to pass through, which is also important.
Despite the limited palette, you can easily find the right tone, besides, in a private house, naturalness looks best. The variety of colors ranges from white to rich chocolate.
Tiles
This material is the best for the oven. This is a special ceramic tile, which is a box-shaped volumetric elements. In fact, this is a flat decor attached to the so-called rump. Thanks to this feature, uniform and rapid heating of the room is ensured, as well as reliable heat retention with the help of an air cushion.
To revet a stove or a home fireplace with tiles, special adhesive mixtures and a cement-sand mortar are used. The additional type of fastening is of great importance here. Each fragment is connected not only to the walls, but also to each other. To do this, a nail is hammered into the seams between the bricks, and a tile is attached to it with wire. Joints and voids are filled with mortar.
Naturally, the question of which tile is best to lay on the stove disappears by itself, if you focus only on these indicators. However, take into account the high price of such products, so sometimes it is more advisable to find a decent budget alternative.
Knowing what kind of tiles the fireplace or stove is lined with, it will be much easier for you to decide on the facing material without making a fatal mistake. Before buying, be sure to estimate the expense of funds for finishing work and the subsequent costs of heating. This will help you decide where to save money in order to end up in a profitable position.