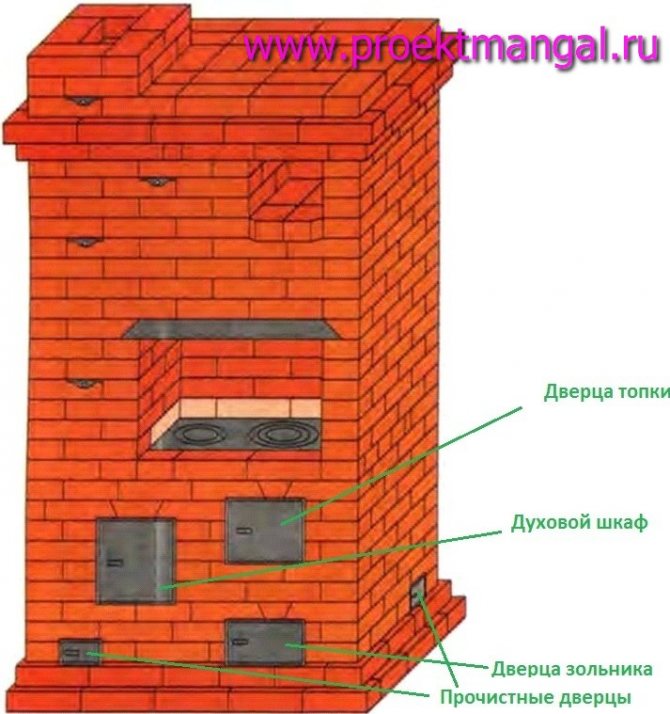
Characteristics of heating furnaces
Heating stoves are designed for heating residential premises. Their designs have changed several times; multi-turn heating furnaces with successive vertical smoke flows have been replaced by single-turn heating furnaces with one ascending chimney and several descending ones.
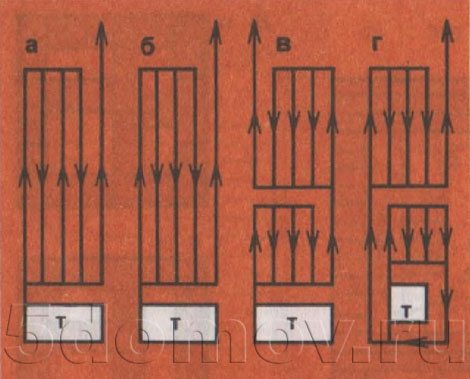
Gas flow patterns in household stoves a - a multi-turn stove with vertical channels; b - single-turn oven; c - stove with upper and lower heating chambers; d - stove with reinforced bottom heating with upper and lower heating chambers
In single-turn ovens, the outer walls are warmed up more evenly. When installing a grate in the firebox of such stoves, the efficiency increases to 70-75%.
The disadvantage of single-turn ovens is that their upper part heats up more than the lower one. Because of this, there is no uniform heating of the premises with a minimum temperature difference at the floor and at the ceiling.
Heating stoves of various sizes and designs with increased bottom heating, given in this article, with their correct operation, ensure uniform heating of premises with a minimum temperature difference at the floor and at the ceiling of 2-3 ° C.
By their design, these ovens consist, as it were, of two ovens, stacked one on top of the other and interconnected by one vertical connecting channel. In heating furnaces of these structures, intensive heating of the lower part of the furnace occurs.
Hot flue gases in the kiln body move as follows. Coming out of the firebox (see Fig. 1), they first warm up the lower part of the stove, then, going up the vertical connecting channel, they warm up the upper part of the stove. In vertical longitudinal and cross sections, arrows show the movement of hot flue gases in individual parts of the furnace body.
In the furnaces of these designs, the flue gases pass the same distance before they exit into the chimney as they move in the furnace mass as in single-turn furnaces with one ascending and several descending channels. Flue gases in heating furnaces of this design make a short path, overcoming a small gas resistance. In an array of furnaces of such designs, flue gases move according to the principle of "free" gas movement, as discussed below.
"Free" movement of gases
The heating stoves listed in this article are thick-walled, moderate heating stoves with increased heat transfer from the bottom of them. The heating of these furnaces lasts only 45-60 minutes, the fuel is placed in them in 3-4 steps. Usually, these stoves are heated once a day, but at a low outside temperature (up to 35-40 ° C), it is advisable to heat the stoves twice a day - in the morning and in the evening. With a two-time firebox, a normal temperature in rooms with a daily fluctuation of 2-3 ° C is ensured.
These furnaces are very economical in terms of fuel, their efficiency is especially increased when installing hermetically sealed furnace and blower doors. Fuel costs are reduced by half or more compared to the operation of multi-turn furnaces. It is advisable to use anthracite as a fuel, and in its absence, you can use coal, coal briquette, peat briquette and any firewood. When harvesting firewood, the length of the logs must be made according to the dimensions of the firebox of the stove.
Below is a detailed procedure for laying a 770 × 640 mm heating stove. The masonry of the rest of the heating stoves is basically similar to the masonry of the above-mentioned stove, therefore, their masonry will be described more succinctly.
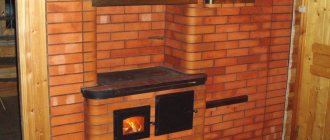
Swedish oven
A feature of this stove is that it was originally conceived for heating two adjacent rooms at once.The appearance of such a structure is shown in Figure 1.
| The lower part repeats the features of a conventional hob so that it will not be required during its construction stove-maker services advanced qualifications. We see a firebox with a blower and an ash pan door. There is an oven. A cast-iron plate with closed holes is used as a firebox overlap. |
| Picture 1 |
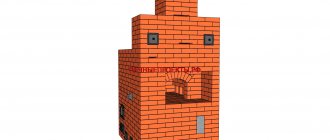
It is worth paying attention to the fact that the ash pan door is on the same level as the cleaning door. The back side of the Swede is a conventional heating plate. Figure 2 shows a section of a similar furnace from the side of the revolutions.
| This version of the Swede has three vertical channels. Furnace gases leave the firebox and pass by the oven and heat it up. This creates conditions for thermal processing of food. It is clearly seen that the ash pan in such furnaces is on the same level with the lower part of the smoke channels. The design has the following features: -has all the capabilities of the hob; - occupies a small area, like a hob with a heating shield; - there is a lower heating of the furnace surfaces; - it is possible to use two rooms for heating at once; -has high efficiency. The disadvantages include the lack of bottom heating at the location of the ash pan. Such properties brick heating ovens become of great importance when heating two rooms at once. In this case, one of the rooms may be without bottom heating. |
| Figure 2 |

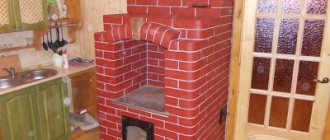
Heating stove with bottom heating, size 770 × 640 mm
The heating stove has dimensions, mm: 770x640x2310 (Fig. 1, a).
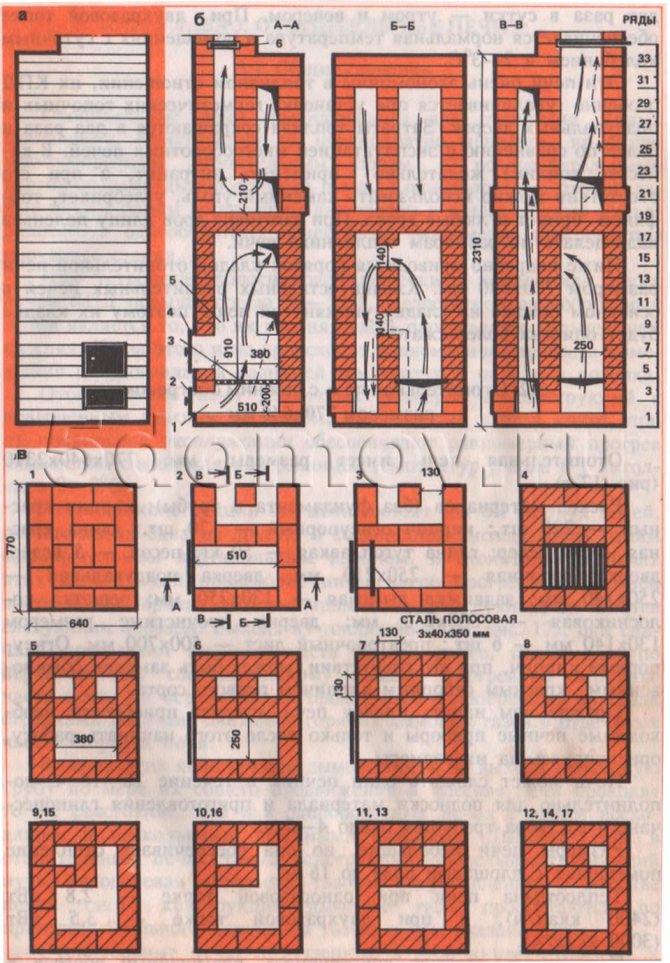
Fig. 1. Heating stove with bottom heating measuring 770 × 640 mm a - facade; b - sections A — A, B — B, B — C; c - masonry 1–17 rows; 1 - ash pan; 2 - blower door; 3 - grate; 4 - furnace door; 5 - firebox; 6 - smoke damper.
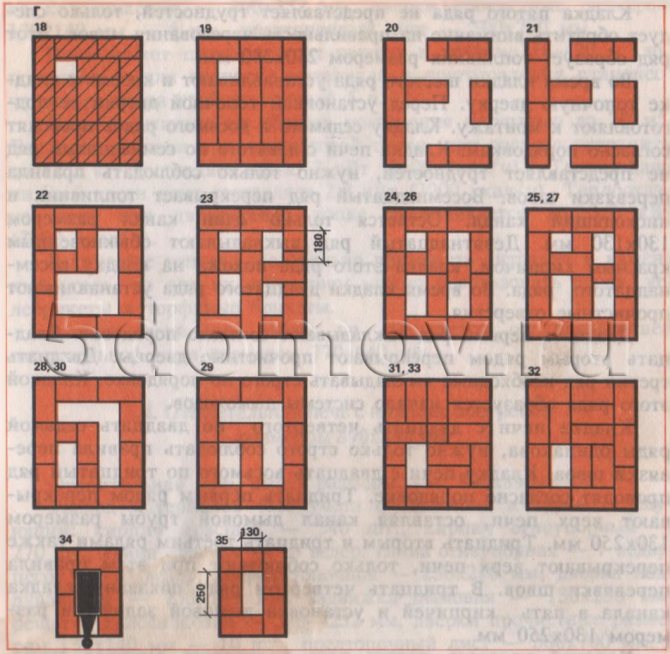
Fig. 1. Continuation: d - laying 18-35 rows
Material consumption (without foundation and pipe):
- red brick - 220 pcs.;
- refractory bricks - 170 pcs.;
- red clay - 10 buckets;
- refractory clay - 50 kg;
- sand - 5 buckets;
- furnace door - 250 × 210 mm;
- blower door - 250 × 140 mm;
- smoke valve - 130 × 250 mm;
- grate grate - 380 × 250 mm;
- cleaning doors with dimensions 130 × 140 mm - 6 pcs .;
- pre-furnace sheet - 500 × 700 mm.
Refractory bricks, in their absence, can be replaced by ordinary red selective bricks of the first grade.
Before you start laying the stove, you should purchase the necessary stove appliances and only then start work, focusing on their size.
The stove can be folded by one stove-maker within 16-18 hours; additionally, it takes about 4-5 hours to bring the material and prepare the clay-sand mortar.
The dimensions of the stove are small, but it provides heating for a room with a floor area of up to 16 m². The heat transfer of the stove with a one-time firebox is 2.8 kW (2400 kcal / h), and with a two-time firebox - 3.5 kW (3000 kcal / h).
The stove has a simple design, increased heating in the lower zone, anthracite, coal, coal briquettes, peat briquettes, and firewood serve as fuel. Hot flue gases in the furnace move through a well-developed chimney system, while heating its inner walls.
In fig. 1, b, vertical sections of the furnace are given along A — A, B — B and C — C, and the orders show in what sequence the laying of bricks and the installation of oven devices in each row are carried out.
The vertical sections show the firebox 1, the ash-pan 2, the grate 3, the furnace door 4, the blower door 5, the smoke valve 6, cleaning holes.
The arrows indicate the directions of movement of hot flue gases in the heating furnace, and the dashed lines show the movement of cold room air in the heated furnace before the complete closure of the smoke damper.
Hot flue gases of the warming-up stove from the firebox rise up to the firebox overlap and from the upper opening.
Masonry fifth row does not present difficulties, only you should pay attention to the correctness of the alternation of the seams. This row forms a firebox measuring 250 × 380 mm.
During masonry sixth row install and attach the fire door to the masonry. Before installing the combustion door, it is prepared for installation. Masonry seventh and eighth rows carried out according to the orders. Furnace masonry from the ninth to the seventeenth row does not present difficulties, you just need to follow the rules for bandaging the seams. Eighteenth row blocks the firebox and the descending channel. Only one channel of 130 × 130 mm remains. Nineteenth row they are laid out with ordinary red bricks, the laying of this row is similar to that of the eighteenth row. During masonry of the twentieth row, clean-out holes are installed.
Twenty-first row spread according to the order. Twenty-second nearby block the cleaning doors. Twenty-third row must be laid out strictly in order. The masonry of this row forms the beginning of the chimney system.
Furnace masonry from twenty-fourth to twenty-seventh rows is the same, you just need to strictly follow the rules for bandaging the seams. Furnace masonry from the twenty-eighth to the thirtieth row carried out according to the order. Thirty-first row cover the top of the furnace, leaving a chimney channel 130 × 250 mm in size. Thirty-second and thirty-third rows also overlap the top of the oven, only observe the rules for bandaging the seams. In the thirty-fourth row the masonry is shown (a channel of five bricks and the installation of a smoke damper with a size of 130 × 250 mm.
Masonry thirty-fifth row the chimney begins. Pipe laying is not difficult. The pipe is laid out "five", in detail observing the rules for dressing the seams, with an internal pipe size of 130 × 250 mm strictly vertically. When passing through the ceiling and roof, fire-prevention measures must be observed. After finishing the laying of the stove and chimney, they are dried with test furnaces, after drying they are plastered and whitewashed.
Litlife
Kirill Alexandrovich Borisov
We build stoves and fireplaces
Introduction
The first ovens appeared in Russia at the beginning of the 15th century. Their name - "Russians" - has not changed to this day.
The first models of stoves had a simple design and were fired in a black way, that is, the smoke went straight into the room and was drawn out through the slightly open door. But it is worth noting that the peasants knew how to properly position the stove so that the soot settled directly next to it, without clogging the entire room. They also learned to select the right fuel, which burned out evenly, without giving off suffocating gases. In its own way, it is a whole art - to correctly arrange the logs in the firebox, alternating different types of wood.
As time went on, the design of the Russian stove was improved and updated. So, a chimney appeared, which went out through the ceiling. Its design is based on the thrust principle. When building a furnace, Russian craftsmen created from 5 to 9 knees in the chimney - bends, which formed chambers with different pressures, due to which draft appeared.
But over time, fundamentally new heating designs for various types of furnaces were developed. The premises began to be heated using gas, hot water, electricity, but even today, charcoal heating remains relevant, for example, for country cottages or garden houses. Do not forget that stoves and fireplaces create coziness in the room, it is this quality that gave rise to the development of such an industry of stove construction as decorative fireplaces.
Building a fireplace or stove at home is not an easy task, but it is quite doable, you just need to have brickwork skills, accuracy in work and free time.
In this book, you will find basic information to help you get started.There is a list of the necessary tools, the rules for their operation and putting them into working order, the classification of consumables, the methods of making them at home, and, of course, the book discusses specific models with a full description and diagrams that you can improve to your liking.
So, good luck to you!
Varieties of ovens
You certainly know that stoves are different, and sometimes the two models have practically nothing in common. Considering several basic parameters, it is possible to classify the types of ovens. The main parameters are the following:
1. Appointment.
2. Wall heating temperature.
3. Duration of fuel combustion.
4. The time required for warm-up and full heat transfer.
5. Diagram of the movement of gases in the channels.
6. The design of the chimney.
7. Form.
8. Finishing of the outer walls.
9. The main material for manufacturing.
Appointment
Speaking about the purpose of the furnace, there are four main types:
1. Heating stoves.
2. Heating and cooking ovens.
3. Cooking stoves with heating shields.
4. Stoves for special purposes: baths, laundries, fireplace stoves, etc.
The functions of each model are inherent in its name. So, heating and cooking ovens are designed for heating the room and cooking. As an example, we can cite the Russian oven, because it is believed that many dishes, such as, for example, cabbage soup, can only be cooked with high quality in it. After boiling, the food should sweat in a cooling oven, only then it acquires a unique taste and aroma. And this process directly depends on the parameters of the stove, its dimensions, the method of removing the smoke, and, of course, the fuel used is very important.
The design of the Russian stove has remained unchanged for a long time, but, unfortunately, it is still far from ideal. The Russian stove heats up only the upper layers of the air and has a rather narrow frame when choosing a fuel.
Stoves are designed exclusively for cooking, their heating capacity is mediocre, but in a small room, the heat they radiate is sufficient for heating.
To increase the heating capabilities of kitchen stoves, heating shields are included in their design. Such stoves are called kitchen stoves with heating shields.
The range of heating shields is quite wide. They are made of brick, metal or other refractory material. The heating plate is a side wall with a duct system inside. Hot air from the stove furnace passes through the channels of the shield, heating it, and, slowly cooling down, the shield, in turn, heats up all layers of air in the room.
Heating temperature
Plates are different, and, of course, the heating temperatures of their outer walls differ. According to this characteristic, there are three following types of furnaces:
1. Moderate heating - 90 ° C.
2. Increased heating - 120 ° C.
3. High heating - 120 ° C and above.
For different types of furnaces, certain building materials are also used, first of all, their refractoriness is considered, since the material from which the outer wall of the moderately heated furnace is made is unlikely to be suitable for a furnace with high heating. But the conversation about materials will go a little further.
Gas flow diagram in channels
The scheme of gas movement in the flue ducts of the furnace is one of the most important parameters during its construction. (fig. 1)
... With the exception of special-purpose ovens, the following types are distinguished:
1. With parallel channels (one- or two-turn).
2. Serial connection (single or multi-turn).
3. Channelless (bell-type).
4. With a combined system of flue ducts.
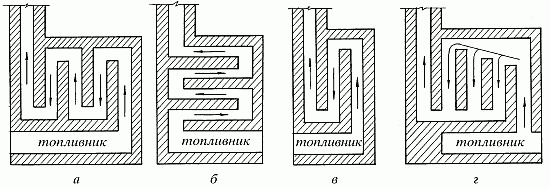
Fig. 1. Scheme of gas movement in channels: a - multiturn; b - single-turn with one drop channel; в - single-turn with three drop channels; g - channelless
For a summer residence or a country house, it is most profitable to build a medium-sized stove, in this case it is recommended to use a structure with a parallel arrangement of channels.In this case, the resistance to the outgoing gases is reduced due to the short path, and less thrust is required for the full combustion of the fuel.
The multichannel system is used quite often when building larger models. But such a system has a number of serious drawbacks: the long length of the channels provides strong resistance to the outgoing gases, as a result of which it is necessary to significantly increase the draft in the chimney; the surface of the furnace heats up unevenly, areas of temperature drop are created, at the junction of which damage can occur; in the horizontal sections of the system, soot is constantly deposited in large quantities, which entails the need for regular cleaning.
The channelless system, for obvious reasons, is considered the simplest. Directly above the firebox of the stove, a bell is installed (therefore, it is sometimes called a bell-type) or a chamber, which removes the smoke. The resistance to the outgoing gases in this case is low, but the main heating occurs in the upper part of the furnace.
Heating stove with bottom heating, size 770 × 770 mm
The heating stove has dimensions, mm: 770x770x2310 (see Fig. 2).
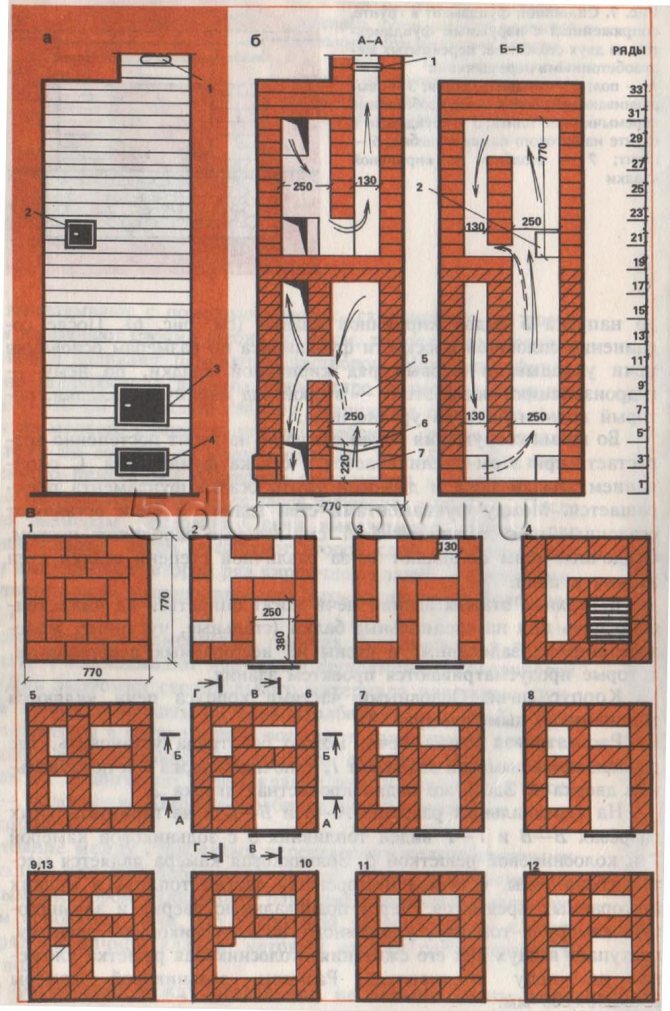
Fig. 2. Heating stove with bottom heating measuring 770 × 770 mm a - facade; b - sections A-A, B-B; c - masonry 1-13 rows; d - sections B — B, G — G; e - masonry 14-35 rows; 1 - smoke valve; 2 - holes for cleaning; 3 - furnace door; 4 - blower door; 5 - firebox; 6 - grate; 7 - ash pan

Fig. 2. Heating stove with bottom heating measuring 770 × 770 mm g - sections V — B, G — G; e - masonry 14-35 rows; 1 - smoke valve; 2 - holes for cleaning; 3 - furnace door; 4 - blower door; 5 - firebox; 6 - grate; 7 - ash pan
The material consumption (excluding the foundation and pipe) is as follows:
- red brick - 230 pcs,
- refractory bricks - 210 pcs.,
- red clay - 12 buckets,
- refractory clay - 6 buckets,
- sand - 7 buckets,
- furnace door - 250 × 210 mm,
- blower door - 250 × 140 mm,
- smoke valve - 130 × 250 mm,
- grate grate - 300 × 252 mm,
- cleaning doors with dimensions 130 × 140 mm - 6 pcs.,
- pre-furnace sheet - 500 × 700 mm.
The stove can be folded by one stove-maker within 18-20 hours; additionally, it takes about 5 hours to raise the material and prepare the clay-sand mortar.
The stove is designed to heat a room up to 20 m². The heat transfer of the stove with a one-time firebox (with a consumption of anthracite up to 12.2 kg) is about 3 kW (2600 kcal / h). The heat transfer from the bottom of the furnace is 2.3 kW (2000 kcal / h). The heat transfer of the stove with a two-time firebox increases to 3.7 kW (3200 kcal / h).
It is desirable to use anthracite and coal as fuel, but if they are not available, you can use firewood, coal briquettes and peat briquettes.
The brickwork of the stove in rows does not differ from the previous heating stove measuring 770 × 640 mm.
Design features and principle of operation
The oven that provides cooking is somewhat different from the oven that provides extremely warmth in the home. In the summertime, the stove with the stove will have to be melted, but all the heat generated must go to heating the stove and be immediately removed. This is achieved by installing a special damper that redirects the heated air through channels inside the housing.
The basic structure of all wood-burning stoves is the same. You can highlight common elements that perform specific functions.
- The ash pan serves as a container for collecting ash. It is located at the bottom of the furnace and is a chamber with a door for ash removal. But this door is also a blower. Through it, air enters the firebox. The position of the door sets the intensity of fuel combustion.
- Fuel combustion takes place in the firebox. In different models of stoves, designers have tried in various ways to increase the proportion of energy converted into usable. Therefore, the furnaces are equipped with various screens that focus the radiation.The efficiency of the furnace depends on the size of the furnace, therefore, there should be no self-activity in self-construction. It is necessary to adhere to strictly established dimensions.
- The chimney ensures the removal of combustion products from the room. But, before the smoke gets into the chimney, it passes through the labyrinth of channels inside the stove, giving off its heat to the masonry. When the stove is switched to summer mode, the smoke after the furnace immediately enters the chimney.
Construction is coming to an end
- The gate damper closes the chimney, increasing or decreasing draft. But its main purpose is to prevent heat leakage into the atmosphere. After the oven has completely burned out, the damper is completely closed.
- A hob, usually made of cast iron, is heated directly by the flame. But contact with an open fire is harmful to any material, including dishes, so a barrier is built in the firebox that cuts off the flame, and after this barrier, a hob is installed.
- Other elements due to the technical features of a particular model can be represented by cleaning doors, additional channels, parts for arranging an oven and a frypot.
Good to know: How to build a brick barbecue oven, a step-by-step technique for beginners
Heating stove with bottom heating, size 890 × 890 mm
The heating stove has dimensions, mm: 890x890x2310.
The material consumption (excluding the foundation and pipe) is as follows:
- red brick - 340 pcs.,
- refractory bricks - 270 pcs.,
- red clay - 16 buckets,
- refractory clay - 7 buckets,
- sand - 10 buckets,
- furnace door - 250 × 210 mm,
- blower door - 250 × 140 mm,
- smoke valve - 130 × 250 mm,
- grate grate - 380-252 mm,
- cleaning doors with dimensions 130 × 140 mm - 10 pcs.,
- pre-furnace sheet - 500 × 700 mm.
The stove can be folded by one stove-maker within 24 hours, in addition, it takes about 6 hours to bring the material and prepare the clay-sand solution.
The stove is designed to heat a room with an area of up to 25-30 m. The heat transfer of the stove with a one-time firebox is about 3.7 kW (3200 kcal / h), and with a two-time firebox - 4.7 kW, (4000 kcal / h). Drawings of sections of the furnace and the order of the masonry are shown in Fig. 3.
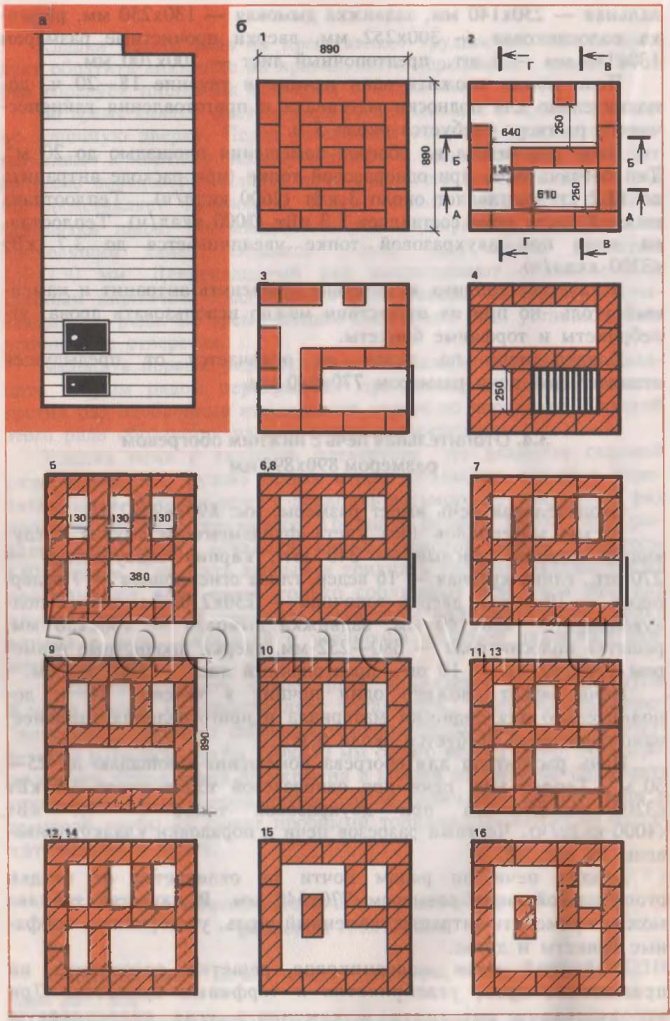
Fig. 3. Heating stove with bottom heating measuring 890 × 890 mm a - facade; b - masonry 1-16 rows;
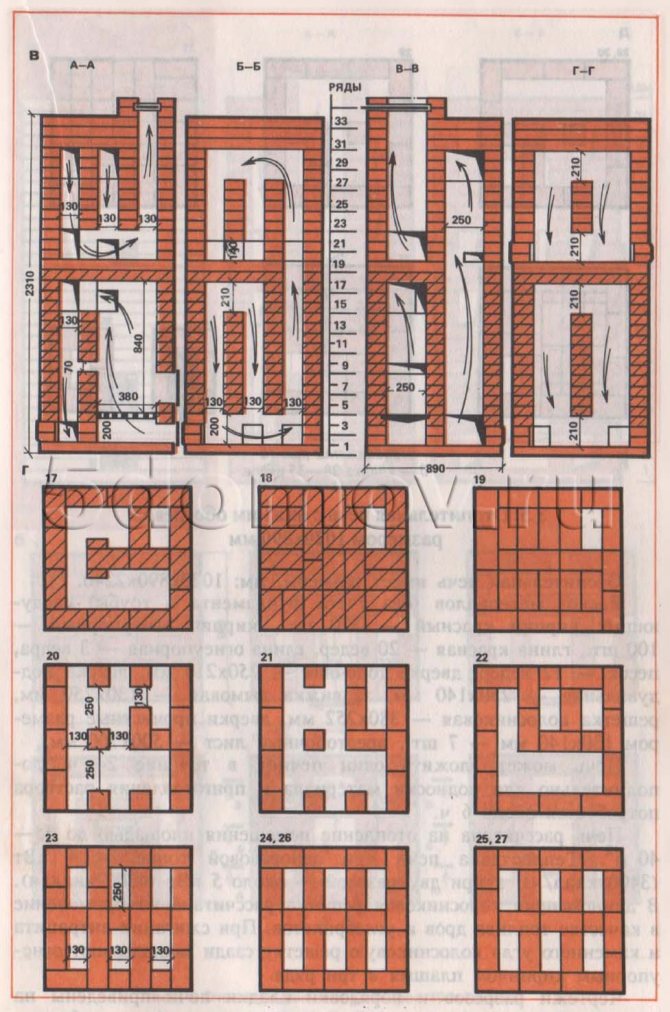
Fig. 3. Continuation c - sections A — A, B — B, C — C, G — G; d - 17 - 27 rows
Fig. 3. Continuation d - laying 28-35 rows
The masonry of the stove in rows is almost the same as the masonry of a heating stove measuring 770 × 640 mm. Anthracite, coal, coal briquettes, peat briquettes and firewood can be used as fuel. In this oven, the grate is designed for the use of firewood, coal briquettes and peat briquettes. When using anthracite and coal, the grate is laid flat behind with three rows of refractory bricks.
Heating stove with bottom heating, size 1020 × 890 mm
The heating stove has dimensions, mm: 1020x890x2240.
The material consumption (excluding the foundation and pipe) is as follows:
- red brick - 570 pcs.,
- refractory bricks - 100 pcs.,
- red clay - 20 buckets,
- refractory clay - 3 buckets,
- sand - 12 buckets,
- furnace door - 250 × 210 mm,
- blower door - 250 × 140 mm,
- smoke valve - 130 × 250 mm,
- grate grate - 380 × 252 mm,
- cleaning doors with dimensions 130 × 140 mm - 7 pcs.,
- pre-furnace sheet - 500 × 700 mm.
The stove can be folded by one stove-maker within 24 hours, in addition, it will take about 6 hours to bring the material and prepare the solution.
The stove is designed to heat a room up to 35-40 m². The heat transfer of the stove with a one-time firebox is 4 kW (3400 kcal / h), and with a two-time one - about 5 kW (4300 kcal / h).
In this stove, the grate is designed to use firewood and coal briquettes as fuel. When burning anthracite and coal, the grate is laid in the back with refractory bricks flat in three rows.
Drawings of sections and orders of the furnace masonry are shown in Fig. 4. The laying of the stove is carried out according to the order, observing the rules for bandaging the seams.
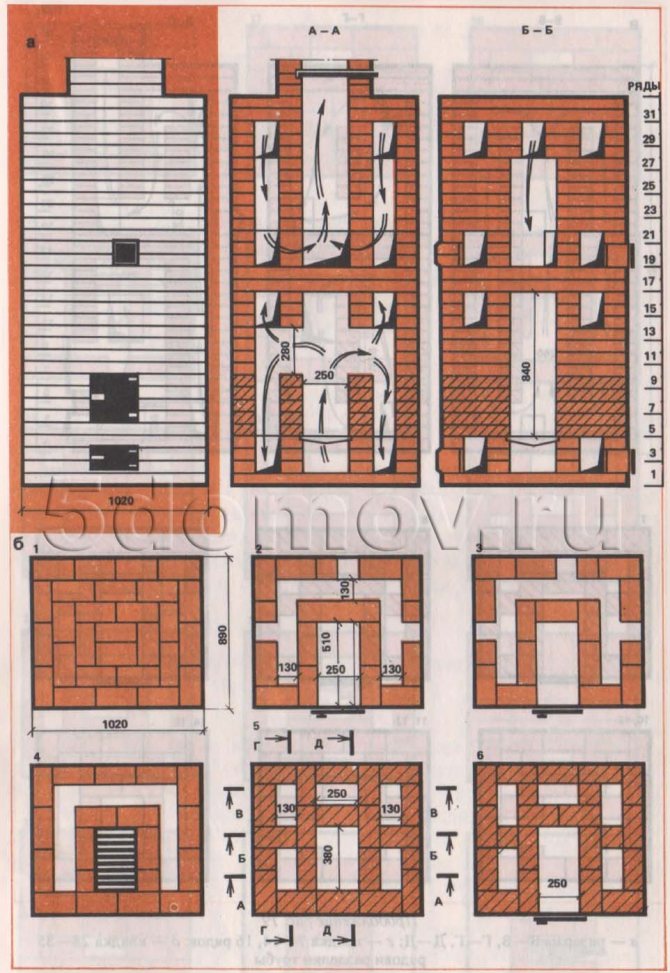
Fig. four.Heating stove measuring 890 × 1020 mm a - facade and sections A — A, B — B; b - masonry 1-6 rows
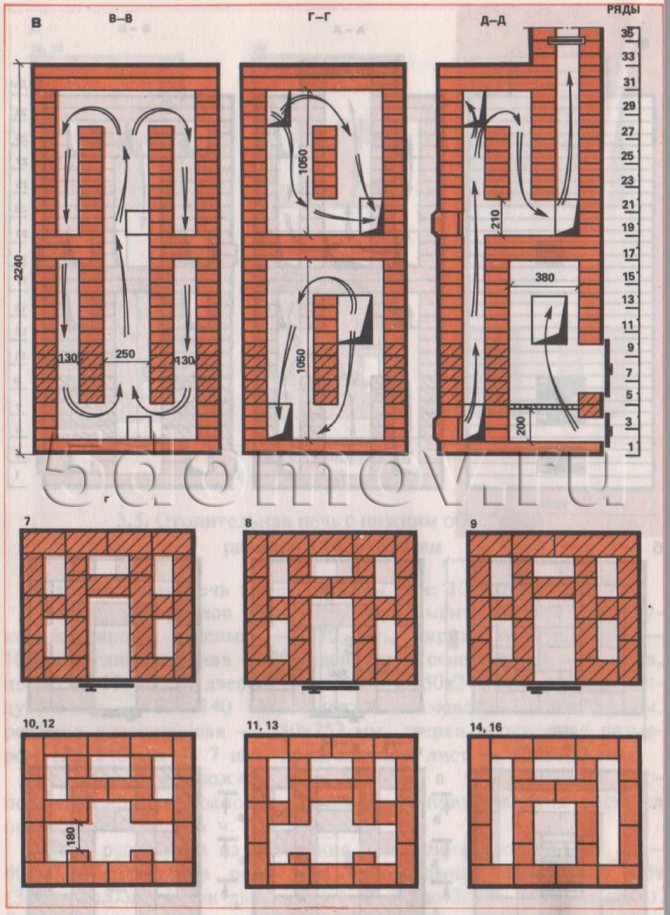
Fig. 4. Continuation in - sections V — V, G — G, D — D; d - laying 7-14, 16 rows

Fig. 4. Continuation d - laying 15, 17-34 rows and pipe cutting
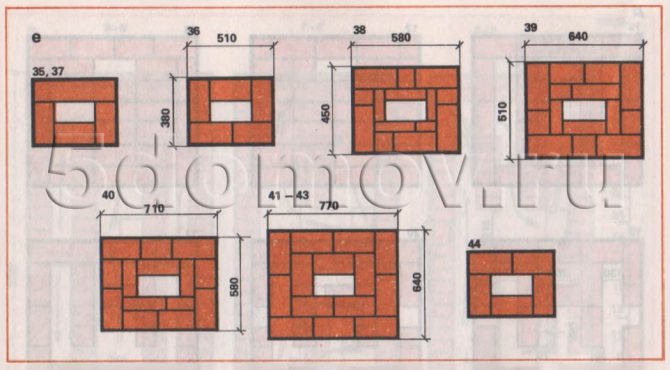
Fig. 4. Continuation e - laying 35-44 rows
From the thirty-sixth to the forty-third row, the laying of a pipe cut with an internal pipe section of 130 × 250 mm is shown. The forty-second and forty-third rows must be laid out in the same way as the forty-first row, while always observing the rules for dressing the seams (orders 42 and 43 are not shown). The laying of the forty-third row is similar to the laying of the forty-first row.
Heating stove with bottom heating, size 1160 × 890 mm
The heating stove has dimensions, mm: 1160x890x2240.
The material consumption is as follows:
- red brick - 580 pcs.,
- refractory bricks - 140 pcs.,
- red clay - 22 buckets,
- refractory clay - 5 buckets,
- sand - 13 buckets,
- furnace door - 250 × 210 mm,
- blower door - 250 × 140 mm,
- smoke valve - 130 × 250 mm,
- grate grate - 380 × 252 mm,
- cleaning doors with dimensions 130 × 140 mm - 9 pcs.,
- pre-furnace sheet - 500 × 700 mm.
The stove can be folded by one stove-maker within 26 hours; in addition, it will take about 6 hours to prepare the clay-sand mortar and to bring the material.
The stove is designed to heat a room with an area of up to 45 m. The heat output of the stove with a one-time firebox is 4.3 kW (3700 kcal / h), and with a two-time firebox - 5.4 kW (4600 kcal / h).
In this furnace, the grate is designed to use firewood, coal briquettes and peat briquettes as fuel. When using anthracite and coal, the grate is laid at the back with refractory bricks on the edge.
Drawings of sections and ordering of masonry are shown in Fig. five.

Fig. 5. Heating stove with bottom heating, size 1160 × 890 mm a - facade; b - laying 1-12 rows

Fig. 5. Continuation c - sections A — A, B — B, G — G; d - masonry 13-18 rows
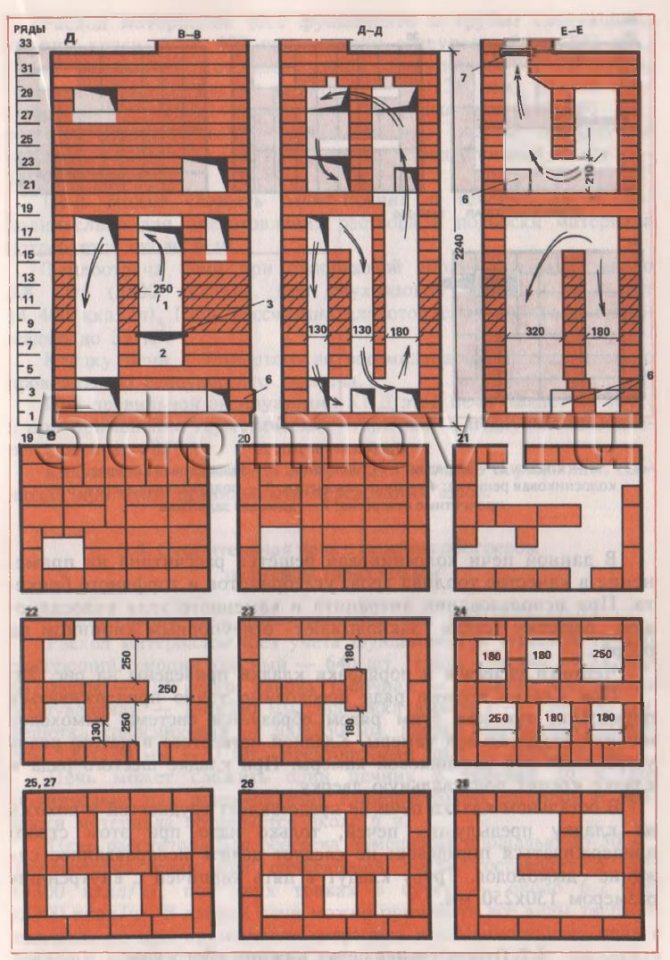
Fig. 5. Continuation d - sections B — B, D — D, E — E; f - masonry 19-28 rows; 1 - firebox; 2 - ash pan; 3 - grate; 4 - furnace door; 5 - blower door; 6 - cleaning holes; 7 - smoke valve
Fig. 5. Continuation g - laying 29-32 rows
When laying the second row, it is necessary to strictly adhere to the order, since this row forms the chimney system of the lower heating chamber. Masonry of the fourth and fifth rows' arrange the bottom of the ash pan. When laying the sixth row, a blower door is attached to the masonry.
Otherwise, the laying of the stove does not present difficulties and is similar to the laying of previous stoves, only it is necessary to strictly adhere to the procedures: you should not make unjustified narrowing of the chimneys. The pipe is placed in five bricks with an internal dimension of 130 × 250 mm.
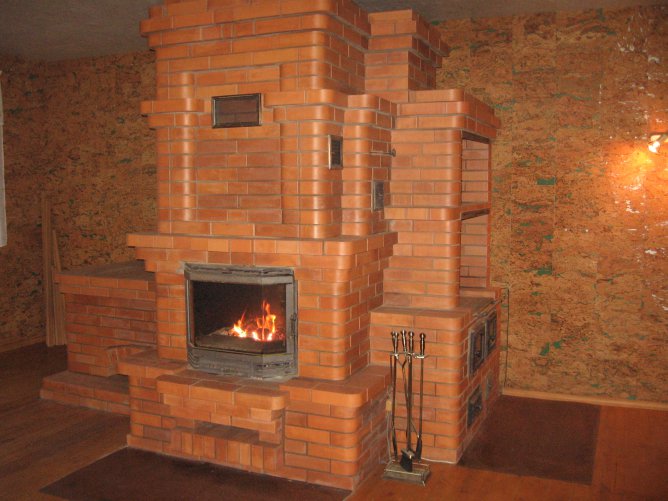
T-shaped stove with fireplace
This was the old heating and cooking stove.
As any house requires some kind of repair or restoration over time, each stove has a certain turnaround cycle. When, after 20 years, a new owner appears at a country house with his own views on the arrangement, then one cannot do without reconstruction inside the dwelling.
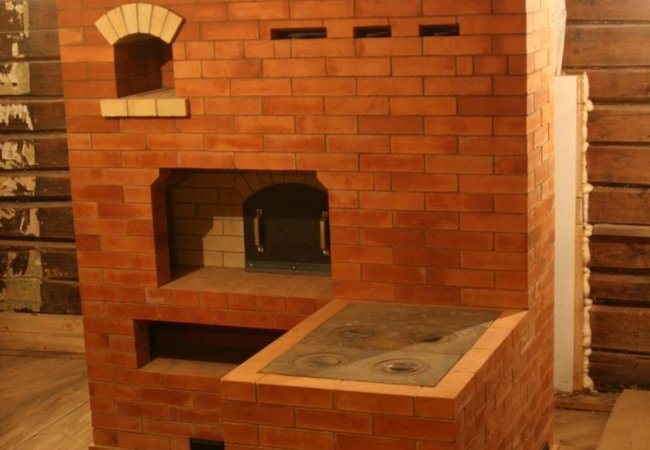
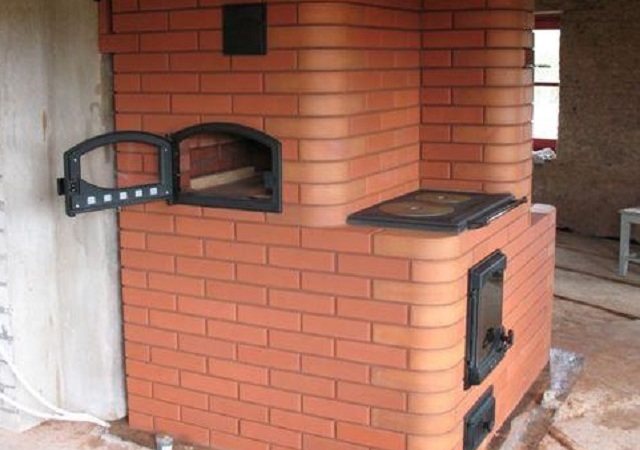
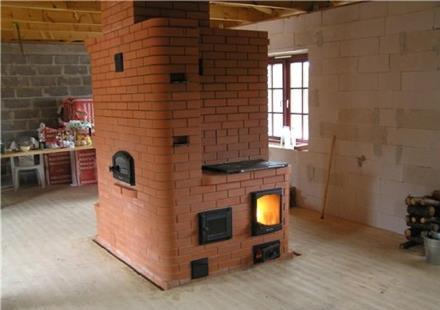
The heating and cooking stove (photo 1), which warmed the previous owner for many years, did not escape a similar fate. The wind of change brought a new idea: not to repair the stove, but to disassemble it, and build a fireplace, combined with a heating stove, on the area vacated after dismantling (photo 2).
The most optimal variant turned out to be the option of combining the well-known design of a T-shaped heating stove with an ordinary direct fireplace, which was successfully implemented by the masters of furnaces from the city of Balashikha, Moscow Region, under the leadership of N. Dolgikh. Such a combination required a minimum number of bricks and gave good heat engineering parameters.
The new combined oven gives warmth and pleases the owner of the house with its aesthetics (photo 4).
Working moment of dismantling the old furnace.
Masonry oven-fireplace in rows
1st - 2nd row.To save bricks, we perform the bottom of the fireplace with a sand-brick backfill.
3rd row. In the front part of the furnace we form the bottom of the ash pan. The brick lying in the ash pit is beveled for easy ash removal. We lay out with bricks under the fireplace according to the order.
4th row. We begin to form the walls of the fireplace and the lower vertical niche. We install blower and cleaning doors. At the back of the stove, we form a horizontal smoke channel.
5th row. We lay out the bricks in the front part so that when laying the next row, the ligation of the vertical seams is observed.
6th row. We finish the walls of the blower with three-quarters, expanding them so that the grate can be laid. In the rear part, we begin the incisions separating the lifting vertical channels. The bricks facing the inside of the fireplace are chamfered downward. We begin to form the slope of the back wall of the fireplace. We install the fuel door.
Preliminary layout of the new combination oven. View from the side of the cooking chamber and decorative niches.
7th - 9th row. We lay out the firebox of the stove and fireplace according to the order.
10th row. We put the ceiling over the firebox door.
11th row. We lay the hob. We connect the firebox with the heating shield. In the front part of the fireplace we lay cross-members - steel strips 650 mm long.
12th row. We cover the lower vertical niche. We erect the walls of the cooking chamber with bricks laid on a narrow edge. We close the fireplace portal.
13th row. We form a smoke tooth. We gradually expand the front wall inside the fireplace firebox.
14th row. We install the cooker hood. It will also serve as a cleaning door for the fireplace tooth.
15th - 17th row. We complete the walls of the cooking chamber. On top we lay a frame welded from a steel corner 40 × 40 mm and steel strips.
18th row. We close the cooking chamber.
View of the new combination oven from the fireplace side.
19th-20th row. We install another samovar door and a support post — a brick put on a poke.
21st row. We cover the middle vertical niche.
22nd-23rd row. Through the support post we lay the base of the cut between the upper chamber and the pipe.
24th-25th row. We close the heating shield.
26th-27th row. We put the upper clean door and a cut between the vertical channels.
28th-30th row. Gradually block the upper horizontal channel. Put the stove and fireplace valves on top.
31st row. We spread the overlap.
32nd row. We start laying out a separate chimney.
Materials (edit)
Brick (without chimney) .. 1130 pcs. Sand ……………………………… .0.6 m3 Clay ……………………………… .0.2 m3 Furnace door …………………. 1 pcs. Blowing door ……………. 1 pc. Cleaning door ………………. 5 pcs. Grate grate …………… 1 pc. Wire 02 mm ………………… ..12 m Gate valve …………………………… 3 pcs.
A selection of articles on the topic of stoves and fireplaces. Previous page :: Next page >>
Our site is regularly updated with interesting and unique materials and articles on the subject of ovens, barbecues, grills and barbecues. If you would like to receive information about this, subscribe to the newsletter of our website. It is guaranteed that your address will not be passed on to third parties.
Heating stove with bottom heating, size 1290 × 510 mm
The heating stove has dimensions, mm: 1290x510x2310 (see Fig. 6).
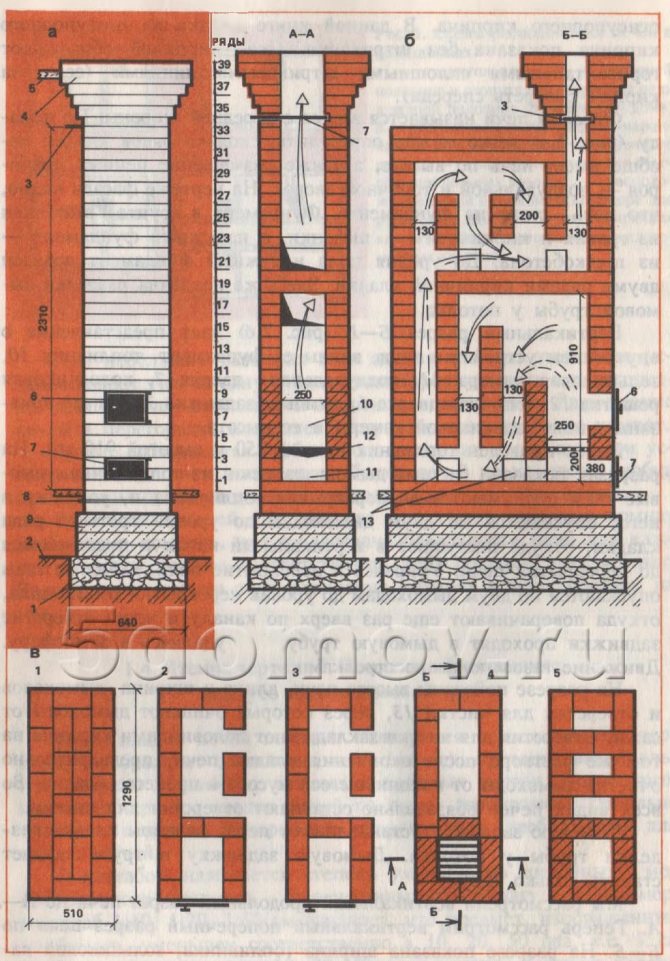
Fig. 6. Heating stove with dimensions 510 × 1290 mm a - facade; b - sections A — A; c - masonry 1 - 5 rows; 1 - foundation in the ground; 2 - soil; 3 - smoke valve; 4 - cutting; 5 - ceiling slab; 6 - furnace door; 7 - blower door; 8 - waterproofing; 9 - external foundation; 10 - firebox; 11 - ash pan; 12 - grate; 13 - holes for cleaning
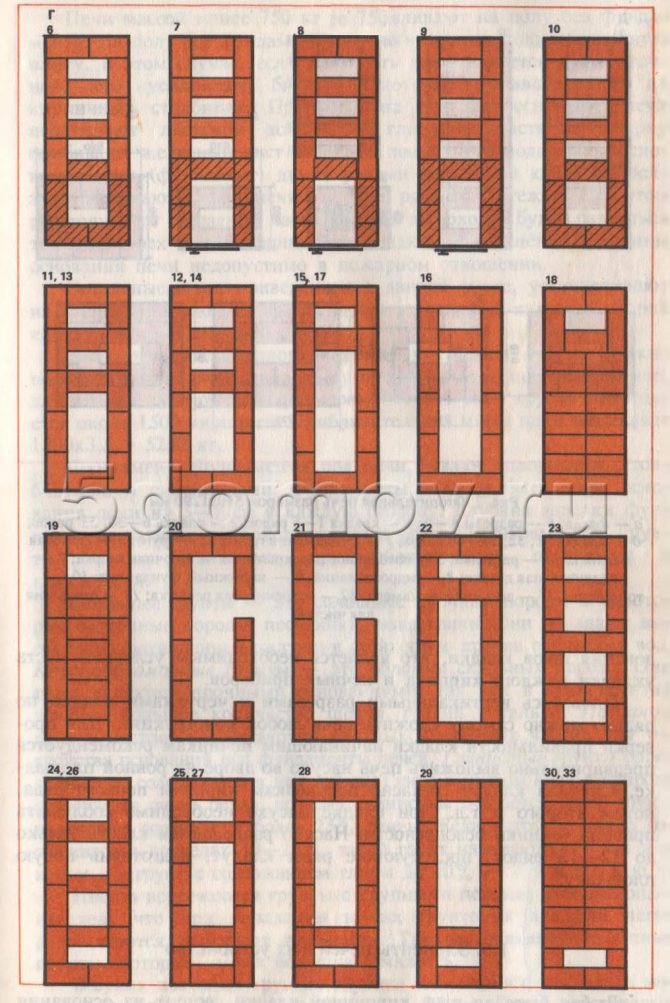
Fig. 6. Continuation d - laying 6-30, 33 rows

Fig. 6. Continuation d - laying 31.32, 34-40 rows
Material consumption (without foundation and pipe) is as follows:
- red brick - 400 pieces,
- refractory bricks - 220 pcs.,
- red clay - 16 buckets,
- refractory clay - 10 buckets,
- sand - 11 buckets,
- furnace door - 250 × 210 mm.,
- blower door - 250 × 140 mm,
- smoke valve 130 × 250 mm,
- grate grate - 300 × 250 mm,
- cleaning doors with dimensions 130 × 140 mm - 4 pcs.,
- pre-furnace sheet - 550 × 700 mm.
The stove can be folded by one stove-maker within 24 hours; in addition, it will take about 6 hours to prepare the solution and bring the material.
The heat output of the stove with a one-time firebox is about 3.8 kW (3300 kcal / h), with a two-time firebox - 5.1 kW 14 400 kcal / h) ^ The stove is designed to heat a room with an area of up to 35 m. It is advisable to lay the furnace from the fourth to the eighteenth row from refractory bricks. With proper operation, the efficiency of this furnace can be up to 80%, and with the use of sealed (furnace and blower) doors it reaches 85%.
The laying of the stove is simple, it is carried out according to the orders, while observing the correct alternation of the seams.
Heating stove with bottom heating, size 1650 × 510 mm
The heating stove has dimensions, mm: 1650x510x2310.
Material consumption (excluding the foundation and chimney) is as follows:
- red brick - 640 pcs.,
- red clay - 22 buckets,
- sand - 12 buckets,
- furnace door - 250 × 210 mm,
- blower door - 140 × 250 mm,
- smoke valve - 130 × 250 mm,
- grate grate - 300 × 250 mm,
- cleaning doors with dimensions 130 × 140 mm - 7 pcs.,
- pre-furnace sheet - 500 × 700 mm.
The stove can be folded by one stove-maker within 26 hours; in addition, it will take about 6 hours to prepare the clay-sand mortar and to bring the material. 2
The stove is designed to heat a room with an area of up to 50 m. The heat output of the stove with a one-time firebox is 5 kW (4300 kcal / h), with two fireboxes per day - about 6.2 kW (5300 kcal / h). All types of solid fuel can be used in this stove, but when using anthracite and coal, it is advisable to lay out the stove from the ninth row to the firebox overlap with refractory bricks, and in its absence, lay out the firebox using selected red bricks in these rows.
Drawings of sections and ordering are shown in Fig. 7.

Fig. 7. Heating stove with bottom heating, size 1650 × 510 mm a - facade and sections G — G, D — D, E — E; b - masonry 1-8 rows
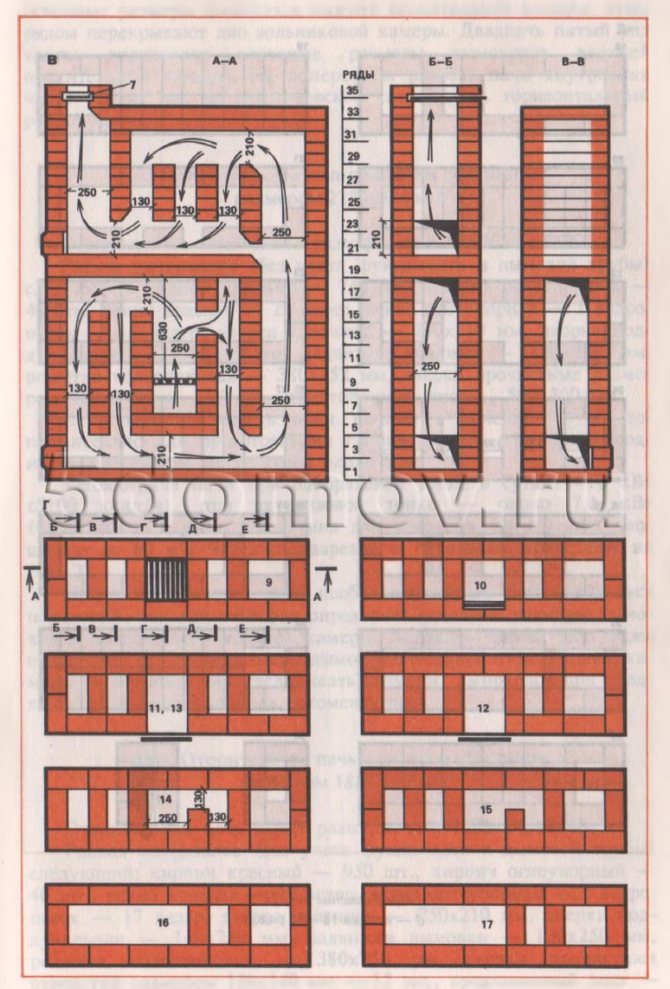
Fig. 7. Continuation c - sections A — A, B — B, B — C; d - laying 9-17 rows
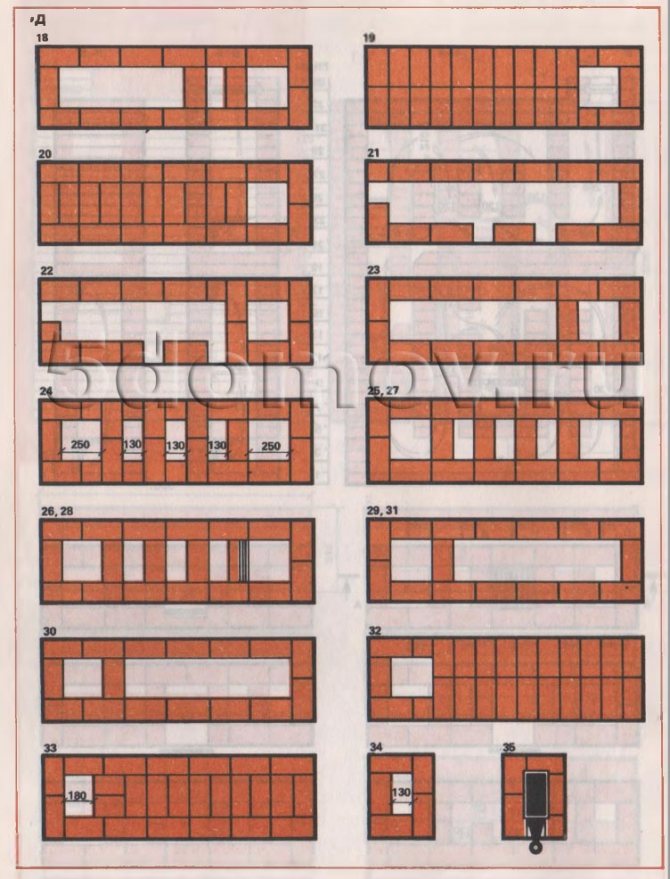
Fig. 7. Continuation d - laying 18-35 rows
The laying of the stove is not particularly difficult. The fifth row determines the main dimensions of the chimneys of the lower heating chamber; this row covers the bottom of the ash pan. The twenty-fifth row also defines the main dimensions of the chimneys of the upper heating chamber. In a cross-section of the furnace, the interior is visible, as in an X-ray photograph (see the horizontal section of the furnace).
T-shaped heating stove
⇐ Previous Page 5 of 5
Such a stove can be used to heat large rooms. It is convenient to install it in partitions. The heat output of this furnace is 5.3 kW. After laying, the stove is plastered.
Materials. Red bricks - 490 pieces; ordinary clay - 0.4 m3; sand - 0.4 m3; oven wire with a diameter of 2 mm - 3 mm; pre-furnace sheet 70 x 50 cm - 1 piece; roofing board for waterproofing - 3 m2; grate 25 x 25 - 1 piece; furnace door 28 x 27 cm - 1 piece; blower door 14 × 13 cm - 1 piece; cleaning doors 14 x 13 cm - 3 pieces; view latch 25 x 13 cm - 1 piece (Fig. 106).
Ordering. 1st row: the bottom of the ash pan is laid out. The brick behind the blower door is chipped towards the back. 2nd row: install the blower door. In the back, a channel is made with a cleaning door on one side. 3rd row: do as the second, with dressing of the seams. 4th row: the thickness of the walls is increased to 18 cm. In the back, they begin to lay incisions for lifting vertical channels. 5th row: put the grate. 6-9th rows: a firebox measuring 26 x 51 cm is laid out in front of the stove. 8th and 9th rows: connection of the firebox with the fire chamber. 10th row: block the fire door. 11-13th rows: make outlets to overlap the firebox, continue laying the fire chamber. 14th row: put a cleaning door in the front wall. In the front chamber, a column is made in half a brick to divide it into the chamber itself, connecting channels and the base of the chimney.15-17th rows: the same as the 14th row, with bandaging of vertical seams. Rows 18-21: make the base of the cut of the upper chamber and chimney, resting on a post. Rows 22-23: Overlapping the lower heat chamber. Rows 24-25: connection of the vertical lift channel to the upper chamber by means of a horizontal channel. On the 24th row, a cleaning door is placed to clean the horizontal channel. Rows 26-29: arrange the stove overlap. On the 28th row, a view valve is installed. 30th row: start of laying the chimney. The section of the pipe channel is 13 x 25 cm.
Heating and cooking stove
Dimensions - 102 x 64 x 224 cm. Weight without pipe - 1900 kg. Heat transfer - 2800 kcal / h (with two furnaces).
Materials:
red brick - 397 pcs.; refractory (refractory) brick 68 pcs .; ordinary clay - eight buckets; refractory clay (with chamotte) - 34 kg; steel strip 50 x 5 mm - 1 m; sand - four buckets; roofing steel for the pre-furnace sheet - 50 x 70 cm; steel corner 30 x 30 x 4 mm - 2 m; steel tape 25 x 15 mm - 2.2 m; waterproofing - 1.5 m2. Furnace appliances: grate - 250 x 252 mm; furnace door - 250 x 205 mm; steel strip tape 650 x 20 x 1 mm (2 pcs.) and 1300 x 20 x 1 mm (2 hit.); doors 13 x 14 cm - 4 pcs.; ventilation duct door - 130 x 75 mm; smoke dampers 13 x 14 cm - 3 pcs .; cast-iron composite flooring 36 x 41 cm - two stoves with a burner; a cast-iron deck plate without a burner - 19 x 41 cm (see the eleventh row of Fig. 7.19);
Fig. 7.19. Heating and cooking stove - order
refractory bricks are used for laying the first channels and parts of the firebox that are exposed to strong heating. If it was not possible to get it, then you can use selected red brick.
1st row - the laying is carried out strictly according to the level and the square. A blower (ash chamber) is arranged to the right of the furnace. Opposite it (on the front side of the furnace), a three-quarter brick is used for laying. The inner sides are tapering (towards the chamber) for easy ash removal.
First, the blower door is installed. After that, the 2nd row is laid out. Pay special attention to the seams.
In the 3rd row, the laying is carried out according to the order. The required shape of the blower is achieved by chipping bricks from both sides. The height of the masonry of the 3rd row is the same as the height of the blower door frame.
The 4th row is recommended to be laid out in the following sequence. Work starts on the left side of the oven. A cleaning door is installed. Further, the laying is carried out according to the order. The blower door is blocked with a brick. In this case, the hole above the ash pan (top) is given the shape of a square. This is achieved by laying two bricks, one of which is chipped off.
The 5th row is almost the same as the 4th. On the front side of the furnace, two bricks are laid flat, which narrows the opening above the ash pan even more.
The 6th row is recommended to be laid out of fire-resistant bricks (shaded with a cell). If necessary, you can also from the usual. On the front side of the furnace, in front of the grate (in front of the opening of the above-ash pan), the brick is chipped off (the area is shaded). This is necessary to improve the flow of fuel onto the grate. The grate is placed on the 5th row of masonry. In the 6th row, a gap of 10-15 mm is left along the entire perimeter of the grating (to compensate for the expansion of the metal during heating), which is filled with sand or ash (section G-G).
7th row - in accordance with the order. The channel in the shape of the letter "P", arranged earlier, is covered with masonry so that three new channels are obtained: one large one and a half bricks and two small square (13 x 13 cm) half a brick in size. Next, a furnace door is placed, which rests and is fixed on the 6th row. P 8th and 9th rows have a difference from the 7th only in the dressing of the seams. The wall, which separates the firebox from the channel (9th row), in the upper part on both sides is squeezed into a cone in order to ensure the smoothest transition of gases discharged from the firebox into this channel.
In the 10th row, the masonry is made of refractory bricks as evenly as possible (level control), since it is the basis for laying the cast-iron flooring (with a single-burner stove). During the laying of this row, only two channels remain, having a square cross section, which overlaps the fire door. Opposite the firebox (at the back wall), two bricks move 2 cm inside the furnace. This is due to the size of the cast iron stoves that are used for the cooking chamber. They are somewhat short.Feature - the dimensions of the 10th row masonry are indicated in centimeters.
For the 11th row, a regular brick is used. On the left side, just like in the previous rows, there are two channels. The opening above the firebox is covered with a cast-iron flooring. Laying is carried out on top of the flooring. The gap between the deck and the masonry (2 cm) is obtained by cutting off the edge of the brick. Leaning on the 10th row, the door of the cooking chamber (57 x 41 cm) is installed and fixed in this.
The 12th row is carried out in accordance with the order. Square channels are combined into one rectangular channel, the length of which is one and a half bricks.
In the 13th row, the formed rectangular channel overlaps to form two square ones (13 x 13 cm).
The 14th row is laid in the same way as the previous one.In it, a valve is installed that is used in the summer (during the period when the furnace does not need to be heated).
15th row - similar to the previous one (pay attention to the dressing of the seams). In the process of masonry, the valve is closed, a steel corner (50 x 50 x 5 mm) with a length of 62 cm is laid. At the level of the upper part of the frame of the installed door, the top of the cooking chamber is overlapped.
16th row - in order. In this row, in the process of masonry, the door of the chamber is blocked, in the latter a hole is laid out and a door is mounted in it (130 x 75 mm). Its purpose is to remove odors, fumes and steam, as well as to ventilate the cooking chamber.
17th row - according to the order. In the course of work, the installed door is closed, steel strips (50 x 5 mm and 50 cm long) in the amount of 2 pieces are laid above the top of the chamber. Subsequently, the top of the cooking chamber overlaps along them.
The 18th and 19th rows overlap the cooking chamber from above in such a way that on the left side of the oven there are two channels that have the shape of a square in projection.
After the completion of the masonry of the 20th row, only one channel with a square cross section remains. On this row, cleaning, a valve for the winter version of the furnace and a door for the samovar pipe are installed and fixed. On top of the overlapped cooking chamber (inside the masonry), a pair of bricks is installed on the edge. In this case, you need to step back from the front wall by 11 cm, and from the back - by 4 cm.
The 21st row is similar to the 20th (observe the dressing).
In the 22nd row, during the laying process, two square channels are again formed on the left side of the furnace. Installed latches and doors overlap. The brickwork inside the oven is ribbed in such a way as to form three longitudinal channels. The width of the middle canal is 5 cm, the two outer ones are 11 cm each.
23rd row - the square channels on the left side remain. Long channels running in the middle are covered with a transverse brick wall (the material is placed on the edge), forming two rectangular channels. Inside them, in turn, a brick is installed on the edge at the distance indicated in the 20th row.
24th row - similar to the 23rd (pay attention to the dressing of the seams).
The 25th and 26th rows are similar to the 22nd row (observe the dressing of the seams).
In the 27th row, leave only one square channel (13 x 13 cm) on the left side. At an equal distance from one another and from the walls of the furnace, three bricks are installed on the edge inside it.
28th row - similar to 27th. Pay attention to the dressing of the stitches.
In the 29th row, one square channel remains on the left (13 x 13 cm). From the front side (this is the front wall), having sunk 50% of their length inside the furnace, lay a couple of bricks, resting them on those that were previously laid on the edge.
The masonry of the 30th row overlaps the thermal chamber. A valve is installed in it, which closes the furnace as a whole. This valve is fixed over the square channel. The installation locations of the bricks are marked in the order.
31st and 32nd rows - according to the order. After completing the masonry above the heat chamber near the ceiling (above the stove top), you will have three rows. This adequately ensures fire safety.
The 33rd and 34th rows show the sequence of laying a pipe with a square section (13 x 13 cm) flue duct. Four brick masonry.
Second oven
Heating and cooking stove
The heating and cooking stove is heated both in summer and winter. Its mass without a pipe is 1900 kg. The furnace has the following dimensions: length - 1020 mm, width - 640 mm and height - 2240 mm. With two furnaces per day, the heat output of the furnace is 2800 kcal / h.
The heating and cooking stove is installed on a foundation, which is not brought to the floor level by two rows of brickwork. Between the 1st and 2nd row, two layers of roofing tar are laid. Waterproofing must be done at a level of 100 - 150 mm above ground level.
Materials for the masonry of the heating and cooking stove:
red brick - 400 pcs.;
refractory brick (you can replace it with selected red) - 70 pcs.;
grate grate 250 x 250 mm - 1 pc .; furnace door 260 x 205 mm - 1 pc .; blower door 260 x 140 mm - 1 pc .; cleaning door 130 x 140 mm - 2 pcs .; samovar door 130 x 140 mm - 1 pc .; door for the cooking chamber - 1 pc .; smoke valve 130 x 140 mm - 2 pcs .; cast iron plate - 1 pc .; roofing material for waterproofing - 1.5 m2; roofing steel for pre-furnace sheet 500 x 700 mm - 0.35 m2.
The sequence of laying the heating and cooking oven:
1st row - laid out in a square strictly horizontally.
2nd row - laid out in compliance with the dressing of the seams, starting with the installation of the blower door.
3rd row - laying is done in accordance with the order. The height of this row of masonry corresponds to the height of the blower door frame.
4th row - start laying on the right side of the oven. The cleaning door is installed.
5th row - the laying is carried out in the same way as the 4th row. Narrow the hole above the ash pan.
6th row - is laid out from ordinary, better refractory bricks. Grizzly
the lattice is installed on the 5th row of masonry, while the masonry of the 6th row on all sides of the lattice is not brought to it by 10 - 15 mm. This distance is necessary for the free expansion of the metal when it is heated during the heating of the furnace.
7th row - laid out in accordance with the order. The channel previously arranged in the form of the letter P is overlapped with masonry in such a way that three channels are formed: two square in half bricks and one in one and a half bricks. A combustion door is installed, which should rest on the 6th row and be fixed on it.
8-9th rows - differ from the previous one only by bandaging the seams.
10th row - laid out of refractory bricks as horizontally as possible, since cast-iron flooring will be installed on it. During the masonry, only two channels of a square cross section should remain with the overlapping of the combustion door. Against the firebox of the rear wall, two bricks protrude into the furnace by 20 mm, which is associated with the dimensions of a standard cast-iron stove for the cooking chamber.
11th row - is laid out from ordinary bricks. The same two channels remain on the right side of the oven. The opening above the firebox is covered with a cast-iron flooring, on top of which the masonry is laid. In order to leave a gap between the masonry and the flooring, the edges should be cut in the bricks. With the support on the 10th row, the door of the cooking chamber is installed and firmly fixed.
12th row - laid out in accordance with the order. Two square channels are converted into one, which is shaped into a rectangle one and a half bricks long.
13th row - laid out in accordance with the order, similar to the previous row. The rectangular channel is overlapped so that two square channels are formed in half a brick.
14th row - laid out similarly to the 13th row. In this row, a valve is installed, which is opened in the summer when the stove is not heated.
15th row - laying in compliance with the dressing of the seams, overlapping the valve. In the same row, sheet steel with a cross section of 50 x 50 x 5 mm, 620 mm long is laid, an overlap of the top of the cooking chamber is arranged, which is carried out flush with the top of the door frame.
16th row - the chamber door is closed, a hole is made in it, into which the door is installed, which is necessary for ventilation of the cooking chamber (removal of steam, burning, odors).
17th row - laid out in accordance with the order. The delivered door overlaps.Above the top of the cooking chamber, two steel strips with a section of 50 x 5 mm and a length of 500 mm are laid, on top of which the overlap of the top of the cooking chamber is arranged.
18-19th rows - overlapping the top of the cooking chamber. The laying is carried out in compliance with the dressing of the seams. Leave two square channels on the right side of the oven.
Rows 20-21 - laying is carried out in such a way that only one square channel remains. The cleaning is established. On the top of the covered cooking chamber from the inside of the oven (masonry), two bricks are placed on the edge, stepping back from the back wall by 40 mm, and from the front wall by 110 mm.
Rows 22-23 - laying is carried out in such a way that two channels of a square cross-section are formed on the right side of the furnace. Inside the furnace, the bricks are laid on the edge, while three longitudinal channels should remain: two extreme ones with a width of 110 mm and an average one with a width of 50 mm.
24-25th rows - laid out with bandaging of the seams so that two channels remain on the right side of the oven. A samovar door is installed.
26th row - laid out similarly to the 22nd row.
Rows 27-28 - the laying is carried out in such a way that only one square channel, 130 x 130 mm, remains on the right side. Inside the kiln, bricks should be placed on the edge and placed at the same distance from the kiln walls and from each other.
29th row - laid out so that one channel with a square section remains on the right side. On the side of the front and rear walls, two bricks are laid, extending inward half of their length.
30th row - the overlap of the thermal chamber is performed. A gate valve is installed to close the entire furnace as a whole.
31-32nd rows - laid out in compliance with the dressing of the seams. At the end of the masonry above the thermal chamber, near the ceiling, there should be three rows of masonry, which meets the fire safety requirements.
Further, taking into account the dressing of the seams, a pipe is laid out, the section of the smoke channel of which is 130 x 130 mm.
1-2 row laid out from a whole brick.
3-4 row- ash pan masonry.
C5 to 12 row- laying of the firebox. When firing a furnace with coal, refractory bricks are used. (lining inside the firebox).
5th row the grate is installed.
From 7 to 9 row - installation of a combustion door.
The firebox is laid along the perimeter with bandaging of the seams.
14, 15, 16 row - narrowing of the firebox masonry. Haylo masonry for gas outlet from the firebox.
From the 17th row- channel tab. The first ascending channel reaches the furnace ceiling.
Row 27-28 gases unfold from the overlap and through pass go down through two channels at once (indicated by the letter "N").
Go down up to 17 row and through curl fall into the second lifting channel, which leads to the exit of gases from the pipe.
From row 30 the laying of the overlap of the furnace begins with the filling of bricks.
32 row –Transition to the neck of the pipe.
⇐ Previous5
Recommended pages:
Heating stove with bottom heating, size 2250 × 510 mm
The heating stove has dimensions, mm: 2250x510x2480.
Material consumption (excluding the foundation and chimney) is as follows:
- red brick - 740 pcs.,
- refractory bricks - 40 pcs.,
- red clay - 25 buckets,
- refractory clay - 1 bucket,
- sand - 15 buckets,
- furnace door - 250 × 210 mm,
- blower door - 250 × 140 mm,
- smoke valve - 130 × 250 mm,
- grate grate - 380 × 252 mm,
- cleaning doors with dimensions 130 × 140 mm - 7 pcs.,
- pre-furnace sheet - 500 × 700 mm.
The stove can be folded by one stove-maker within 30 hours; in addition, it will take about 8 hours to prepare the clay-sand mortar and the materials to be brought in.
The heat output of the stove with a one-time firebox per day is 6 kW (5100 kcal / h), with a two-time firebox - about 7.1 kW (6100 kcal / h). The stove is designed to heat a room up to 60 m². Drawings of sections and ordering are shown in Fig. eight.
Fig. 8. Heating stove with bottom heating, size 2250 × 510 mm a - facade; b - sections A — A, B — B, B — C; c - masonry 1-6, 8 rows
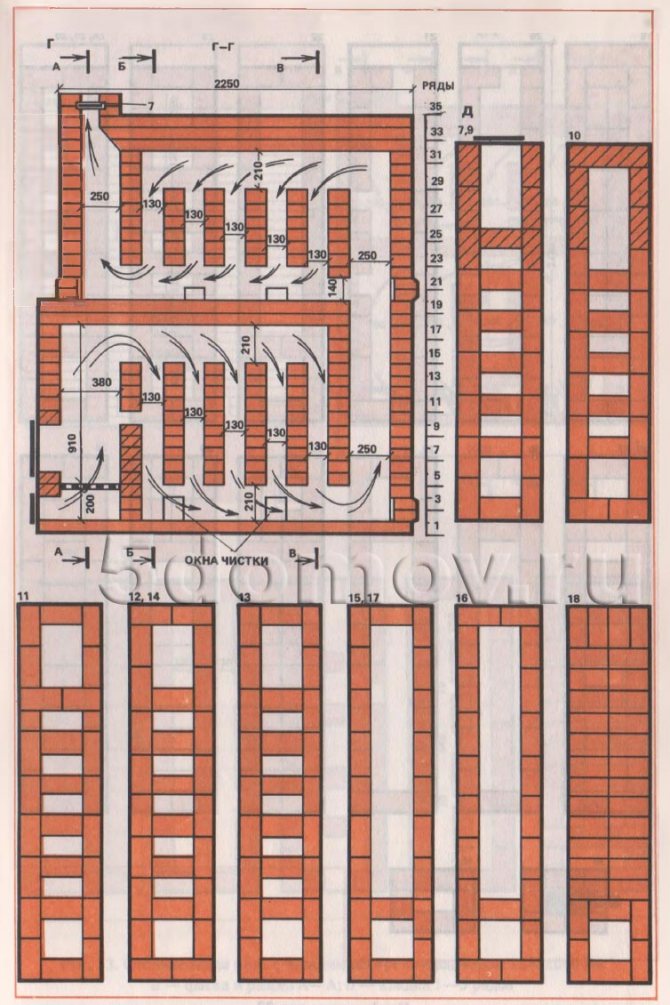
Fig. 8. Heating stove with bottom heating, size 2250 × 510 mm g - section G — G; d - laying 7 - 18 rows
Fig. 8. Heating stove with bottom heating, size 2250 × 510 mm e - masonry 19-36 rows
When laying the fifth row, it is necessary to strictly adhere to the order, since this row determines the main dimensions of the chimneys of the lower heating chamber. The twenty-third row also defines the main dimensions of the chimneys of the upper heating chamber.It is not recommended to reduce or increase the size of chimneys when laying subsequent rows.
Varieties of ovens
Heating stoves have significant differences in the duration of the furnace (long-term and short-term), as well as in the degree of heating (increased and moderate) and the amount of heat transfer.
A heating stove is a rather complex structure that requires an appropriate approach to construction and operation.
At the time of selection, it is necessary to pay special attention to such an aspect as the warming up of the lower part (it is this part that provides heating of the lower zone of the room). This is especially true for low-rise residential buildings in which the canopy and stairwells are not heated, as a result of which the floors are always cold. The most popular varieties can be folded by hand.
Warm-up classification

A moderately heated stove is used to heat two rooms with a firebox located in the corridor.
Moderate heating furnaces have walls that are usually at least half a brick thick. Thanks to this, they cool slowly and keep warm for a long time. However, it takes a considerable amount of time to warm up such a colossus. One or a maximum of two fireboxes per day will maintain a uniform air temperature. On the surface of the oven itself, the temperature can reach 60 degrees Celsius, which prevents dust from burning.
However, with all the advantages of this furnace, its use requires a foundation of special strength and a significant amount of building materials.
High-temperature furnaces have thinner walls (from half to a quarter of a brick).
Thanks to this, they warm up much faster, however, at some points on the surface, the temperature can reach 120 degrees Celsius, which, in turn, can lead to dust burning. The advantages of such furnaces include a small amount of material required for the manufacture of a furnace, as well as a relatively small area.
Classification by shape
The most popular options for heating stoves:
- rectangular;
- t-shaped;
- round.
Heating stove with bottom heating, size 1880 × 640 mm
The heating stove has dimensions, mm: 1880x640x2380.
Material consumption (excluding the foundation and chimney) is as follows:
- red brick - 950 pcs.,
- refractory bricks - 40 pcs.,
- red clay - 29 buckets,
- refractory clay - 1 bucket,
- sand - 17 buckets,
- furnace door - 250 × 210 mm,
- blower door - 140 × 250 mm,
- smoke valve - 130 × 250 mm,
- grate grate - 380 × 250 mm,
- cleaning hole doors 130 × 140 mm - 12 pcs.,
- pre-furnace sheet - 500 × 700 mm.
The stove can be folded by one stove-maker within 36 hours; additionally, it will take about 10 hours to prepare the solution and apply the material.
The heat output of the stove with a one-time firebox per day is about 5.5 kW (4700 kcal / h), with two fireboxes - 6.6 kW (5700 kcal / h). ^ The stove is designed to heat a room with an area of up to 55 m. All types of solid fuels can be used in this furnace. The grate is designed for using firewood, coal briquettes and peat briquettes as fuel. When using anthracite or coal as fuel in this furnace, the grate is laid with refractory bricks on the edge.
Drawings of sections of the furnace and orders are shown in Fig. 9. Arrows indicate the movement of flue gases in the chimneys of the furnace.

Fig. 9. Heating stove with bottom heating, size 1880 × 640 mm a - facade and section A — A; b - masonry 1-5 rows
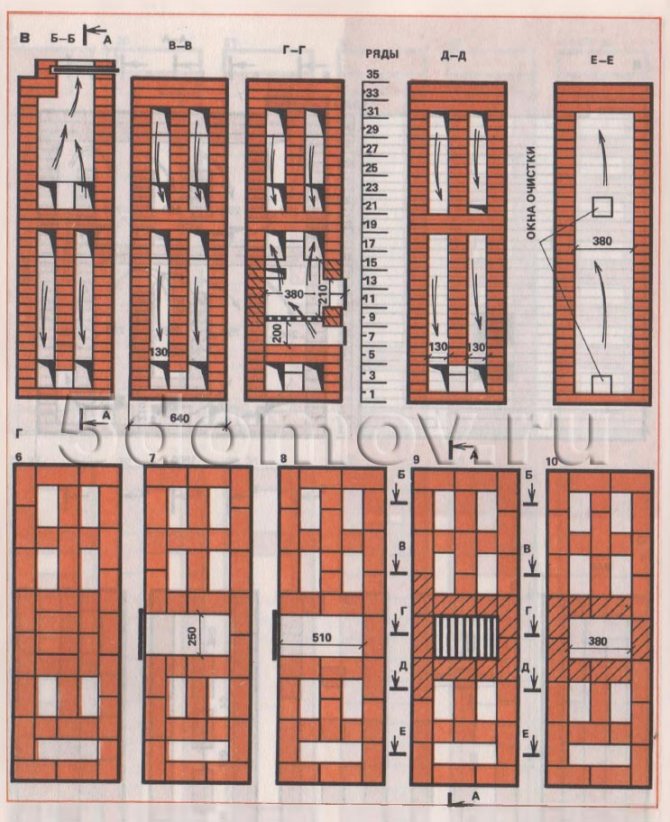
Fig. 9. Heating stove with bottom heating 1880 × 640 mm in size - sections B — B, C — C, G — G, D — D, E — E; d - smooth 6-10 rows

Fig. 9. Heating stove with bottom heating measuring 1880 × 640 mm d - masonry 11-28 rows
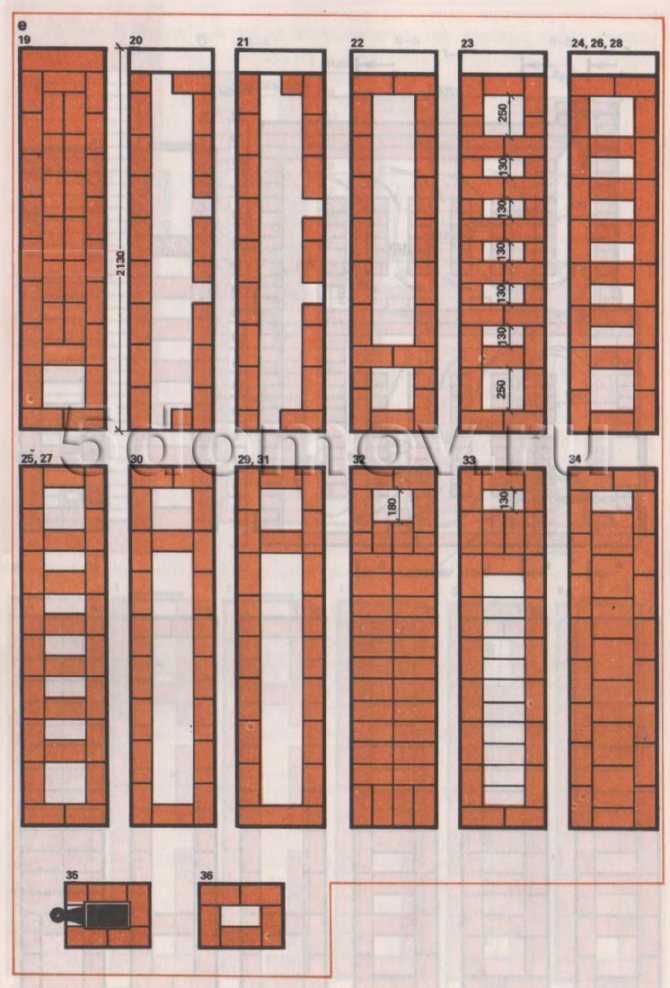
Fig. 9. Heating stove with bottom heating, size 1880 × 640 mm e - masonry 29-36 rows
The laying of the stove does not pose any particular difficulties, but first you need to study the drawings of the sections and the order of the brick laying well.
From horizontal (along A-A fig.9, b) of the section, it can be seen that there is a horizontal chimney under the ash pan. The firebox is lined with refractory bricks.
When laying the second row, you must strictly adhere to the order. The masonry of the fifth row determines the main dimensions of the chimneys of the lower heating chamber. The laying of the twenty-first row must also be carried out strictly in order, a chimney with a width of 130 mm is left at the vertical channel. The masonry of the twenty-fourth row also determines the main dimensions of the chimneys of the upper heating chamber. The rest of the rows of the oven masonry are similar to those of the previous ovens.
Choosing a furnace model
If there is a sufficient amount of theoretical and practical material on a narrow topic in the field of construction, few will miss the opportunity to save a certain amount of money and do the work on their own, because a brick-built cooking stove with their own hands eliminates the payment for the work of the master.
The construction of a furnace is a time-consuming and energy-consuming process. Everything is complicated by the preparatory stage, at which it is necessary to make calculations of the main parameters, determine the choice of the furnace model, and get acquainted with the project of this model.
Undoubtedly, the best practices from professional craftsmen make the tasks of self-construction much easier. All parameters, drawings, diagrams of various models are collected in a single document called a project. The novice wizard can only choose the most suitable projects for their tasks and use ready-made standard calculations. But even the choice of a finished model should be made on the basis of some criteria, and not spontaneously, as many people think who have never faced such a question as heating stoves.
Stove ready to start
Despite the fact that technical calculations are more related to the firebox and chimney, it is necessary to assess the dimensions of the furnace itself and the dimensions of the room in which it is planned to be installed. Bulky brick ovens for a home with a hob in a small room will look ridiculous. And the heating process will not become more efficient from this, because in order to heat a large structure, it will have to be heated longer. The size ratio can be found in Runet along with the project.
Good to know: Fireplace stove with oven, original design for home and summer cottages
The location of the stove will influence the choice of model. Ovens with a hob should be oriented so that cooking units open into the kitchen and the back and side walls heat adjacent rooms. But this is just practical advice and the owner has the right to choose where to fold the stove.
The ordinal masonry scheme presented in the project will allow the construction of one of three options for stoves: T-shaped, square or rectangular. The T-shaped device is installed in the center of the room, partially producing its zoning. It efficiently heats several rooms at once. This principle was implemented in peasant huts. First, a stove for the house was built, and then the frame itself was erected.
T-shaped version
The other two types can serve as island or wall models.
Stove ready for operation
The compact oven does not take up much space while being an efficient heat source. This model is designed specifically for summer cottages and small country houses. It allows you to warm up the room, adapting it for long-term living in the winter.