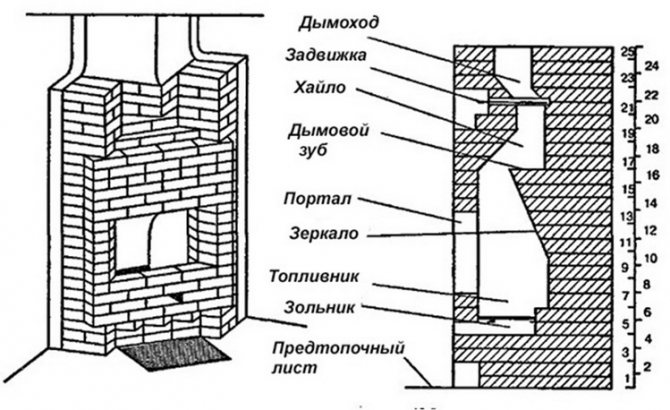
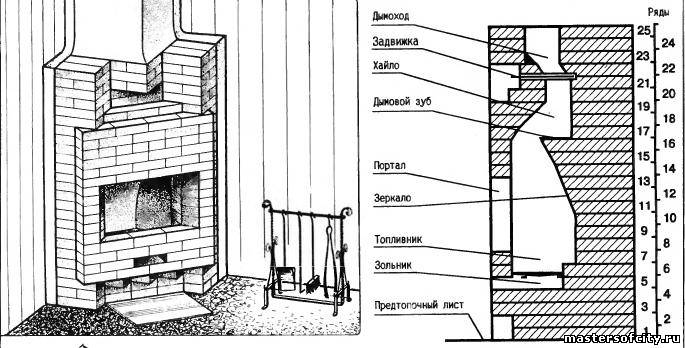
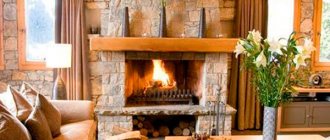
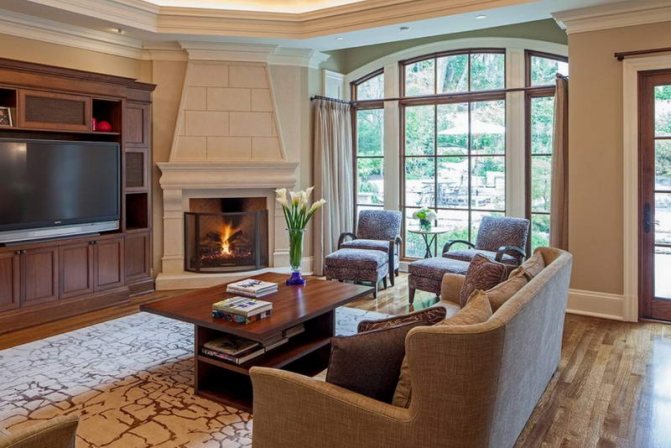
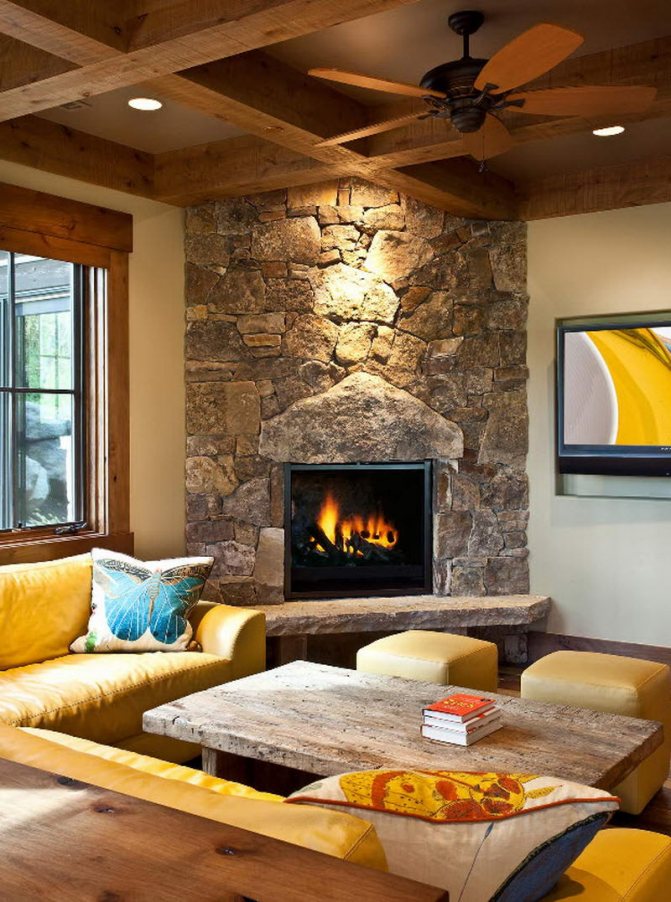
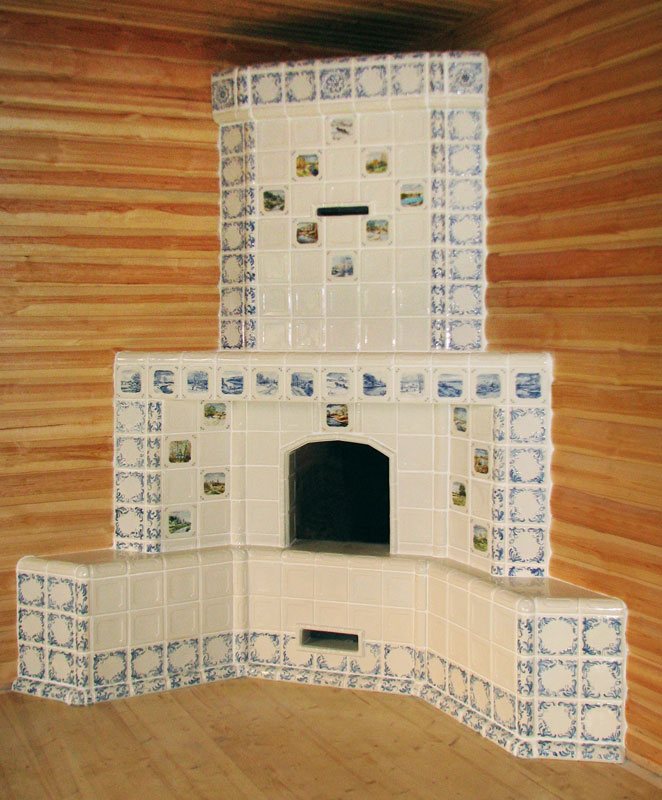
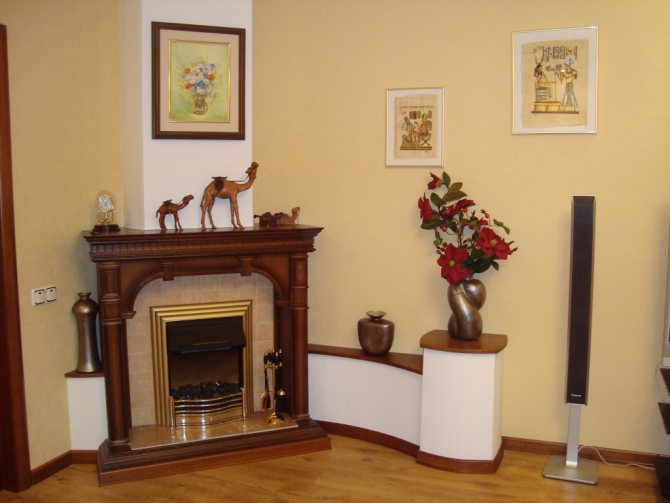
In the distribution of all models of fireplaces according to the way they are placed in the room, a separate group is made up of corner fireplaces. They are mounted along two walls in the corner of the room and can be in the form of a prism with a triangular or pentagonal base. Corner models are installed in small rooms in order to save space. In a large room, the fireplace located in the corner will be invisible.
The main advantage of the described model is that the room is visually perceived as large and spacious. The fact is that the line of intersection of the planes of the walls (angle) determines the dimensions of the room. The body of the fireplace hides this corner, so there is an illusion of increased space.
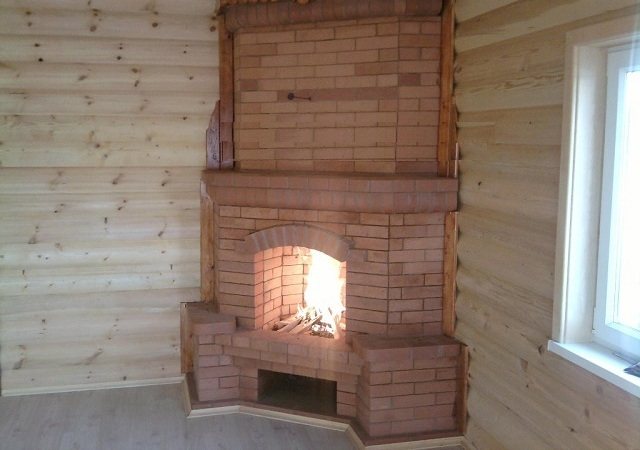
In the internal arrangement, corner fireplaces are no different from wall fireplaces of the same type. Among all the options, brick fireplaces are considered the most popular. Fans of original design are increasingly leaning towards the classics when choosing a hearth. A brick corner fireplace satisfies the needs of consumers. In addition, construction work can be done independently, with your own hands.
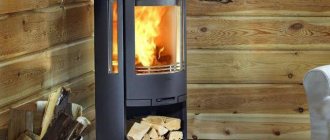
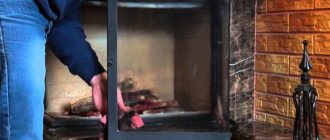
Ready hearth
Project preparation
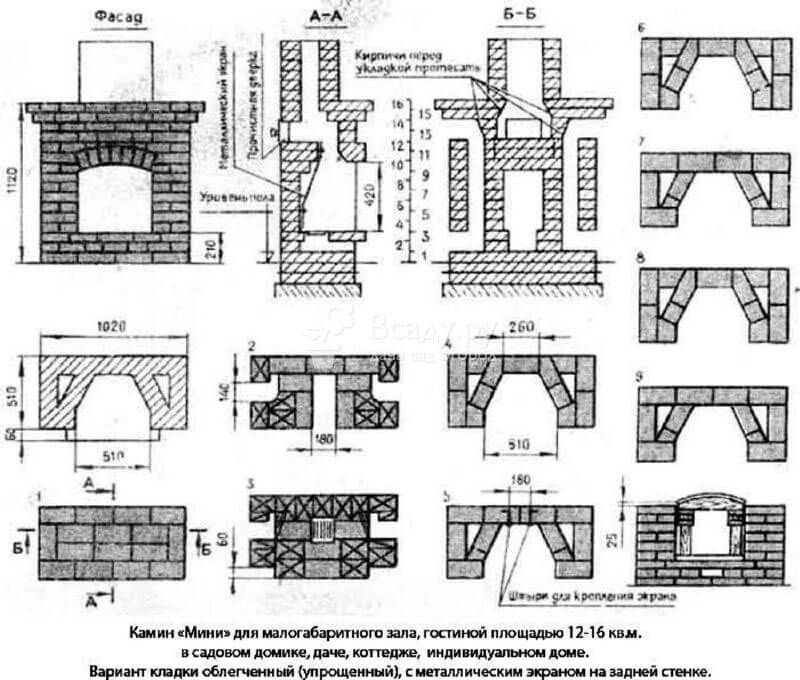
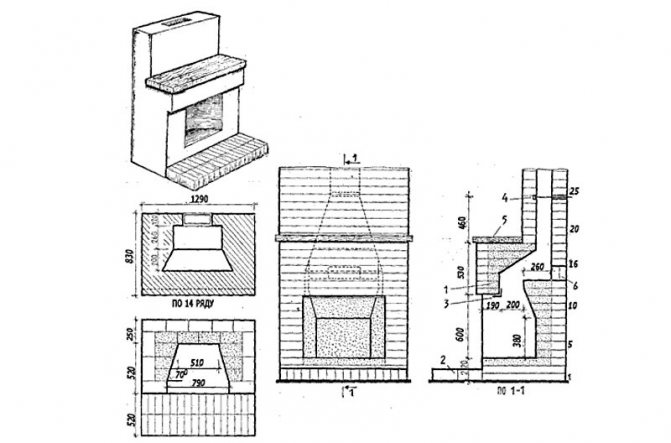
To build a corner fireplace with your own hands, you need to develop a series of instructions that will determine the course of work. Such instructions are called a project. It includes a description of the model, the tools and materials used, drawings of the fireplace in different planes, as well as a detailed diagram of the laying of the fireplace body.
Ready-made projects, which were developed by professional craftsmen, allow you to build a fireplace of any complexity. To use them, you need to choose the option that is suitable in appearance and performance. Many resources that specialize in matters of fireplace and stove masonry provide paid projects for personal orders.

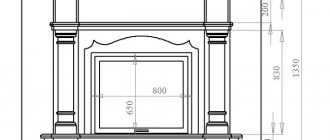
Drawn model of the fireplace
Self-preparation includes calculations of the main dimensions of the fireplace. Oddly enough, but these dimensions do not include external dimensions. Let's list the basic requirements for the device.
- For efficient combustion of fuel and ensuring the removal of products, a pressure difference in the chimney is required. Good traction is a direct indicator of the correct execution of all installation work.
- The fireplace heating functions must provide enough heat to fill the room with warmth within an hour.
- The released heat should be directed into the room, and not removed through the chimney to the outside.
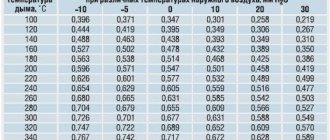
The implementation of all these requirements is possible with a competent combination of the dimensions of the fireplace insert with the dimensions of the heated room. There are ready-made tables in which the parameters of the furnace are indicated, which, according to a certain mathematical formula, depend on the linear dimensions of the room. It is necessary to choose the most suitable area value and use tabular data. If this is not possible, then all the calculations will have to be done independently.
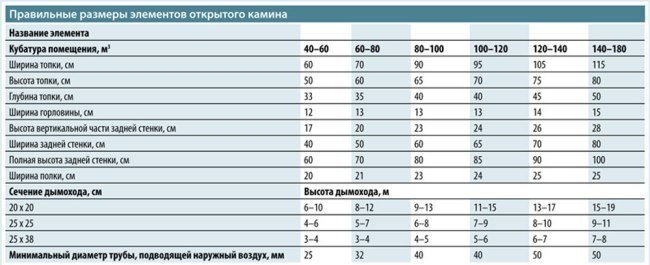
Example of a table with the dimensions of fireplaces
To calculate the basic dimensions, you need to remember a few elementary formulas. The area of the furnace hole = the area of the room: 50. In a strict sense, this formula should establish the dependence of the area on the volume of the room, because the height of the room significantly affects the amount of energy for heating. The specified calculation option assumes a certain power reserve.
Good to know: How to build an outdoor fireplace with your own hands, a brief educational program
For the specific dimensions of the chimney opening, you will have to solve a simple equation and choose the height and width, which, in a fractional ratio, are determined by the proportion of 2: 3. The specific results obtained are used to calculate the depth of the firebox, which is 2/3 of the height of the opening.
The next knot to be calculated is the chimney. Here, it is not so much its length that is important as the size of the part protruding above the roof of the roof. With sufficient distance from the ridge, you need to use the following rule. The line drawn through the ridge and the top of the chimney makes an angle of 10 ° with the horizontal line. Naturally, such a principle will give very approximate results, since it is not possible to measure this angle exactly without special devices.

Corner fireplaces in the design of the living room
Posted December 22, 2014
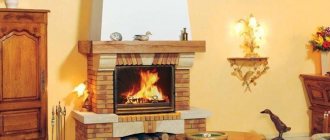
Corner fireplaces vary in shape, model, size, material. In modern society, they are used as much as possible in houses and apartments.
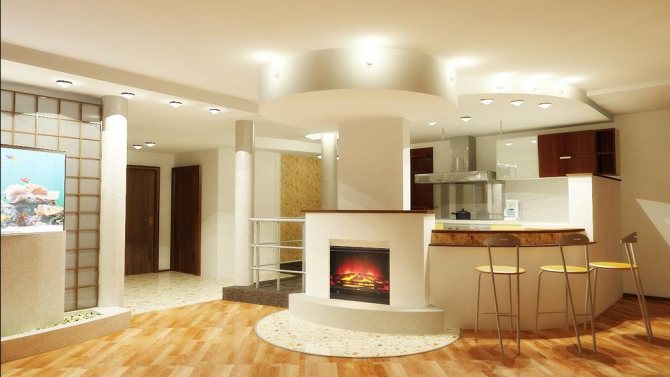
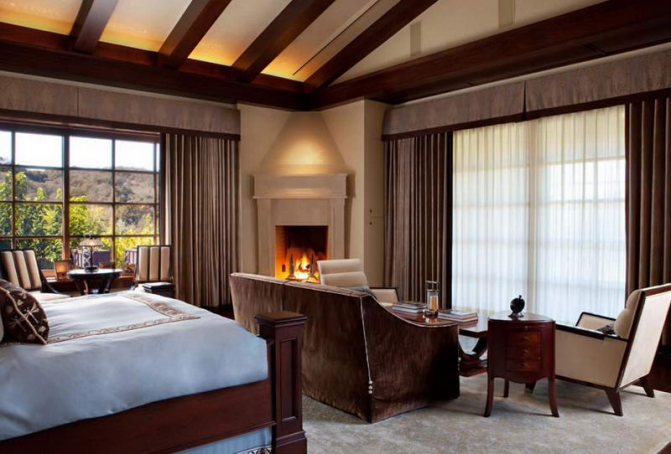
Corner fireplaces are very technological, simple and comfortable. Angular fireplaces are compact, take up little space, ideal for living rooms of apartments.
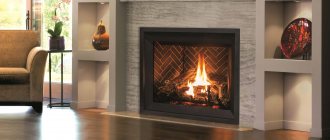
This source of "living warmth" emphasizes the good taste of the owners, the sophistication of the interior, the value of traditions.
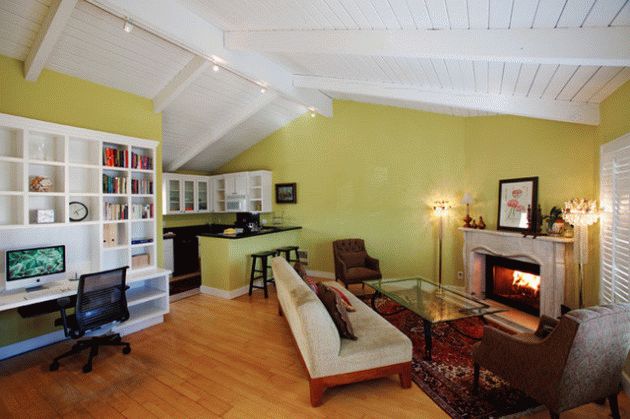
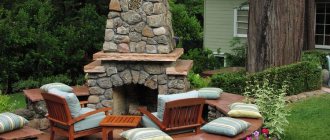
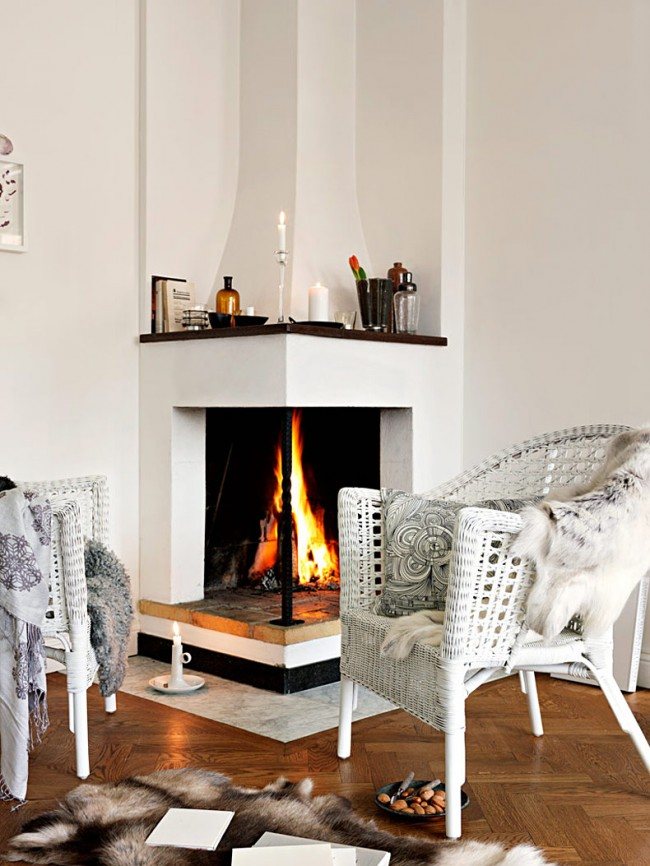
Photo: symmetrically located lighting near the fireplace will add originality to the design of your living room
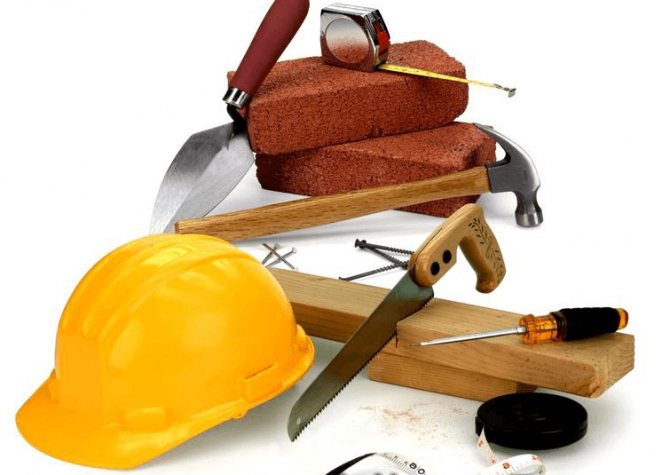
Material preparation
The preparation stage determines the pace of subsequent work. If you carefully prepare for the construction of a fireplace, then all other work can be done without distraction. As the material necessary for the construction of a brick fireplace with your own hands, red refractory bricks are used. But the firebox itself, where the direct combustion of firewood will take place, is lined with fireclay bricks. In addition, you can make a list of additional materials.

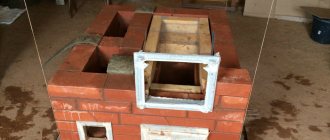
A small structure to create comfort in the house
- Roofing material, it is necessary to ensure waterproofing of the foundation.
- Reinforcing mesh or other suitable material for pouring the foundation.
- Metal corners that provide overlapping of the firebox.
- Sand, clay, cement or ready-made mixture for laying ovens.
- Chimney damper and blower door.
- Materials for exterior decoration.
For the construction of different parts of the fireplace, a solution of different composition is required. The foundation is poured with a mortar of cement and sand. The proportion of cement here can vary from half to a quarter. The masonry of the firebox and fireplace body does not imply the use of cement. Clay and sand in fractions 1 and 3, respectively, form a refractory composition. When building a chimney, cement and lime are added to a similar solution.
The preparation of clay mortar is a whole art. First, you need to choose the right kind of clay that has a normal fat content. After that, the clay is soaked, crushed and mixed with sand. To save time, it is advisable to use a ready-made mixture. Even professional craftsmen today no longer resort to self-preparation of clay-sand mixtures.
Good to know: Which brick to use for facing the fireplace, choose the appropriate option
Brick fireplace masonry
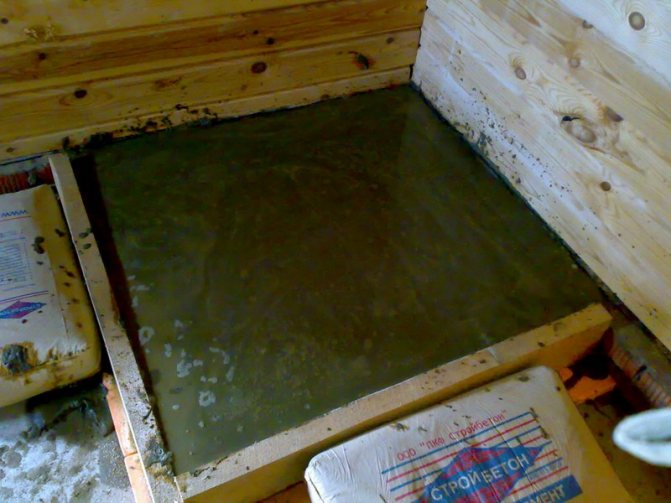
Fireplace construction work begins with laying the foundation. A separate foundation is laid under the fireplace. We make the dimensions of the basement area 6 cm larger than the basement of the fireplace.
Foundation
- Dig a hole for the foundation 10 cm larger than the dimensions of the finished foundation and up to 60 cm deep.
- At the bottom of the pit, fill in crushed stone with a layer of up to 15 cm.
- Install wooden formwork and treat the inside with bitumen.
- Lay stones, broken bricks and rubble.
- Fill with a mortar made of cement and sand in a ratio of 1: 3. The solution must be thoroughly mixed and uniform.
- Level the completely poured foundation and make the horizontal control.
- Cover the foundation with foil and let stand for a week.
Fireplace masonry
Three days before starting work on the laying of the fireplace, you need to soak the clay by adding water in small portions so that the solution is not too thick. The quality of the masonry depends on the quality of the prepared solution. The finished clay pulp is poured into washed dried sand and thoroughly mixed to a thick jelly. Small sticks up to 15 mm thick are rolled from the finished mixture. With excellent quality of the solution, the sticks will not disintegrate and stick to the hands.
Calibrate the bricks carefully. Lay waterproofing on the finished foundation, it can be roofing material, covered in two layers.
Everything is ready for work and you can start the main stage of work.
For laying the first row, add up to 30% of the bulk of Portland cement to the solution. The compiled order is kept next to them in order to periodically check the accuracy of work. After laying the row and making a check to maintain the geometry of the planned structure, you need to put a mark in the project. The laying of a fireplace structure is a painstaking work, and such control will greatly simplify the task set before itself.
A trowel or trowel is used for laying continuous rows. It is better to lay the firebox and smoke box by hand. The seam thickness should not be more than 5 mm. Spread the mortar in the middle of the brick in such an amount that it does not go beyond the edges of the brick.
The laying of the firebox, smoke box and ducts is carried out with great care. Excess solution must be removed
It is very important to remember that these elements of the fireplace inside do not lend themselves to plaster.
For a beautiful high-quality masonry of a curved vault, you need to install a circle - a temporary formwork. Having laid the first brick in the middle of the vault, continue laying in both directions.
Chimney installation
check its verticality. wipe with a cloth soaked in liquid clay
It will be much easier to carry out work related to the installation of a chimney if you use special pipes in the chimney. These can be chimneys made of ceramic pipes, modular stainless steel, thin-walled structures made of acid-resistant and heat-resistant steel.
Installation of metal elements
During the installation of the fireplace structure, metal fittings are placed in the seams, leaving gaps of up to 8 mm. It is undesirable to lay a lot of metal elements in brickwork, but you will not be able to do without them at all. A fireplace insert and a view must be present.


The frames of the firebox and valves are not attached with anything, they adhere perfectly to the prepared solution. The valve is installed at a height of 2 meters.
Decorative finishing
grouting.
If, nevertheless, you have a desire to start decorating the fireplace, use special smooth or patterned tiles for cladding that can perfectly adhere to the hot surface of the fireplace.
Today, you can purchase portals from manufacturers of fireplaces made from natural materials of various qualities. It can be travertine, marble, stone. Ready-made portals will be able to adequately decorate the fireplace you have folded and give it even greater uniqueness and beauty.
An excellent addition to the fireplace will be a special fireplace set made of non-ferrous or cast iron forged metal. The sets always include tongs, a hook, a broom and a scoop. A beautiful and practical screen can protect the carpet spread by the fireplace from accidentally falling coal.
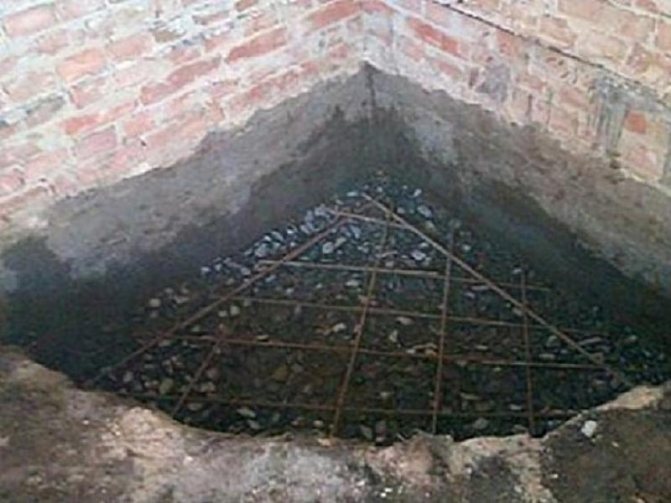
Foundation
A brick fireplace must be built on a solid foundation, but even a concrete slab that is installed for cast iron models will not work as such. Here it is necessary to build a full-fledged foundation with a pit. It was necessary to think about this even during the construction of the house.Therefore, if you decide to build a fireplace in a finished house, you will have to raise the floor in order to carry out work there.
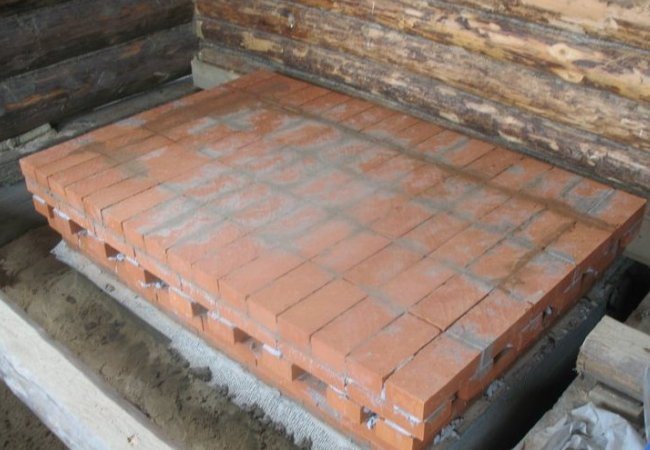
An example of a well-made foundation
The area of the foundation pit should be slightly larger than the area of the fireplace body. The depth of the pit can vary in the depth range of 0.50-0.70 m. The exact value depends on the version and model weight.
Sand is poured at the bottom of the pit, and crushed stone is poured on top. In order for this composition to be tamped tightly, it is watered with water. On top of the crushed stone, metal structures are installed, which will play the role of a reinforcing element. The foundation is poured in several layers. The bond between the layers is carried out with a special mesh. With the help of wooden formwork, the foundation is brought to the floor level. Once dry, it will be ready to build a fireplace.
Self-made corner fireplace
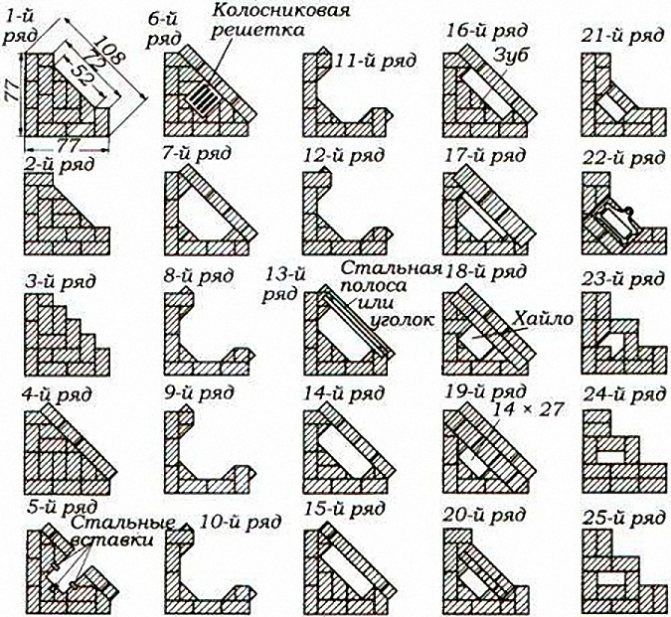
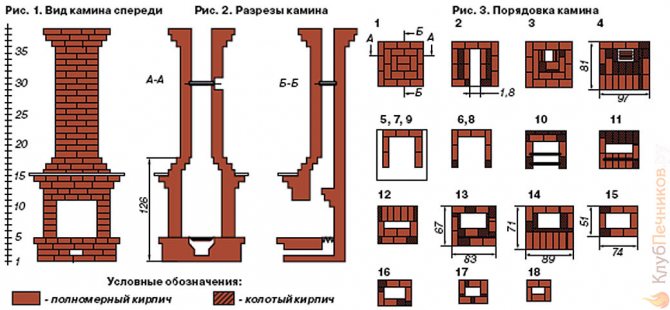
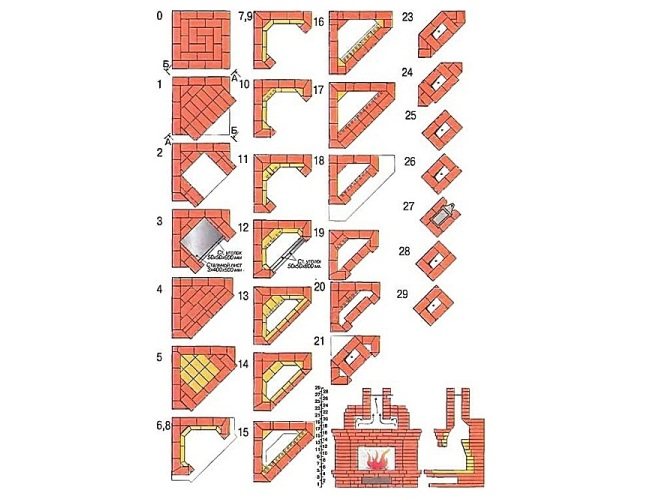
Before erecting a fireplace, it is necessary to make an ordering diagram on an A4 sheet. Ordering is a clear sequence of work on laying out a fireplace. It should always be in front of your eyes, so as not to get confused in the rows and clearly know where to lay whole bricks, and in what places - halves or quarters. Laying a corner fireplace is a common building process. The only feature is the creation of thinner seams, since in this case the structure will better retain heat.
Without ordering, even a specialist will not undertake the laying of a fireplace
Features of making the foundation
A corner fireplace, like any stove, must have its own foundation, independent of the foundation of the residential building. The sketch of the foundation is combined with the drawings of the firebox and pipe. When creating a pipe scheme, it is necessary to take into account its location relative to the existing rafters and beams (contact of the pipe with the structural elements of the roof is unacceptable).
Foundation construction consists of several stages:
- We dig a foundation pit about 60 cm deep.
- We lay down a 10-centimeter layer of crushed stone and tamp it.
- We make the formwork from wooden panels, process it with bitumen or cover it with a layer of waterproofing material and install it on the bottom of the pit.
- We put large stones on top of the formwork, fill the gaps between them with rubble.
- Fill with a layer of rubble, consisting of 1 hour of cement, 3 hours of sand and 5 hours of crushed stone and level the surface. The level of the rubble should be below the floor level by the thickness of one brick.
- Pour water and tamp the surface again.
- Cover with plastic wrap and leave for a week.
To achieve increased strength, the foundation is reinforced with reinforcement. After the required time has elapsed, we remove the formwork and begin laying out the brick fireplace according to the ordering drawing.
A corner fireplace, like any stove, must have its own foundation.
Laying the base of the fireplace
The section of the fireplace located under the firebox is called the base. Before starting its construction, on top of the foundation, we arrange a two-layer waterproofing made of roofing material or impregnated roofing cardboard. Lay the sheets of material with an overlap. 72 hours before starting work, the clay should be soaked, gradually adding water to the clay solution and stirring well. First, we put the bricks without mortar (we grind them) and, if necessary, adjust the dimensions in accordance with the diagram.

First, we put the bricks for the base of the fireplace without mortar, that is, we carry out their grinding
The construction of a corner fireplace begins with the laying of the first three rows of bricks, observing their compliance with the brickwork module. The first row aligns the foundation with the floor level. The size of standard bricks for fireplaces is 25x12x6.5 cm.The seam between them should be no more than 0.5 cm.The first rows, which represent the fundamental base of the fireplace, are laid out to the level of the firebox, and then the bricks are laid according to the plan with layer-by-layer order.
If you want to make the fireplace as safe as possible, equip the firebox with a door made of durable cast iron. And if you build a small window of fireproof glass in the door, then through it you can observe the tongues of flame.
During work, it is necessary to check the plan quite often so as not to get confused in the features of the masonry. You should also chalk each row you place.
The construction of a corner fireplace begins with the laying of the first three rows of bricks
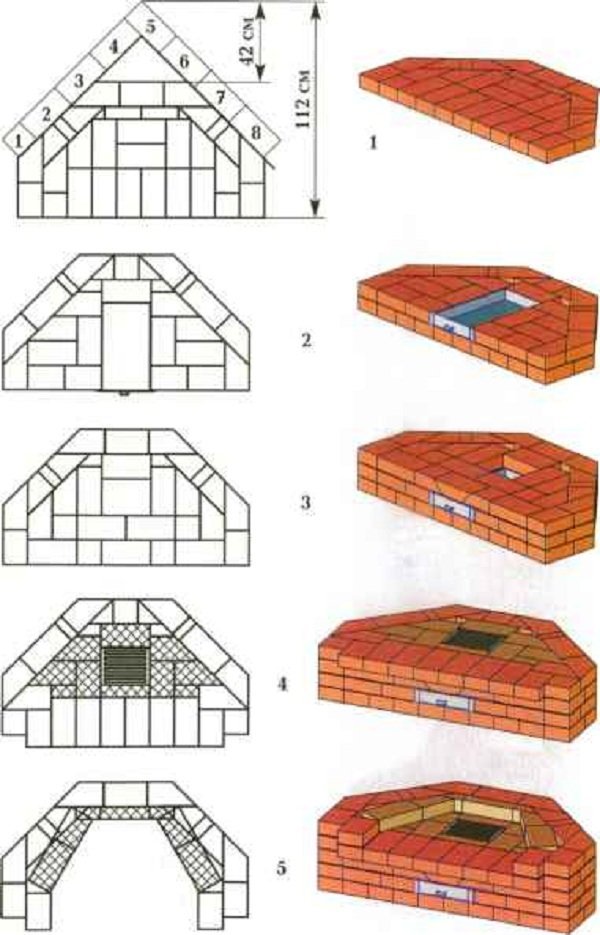
Features of the layout of the firebox
After the third row, we proceed to the construction of the firebox. Its base is located above the floor at a height of about 25-30 cm. This configuration will make your fireplace as easy to use as possible. To increase the efficiency of a corner fireplace, a layer of reflective heat-insulating material should be laid between it and the wall of the house.
- From the fourth row, the construction of the hearth begins. It is laid out in full, like the first three.
- On the fifth row, the ash pan is laid out. At the same time, supports for the grid are placed.
- The sixth row forms the bottom and fixes the supports, and the grate is directly mounted on the upper bed of bricks.
- The bottom flashing of the firebox starts from the seventh row.
In some schemes, the ash pan is arranged in the third row, and the grate is placed on the fourth row of brick blocks. Accordingly, the whole order is changing. When laying the fifth row, the bricks should be pushed forward a little, forming an overlap.

The base of the firebox is located above the floor at a height of about 25-30 cm
Features of the formation of the portal
The walls of the fireplace (portal) are laid out from the eighth to the thirteenth row. In this case, you should bandage the seams and put the corners. The outer wall of the fuel portal is not tied, as this can cause deformation due to the temperature difference.
Operating procedure:
- From the eleventh row, laying from the back wall should be done at an angle, forming a so-called mirror. The corner of the back wall is leveled by a metal screen mounted in the masonry.
- In the fourteenth and fifteenth rows, we continue to bandage the seams taking into account the portal overlap and continue to raise and tilt the mirror.
- In the sixteenth row, we finish laying out the mirror and proceed to lifting the upper part of the fireplace tooth with an inclination of 20 degrees. From the side of the chimney, it must be coated with clay to reliably protect the structure from burning out. The construction of the chimney tooth continues for two more rows.
- For laying out 17-19 rows (fireplace facade), bricks are taken with an edge chipped towards the high, or they are placed with a projection of 5-6 cm. In the nineteenth and twentieth rows, to narrow the firebox, the bricks must be pushed forward a little.
- The portal opening should be closed with brick lintels, which are laid along the circle, which rests on the racks during operation. If this is provided for by the design, a cast-iron door is installed.
- In front of the chimney, a mantelpiece with straight brickwork is being built. Then the oven grate is installed.
The walls of the fireplace (portal) are formed from the eighth to the thirteenth row
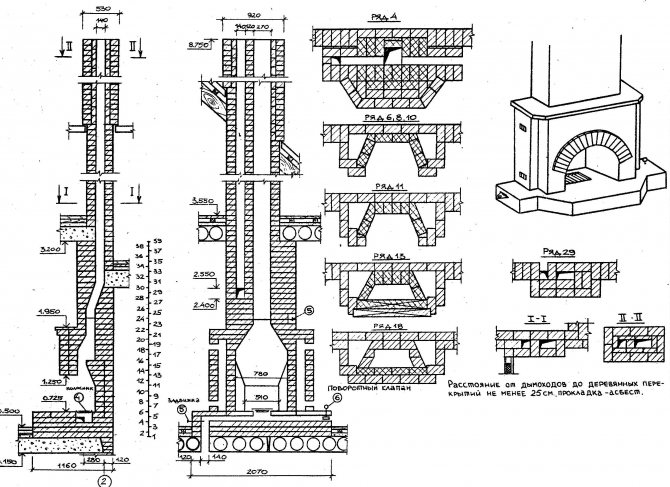
Features of making a chimney
From the nineteenth to the twenty-second row, a chimney is formed, the dimensions of which were determined earlier. This part of the fireplace is shaped like a bell, inside of which there is a steel pipe that turns into a chimney. Ceramic chimney blocks can be used instead of a steel pipe.
- The vaults are laid out with gradual overlaps of bricks - 5–6 cm in each subsequent row, the back wall is vertical, and the side walls are tapering at an angle of 45–60 °. The height of this part of the structure should be approximately 5 m from the burning surface of the fuel. To reduce heat loss, the walls of the chimney must be fairly thick.
- On the 22nd row, the fireplace valve is being installed, the frame for which is fixed in the masonry with a liquid solution.
- In the next row, a dovetail-shaped smoke hole is formed.
- The stacking of the smoke box is completed after the 24 rows have been laid.
- Experienced craftsmen lay out the chimney with their bare hands, without the use of tools. This is done so that small fragments of brick and foreign particles that can be brought along with the solution do not get inside. The pipe is brought out to the roof using the same mortar that was used to form the basement.
- At the intersection of the chimney with the roof, an otter and fluff are arranged, that is, the chimney is cut. The gap between it and the body of the fireplace is called a neck, a valve is mounted in it. In height, it should be at least three rows of masonry. The height of the fluff is 26–38 cm, and in the place where it is arranged, the neck expands.
- The riser is laid out to the roof, and then a second fluff is arranged, called an otter. It should overhang the top roofing material by about 6-10 cm. The size of the pipe above the otter should be selected in accordance with the main riser.
- The chimney installation begins with the installation of the block above the chimney. The openings of the pipe and chimney are connected with cement mortar. Anchor connections are used to fasten the brickwork to the pipe. They are inserted between the outdoor pipe blocks and sealed in the seams between the brick blocks. There should be no gaps on the inner surfaces.
- The head of the pipe is laid out with a thickness of at least 1 brick. To reduce the accumulation of condensate in the chimney duct and prevent the structure from catching fire, it is necessary to install thermal and thermal insulation.
- A conical spark arrester is installed on top of the pipe (to protect the fireplace and residential building from fire) and a deflector with a round section (to increase traction and protect the pipe from wind).
During work, it is necessary to check the ordering plan quite often so as not to confuse the rows, and also to monitor the density of the masonry.
At the intersection of the chimney with the roof, an otter and fluff are arranged
Masonry
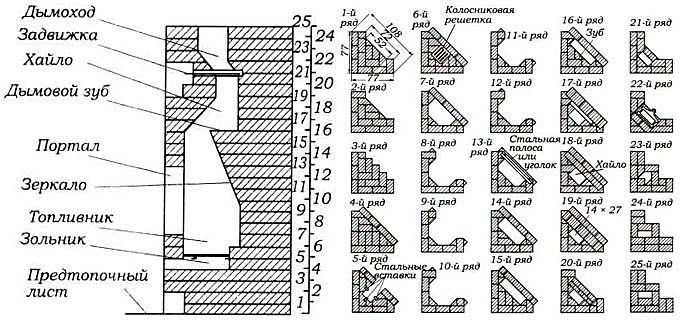
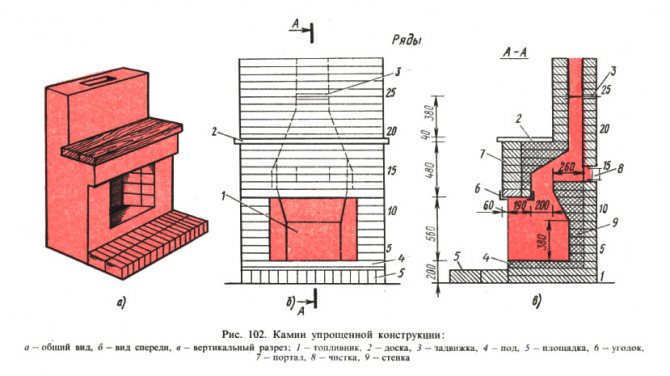
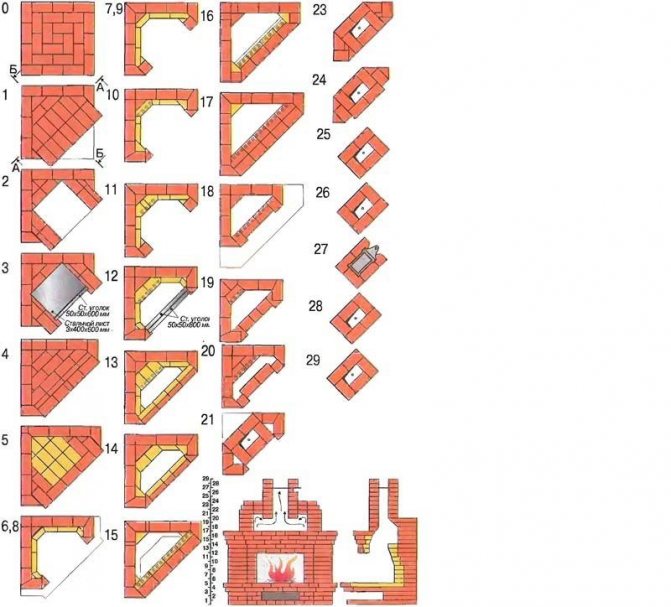
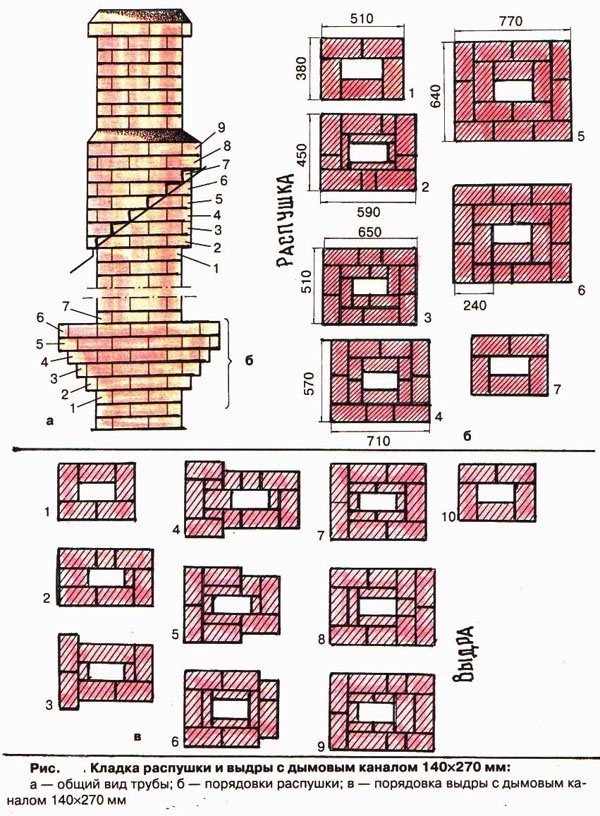
A layer of roofing material is laid between the first row of the base of the fireplace and the foundation. Further, strictly according to the project, in which there is an ordering, the laying of the fireplace is carried out. Ordering is a step-by-step instruction that allows you to work based on previously developed schemes that have proven themselves on the positive side. We do not set ourselves the task of covering all existing projects, there are other resources for this. We will consider the simplest version of a corner fireplace, which even an amateur in the stove business can handle.
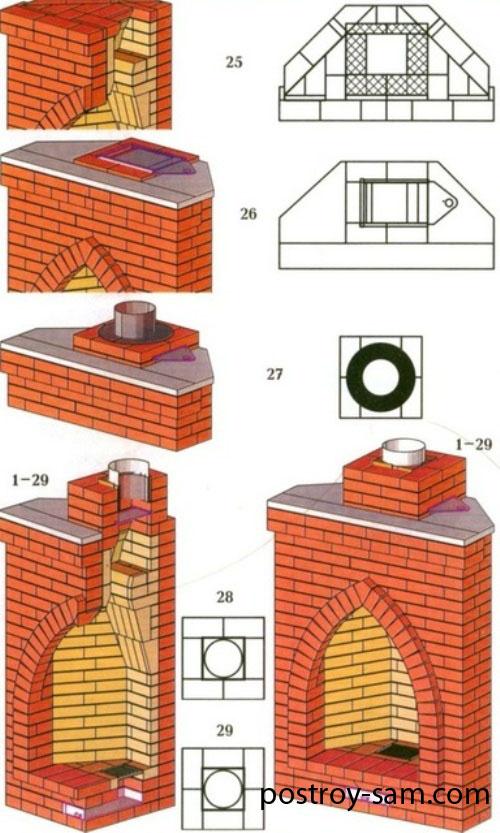
Simple ordering
Note that the first row is square. Lay it out, carefully checking the levelness of the level. This condition must be met. Laying bricks should be done using all the binding rules. Before making a new row, lay it out without using mortar. This method will allow you to process bricks, if necessary, without dismantling the masonry.
Good to know: Installing a fireplace in a wooden house, the main stages of work
It is convenient to present a commentary on construction in the form of a list of types of work by rows:
- 1 - the formation of a horizontal base. If you do not maintain the level, then deformations of the structure are possible, leading to a violation of the integrity of the masonry.
- 2 - the opening in the diagram is a section for storing firewood. In our model, it plays, rather, a decorative function, since it will turn out to be rather cramped.
- 3 - the overlap is made of a metal sheet.
- 4 - overlapping with brickwork is duplicated.
- 5 - a compartment for fuel combustion begins to form from fireclay bricks.
- 6-8 - construction of the firebox. The color shows the use of fireclay bricks when laying out the walls of the furnace.
- 9-13 - the formation of a smoke tooth is observed in the corner. All other elements are duplicated.
- 14-17 - there is a displacement of the masonry from the front side. This is a way to form a mantel.
- 18-20 - the chimney opening goes into the chimney channel.
- 21-29 - chimney channel.
- 27 - installation of the gate.
There is no continuation in the diagram for the construction of the chimney pipe itself. In various ways of presentation, it can be made of brick or have a circular cross-section, since a metal pipe is used.
When ensuring the passage of the smoke channel through the ceiling, it is necessary to protect the surface from the effects of temperatures. Choosing combinations by color, style and, of course, by purpose, you can use asbestos sheet or mineral wool slabs.
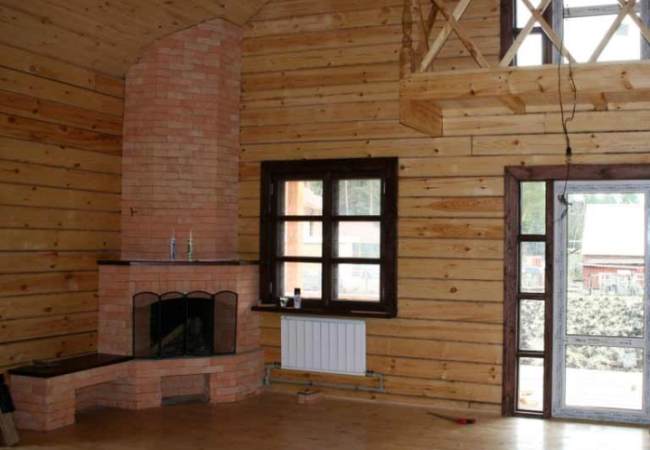
Ready-to-use building
The chimney is lined with an insulating substance around the perimeter. A similar manipulation must be carried out when the pipe is removed through the roof. The task is complicated by the fact that it is necessary to ensure tightness so that during the rain water does not penetrate into the attic. This task will be greatly simplified by the use of modern sealants.
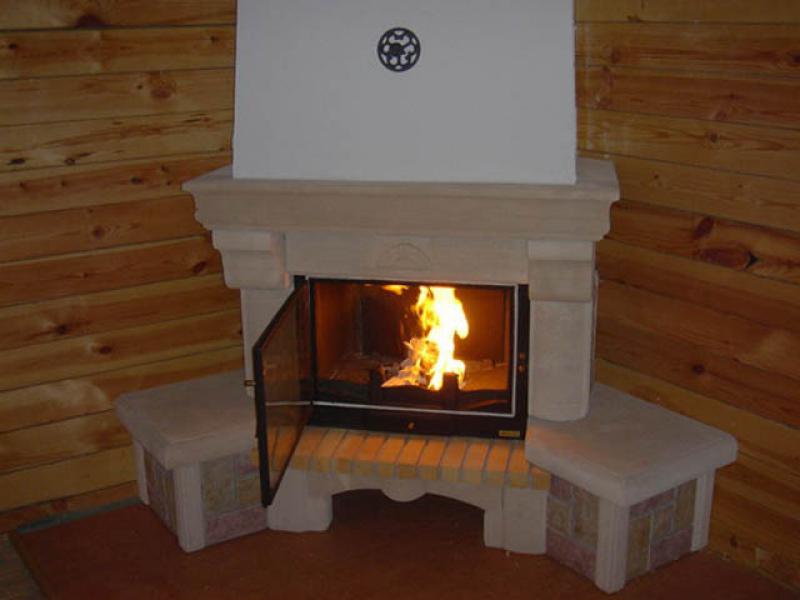
Mantel
A corner fireplace is a decoration for your home. He will always be in the spotlight. Therefore, it is necessary that it not only works properly and gives you warmth, but also be visually attractive. For this, there is a finish. But now there is such a huge amount that it becomes difficult to opt for one thing. Let's deal with all these types.
Plastering
Plastered and painted corner fireplace in the interior
Of all the existing cladding options, plaster is the simplest. By adhering to the following rules, you will be able to do everything yourself:
- Plastering should only be started when the entire structure is completely dry.
- To avoid cracking, wait a little more until shrinkage occurs.
- Prepare the surface and deepen the seams. Layers of finishing material should be no more than 1 centimeter.
- Paint the surface with heat resistant paints.
- Plaster only on the material on which the brick was laid for better adhesion of the elements.
Tile
Here is such an unpretentious drawing obtained using tiles of different colors.
Tiling is more difficult, remember this. And if you are not confident in your abilities, then trust the specialists.
Tips for tiling:
- Check quality certificates for tiles before purchasing.
- Check for instructions that describe the modes of use of the elements. Often, modern materials can be used only at positive temperatures, and they are not adapted to frost. This applies to rooms with intermittent heating or open verandas.
- Prepare the tile base correctly so that its durability will please you.
Stone cladding
A very popular option due to its environmental friendliness and durability.
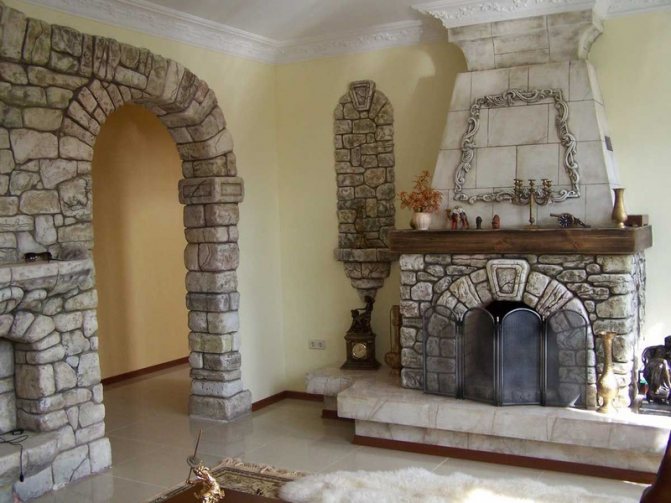
Stone cladding in the same style as the interior
How not to ruin everything:
- Make a stone layout first on the floor, adjust all dimensions to fit your fireplace. And only after that fasten it.
- The thickness of all parts must be different. This will give a more natural look to your fireplace.
- Wax the surface. This will make it possible not to think about the restoration, in contrast to the lacquer coating, which performs an exclusively decorative function.
Marble
This variation is considered a classic of the genre. Due to the fact that it is igneous rock, it copes well with temperature extremes. It is durable and environmentally friendly. Has a large selection of colors. Requires good polishing.
Facing with marble is a rather complicated process, since it is difficult to cut it into the desired pieces. But its laying is the same as for tiles. Only the adhesive is different. There are special high-strength adhesives for marble.
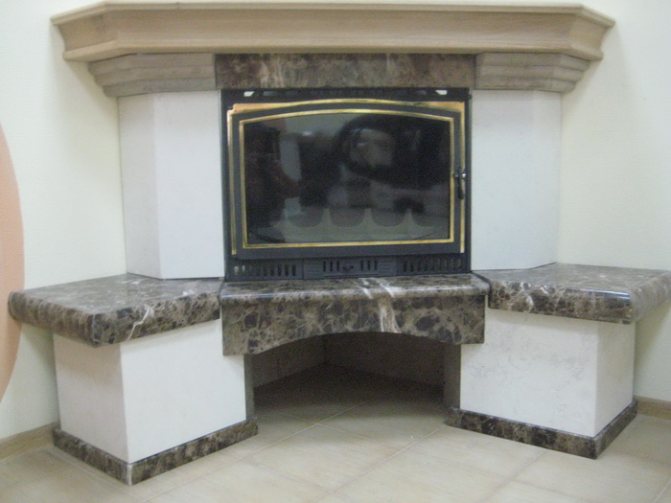
The marble finish of the fireplace gives it a special grace and rich look
Brick
Brick installation can be financially costly.This cladding option is better for those who already have an old structure that needs to be restored a little.
- Do not use hollow elements. Purchase brand materials from M150. Ideally adding fireclay to bricks for high temperatures.
- Do not brick the top of the fireplace. Better use a stove.
- The weight of such a structure will be very large, make sure that the foundation is strong.
Wood
This cladding option is not safe when using open fire. Therefore, it is better to sheathe electric fireplaces with wood, or the so-called false fireplaces.
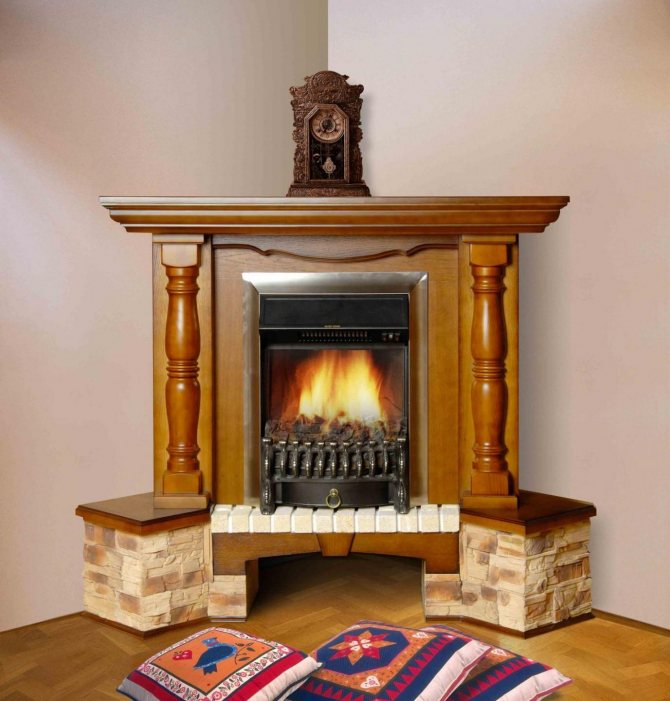
Using only wood when facing a fireplace is irrational: it is often combined with other options
- The advantage of this option is the large price range. You can choose both cheap and expensive.
- To prolong the life of wood cladding, a fireplace requires constant maintenance. Treat it with a special antiseptic.
- This option is only suitable for rooms with a positive temperature.
- Solid wood is more durable and aesthetically pleasing.
Combination
Combination of wood and tiles
If you make the cladding of your fireplace not from one material, but from several, then this can add more color and beauty to your design. Just do not need to randomly sculpt everything that comes to hand. Do it wisely, think well and imagine how this or that combination will look.
Cladding
The external decoration of the fireplace is responsible for its perception, place in the interior of the room, and compliance with the style. The need for such work is dictated by your needs and the quality of the masonry produced. The fact is that, provided that the masonry is neat, in which the dimensions of the seams are the same everywhere and the vertical and horizontal levels are observed, a surface with a natural brick texture looks very original in any interior.
If necessary, various heat-resistant materials are used for finishing. The most popular are ceramic tiles, tiles and decorative stone. These three material varieties come in a variety of colors and textures.
Facing materials for the manufacture of fireplaces
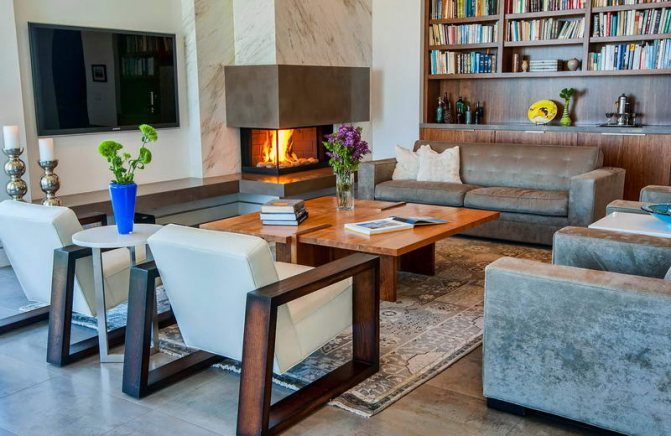
It is believed that corner fireplaces made of cast, mirrored brickwork or tiles are durable, stylish and durable. In fact, it does not matter in what style the model of the fireplace is made, because the unifying elements of all types of fireplaces without exception are grates or dampers, a hearth, fireplace shelves, a portal.
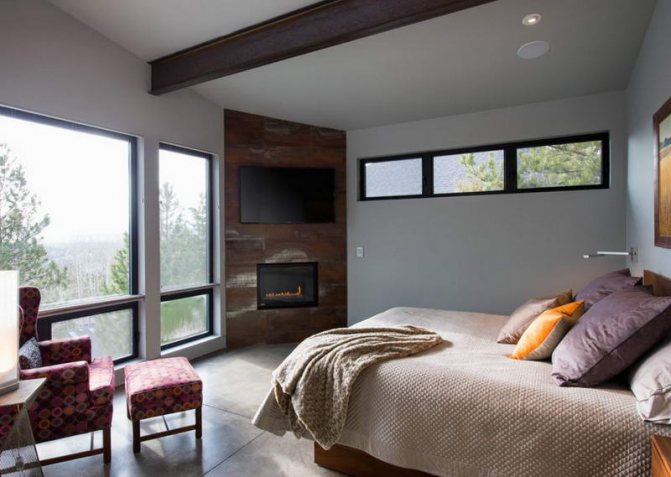
When choosing a fireplace design style, look at the photo in advance to take into account all the design nuances. Wide spacious rooms simply need to be displayed in interiors of such styles as Baroque or Rococo with a unique design of the fireplace portal.
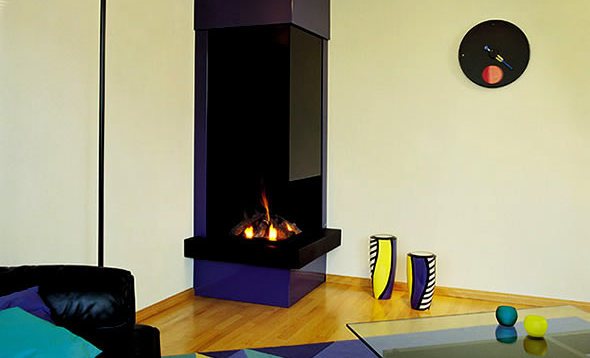
For small apartments, it will be appropriate to design in the style of minimalism with a predominance of decorating items from modern building materials (for example, glass, steel, ceramics) in the interior. It is more rational to install a built-in biofireplace or a wall-mounted electric fireplace in the apartment. Optionally, you can create a design with a fireplace located separately from other interior items.
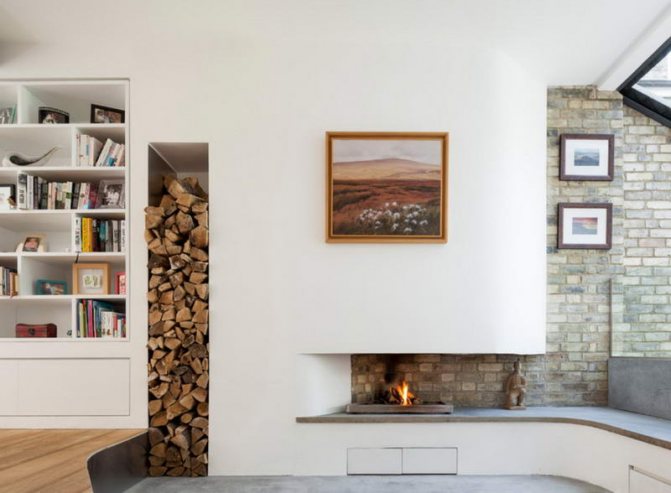
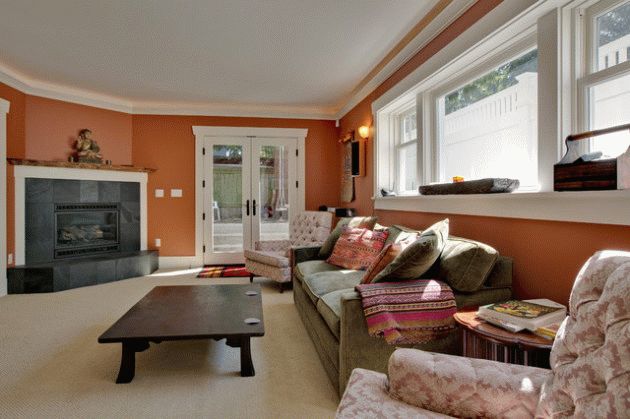
For those wishing to install a fireplace in the living room of a summer cottage or a private house, we recommend giving preference to the country style, which will originally emphasize the overall interior of the room and create an old cozy atmosphere.
It is welcomed in the interior of the living room with a corner fireplace and Art Nouveau style, because its peculiarity is the combination of any interior details.
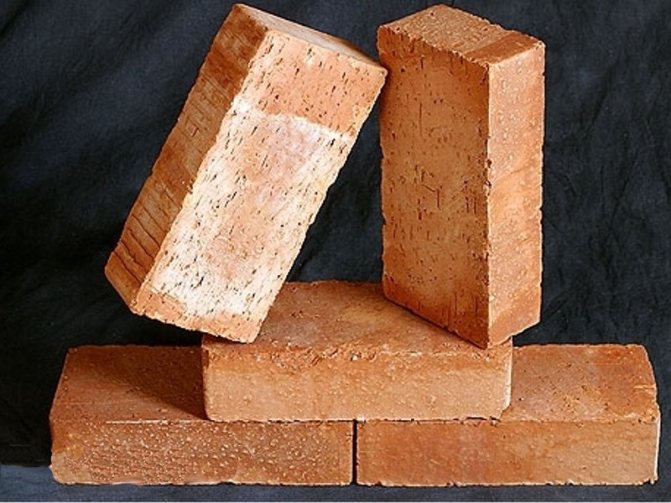
The material used for masonry do-it-yourself fireplace
To build a fireplace you will need: red brick, rubble stone, clay, sand, cement and crushed stone. To build a fireplace that can be used for a really long time, you need to carefully choose a brick - by the piece.Brick for fireplaces should be perfect: no flaws, have a uniform structure of orange-red color, regular shape with smooth surfaces and right angles. Each brick must be checked by hitting it with a hammer - it should make a clear sound. If the brick has not been sufficiently heat treated, it will be lighter in color and its fracture is heterogeneous in structure. After being hit with a hammer, such a brick will emit a dull sound, which indicates poor-quality firing.
Burnt brick has a blue-black or dark gray color; traces of melting are visible on its surface. Hitting such a brick with a hammer will produce a high pitched sound. If there are white spots on the surface of the brick, they indicate a broken drying technology (it is overdried). The required number of bricks is about 200-300 pieces (depending on the size of the fireplace and excluding the chimney). Fireplaces and stoves are laid out using a binder solution consisting of clay, cement and sand. There is an opinion that wood-burning fireplaces last the longest if they use Cambrian clay (blue) when creating them. But red and even ordinary clay is quite suitable. If you are using refractory bricks, you will need refractory clay for the masonry. You will need from 0.2 to 0.5 m3 of clay (depending on its fat content). When creating a fireplace with your own hands, you need to take care of the cement. Packaged Portland cement grade 200 or 300 is quite suitable. Requirement: 70-100 kg (including foundation work).
Real Portland cement for fireplace masonry Sand for masonry mortar: fraction 0.2-1.5 mm, maximally cleaned of dirt and debris. Requirement: 0.7 m3 (including foundation work). Crushed stone of a fraction from 2 to 6 cm will be required - it will be needed for the construction of the fireplace foundation. Requirement: 0.2 m3. In addition to the basic materials, you will need: a smoke damper (it is also a stove valve), a grate, reinforcement rods (about 15-20 pieces, with a diameter of 8 to 10 mm, a length of 700 mm).
6bcc323d3a88dfb5e1dfebdd9122d511.jpe
1a89aff5580768c5db8f278b95298ffa.jpe