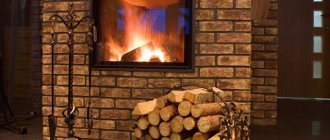

Sometimes situations arise when it is necessary, without significant material costs, to heat a small room (garage, workshop or warehouse) as efficiently and quickly as possible. An excellent solution to the problem will be a compact do-it-yourself stove, which requires ingenuity, desire, tools and metal to create.
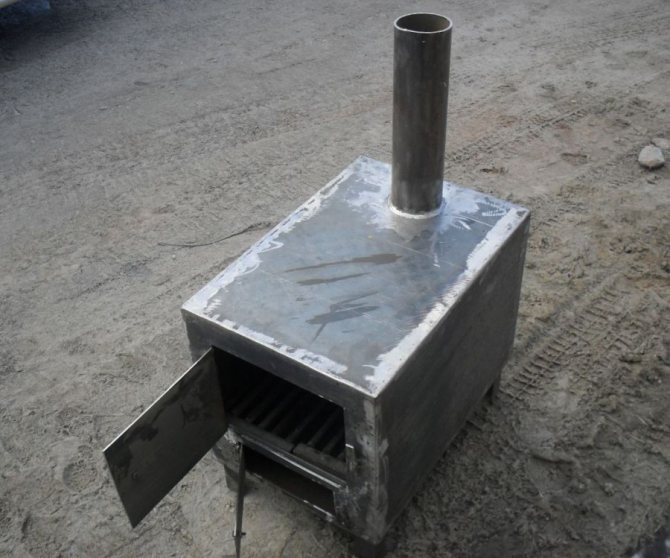
A simple potbelly stove can be built from materials that are at hand. You can use a regular can or a thick-walled barrel. Many years of practice have shown that very thick metal (over 8 mm) is too difficult to warm up. Thus, efficiency decreases and most of the heat is not used for heating.
If the metal turns out to be too thin, under the influence of high temperatures, it will begin to deform and quickly lose its original shape. The best option is walls of about 3-4 mm.
Rectangular potbelly stove with reflector
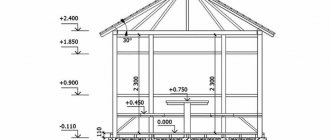
When deciding what shape and size a finished potbelly stove should take, everyone must independently. A person with engineering education and skills can take any, even the simplest design, and make the desired changes aimed at improving it.
Drawing of a rectangular potbelly stove:
A simple and multifunctional do-it-yourself stove is made from the following materials:
- Outline and simple design drawing showing all basic dimensions
- Sheet metal (its quantity depends on the desired dimensions of the furnace)
- Steel corners (thickness 4-5 mm)
- Metal tube 25-30 mm
- Pipe 180 mm
- Welding machine
- Working hand and electric tool
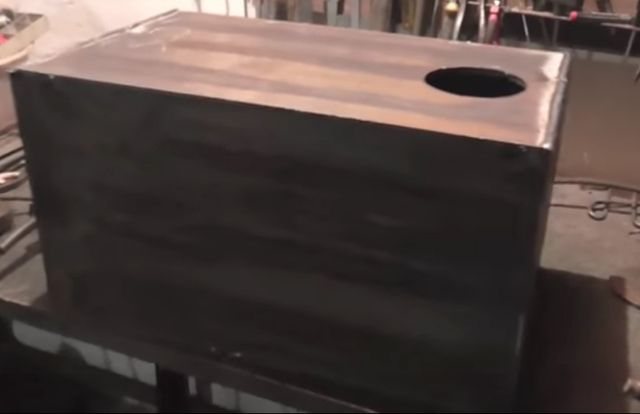
The furnace body will be made in the form of a rectangle with steel sheets, which are butt-welded to each other. It is necessary to cut the workpieces under five main planes (bottom, top, side and back walls). On the front panel there will be a blower and a door for the furnace, so it will be possible to resolve the issue with it later.
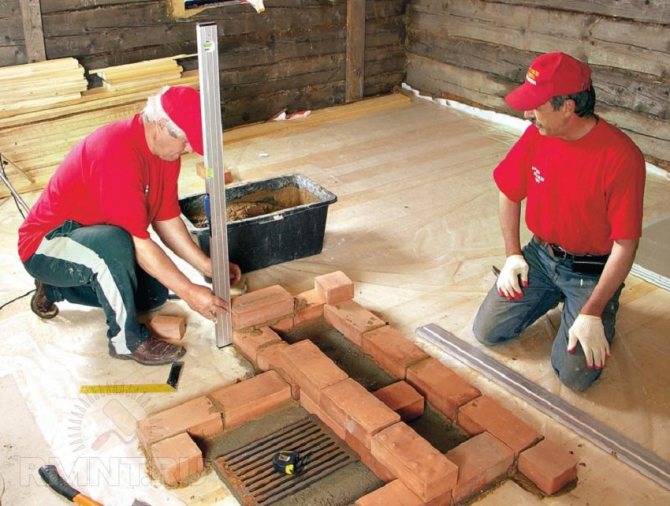
First, the side surfaces are welded to the bottom. It is necessary to ensure that they are located strictly vertically, using a level or square, and docked at a right angle. Having taken in 2-3 places, once again we are convinced of the correctness of their location and cook.
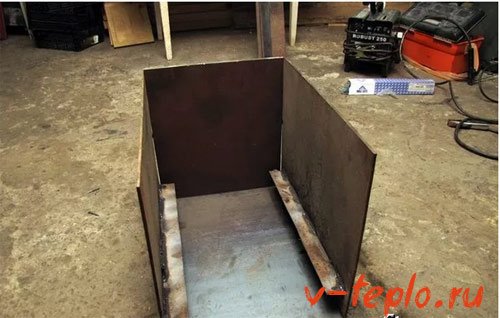
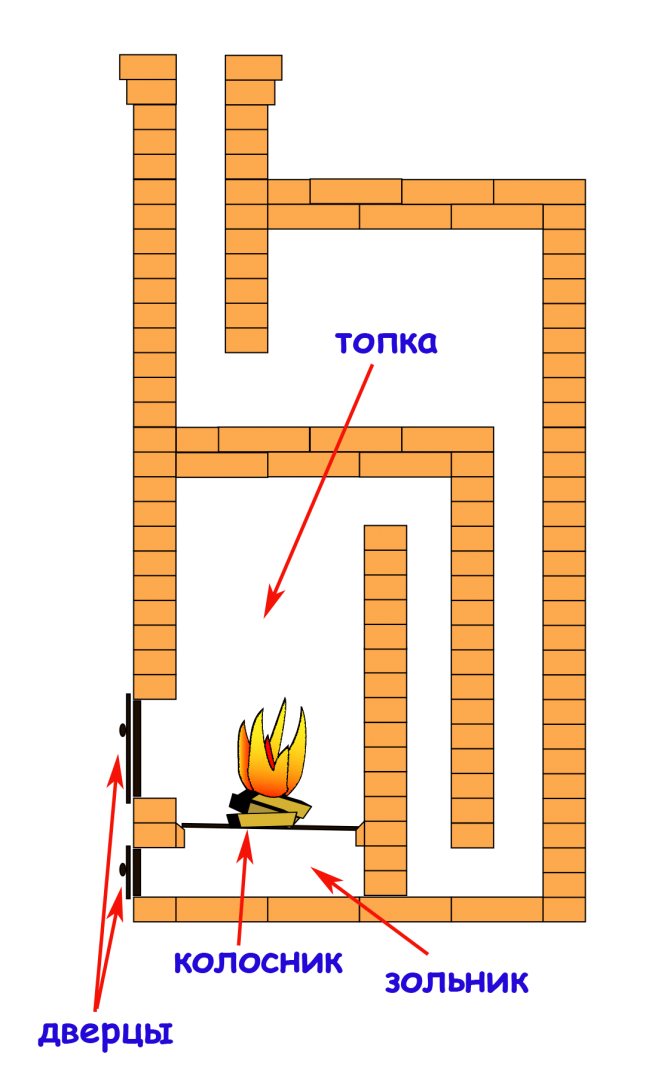
After that, the back wall is welded. All internal space must be divided into three parts:
Recommended reading: an article on how to make a pyrolysis boiler yourself
The last two must be separated by a grate, on which solid fuel (peat, firewood) will be laid. It is done as follows:
- From the inside on the sides at a certain height (10-15 cm), the corners are welded to the entire length
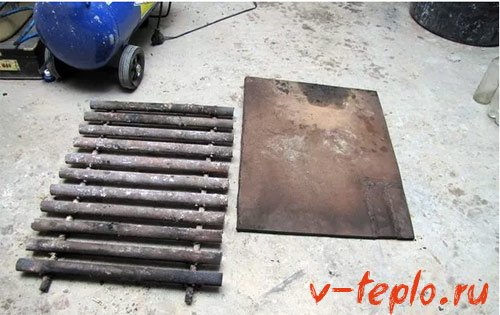
- For the lattice, it is necessary to prepare strips of thick sheet steel with a width of 25-30 mm and a length corresponding to the width of the stove

- The distance between the plates is about 5 cm
- Strips are welded to two metal rods with a diameter of 15-20 mm as reliably as possible, since they have another role to play - stiffeners
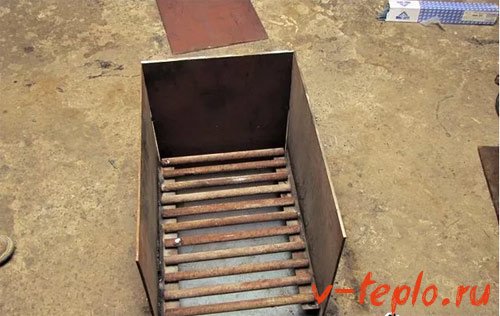
There is no need to weld the grille to the inner corners. If necessary (cleaning the stove, repair), it can be easily obtained. After some time, some of the plates may burn out and will need to be replaced. There are many more reasons to leave the grille removable.
In the next step, you need to weld two metal rods on top, on which the reflector will be located. The latter is a metal sheet that separates the smoke flow and the firebox. The reflector is removable.

It is necessary to position the reflector so that a channel is formed in front, allowing smoke to escape.It will warm up inside the most, so it is made of very thick metal (12-16 mm).
It's time to start the final stages of work. First, the future stove cover is welded. It will not be superfluous to provide an opening for the chimney in advance. Then the upper lintel is cut and welded, then a narrower one, placed at the level of the grate and separating the doors of the grate and ash pan.
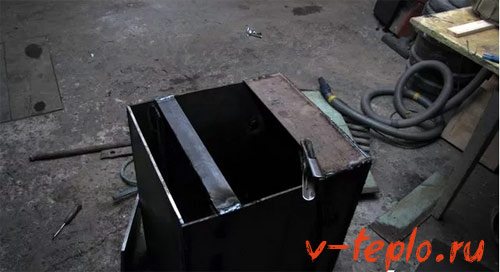
You should not bother much about the size of the doors. The main thing is that it is convenient to lay firewood through them and remove ash and ash. The door for the firebox is made, as a rule, almost the entire width, so that the reflector and grate can be removed, for the ash pan - narrower.
Next, you need to weld the handles for the doors for the stove, latches and curtains. The latter are recommended to be made by yourself from a thick rod and a steel tube. Such work should not be difficult.
Having gathered everything together, it is time to think about how to install the finished structure on the legs. They are recommended to be made of a metal tube 2-3 cm in diameter and 8-10 cm in length with a nut welded at the end and a screwed in bolt. This will allow you to adjust the height. To many, such a step may seem strange, but during the installation process, everything will become clear.
It's time to think about the chimney, which will be made of a pipe with a diameter of 15-18 cm. At the same time, it should be led out through a hole in the wall. Bends are made at an angle of 45 degrees, there should be no horizontal sections.
A rotary damper must be provided at the lower end of the chimney. For it, a circle is cut out of sheet metal, with a diameter slightly less than the similar characteristic of the pipe, in which a hole is drilled for the handle for rotation. The latter can be made from a metal bar.
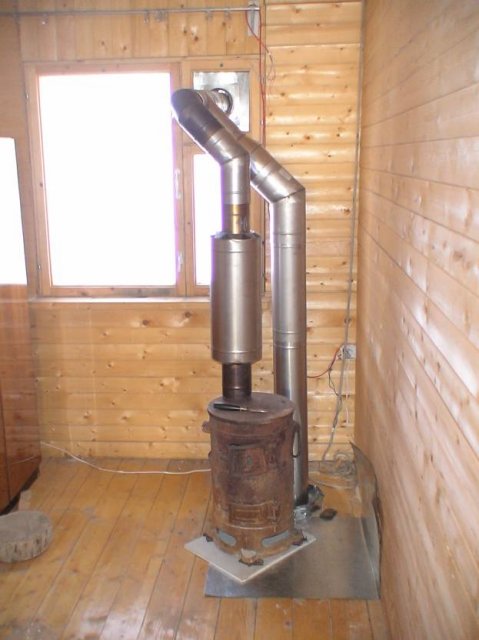
It is necessary to place the chimney on a sleeve 15-20 cm high. It is made from a product with a diameter slightly smaller than the chimney and is welded along the hole to the top cover. It's time to install the stove, adjust the height and that's it - you can heat the room.
Perhaps you will also be interested in an article on how to implement alternative heating of a private house.

Simple potbelly stove from a can
The simplest do-it-yourself potbelly stove is made from an ordinary can. There is no need to talk about the durability of such a structure, but it is quickly built, easy to install and gives enough heat.
All work consists in the installation of the legs, the arrangement of the outlet pipe and some cosmetic operations. For work you need:
- Can
- Chimney pipe
- Grate wire
- Welding machine
- Tools
Getting Started
- We set the can horizontally and mark where the blower will be, which has the shape of a rectangle or a sickle. Place it under the lid
- A hole is cut in the wall or bottom of the can, equal to the diameter of the chimney pipe
- To make a grate, you need to stock up on steel wire. It is bent, carried through the lid into the inside and gently unbent so that the zigzag is in the desired position, while it remains convenient to lay chips, firewood, etc.
- The can must be fixed on legs that are cut from tubes or corners and welded
- The chimney is welded


Materials and tools
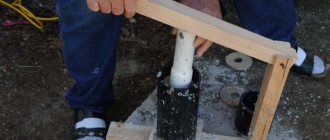
To create a potbelly stove you will need: • metal with a thickness of 3 ± 0.5 mm: thinner sheets will quickly burn out, in addition, under the influence of high temperature they can be driven, and the furnace will become shapeless; thick-walled metal will warm up for a very long time; • chimney pipe; • rods 16 mm; • sheet of metal with a thickness of 0.3 mm for the installation of a box for collecting ash; • tape measure, ruler,a piece of chalk; • welding machine 140-200A; • grinder for metal cutting; it is more convenient to use a gas cutter to make round holes; • metal brush for cleaning welding spots; • emery wheel for adjusting the doors; • drill and drills.
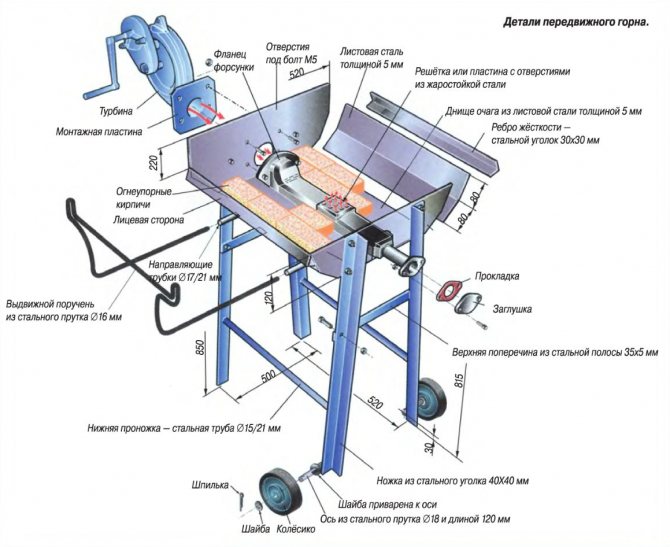
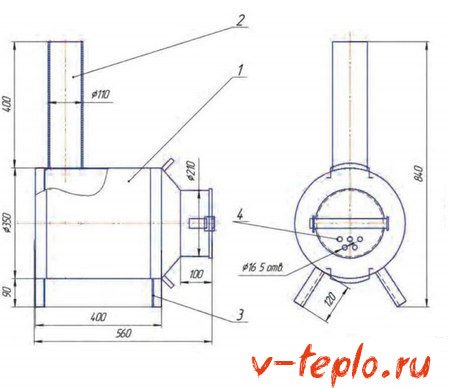
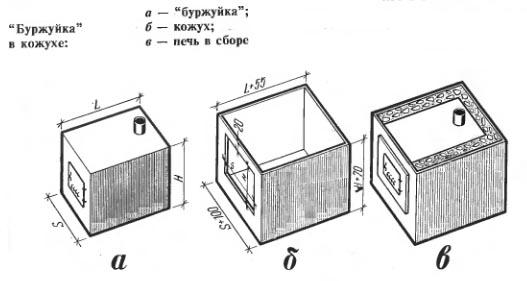
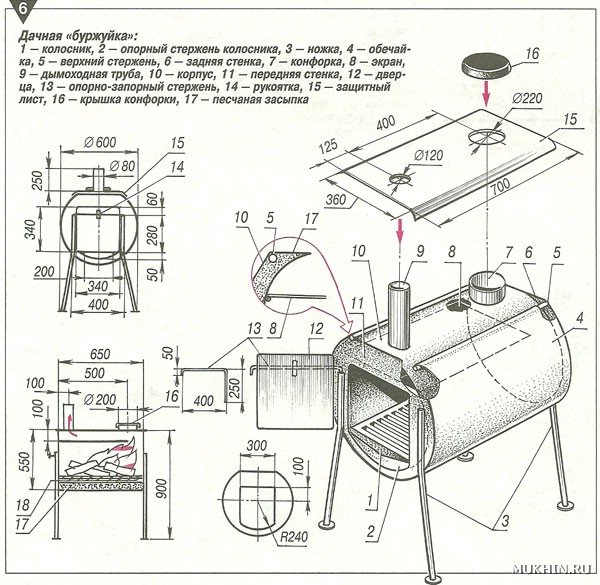
Burzhuik schemes
The main advantage of a rectangular stove
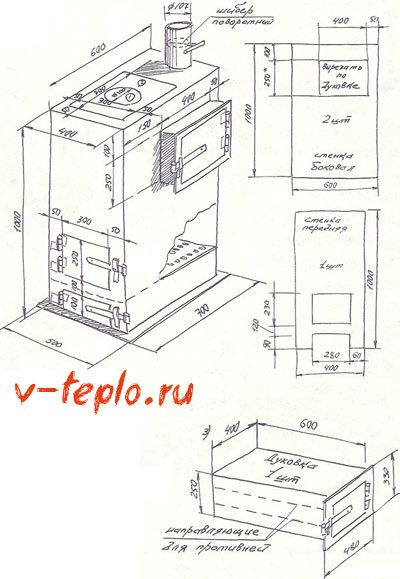
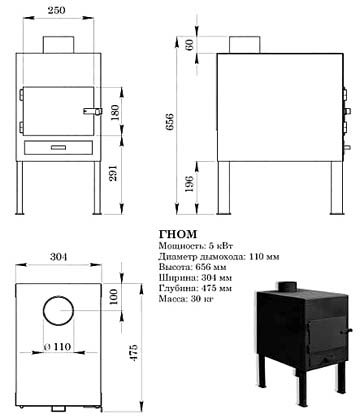
, unlike oval products made of pipes or gas cylinders, it consists in a larger area of the heated surface, so its efficiency will be much higher. The optimal size for a potbelly stove is 800x450x450 mm. A stove of this size does not take up much space and can easily fit even in a small room.
An important distinction Loginov ovens
is the presence of two plates (
reflectors
) in the upper part of the combustion chamber. As
gas path
at the same time, it increases, the heat transfer of such a potbelly stove is significantly higher than that of a conventional metal stove.
Advice
... If it is required to reduce the size of the Loginov oven, then it is desirable to change only its width. With a change in the length and height of the structure, its effectiveness can be significantly reduced.
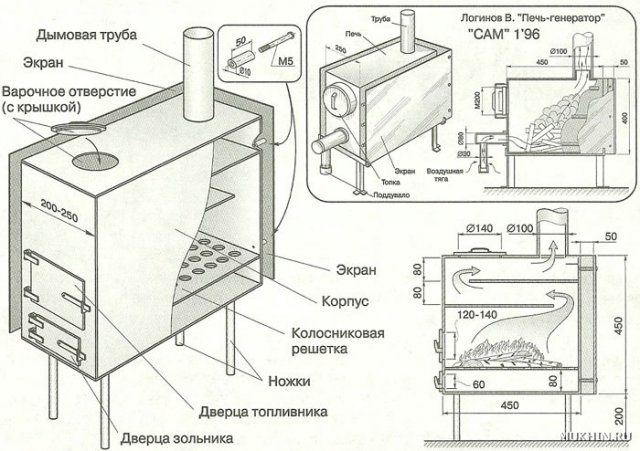
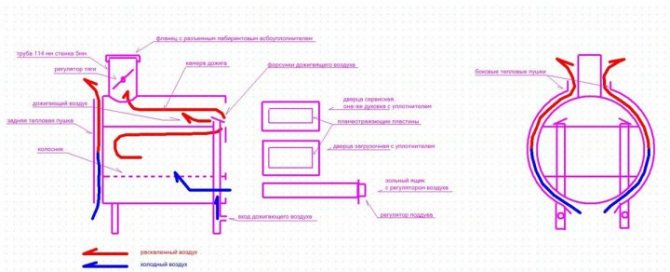
Detailed diagram of Loginov's stove
Furnace design
Any stove for a bath consists of several essential elements:
- Ash pan... It is located immediately under the firebox, so ash remaining after fuel combustion gets into it. The tank should be cleaned of ash from time to time.
- Blown... This is a special door that allows air to enter the firebox, as a result of which the fuel burns better.
- Chimney damper... This damper provides traction in the oven. The wider it is open, the more intensively and faster the fuel in the furnace burns. After the coals and the stove have completely burned out and cooled, these dampers are completely closed to retain heat. If the coals are still smoldering, then in order to avoid carbon monoxide poisoning, leave a 2 cm gap for ventilation.
- Coil or boiler... In these cells, built into the fuel compartment, the water is heated. The steam escaping from them creates the necessary microclimate in the bath, in addition, the water will not need to be boiled additionally.
Each of the types of stoves has its own characteristics, which must be taken into account when choosing the best option for creating certain conditions in the bath.
There are ovens such as:
- On the wood... This furnace design is the most common and common. It includes a firebox, grate, ash pan and chimney. The material for the stove can be brick or metal. It is noteworthy that such structures, with their small dimensions, are able to quickly and efficiently warm up even a spacious room. They are often used in buildings where the central gas supply is not connected. It is a wood-burning stove for a bath that is easiest to cook with your own hands. A pleasant bonus is the slight crackling of wood during burning, which calms and pacifies.
- Cast iron... According to the technology of operation, such stoves are of constant and temporary combustion (in more detail: "How to choose a cast-iron stove for a bath - tips and tricks"). Temporary constructions are heated with wood. You can start using the steam room only after the fuel has completely burned out. But constant heating furnaces run on gas or liquid fuel. In this case, you can stay in the steam room all the time while the stove is heated, and the steam is distributed evenly throughout the room, and it warms up much faster.
- Electrical... Plants of this type are available in various sizes, capacities and efficiencies. Such ovens are able to quickly catch up to the required temperature, they are durable and give off heat well. At the cost of an electric furnace, it is not very expensive, moreover, they do not need a chimney.
- For Finnish saunas... The very design of such furnaces involves the production of dry steam and high temperature in the steam room. They can be either electric or wood-fired. In the presence of special drawings, the welding of a stove for a Finnish-type bathhouse can be done independently (in more detail: "Which Finnish stove for a bath is best suited").
It is worth paying attention to a number of features that furnaces of various designs have.
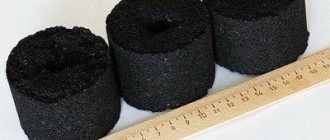
In particular, wood-burning stoves can be heated with other types of solid fuel, for example, coal or briquettes.
Cast iron installations running on gas must be connected to a centralized gas supply system. The use of gas cylinders is not recommended due to the high risk of explosion or fire.
In addition, oil fired stoves have a specific odor that is emitted during combustion. And their fire hazard is as great as that of gas.
If you are planning to install electrical equipment, it is worth checking the condition of the wiring and the thickness of the cable. And from the point of view of economy, due to high prices for electricity, it is better to use such ovens only in small rooms.
But if you figure out how much it costs to cook a stove for a bath, everything will depend on the size of the stove and the amount of materials required.
The main stages of manufacturing a potbelly stove
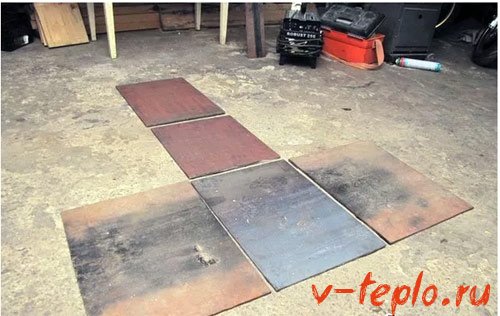
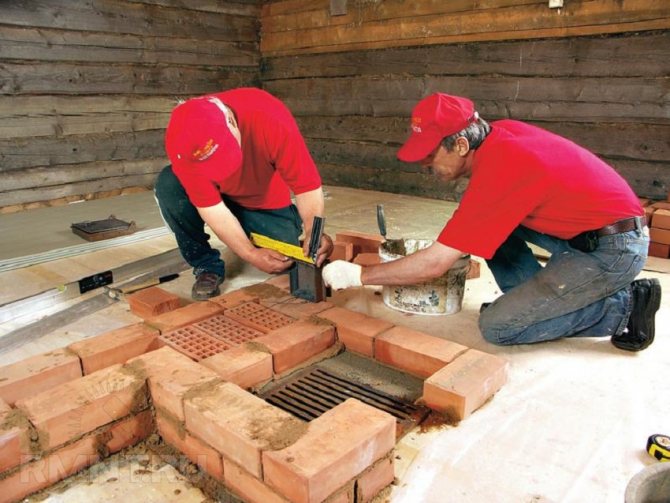
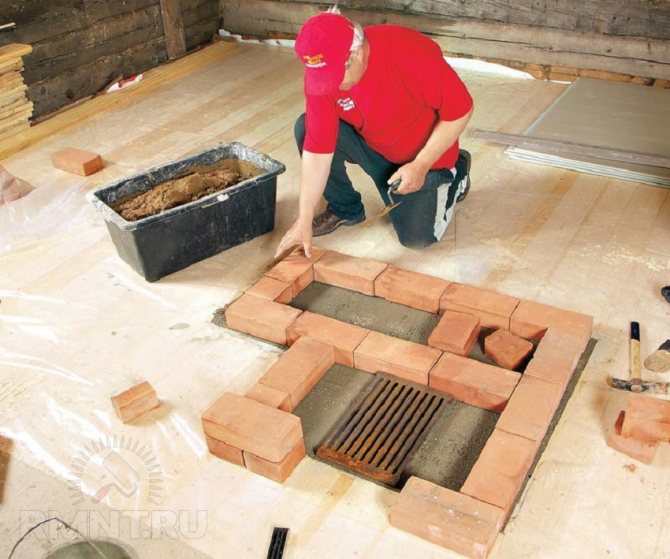
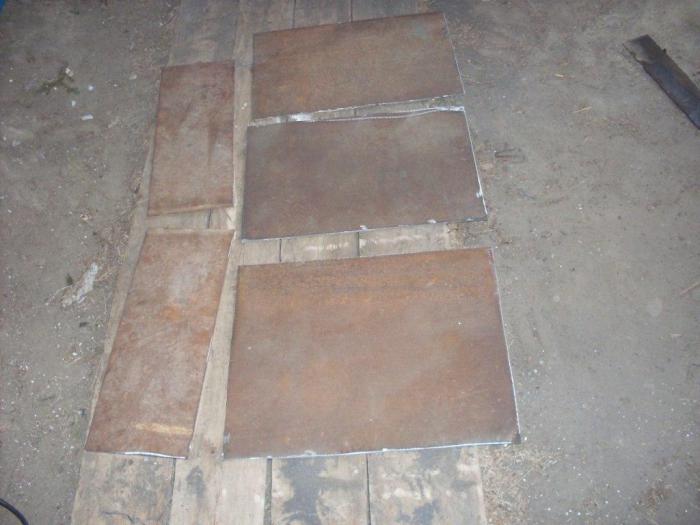
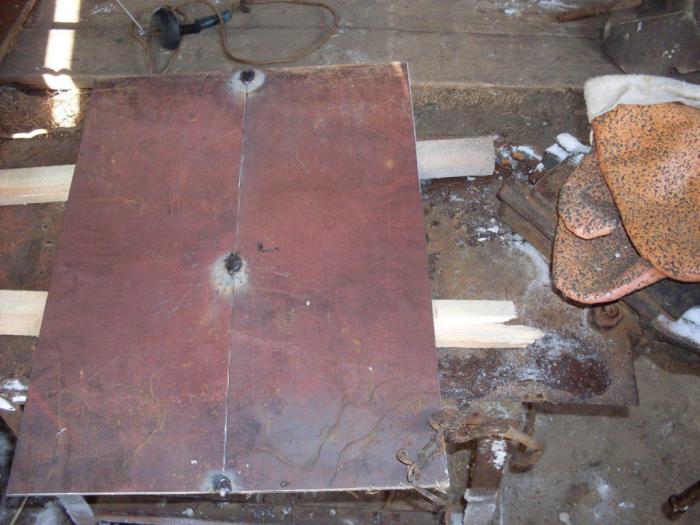
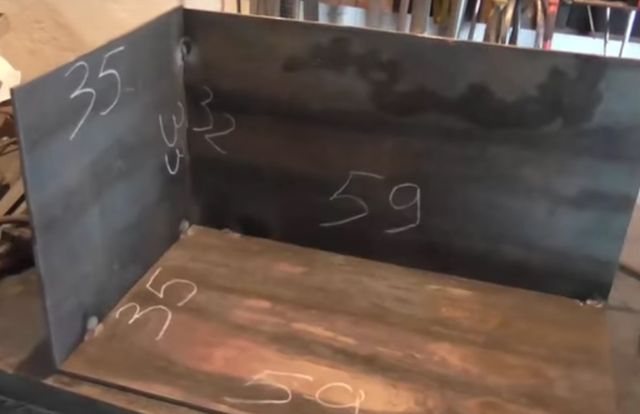
1. All the details are marked on a sheet of metal: 6 steel rectangles for the walls of the furnace, 1 rectangle for creating a smoke reflector, a plate for a grate and a latch for a door. 2. Cut out
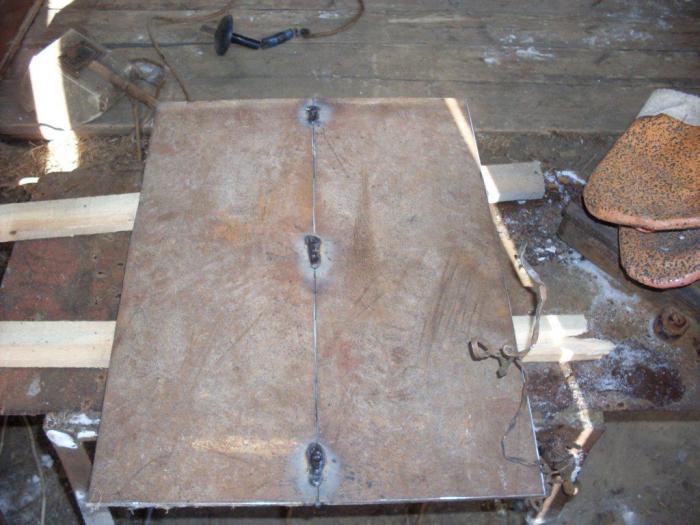
a sheet of metal is possible at any metal warehouse. The guillotine, in contrast to the grinder, allows you to cut (chop) it more accurately. In this case, straightening (aligning the sheets) will not have to be done. 3. The furnace body is made in the shape of a rectangle. Their sides are joined together at an angle of 90 ° and welded together.
Box welding
4. To avoid mistakes, the oven box is first only tacked by welding in several places, and only then, after checking its horizontal and vertical, its seams are welded.
Important!
All connections in the housing are carefully welded;
to check the seams
for tightness, you can coat the joints with chalk or kerosene.
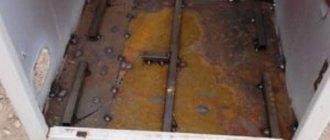
5. Welding seams are cleaned with a wire brush. 6. The inner space of the stove is divided into three parts: a firebox, a smoke chamber and an ash pan. To separate the firebox from the ash pan, a grate is laid between them, on which the fuel will be placed. To do this, at a height of 10-15 cm from the bottom of the furnace, from the sides and on the back of the box are welded corners 5x5 cm
on which the lattice will be located.
Advice.
It is better to make a grate from 2-3 detachable parts. Otherwise, when replacing a burnt grate, it will be difficult to get it out of the firebox.
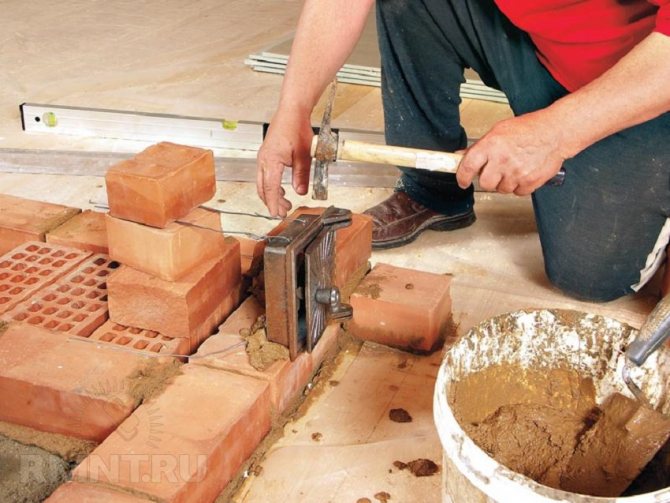
7. The grating is welded from thick steel bars or strips 30 mm wide. They are attached to 2 stiffeners - rods with a diameter of 20 mm. Since the grates burn out over time, it is better to make such a grate removable.
Manufacturing of a grate
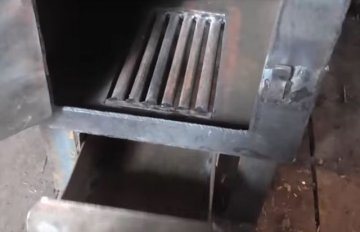
8. At a distance of 15 cm from the top of the box, two strong rods are welded on which it will be stirred one or two removable reflectors
- thick-walled metal sheets, which will trap the flow of hot gases and send them for afterburning. However, they should not completely cover the oven. In order for hot smoke to enter the chimney, an indent of about 8 cm is made from the front (for the first sheet) and the back of the stove.
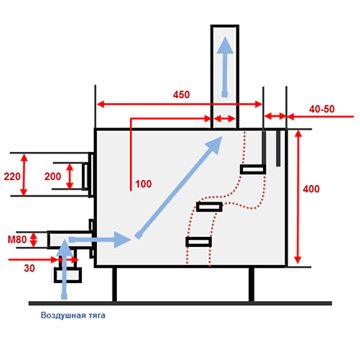
Diagram of the passage of gases in the simplest potbelly stove and oven with a reflector installed
9. Next, the upper part of the box is welded, and then cut out in it pipe hole
.
Pipe hole
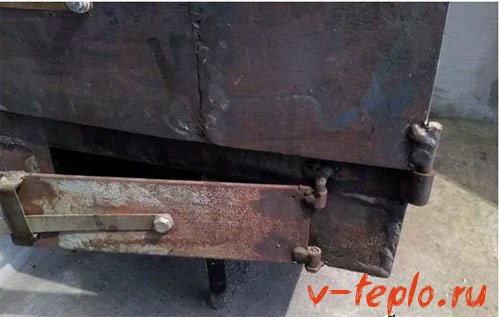
10. The front part of the stove with holes cut in it for the doors of the firebox and ash pan, is welded last. 11. The size of the door of the firebox must be large enough to be able to load fuel and change the grate without effort. The hole for the ash pan is made slightly smaller. 12. The hinges are welded first to the door and then to the stove body. They can be bought ready-made or welded from two tubes of different diameters. Door handles can be made from a strip of metal or a bar.
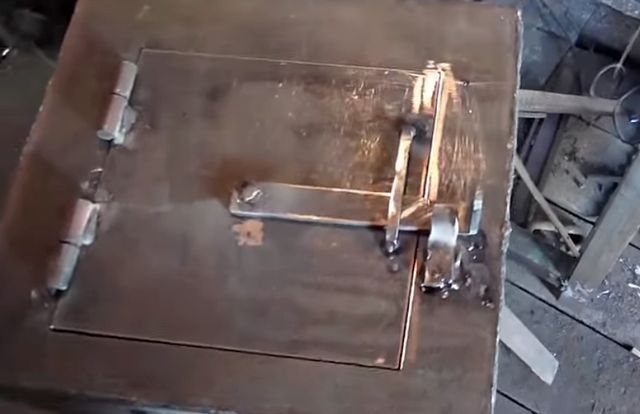
Welding the door
Important!
When attaching the doors,
fit them to the body
as tightly as possible; for this, they are straightened (leveling) and cleaned with an emery wheel. The wedge latches that close the doors fit as tightly as possible to the body.
13. This oven can be used to cook food or warm water. For this, a hole of the required diameter is cut in the upper part of the box. Oven burner
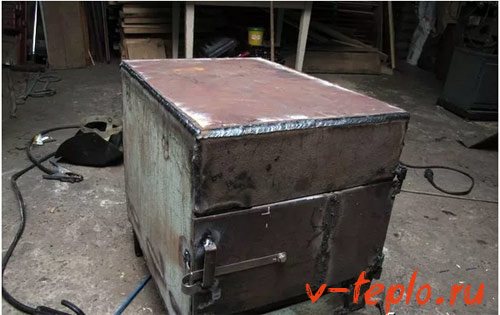
that will fit into this hole can be purchased at any hardware store. 14. For ease of use, the design
installed on legs
or a welded pipe support. 15. The chimney is connected to the stove
using a sleeve
. 16.
For inserting a damper
regulating the smoke outlet, two holes are drilled in the pipe. The metal rod is inserted into the holes and bent 90 °. A "penny" made of metal is grabbed to it in the center of the pipe - a gate, the diameter of which should be slightly less than the diameter of the pipe itself by 3-4 mm.
How to make a metal stove
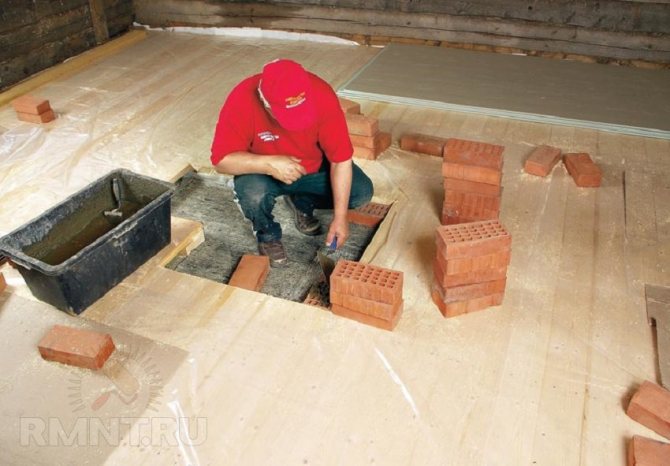
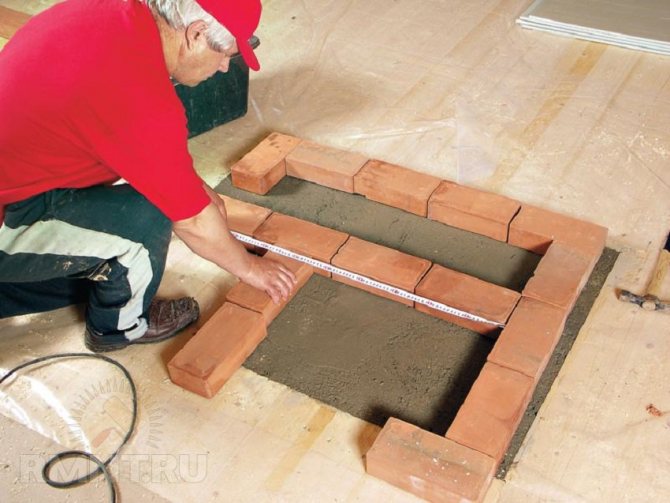
Since no complex calculations and drawings are required to create a bath stove, many people prefer to do this work on their own. The finished home-made design in its functional features will not differ in any way from the factory counterpart. As a rule, such a furnace is required to heat the sink, dressing room and steam room.
Before you cook a stove for a bath with your own hands, you should only purchase materials and consult with specialists.
The following items are required to weld the furnace:
- sheet steel 8 mm thick or a metal pipe with a cross section of 50 cm;
- chimney with a cross section of more than 10 cm;
- reinforcement rods with a cross section of 1 cm or more;
- grates;
- metal water tank with a capacity of 1000 liters;
- doors for the firebox and ash pan;
- welding machine;
- grinder with a set of wheels for cutting and grinding.
To understand how to properly cook a sauna stove, we suggest studying the detailed instructions with a photo.
Chimney device
• To prevent precious heat from escaping too quickly through the pipe, it must be specially designed. Such a device has two main parts: vertical
height from 1.2 m, installed at an angle of 90 ° above the oven and an inclined part, called
hog
, 2.5-4.5 m long or more, in which the smoke burns out. It is the boar that gives up to 1/4 of the heat of the entire furnace.
Chimney hogs
• A tall person can touch a heated pipe, so the hog must have a protective cover in the form of a mesh. To avoid burns, the distance from the floor to this pipe should be 2.2 m. The vertical part of the pipe coming from the oven is additionally wrapped with thermal insulation.
Important!
The pipe should be located away from the plastered walls at a distance of 1.2 m. The distance from the wooden structures is 1.5 m.
Advice.
Laying a pipe through a wooden ceiling and roof is a rather laborious process. It is much easier to bring it out through a hole in a wall or window.
Smoke output through the window
Rules for the safe installation of a metal oven
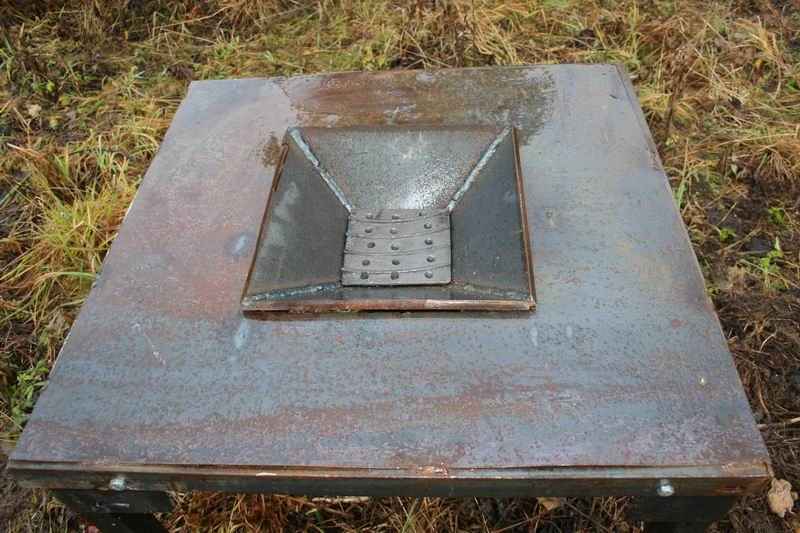
The potbelly stove heats up much more strongly than a brick oven, so all flammable objects should be at a sufficient distance from the oven. If the floor in the room is wooden, it is installed only on bricks or metal sheet. The metal, in turn, is laid on a sheet of asbestos with a removal of it 35 cm or more from the edges of the stove. In front of the firebox, it should protrude 5.5 cm. Asbestos can be replaced with felt soaked in clay. It is also possible to install such a screen to reflect heat on concrete.
Important!
A working oven requires supervision. You should not be away from the room for a long time, where the stove is heated.
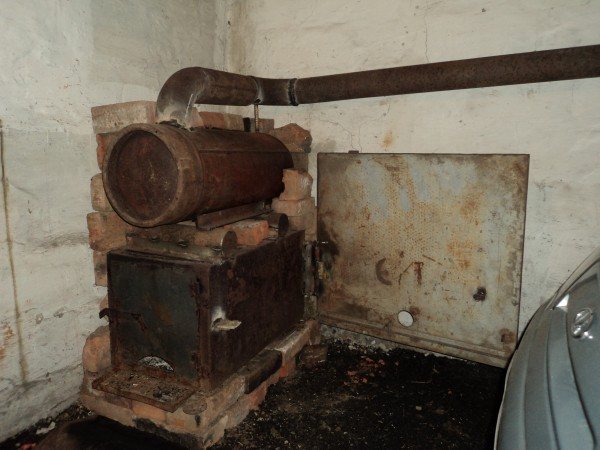
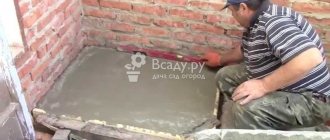
Installing a potbelly stove on a brick base
Production materials and safety during operation of furnaces
Iron furnaces are most often made of steel or cast iron. These materials can withstand very high temperatures without changing their properties.
To increase heat transfer and slow down the cooling of the oven, you must do the following:
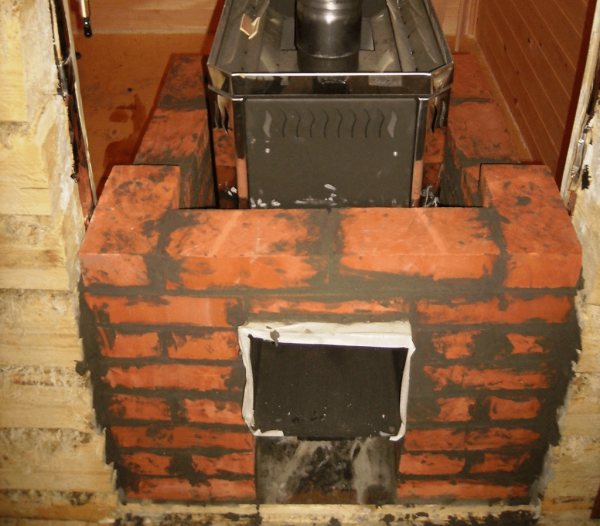
- Cover the furnace with stone or refractory bricks;
- Install special fireboxes in the stove that reduce the rate of heat loss.
Safety when firing up and using the stove is a very important point, therefore, regardless of its purpose, the following must be remembered and observed:
- Refractory materials should be placed in the furnace in those places where there is the proximity of an open flame;
- It is advisable to cover the finishing materials of the room around the stove with metal or treat with asbestos. This will prevent them from burning;
- The laid chimney pipe must be finished with materials that are not flammable;
- The thickness of the kiln masonry and the joints between the bricks must comply with the standards;
- Before using the stove, it must be carefully checked, make sure that smoke does not penetrate through the masonry into the room;
- During the heating of the furnace, it is necessary to use devices that will allow you to quickly remove the combustion materials;
- The fuel with which the stove will be fired must correspond to its purpose. It is not recommended to use an inappropriate type of material for kindling the furnace;
- It is strictly forbidden to use gasoline or kerosene as a material to accelerate the ignition. They are capable of not only flaring up and igniting sharply, but also due to the substance that is released during their combustion, they can explode;
- An open flame must not be left unattended in the oven. You also need to be able to properly regulate the draft and in no case block the chimney with a damper;
- It is advisable to purchase a fire extinguisher, which will be located near the stove.
The above rules are able to ensure the safe operation of the furnace.
We increase the efficiency of the furnace
The potbelly stove is able to heat the room in just a matter of minutes. Moreover, everything that comes to hand can be thrown into the firebox: since there is no branched network of chimneys in it, and the smoke comes out “directly” in it, there is no need to fear that they will clog up.
But if an ordinary heating stove, installed in premises for permanent residence, has an extensive network of chimneys that trap heat, in a stove it goes directly into the pipe, so its efficiency is not too high. That is why it is too "gluttonous" and requires a lot of fuel.
To reduce fuel consumption, you can use the following tips from experienced stove-makers: • door to the firebox and blew
in such a furnace should be as tight as possible; otherwise, the air supply to the stove will increase, and the fuel will burn out too quickly; • to regulate the output of warm smoke in the chimney
it is desirable to provide a damper
; • near the stove can be provided
side metal screens
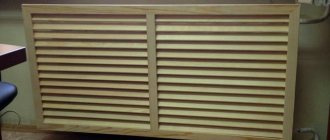
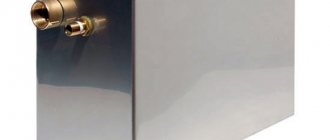
at a distance of 5-6 cm from the stove, in this case, it will heat the room not only by radiating heat, but also by convection (circulation of warm air); • a potbelly stove, "dressed" in a metal casing, will help keep the heat much longer;
Potbelly stove in a casing
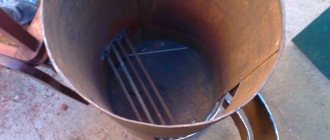
Round furnace with afterburner and casing with heat gun
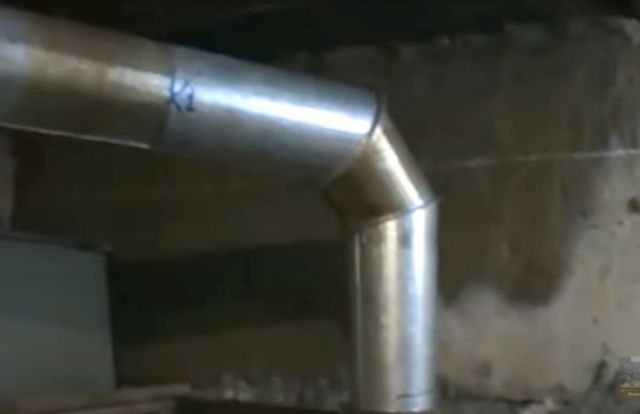
• to retain heat in the room, bends should be built up in the pipe; however, at the same time, soot will linger in them, so it is advisable to create a collapsible structure; • the pipe can also be given a stepped shape: arrange the elbows in stages, with each step turning by 30 °; in addition, each of the knees must be securely attached to the wall with rods;
Stove with chimney elbows
• chimney throughput
should be less than the capacity of the furnace itself, in which case the hot gases will not go into the pipe immediately; its diameter should be only 2.7 times larger than the volume of the furnace, for example, with a volume of the furnace of 40 liters, the diameter should be 110 mm; • you can increase the efficiency of the furnace and using
chimney blowing with a fan
- this will turn the oven into a kind of smoke cannon; • to reduce air circulation
firewood in the oven
should fit as tightly as possible; if it is heated with coal, stir up the resulting ash as rarely as possible; • to regulate the air flow, the door to the blower can be made adjustable by equipping it with vertically arranged
slots and latch
which will cover these gaps; • to increase the heating area, it can be ribbed, that is, welded onto its body perpendicular to the furnace
metal stripes
; • if you put steam on the stove
buckets or metal box with sand
, then they will accumulate heat and store it even after the oven goes out;
sand filling or heat accumulator made of stones
can be sewn up inside the metal body of the furnace;
The scheme of a potbelly stove with a sand backfill, the furnace is made of a pipe with a diameter of 500 mm, its length is 650 mm
• bake, lined with 1-2 layers of brick
, will keep warm for much longer;
Brick screen
• the volume of the furnace also matters: the more the area of its walls
, the more heat they will give into the room; •
bricks or sheet metal
, on which the stove is installed, will help not only to protect the room from fire, but also to keep warm.
Related video: Do-it-yourself stove stove
From my own experience, I know that buying even the simplest heating stove can deal a serious blow to the budget of an ordinary person. Having studied the many available designs of stoves, I decided to give preference to Buleryan. A homemade modification of a well-known foreign heating stove perfectly took root in my garage.
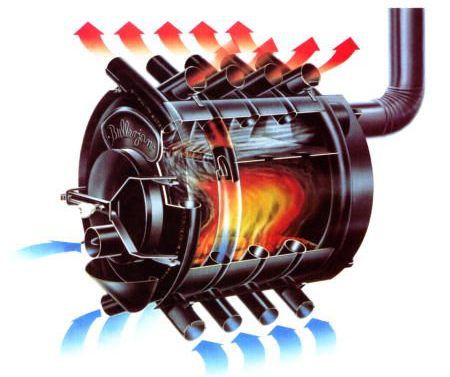
Do-it-yourself buleryan stove - drawings and assembly diagram
furnace blower
In this video, you know how to make a blowing for the furnace with your own hands, it will be a homemade fan like ...
second channel on youtube - https://www.youtube.com/channel/UCedSQ_YEeQ8-3osEysAHh8Q group in contact for questions and comments, on ...
Making homemade blacksmith furs from plywood and dermantine Another blacksmith furs https://www.youtube.com/watch?v=pb-tXoQ5Ns8...
How to blow air into a homemade forge forge with your own hands at home.
Choice of two fans by a rule of thumb and connection via a computer power supply, for a burner ...
A productive hood for a fume cupboard, it is also a blower for a forge, which can be powered ...
Made a powerful furnace for melting metals ...
Forge forge, dismountable forge, garage version of the forge, BLACKSMITH VT1-2 fan.
Made from garbage, except for the engine) In the video, when I turned it on, I muffled the sound, just cameras ...
Homemade sledgehammer with a round striker. This is a trial sledgehammer, in the future I will make exactly the same only from trees ...
There is a lot of controversy and speculation about what to use as a blower for a gas furnace….
Redesigning the ash pan blowing and cleaning system in a homemade coal-fired forge. video partner: https: // al ...
A short video about the new coal furnace, and tips on how and what to make it from. I use an old kitchen for blowing ...
Robiv good, ale not dovgo,
An affordable option for air supply to the furnace.
How to connect a 12V electric motor from a car stove through a computer power supply for blowing a furnace !!!
Introducing the modern replacement for bellows - BlackSmith Forge Fan ...
Forge fan VT1-2 Blacksmith - https://www.smsm.ru/product/18961 Forge fan VT1-2.5 Blacksmith ...
I made a furnace with electric blowing from an old barbecue, it turned out two in one.
Horn fan VT1-2 Blacksmith. It is used as a snail for a forge providing air supply to a hospital ...
My second video on making a coal forge. This forge is much simpler than the first one to make, but from ...
Made a blowing for a new forge, the new forge will be in the next video) motor from the Volga stove.
How to make a HORN without problems! A budget option. I'm on instagram https://www.instagram.com/aleksandrlopata I'm on facebook ...
Help channel: donation https://yasobe.ru/na/dvokat https://www.paypal.me/advocatttt This is a video about my homemade portable blacksmith ...
In this video, the continuation of the blacksmith theme, preparation and manufacture of equipment and tools for home ...
Horn, #blowing, #forging.
In this video I will show you how to make a forge forge with your own hands. Happy viewing. How to blow ...
Help for the author - https://www.donationalerts.ru/r/74pavlo More subscriptions to YOUR channel - https://vktarget.ru/?ref=2816489.
Made from junk spare parts The video is available at https://www.youtube.com/watch?v=jCSM0E5fUFw For questions and advice, write ...
Inertial fan. It blows not bad. But for now an experiment. I'll check in practice what's what ...
brskills loader firmware sm-j500m mod herobrine 1.5.2 ddtank apple transformar bravissimo em phantom diminuir voltagem com diodo modo de recuperacao iphone 5s fonte do gta san andreas receptor century midiabox shd7050 analogico digital hd 3d vitinho joga minecraft
debojj.net
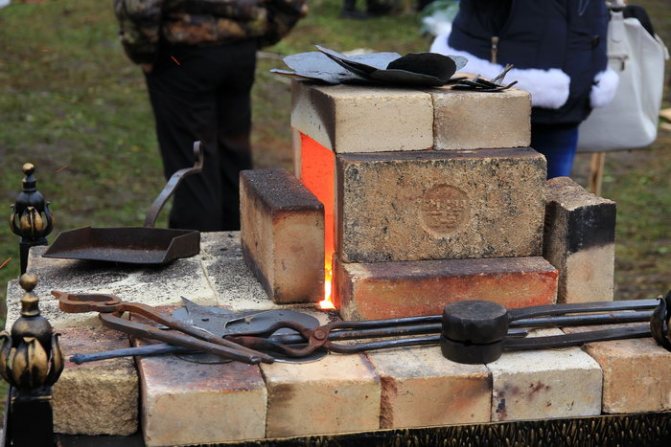
Furnace Crafting Kit
First, I prepared everything I needed to assemble buleryan with my own hands. First of all, I took out a drill from the pantry with a set of drills for all occasions, a grinder with discs from the kit, a welding machine, clamps and other little things.
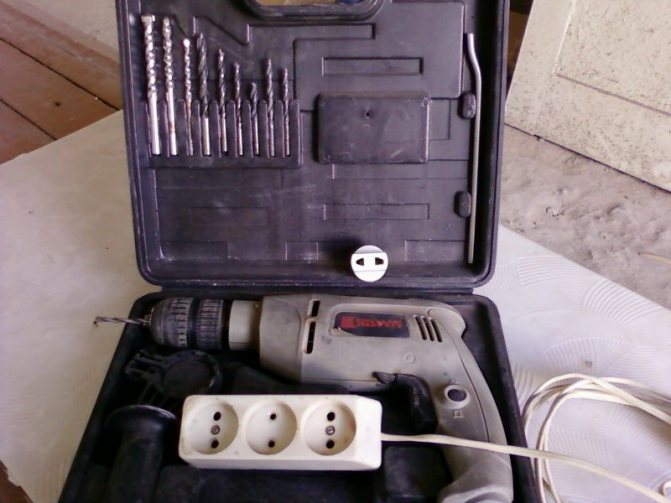
My drill
I had to tinker with the materials. To make Buleryan truly reliable and of high quality, I decided to make it from heat-resistant boiler steel. This material is able to provide a truly long-term and reliable operation of the heating unit. Find the material mentioned in your household or buy it from a specialized store.
I also used 4mm steel sheet. A sheet with dimensions of 100x200 cm was enough for me. In addition, I needed a little (40x70 cm) of 6 mm steel sheet, about 4 meters of pipe with a diameter of 11 cm, about 10 m of profiled pipe with dimensions of 57x4 mm. In addition, I bought handles, hinges and locks for arranging the doors, prepared pieces of a 35-centimeter pipe and, in general, a few metal blanks just in case.
Prices for popular models of welding machines
How to do it yourself
Materials and tools
If you want to make a door for the stove with your own hands, then you will need:
- Main material (cast iron sheet, steel sheet, wood).
- Cardboard, felt-tip pen, scissors for making a template.
- Grinder to cut metal, jigsaw.
- Wire with a diameter of 1.2 cm (for steel structures).
- Blanks of handles with fasteners (U-shaped steel rods are more often used).
For decoration you will need: masking tape, heat-resistant varnish, forged details for decoration (optional).
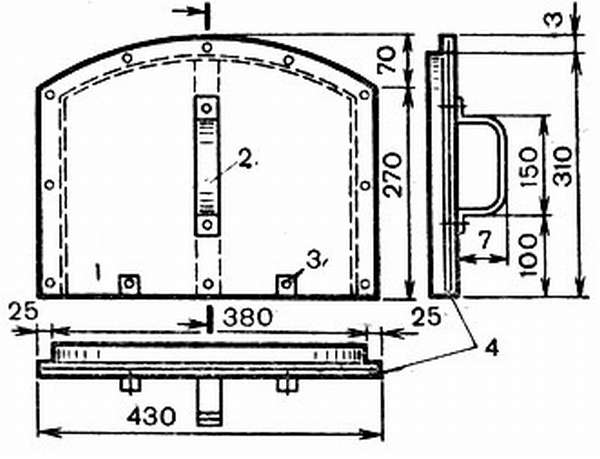
Drawings and dimensions
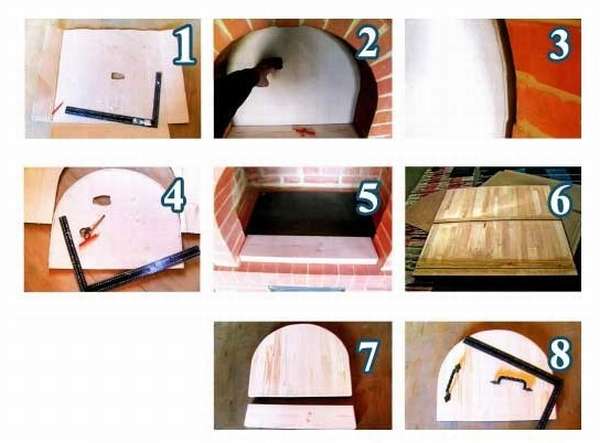
No special drawings required... You can make a blank from cardboard with your own hands. A piece of cardboard is taken a little larger than the mouth, a hole is made in the center.
The cardboard is placed sideways in the arch, holding it by the central hole, pressed from the inside to the wall of the furnace opening, and the borders are circled with a felt-tip pen. Now you need to take out the workpiece, add 3-4 millimeters to the drawn line and cut out the template.
The cardboard stencil is worth checking out before you start creating the main door. You need to try to insert it into the mouth of the oven. The template should easily move to the middle of the mouth, then rest against the walls (without falling inward).
Step-by-step instruction
The scheme for creating an oven damper includes the steps:
- The cardboard template is applied to the base, outlined.
- Holes are drilled for fastening the handles.
- The door is cut along the drawn contour.
- Excess elements that appear during cutting are removed with a grinder or a grinding wheel.
- The shield on the reverse side is fastened with dowels in the "dovetail" type.
- To prevent bending of the sheet of iron along the edge, it is wrapped around a wire. The ends of the wire are bent from below - these "legs" will firmly hold the shutter inside the mouth.
- The next step is to install the handle. The ends are fastened with steel rivets in pre-drilled holes.

Manufacturing scheme
The door is decorated if necessary. The easiest decoration option is to cover it with special paint. This is done this way: the front part of the damper is covered with masking tape, and the back is treated with dark heat-resistant paint. After drying, the masking tape is removed, the front surface is treated with a urethane heat-resistant agent (transparent varnish that gives only shine, or colored paint). From above, you can apply painting or attach forged decorative elements by welding.
You can improve the design. Some masters suggest installing timers and thermometers on barriers. Others insert heat-resistant glass windows in the center (allow you to observe the fire without having to move the door). This deprives the stove of its original national charm, but adds convenience of use.
How I modernized Buleryan
The features of the device of the stove in question are such that it can initially qualitatively and evenly distribute oxygen inside itself. The tubes draw in cold oxygen from the bottom, and heated air is discharged from the ones installed at the top. If desired, you can provide forced circulation of oxygen.
I took tubes of a suitable diameter and welded adapters from them to the holes of the stove pipe located below. I plugged the adapter off one edge.
I connected the other side with a fan.
I decided to use "snail" fan models. To ensure their work, in my case, a 90-watt engine at 2800 rpm was enough.
The results are excellent - after the modification, Buleryan began to work even more efficiently.
I am also thinking about connecting the corrugation to the upper outlets and spreading it in different directions - you will get a full-fledged heating system.
You can think of the instructions in your own way. I am happy to read your suggestions and maybe even put something into practice.
My instructions will help you to assemble a reliable, efficient, durable and productive stove with your own hands.
Video - Do-it-yourself Buleryan oven
Did you like the article? Save so as not to lose!
- 5
- 4
- 3
- 2
- 1
5
Vladimir Pechurin.
Made buleryan according to your recommendations. The result was stunning. To say that this is a good oven is to say nothing. The oven is great. Thank you for the article.
Vladimir Pechurin.
Made the oven according to the recommendations of the author of the article. To say that the oven is good is to say nothing. She's just wonderful! I have never met anything better.
Evgeny
We did not try to consider the profile square pipe.