Hello everyone! We continue to study computer literacy with you. And if you have read my previous articles, then you already know and can do a lot.
I think that now there is no such person who would not come across such a concept as - a Windows window. But, and if you are, then you should definitely read this article to the end.
And for those who already have an idea about this, it will also be nice to familiarize yourself with this material.
Why? You ask.
Yes, because all work at the computer where the Windows operating system is installed is connected with the management of these very windows. And you just may not know all the subtleties and nuances of working with them.
And in this very article we will just consider them.
And so let's get started.
Windows windows. The main elements of the window.
Window is a rectangular area of the screen in which various Windows programs are executed. Each program has its own window. All windows have the same composition and structure.
The window includes the following elements:
· Title bar - the top line of the window, which contains the name of the program or the name of the window;
· Button for minimizing the window;
· Button for restoring the window (its appearance depends on the state of the window);
· Button for closing the window;
· System menu button - opens the window's system menu;
· Menu bar - contains commands for window control;
· Toolbar - contains buttons that call the most frequently used commands;
· Scroll bars - allow you to view the contents of the window vertically and horizontally.
· Working area - space for placing objects (text, pictures, icons, etc.) and working with them;
· Status bar - the bar on which the status indicators are located;
Window operations are very simple.
- To open the window, double-click on its icon.
- To temporarily hide an open window (somewhat relieve your desktop), click on the Minimize button of this window.
- To see an open window on the screen that obscures other windows (or if this window is minimized), click on the button corresponding to this window on the taskbar.
- To move the window, drag it, "grasping" the mouse pointer on the title bar (by pointing the arrow and pressing the left mouse button), to a new position on the screen.
- To resize the window, drag the window resizing handle or any (left, right, top or bottom) border with the mouse, the mouse arrow will change its appearance to a double horizontal, vertical or diagonal arrow (12). The user can set the size and position on the screen of the window (s) only of normal size.
- To expand a window to full screen, double-click on the title bar of that window or on its Maximize button.
- To restore the window to its original size, double-click on the window's title bar or on its Restore button.
- To arrange all open windows in a "stack" so that only the title bars of those windows are visible, right-click in any "neutral" area (for example, between buttons) on the taskbar. Then click on Cascade in the pop-up menu. Windows can also be tiled: Windows from left to right and Windows from top to bottom. Title bars and some part of the working area of open windows will be visible on the screen.
- To close the window, click on the Close button in the upper right corner of the window.
- To reopen a closed window, you must repeat all the steps that you followed when you first opened this window. Closing a window also causes the corresponding button to disappear from the taskbar.
- To view the entire contents of the window, use the scroll bars or cursor keys.
The context menu contains basic commands for managing the object.
To call the context menu, right-click on the object. For example, if you right-click on the My Documents icon, a context menu for that folder appears, which contains a specific list of options. Menu items are selected, as usual, by pressing the left mouse button.
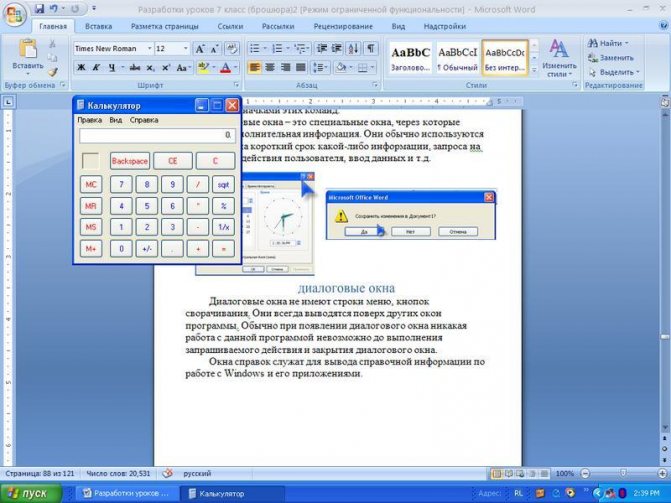
Dialog boxes (Fig. 16) appear when Windows needs additional information to execute a command.
7. MS Word program. Basic functions, technology of preparing a document for printing.
Microsoft Word is a powerful word processor designed to perform all text processing processes: from typing and layout, to spellchecking, inserting graphics in the * .pcx or * .bmp standard, printing text. He works with many fonts, both Russian and any of the twenty-one languages of the world.
Microsoft Word allows you to enter, edit, format and format text and correctly place it on the page. With this program, you can insert graphics, tables and diagrams into your document, as well as automatically correct spelling and grammatical errors. The Word text editor has many other features that make it much easier to create and edit documents. The most commonly used functions:
- cutting out pieces of text, storing them during the current session of work, as well as in the form of separate files;
- inserting pieces into the desired place in the text;
- replacement of words one by another, partially or completely throughout the text;
- finding the necessary words or sentences in the text;
- text formatting, i.e. giving it a certain look according to the following parameters: width of the text column, paragraph, margins on both sides, top and bottom margins, spacing between lines, alignment of the edges of lines;
- automatic pagination of text into pages with a specified number of lines;
- automatic page numbering;
- automatic entry of subheadings at the bottom or top of the page;
- highlighting a part of the text in bold, italic or underlined;
- switching the program to work with a different alphabet;
- tabulation of lines, i.e. creating constant spacing to represent text in columns;
- when entering text, you run into the end of the line, Word automatically makes the transition to the next line;
- if a typo is made when entering text, the auto-correction function automatically corrects it. And the Auto Spell Checker highlights misspelled words with a red squiggle line to make them easier to see and correct;
- if you use hyphens to highlight list items, use fractions, trademark marks or other special characters, the auto-formatting function will correct them itself;
- the ability to insert formulas, tables, figures into the text;
- the ability to create multiple text columns on one page;
- selection of ready-made styles and templates;
- to represent text in the form of a table, you can, of course, use the tabulator, but Microsoft Word offers much more effective tools. And if the table contains numerical data, then it is easy to turn it into a chart;
- preview mode allows you to see the document in the form in which it comes out of print. In addition, it allows you to display all pages at once, which is convenient for making changes before printing.
The program also offers a number of features that save time and effort. Among them:
- autotext - for storing and inserting frequently used words, phrases or graphics;
- styles - for storing and specifying whole sets of formats at once;
- merge - to create serial letters, print envelopes and labels;
- macros - to execute a sequence of frequently used commands;
- “wizards” - to create professionally designed documents.
To print the active document, just click the Print button on the Standard toolbar. However, if you need to print, for example, selected sections of text, or multiple copies of a document, place multiple pages of a document on one printed page, or print a summary of the formatting styles used in the document, you should learn more complex print job management. Word provides the tools to customize the printing options you need to accomplish the above tasks.
Operating system
Probably, not without reason in translation into Russian, the operating system is called "Windows". And it is hardly a coincidence that the "window" is the main concept in the interface. We first learned about this OS back in 1985. Then the first version appeared.
In general, at first the attempts were not very successful. The first versions were not like full-fledged systems. They all represented a set of settings for DOS. Despite this, they could be engaged in adjusting the operating modes of the processors, supported multitasking, and were engaged in the standardization of interfaces.
Each such system consisted of three modules. The first was to manage memory, run executable files, load dynamic libraries. The second was in charge of the graphics, and the third worked with the windows. Their elements from that moment have expanded significantly, although the main parts have remained all the same.
Basic elements of a Windows XP window
Windows window concept
Windows are one of the basic, most important elements of Windows. The operating system itself is named after them. Folders, programs, files open in the form of windows.
Window - a rectangular area of the screen (there are also exotic windows in shape: round and curly, mainly generators of serial keys and multimedia players). The window displays the contents of folders, drives, running programs, documents being created, as well as Windows requests and messages. The window allows you to control an open object.
There are several types of Windows windows:
Folder and Disk Windows
show the contents of disks and folders.
Windows of programs (applications)
display the work of programs, inside these windows open
document windows
.
Document windows
open documents created in programs (if they allow you to work with several documents at the same time). They open and are located only inside the window of their program, they do not have their own menu. The contents of each such window can be saved in a separate file.
Dialog boxes
occur while working with application programs and the operating system itself. Usually they are needed for settings, choosing a method of action or confirming it. The dialog boxes also include the message boxes of the operating system.
Windows window structure
The windows are decorated in the same style, have elements common to all and behave almost the same.
Basic elements of Windows windows:
· Title line. On the left of it is the system icon (clicking on it brings up the window's system menu, double-clicking the window closes the window), next to the icon, depending on the window type, is the name of the open folder (or the path to this folder, depending on the settings); the name of the document and the name of the program in which it is open; the name of the dialog box, on the right are located:
· Window control buttons: minimize to the taskbar, expand to full screen (minimize to the window), close.
· Menu bar. Each disk window, folder, program has its own menu bar, often not similar to others, and some programs do not have this line at all.The menu bar contains command names such as File, Edit, View, Help, and others that, when clicked, open a menu that allows you to select various commands.
· Toolbar. Each window has its own toolbar, it contains icons, as a rule, duplicating the most frequently used commands found in the command list of the menu bar. Designed to speed up work in the window of a folder, program and more convenience for the user.
· Address bar . Quite an important element of the window, it provides easy navigation, quick transition through the folder structure on the computer. And also a quick search for a folder or file by the address of their location. For example, the web page data (URL) is entered into the address bar in the browser, thanks to which we "walk" on the Internet.
· Panel of typical tasks. Located on the left side of the window and allows you to perform various tasks, depending on its content.
· Working field. The main part of the window, in its space there are disks, files and folders (if it is a folder window), for Word the working field is a sheet.
· Scroll bar . This window element appears when the information does not fit in the window in width or height. Thus, by moving the elevator slider, you can view the entire contents of the window vertically or horizontally.
· Status bar . Located at the bottom of the window (its presence is due to the settings of the window or program). It shows service information. So, in MS Word, the status bar shows the number of pages and sections in the document, the language of the text and other information.
These are the basic elements of almost any Windows window.
Source: asmircomp.ru
Diversity
The window interface and its elements may vary. For example, the classic type is represented by the use of elements for different tasks. For example, to organize menus, message boxes or dialogs.
There are applications that fully implement the windowed interface. Such programs usually call separate windows for each subtask. In them, you can work simultaneously with several documents, placing them in a separate block (pane).
So, if we have a window in front of us, regardless of the operating system, we can see a number of elements. You can highlight the contents of the window. If, for example, take the window "My Computer", then the contents will be disks, folders, the directory on the side and the toolbar.
There are window controls. For Windows from version "95" they are the same. There is a window menu on the left side of the header. In the upper right corner there is a "Minimize" icon that "hides" the window on the taskbar, "Maximize" - shows a previously hidden window or switches to full-screen mode, "Close" - exits the program or closes a separate window. If you take the OS X operating system, then all these buttons are in the left corner.
Further, the window has a frame. It helps to separate the content of one block from another. Over time, the frame began to adjust the size of the window. Dragging in this way was not available initially. If you don't like the frame, you can replace it with a shadow. Visually, such blocks will still differ from each other.
The next element is designed to be resized. He settled down below. in the right corner. But in some blocks it is not. And the last main element is the title of the window. Most often this is the name of a folder, document, program, etc. If the block does not have the ability to freely drag and drop, then the title can be an assistant in this.
Windows window types and elements
Laboratory lesson number 2
Introduction to the Windows operating system. User interface
Objective - to study the basic elements of the Windows user interface (working with windows)
Types and elements of windows windows.
Window -it is the main element of the Windows GUI.In the windows, work with active applications is carried out, files and folders are opened, system messages are displayed.
Distinguish the following types of windows:
Typical window (folder or application window)
· Window for displaying system messages (informational).
| Menu bar |
| System menu icon |
| Address bar |
| Title bar |
| Toolbar |
| Window control buttons |
Work area Scroll bars Status bar
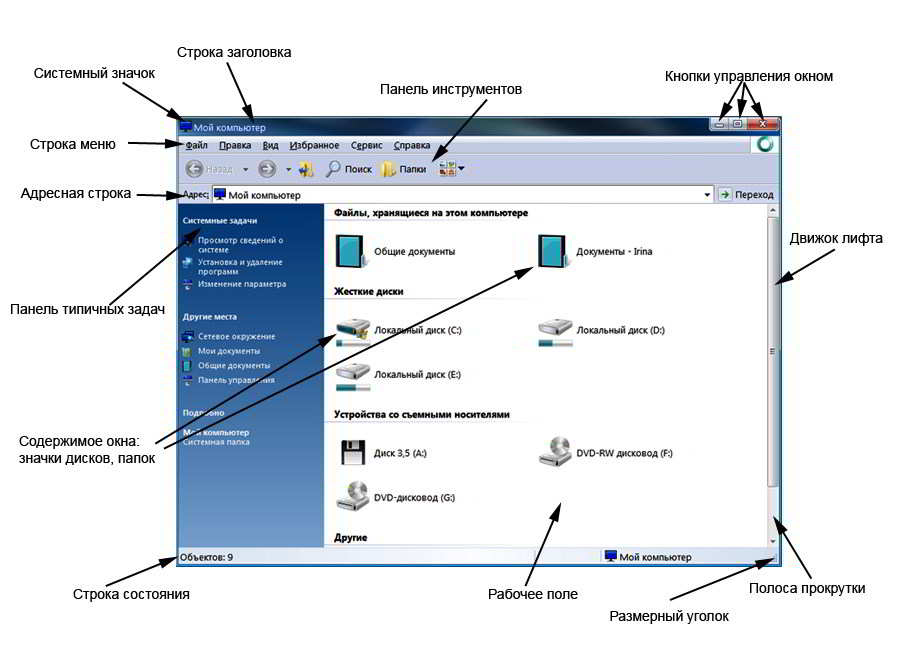
Figure 4.6. View of the Explorer window (typical Windows window)
A typical Windows window contains the following elements:
Title bar... Includes a system menu icon, a window title that lists the name of the open document and application name, and window control buttons. System menu allows you to minimize and maximize the window, restore its previous appearance, change its size.
History
For the first time, the main elements of the window and the window in general appeared back in 1974. Then all research took place at the Xerox PARC center. The developments were calculated on the development of the Xerox Alto system and the Smalltalk language. The first options already had borders, names, although there were no buttons for managing windows. In the next environment, Xerox, the windowed interface has become a further development. The very first successful project that did everything possible and what we are dealing with now was the Apple Macintosh in 1984.
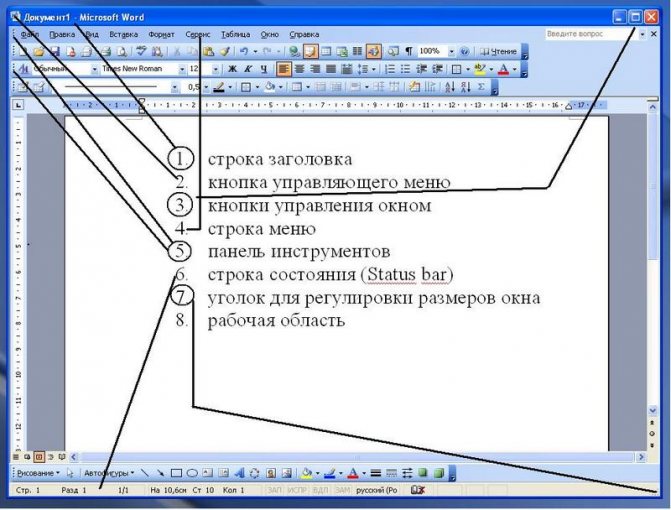
Basic elements of the Microsoft Word application window
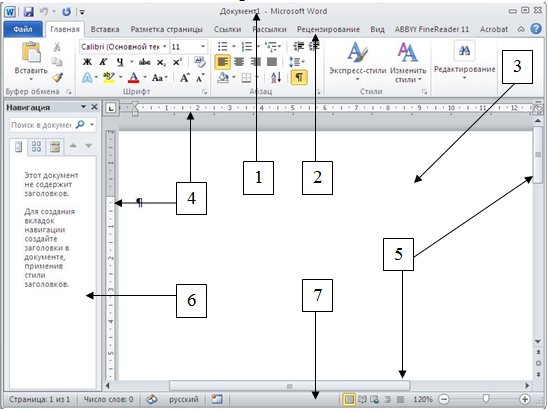
Fig. 1. Elements of the Microsoft Word window
The Microsoft Word window contains the following items (fig. 1)
:
1. Title line.
2. Menu barconsists of menu items (tab names). On each tab in the form of toolbars, commands are grouped according to their functional characteristics. Toolbars are designed to quickly execute commands.
You can customize the appearance of the menu using the command “File, Options, Customize the Ribbon. The dialog box that opens contains a list of standard menu tabs and toolbars and the ability to create a new tab. You can customize which toolbars should be present at the moment on the screen in the Microsoft Word window. The dialog box lists all the toolbar commands. In the list of standard menu tabs, check the box for those that should be visible on the screen.
The buttons and fields on the toolbars are used to invoke most of the commands most commonly used when working in Microsoft Word.
3. Working field Is the space on the screen used to create and work with a document.
4. Scale bars (horizontal and vertical) can be displayed using a checkbox on the toolbar on the View tab in the Show area.
The horizontal ruler allows you to change paragraph indents, page margins, the width of text or table columns, and set tab stops. For this purpose, indent markers are used. They reflect the settings of the paragraph in which the cursor is located. The red line indent marker is located in the upper left corner, in the form of a triangle pointing downwards. Left and right margin markers are positioned at the bottom corners of the horizontal ruler, respectively. The double indent marker (it is a small rectangle on which the left indent marker is located) is designed to simultaneously change the left indent and the red line. To use a double marker, place the cursor on the area of the rectangle and move it while holding down the left mouse button;
The vertical ruler allows you to set the size of the page margins at the top and bottom, the height of the table rows.
5. Scroll bars. They are used when all the text does not fit on the screen and needs to be shifted up and down or left - right. By dragging the slider with the mouse, you can quickly move through the text.
6. Navigation area. Provides the following features: viewing pages in a document, viewing headings in a document, searching text by a sample.
7. Status bar. FROMContains information about the open document (number of the working page, total number of pages, line and column where the cursor is located, etc.), and also provides the ability to quickly switch between different modes of viewing the document and adjust the scale of displaying the document on the screen (allows you to enlarge or reduce the display of the document in the range from 10% to 500%). You can customize the status bar using the context sensitive menu.
Source: megaobuchalka.ru
Using the Toolbar
Execution of commands, designed in the form of buttons on the Toolbar, is carried out by a simple left-click on the desired button.
1. In the list of folders displayed in the window of the C: drive, find a folder named Windows and click to make it current (Fig. 1.11). If the Windows folder is not visible in the window, make it visible using the Left, Right, Down, or Up scroll buttons (Fig. 1.10).
2. On the Window Toolbar, click the Properties button. After a pause, the information window Properties: Windows will appear on the screen, in which various information about the selected object (Windows folder) will be displayed. Pay attention to the very interesting data regarding the size of a folder (the amount of disk space it occupies in bytes) and the number of files and folders it contains. Close the window by clicking the OK button.
3. Using the Control Panel, you can change the form of the objects in the window. Place the cursor over the button with the black triangle pointing down and hold it there without clicking. After a short time, a small prompt will appear about the purpose of the key.
Remark. In Windows, such buttons are always responsible for the appearance of predefined lists of parameters or commands, from which the user must select the desired option.
4. Click the View list button. Select the command from the drop-down list.
do Small icons.
5. The operating system will then resize all the icons in the window. Thus, it is possible to see a larger number of objects stored in it with the same window size. Try to change the form of presentation of objects in the window yourself by sequentially selecting the List and Table options from the list. Then restore the original Pain regimen.
Windows in the Windows operating system
The name of the Windows operating system in translation from English means "windows". This name reflects the whole essence of this operating system, tk. absolutely all work here takes place in rectangular areas on the monitor screen, the so-called windows.
Window Is the main work area for applications, documents and information messages, bounded by both fixed and variable boundaries.
The user has the ability to manipulate windows: change their borders, minimize and maximize, move them to a convenient place, or close them completely, thus stopping work with a document or program. The window size can be set to fill the entire monitor screen, in the so-called full-screen mode, or hidden in the taskbar of the desktop. Programs can open several windows, where the results of work or information required by the user will be shown.
Traffic
Window elements are an important part of them. But it is also important to understand what opportunities these blocks have. As mentioned earlier, this is a movement. If a windowed interface is used, then most of the windows can actually be moved. In words, it seems difficult. But in reality, this is just the usual movement of windows across the desktop. It is carried out by capturing a title or frame. Through the menu, blocks can be transported using the keyboard.
You don't need to do anything to make the window appear in the middle. This is configured by default by the system itself.But you can change this in the settings. Perhaps you want them to open stepwise or randomly, or in a specific place, for example, in the lower left corner.
If you have moved windows at least once, then you know about the sticking effect. For example, you needed to open two folders at the same time and stretch them to half a screen. When one occupied the first half, the second "magnetized" took the second. This happens because there is an area near the border of each frame, and if the border of the second frame falls there, they both "stick".
Basic types of windows in Windows
There are three main types of windows in the Windows operating system:
- Program windows or in other words - application windows. Any program has a main window through which interaction with the user takes place. In addition to the main window, applications can open secondary windows that are subordinate to the main one.
- Document windows... Unlike program windows, this type of workspace is controlled by the program that opened the document window. The document window is located only inside the main program window.
- Dialog windows or a dialog box. Most often, it contains control elements that set the operating settings of the program.
Properties
The window interface is a unified object. Each window does not differ from the previous one, unless, of course, we are talking about different programs. A rectangular window that has a frame. There is a color scheme around the perimeter that differs from the background of the window itself. A title or name is displayed at the top, and there are controls.
It is possible to make windows transparent and translucent. Translucence is observed through the frame or other windows. In general, depending on the operating system, the graphical elements of the window are different. Therefore, it can be both a separately launched program and integrated into another environment.
Window states in Windows
Windows in the Windows operating system can have several states: expanded or collapsed, active or inactive.
The window can be minimized if at the moment you do not need to work in it, but you may need it soon. When minimized, the window hides in the taskbar and is presented there as an icon. When expanded, the window is operational. As mentioned, it can be expanded to full screen or as a rectangle of any size.
Interface
What is a windowed interface? It is a technique that helps to organize the full screen interface of an application. Each part that goes there is in a window, its own subscreen space. This space can be placed anywhere on the main screen.
This method can be implemented using graphics and text mode. But the popularity of this method of organizing information was brought precisely by operating systems, including Windows and Mac. The windowed interface is now one of the most popular types of user interface.
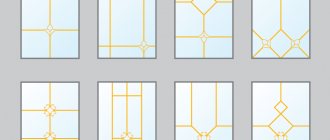
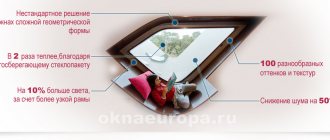
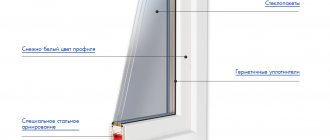
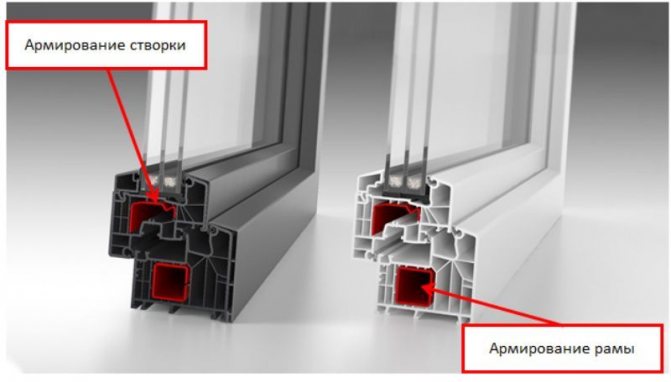
Related article: How to adjust a metal-plastic window
Windows window elements
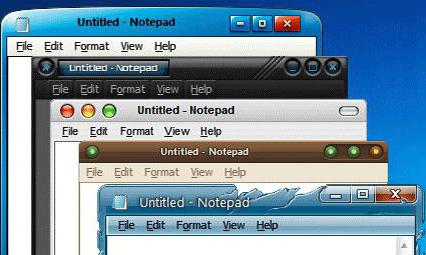
- Workspace... This is the main and most important part of the window. Has the largest working area. In the work area, all information that the user operates is displayed or entered. For example, typing text in the standard Windows Notepad application, you enter information in the working area of the window of this application.
- Title bar... It contains the name of the program or document, as well as the window state control buttons, which are located in the far right area of the title bar.
- Menu bar... Here are the sections of the menu, when you click on them, a drop-down list of submenus opens with the items of this section of the menu.
- Window border... Represents a bounding box for the size of the window. The window can be resized by placing the mouse pointer over the border. In this case, the cursor changes to a double-headed arrow.By holding down the left mouse button, you can move and expand the horizontal or vertical border of the window to a size convenient for you.
- Toolbar... Typically located directly below the menu bar. This area contains buttons for the most frequently used commands. Such a panel is used to equip programs with great functionality.
- Window status bar... Its place is at the bottom, on the border of the window. The status bar may contain information about the contents of window objects and other information depending on the running program.
- Window scroll bars... The so-called sliders for vertical and horizontal scrolling. In an empty window, they are absent and appear only when the content of the work area is completely filled and the work space is forced to expand downward or sideways into an invisible part. To scroll the work area, use the scroll bars, by left-clicking on the arrow buttons or by placing the mouse cursor and holding the left mouse button, move the work area of the window. Another convenient and probably the most common method is scrolling with the mouse wheel. Almost all mice are now equipped with a scroll wheel.
We examined the basic, standard window elements in the Windows operating system. Depending on the programs, there may be other elements related only to the windows of the program being used.
Source: www.pc-school.ru
Programs
The more complex the program, the correspondingly more window elements. Word, Excel and similar software have many different parts, limited by a frame. But there are also universal elements among them. For example, there is also a scroll bar, a border around the perimeter. At the top you will find the title, and in the right corner you will find the Minimize, Maximize, and Close buttons.
At the bottom of the frame is statistical information: document pages, word count, language, markup and scaling. Since both programs are from the same manufacturer, the elements of the Excel window are practically the same. The only difference can be in their functional purpose. But if you do not look at each tool in detail, you can highlight the large panel of options, which is in both text editors.
As usual, on the frame in the upper right corner there is a menu that opens a number of options, and next to it - a set of quick processes: save and "back / forward". Below is the main block with tools. Well, the main element of a program window of this type is the working area. In the case of Word, this is a sheet of paper, and in Excel, it is a table.