Articles
All photos from the article
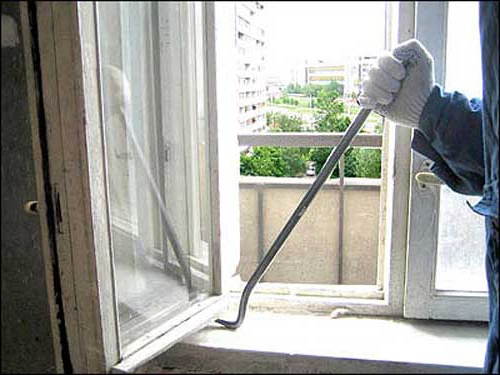
Often, in the apartments of the Soviet era, window blocks with a narrow sash are installed, which, according to the plan of the designers, is intended to function as a window. However, it is not always convenient to open it, so many home craftsmen are forced to make the window on their own.
In addition, the need for its manufacture may arise in the "blind" window frames of old private houses.
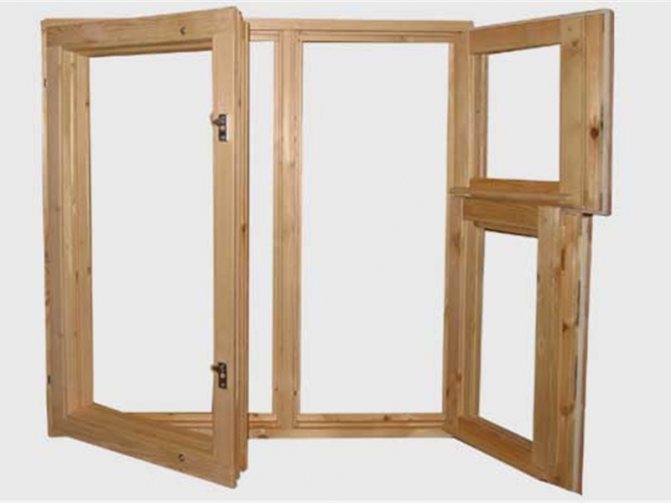
Wooden window with a window
To help in this matter, below we will look at how to make a window leaf in a wooden frame yourself.
DIY wooden windows
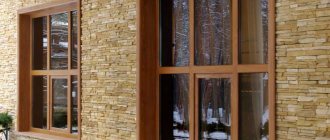
Despite the popularity of plastic windows, they cannot completely displace ordinary wooden windows. Wood "breathes" and products made from it are completely safe. The natural color and texture always attract attention, so your house will have an original, not official look. Of course, to make wooden windows for a summer residence with your own hands, you need to try a little. The skills of working with such carpentry tools as a plane, a milling machine, a screwdriver, a circular saw will be useful to you. If everything is in order with this case, then we will immediately begin work.
How to make a wooden window with your own hands?
- For work, you can use inexpensive pine. Oak, of course, is stronger, but if you are engaged in the production of windows for the first time, then it is better to buy an inexpensive material. The blanks for our window will have dimensions of 140x40 mm.
- The blanks on the vents will be in the form of bars 40x50 m.
- Next, you need to choose a quarter for glass 10x15 mm. On the side racks, it is done on one side, and on the crossbar, which stands in the middle, a quarter is selected from both sides. It is better to use a circular machine for this.
- The quarters are ready, you can measure the blanks to cut them to the desired length.
- Do-it-yourself wooden windows are best done on special carpentry equipment. For example, we perform this work on a circular machine.
- On the crossbar, we make a cut from both ends - a width of 40 mm, and a depth of 10 mm.
Choice of wood material
Since a wooden window can be made only from dry or glued wood (laminated veneer lumber), these materials are chosen for the manufacture of window frames.
It is better to make a window box from oak, larch or pine. If we compare wood with each other, then oak has a high cost. Making wooden windows with your own hands with high quality and inexpensive - it is quite possible, for this you need to choose the right material.

- Glued laminated timber. It is a lightweight and durable material that does not deform and has moisture resistant properties. It acquired such characteristics due to its layering and maximum drying. This material is most suitable for the manufacture of wooden windows. In this case, the most rational size of the timber is 5 × 5 cm.
- Solid timber. Sometimes the material has cracks and knots, so when buying it, it is carefully examined for their presence. In addition, the board can lead, and it will change its shape. There is also a danger that the frame may crack during operation. Despite its disadvantages, solid timber is a good value for money.
- Plywood sheets. This is the cheapest material of poor quality. Plywood tends to quickly absorb moisture and deteriorate.Therefore, the material is used only for those windows that are planned to be installed indoors.
How to make a window
Now let's look at several options for making a window.
FIRST OPTION - when the narrow frame is divided into two parts.
SECOND OPTION - when a window block is inserted into a wide frame.
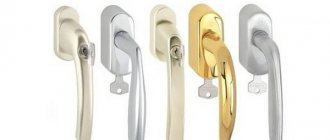
First of all, I suggest you consider the details of which the frame itself is made 1-glass, 2-fittings, 3-spike. Of course, everyone knows what glass is. Those who are not familiar with fittings are better off not taking up work and not spoiling the frame. A window unit is more expensive than you pay to the master. But we will talk about the ship separately.
SHIPKA - but by another name "frame beam". The frame of the frame is assembled from this part. We will work with this frame beam.
First, let's look at the first version of the window inset. To be honest, I always recommend it to all customers.
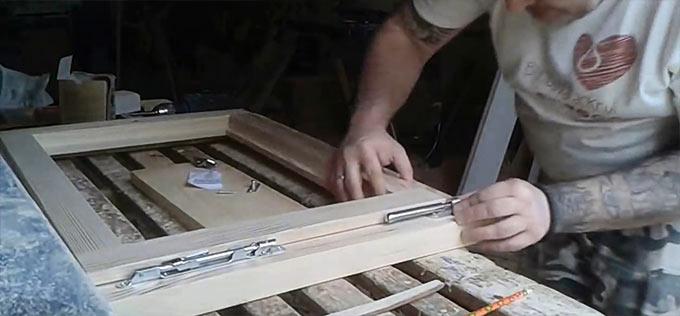
The removed double frame, without dividing it, we must cut it into two parts, into the future window and the future frame. First of all, we remove the fittings (except for frame hinges), remove the glass. Then we measure the length of the frame, divide it by 3. We measure the resulting number from the top of the frame and carefully, at right angles, cut it.
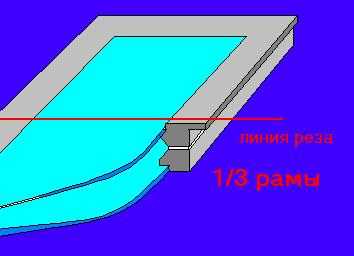
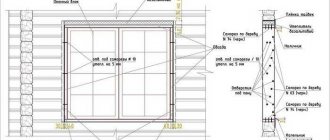
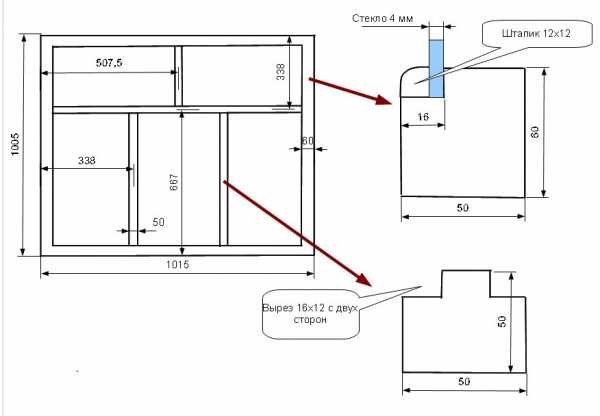
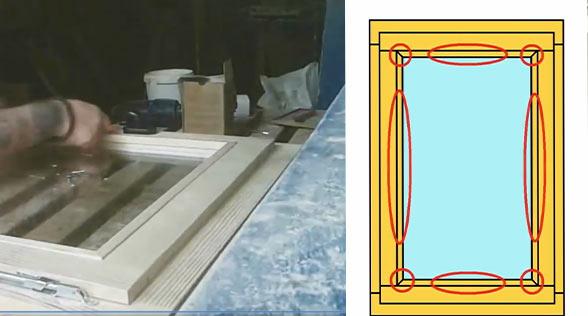
Well, let's start. As a sample, we take the frame beam of your frame (I warn you!) There are no identical frames, although they are made at the same woodworking plant, and even on the same machine), which is drawn in the first figure.
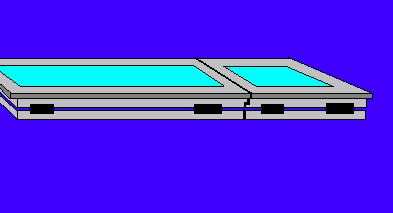
In the second picture, a bar is drawn from which the spike will be made.
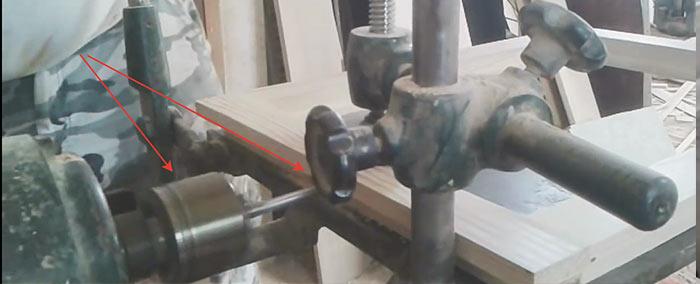
The red lines indicate the dimensions that must match the sample of our frame bar. I do not specifically write the parameters of the bar. I repeat once again, it is different on each frame (on average, it is 4 x 5 cm).
The third picture shows the quarter removed for glass (it is advisable to do this operation on a machine tool. But if you do not have a machine tool, then you can really make a quarter with a simple chisel, although you need to have some skill).
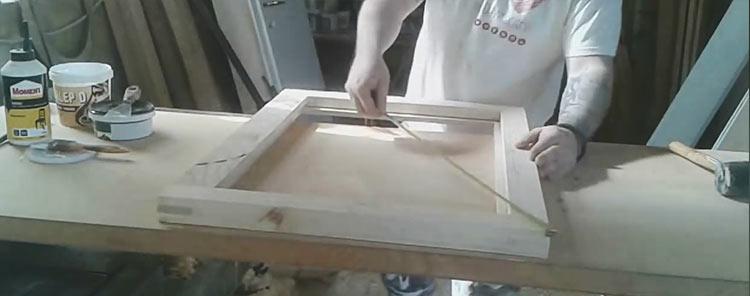
In order for the spike to be almost ready, you need to remove the phase, as shown in the fourth figure. And - almost - because we will complete it already on the frame.

On the other side of the tenon, make the same tenon connection.
What are you working on now?
Much also depends on the size of the window. We have three-leaf windows. Initially, only two outer doors were provided for opening, and only one of the doors (right) under the ceiling had a window, and the middle door was stationary (without opening). The frames were double-leafed, including the window. I., in my opinion, the two-lane system solved the issue of soundproofing from the street, tk. the sound was extinguished on the aisle between the frames, it entered the room with much lower decibels, and I also don’t remember that the windows were studded with insulation. She grew up in this apartment since childhood and it was always warm and the window was always ajar. When I replaced them with plastic windows, I regretted only one case. Soundproofing has become ideal, almost zero, but under the condition of a completely closed window, but the ventilation began to bring great sound discomfort - all cars now "PASS" through our room)))). By the way, in the new window, the window was moved to the middle part of the sash, and the outer ones were left stationary. I think that the right-sided arrangement of the vents in the previous windows was justified - the sound from the street was directed into the interframe space with a large area and was extinguished there))
I saw in a commercial that now, to ventilate a room with plastic windows, specialists are invited who cut a small ellipse-shaped hole in the frame at the top in the middle (5-7 cm long and 1.5-2 cm high), and insert a valve into this hole, which is not necessary close or open. This is the "ajar" window all year round))))
video instructions for manufacturing, installation, repair, drawings, arched extensions, photo and price
All photos from the article
Plastic double-glazed windows that are popular today have many advantages, but it does not always make sense to install them. For example, if you need to glaze a wooden house in the country, then having at least a little experience working with wood, it will be much cheaper and more practical to make homemade frames or update existing ones. Below we will get acquainted with the technology of manufacturing windows, and also consider how to update old wooden windows with our own hands.
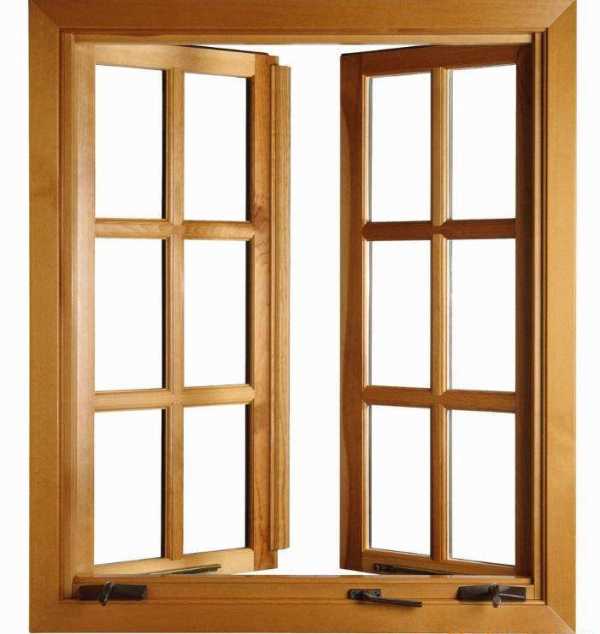
Wooden double-leaf window
Manufacturing of windows
In order to make a window from wood with your own hands from start to finish, you must perform the following steps:
- Drafting a project;
- Manufacturing and installation of the box;
- Window frame manufacturing;
- Installation and glazing of the frame.
Below we will take a closer look at all these stages of work.
An example of a wooden window scheme
Drafting a project
First of all, you need to complete the drawings of how to make a wooden window with your own hands. To do this, you need to decide on the size of the future product and its design. Accordingly, you should first measure the window opening.
In order to correctly draw up drawings of wooden windows with your own hands, you can familiarize yourself with existing projects, and choose the most optimal one of them. In this case, all that remains is to adjust the dimensions of the structure to the window openings of the building.
As a result, do-it-yourself drawings of windows made of wood should display all the details of the product, as well as their dimensions, indicated necessarily in millimeters. The presence of such a project will greatly simplify the workflow, since all the nuances of the design will be before your eyes. Accordingly, the likelihood of making mistakes is reduced.
Below, as an example, consider how to perform the simplest design - a deaf wooden window with your own hands.
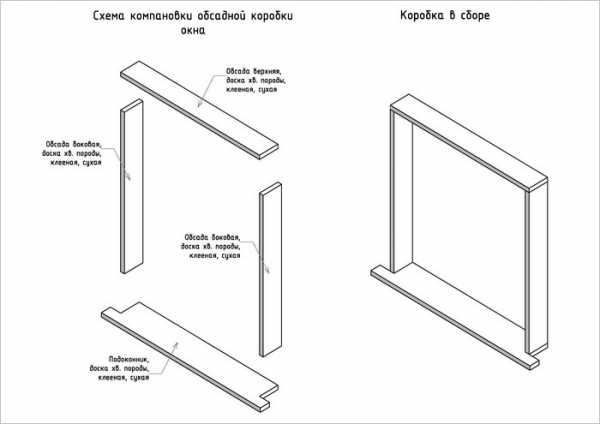
Window box scheme
Box making
The box is, although the simplest elements of the window, it must be approached very responsibly, since it is he who takes on all the load from the window. For the manufacture of the box, you can use only well-dried boards, without any defects. Pine boards are an excellent option, as they are quite resistant to moisture.
The instructions for making the box look like this:
- Work begins with the execution of blanks. To do this, it is necessary to saw off four parts from a board 5 cm thick - two equal to the width of the opening, and two equal to its height.
- Then, at the ends of the boards, which will fit along the width of the opening, you need to cut a thorn with a jigsaw. For vertical blanks, corresponding grooves are made from the ends.
- Further, on each board, using a planer, a groove is selected with a depth of 4 mm and a width of 50 mm.
- After that, the box is assembled. The joints must be glued with wood glue. Additionally, the structure can be reinforced with metal corners.
- At the end of the work, the box is inserted into the wall. It can be fixed in the opening in different ways, depending on the material of the walls. Usually pins or dowel-nails are used.
Output
Having experience in working with wood, it is not difficult to make a window on your own. However, this work requires care and accuracy. At the same time, those operations that cannot be performed independently should be entrusted to specialists (see also the article “Wooden Euro-windows: how to make a box and a frame”).
You can get additional useful information on the above topic from the video in this article.
Is it possible to make high-quality wooden windows with your own hands? - It turns out that if you have the tools, the skill and a detailed plan, you can, and in this article we will tell you how.
This material is about handicraft production at home, about industrial manufacturing We talk about euro windows in this article: How factory production works.
Plastic windows are in high demand among consumers, but wooden windows and doors are a budget and more environmentally friendly option. Since it is not difficult to make a wooden window on your own, many install them in their dachas. The main thing is to understand how the window structure works. In order for the product to be of high quality, it is necessary to observe the production technology, the rules of wood processing and the assembly method. A step-by-step instruction with a detailed description will help with this.
Do you want to order ready-made wooden windows from the Moscow production of Dentro Windows with a 5-year warranty? Below are examples of prices per m2:
| Single leaf | Bivalve | Tricuspid | Balcony block |
| from 12 500 rub | from 12 800 rub | from 13 400 rub | from 12 500 rub |
Calculate the cost of wooden windows in
(Only for residents of Moscow and the Moscow region), send an application to calculate the cost:
Wooden vents: basic options. Manufacturing process. Alteration of window sashes
Often, in the apartments of the Soviet era, window blocks with a narrow sash are installed, which, according to the plan of the designers, is intended to function as a window. However, it is not always convenient to open it, so many home craftsmen are forced to make the window on their own.
In addition, the need for its manufacture may arise in the "blind" window frames of old private houses.
Wooden window with a window
To help in this matter, below we will look at how to make a window leaf in a wooden frame yourself.
General information
Is there a need for a window leaf at all?
To answer this question for yourself, we recommend that you familiarize yourself with its advantages:
- When opening, there is a uniform movement of air masses in the room, but there are no drafts.
- Increases the strength of the window due to the presence of spacers.
- The ability to adjust the opening range. For example, at night, when the body is most susceptible to drafts, you can open it slightly to provide a moderate supply of fresh air.
Hence, we can conclude that wooden windows with a vent for an apartment are indeed a useful element that increases the comfort of living in a home. Therefore, if your window does not have a window, it is advisable to equip it with this element.
Manufacturing
Materials and tools
Before making a window in a wooden window, you need to prepare some materials and tools:
- Bars for a frame with a section of approximately 50x60 mm (selected individually);
- Calipers;
- Joiner's chisel;
- A hammer;
- Roulette;
- Hacksaw;
- Electric planer;
- Roulette.
Note! In order for the product to serve for a long time, the wooden blocks must be dried and of good quality - without knots and cracks. In addition, they must first be treated with an antiseptic agent that prevents wood from rotting.
In the photo - timber 50x60 mm
Drawing
After preparing the tool and materials, you need to complete the drawing. To do this, first of all, you should measure the timber from which the sash is made in order to make a window from the same parts.
On the diagram, it is necessary to indicate in millimeters all dimensions of the window frame, sash and all other elements. The presence of a drawing will allow you to correctly cut the materials and avoid mistakes in the process.
Alteration of window sashes
First of all, it is necessary to redo both window sashes.
The instructions for doing this work look like this:
- The first step is to dismantle the glazing beads and pull out the glass.
- Next, you need to dismantle the upper sash strip and shorten the racks. If you cannot dismantle the upper bar, you can cut out part of the racks in the middle.
The connection of the parts is carried out using wood glue. If a router is available, the tongue / groove connection can be made.If it is not possible to cut the grooves, you should strengthen the connection with metal corners or strips.
- Then it is necessary to shorten the glass and glazing beads so that they can be inserted into the frame.
In the same way, the second, outer sash is performed, the only thing should be borne in mind that it must be smaller than the inner sash so that it can open freely.
Advice! Ordinary curtains interfere with the use of the window. Therefore, you can purchase special roller blinds for wooden windows with a vent or blinds.
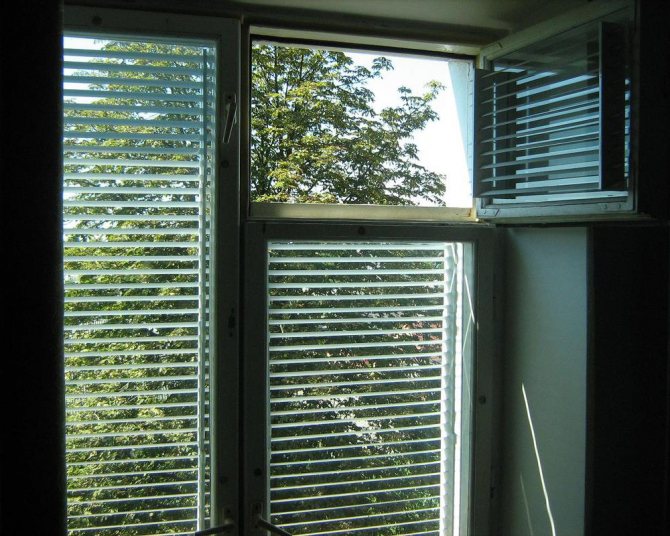
Example - blinds on wooden windows with a window
Manufacturing
Now you can start making the vents.
The work is done in this order:
- First of all, it is necessary to complete the frame of the future structure, which, in fact, is an analogue of a window sash, but in a reduced version. At this stage, you will need a router to make the grooves.
If there is no such tool, you should seek help from a carpentry workshop, where, according to the drawings, specialists will quickly process the timber. As a rule, the price for such works is not high.
- Next, according to the drawing, cut the timber into strips and make cuts at 45 degrees.
- On the cuts, it is necessary to make spikes and eyelets, with the help of which the frame parts will be connected to each other.
- Then you need to cut the glass to size and insert it into the frame. You can fix the glass by cutting glazing beads from the frame.
- Further, the structure is attached to the window frame with hinges and fittings.

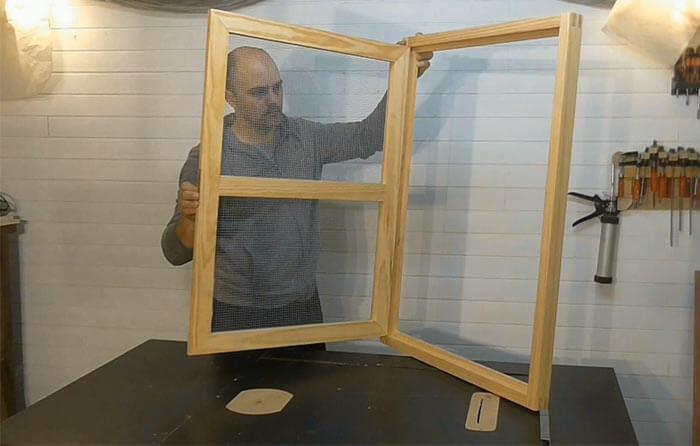
Example of a finished product
Advice! Before working on the manufacture, you should "fill your hand", for example, first make wooden windows with a window for the summer cottage.
The second sash is carried out and installed in the same way. After that, you just need to paint the finished products or open them with varnish. This completes the manufacturing process.
It should be noted that wooden windows with a window leaf with a double-glazed window are made in a slightly different way, since they have double sashes, however, the principle of operation still remains the same.
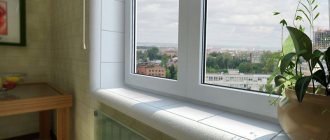
Window sill
One of the stages of installing wooden windows with double-glazed windows is working with a window sill. Material for him can be anything.
Installation of a window sill
Installation of the window sill is carried out in the following sequence:
- The desired shape should be cut from the purchased window sill.
- The window sill must be partially brought under the frame; in the lower part, the fixation is carried out using wedges made of wood.
- The empty space below is filled with foam. Subsequently, the protruding excess is removed with a knife.
How to make a window leaf in a wooden window yourself?
When the question arises of choosing windows for new housing or replacing old window frames, it is rather difficult to decide right away. This is due to the large number of manufacturers, because the materials for the production of windows are generally offered a little. Plastic, wood, aluminum are the main raw materials for their production. Well, manufacturers vary them and the characteristics of double-glazed windows and try to win over the consumer. However, with all the advantages of plastic windows, wooden ones, in some of their characteristics, are superior to them. In addition, wooden window sashes can be constructed, which speaks for the use of wood. It is much easier to make a window or frame of any configuration in a wooden window.

Scheme of a wooden binding of a window with a window.
Varieties and features of frame designs
There are many types of structures. They can be standard or made to order, depending on the window opening. But there are several main varieties:
Varieties and sizes of window frames.
- Blind window sashes that cannot be opened. For the penetration of natural light, they are located, for example, along a blank wall, along which a staircase is built to the 2nd floor.
- Opening.The number of moving sashes can vary from 1 to 3 or more, if the size of the window opening allows, and the width of the sash is not too narrow.
- Lifting and sliding. These windows differ in the way they open and are most often located in rooms with a specific interior to maintain style.
- Bindings with the installation of a window. Moreover, there can be several vents, and usually their number is determined by the number of window sashes.
It is the use of such an additional element of the window cover as a window leaf that gives a number of advantages:
- Through an open window, cold air, getting into a warm room, does not rush to the ceiling, unlike a plastic window with a swing-out mechanism. Due to this, air flows in the room, and there are no drafts.
- The window leaf does not affect the general properties of the window sash, while increasing the strength and reliability of the window structure due to the presence of a spacer;
- The window has a much higher range of regulation of the opening for ventilation, which means there is more opportunity to influence the flow of cold air into the room. That is, by slightly opening the window for the whole day, you can provide the room with fresh air throughout the night, when the body is especially susceptible to drafts. At the same time, the temperature inside the room will not undergo significant changes.
Option 2 - we install a finished glass unit - (new type of windows)
You can buy a double-glazed window without a frame from manufacturers or window companies, although the choice of sizes is limited there, so take this into account even at the stage of drawing up the window drawings.
To fix the finished glass unit in a wooden frame, a colorless sealant is required. It will be invisible and will not spoil the appearance of the window.
After the window is ready, it is installed in the window opening. This is not difficult to do, but when installing, you need to take into account the type of opening and the material from which the house is built. Rules for installing eurowindows in a brick and concrete room:
- The opening in which the glass unit is installed must be flat and clean. Using a level, the geometry of the opening is checked, all uneven places are leveled.
- A double-glazed window made of wood is installed in the opening and fixed with self-tapping screws. Mounts are made at a distance of 70-80 cm from each other. It is impossible to use polyurethane foam and nails for fixing.
- If gaps appear between the glass unit and the box, the window will lose its characteristics. To prevent this from happening, during installation, the window is treated with a sealant.
- All cracks and holes are sealed with polyurethane foam. It will protect the room from dust, dirt and cold air penetration inside.
- When the foam hardens, cut it off with a knife. Outside, the replaced area is sealed with tape, and cashing is installed on top. This is to protect it from destruction.
To ensure high performance, windows are insulated using Swedish technology. The method got its name thanks to the EuroStrip material, which was chosen by the Swedes. In terms of heat saving, groove insulation of wooden windows is not inferior to PVC step-glazing. The manufacturer produces 3 types of gaskets: silicone and rubber, as well as thermoplastic elastomer.
What might be required for the job?
Self-production of a wooden window with your own hands begins with the purchase of wood and the preparation of tools. You will need:
To work with wood you will need: hammer, saw, level, chisel, tape measure, pencil.
- bars for a frame with a section of 50x60 mm;
- bars for a vent with a section of 50x50 mm;
- carpentry chisel;
- a hammer;
- vernier caliper for accurate marking;
- tape measure (ruler), square;
- pencil (marker);
- an electric jigsaw with a set of spare saws or a hacksaw;
- sandpaper of medium and fine grain;
- construction knife with spare blades;
- electric plane.
In order for the manufactured window to serve for a long time without replacement or major repairs, the bars for its manufacture must be of excellent quality and dry.
They should be free of chips, cracks and other defects that can cause damage to the wood at the time of processing or sawing. Knots should be in a minimum amount and be small, or better absent. Such starting material will not only last a long time, but will also be easy to process.
List of possible instruments
Of course, you will need everything you can use to saw, grind, process wood. It:
- Electromeshka
- Just a chisel
- Electric planer
- Circular
- Manual milling machine for woodworking
- Painting knife
- Purchased glazing beads made from a similar wood species
- Silicone
- Construction gun
- Building meter
- Marker
- Pencil
- Metal ruler
- Wood glue
Making a window with a window
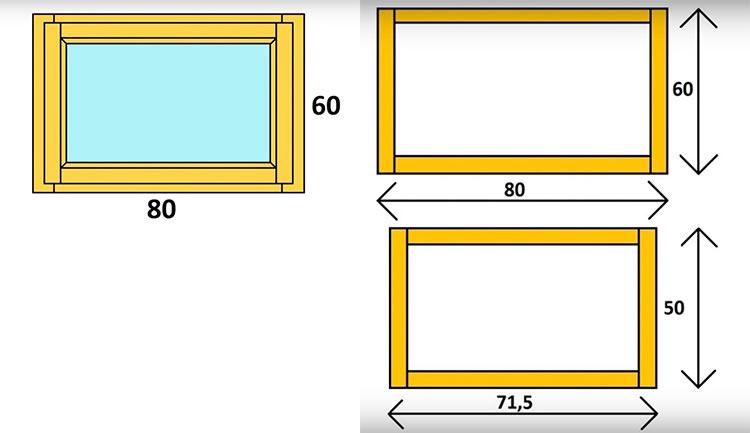
Scheme of half-preparation of the leaf for the installation of the leaf.
Before sawing the bars, you need to make a drawing of the window. At the same time, it must contain the dimensions of the flaps, vents. This will make it possible to buy only the required amount of wood materials, and also in the future will help to make the correct marking and cut of the bars.
The sash consists of such structural elements as:
- box;
- vertical strapping bars (right and left);
- 2 doors: 1 with and 1 without a vent;
- slider for the window;
- transom;
- imposts (horizontal, vertical);
- fastening elements (hinges).
Next, you should prepare the parts of the wooden window. They begin to do this by sawing off from the prepared bar of parts, the length of which corresponds to the horizontal and vertical bars of the strapping, slabs, transom. Their number and dimensions must strictly correspond to the drawing of the window. According to these drawings, you can saw off the details of the window. Further, folds are made on the strapping bars, the slab, the transom. The presence of such a recess on the parts of the window will allow the glass to be fixed in the future.
It is necessary to ensure that the depth of all folds is the same for all elements of the window, otherwise the glass will not fit tightly and it will be impossible to insulate it. Moreover, such folds are made on the transom on both sides of the bar. You need to perform these indentations with an electric plane. You can also cope with this task with a saw, preliminarily holding the block in a vice for rigidity.
Diagrams of the position of the pane.
However, the saw for such work must be with fine teeth, otherwise, when cutting, the edges may turn out to be uneven, with chips. If, when making the folds, minor defects (small indentations) were formed, then they can be leveled using a special putty for wood.
On the crotch, in addition to the fold, it is necessary to saw through a quarter, in which the window will later lie. The size of the selected quarter at the sash depends on which side the window will open, outward or inward. If you plan to open the window inward, then on the side of the fold, an additional restrictive bar is nailed or screwed onto the screws. When opening the vents inward, there is no need for such a bar. An additional indentation can be made with a chisel, and this can be done neatly and evenly.
After that, they begin to make spikes and eyelets. It is with the help of them that the frame will be fastened. A spike is a protrusion specially cut to size, and a slot (groove) is called an eyelet. The execution of lugs and spikes must be done strictly in size and very carefully, avoiding deviations even by a millimeter. The reliability of the fastening and the durability of the frame depend on their correct execution. When creating a thorn, it is necessary to take into account that its front shoulder will be the size of the already sawn fold.After marking, cuts are made using an electric jigsaw or a metal file. To make an eyelet, it is necessary to make cuts according to the marking.