Installing plastic windows is not a very time consuming job. Therefore, each person can independently start the installation of plastic windows. But who nevertheless decided to occupy himself with installing windows with his own hands, then he is faced with the problems of choosing fasteners. Indeed, there are many types of fasteners on the product market. And every novice builder asks a question.
What fasteners are best for window installation? To answer this question unambiguously, let's understand this issue thoroughly. And we will consider the types of fasteners for plastic windows, as well as installation rules and characteristics.
What it is
Installation of double-glazed windows in compliance with all requirements gives the product a guarantee. This is useful when hired workers are involved in the process.
An agreement is concluded with them, which states that the installation of plastic windows must be carried out in accordance with GOST.
Requirements and Recommendations
If foremen are hired for the work, they install the products according to the standard. By law, all templates are followed. But often, each individual case is discussed.
To install

If the worker performs the procedure in accordance with all the rules, then he must maintain appropriate documentation.
GOST for PVC windows 30971 talks about the following standards:
- filling the assembly seam;
- the size of the gap between the profile and the opening;
- the dimensions of the opening itself;
- installation of the structure;
- general installation rules;
- correct document management;
- guarantee.
When performing work, all of the above standards are observed.
To the window opening
According to the requirements, the window opening must be fully aligned. Most often, this is possible if the structures are installed in a new home.
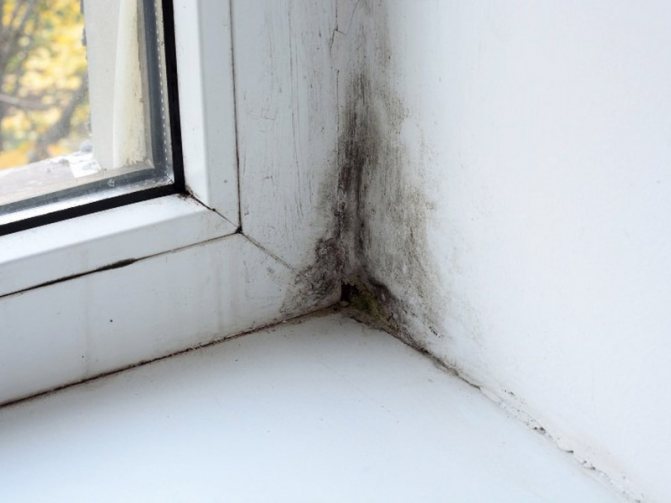
Difficulties may arise when replacing. The thing is that the opening transforms over time. It is influenced by temperature, wind and other natural conditions.
When dismantling, you may find that the plaster is sprinkled and the bricks are chipped off. In order to comply with all norms, it is necessary to prepare the opening for subsequent manipulations.
The surface must be cleaned of old plaster and treated again. After complete drying, apply a primer and leave to dry again. Only then can the main process begin.
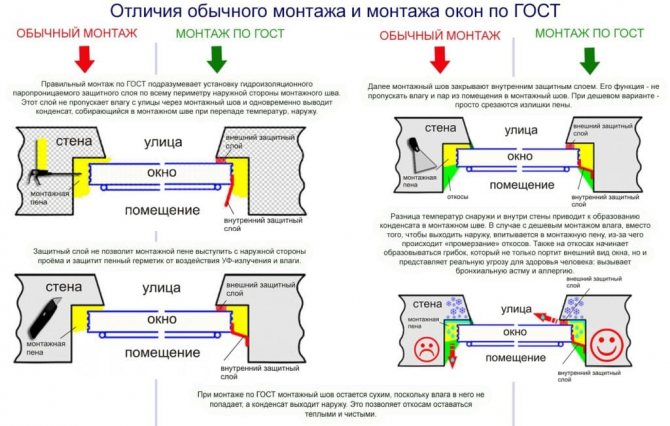
To the assembly seam
Its standards consist of two basic rules. First of all, it must be resistant to external influences. The connecting part of the structure has its own characteristics of heat and sound insulation, water resistance.
By standards, the seam is divided into three parts:
- interior;
- central;
- outer.

Each layer has its own purpose. Due to the external, moisture does not get into the joint. Central - has thermal insulation. Internal - aimed at vapor barrier.


Measurements of windows
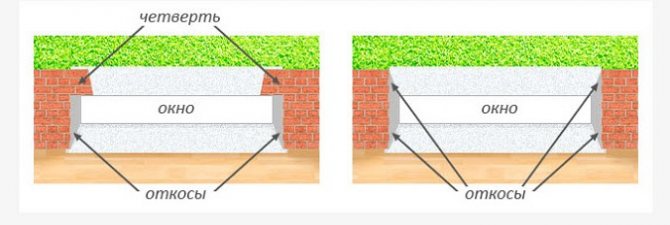
Carrying out the necessary measurements, you need to pay attention to the fact that window openings exist with a quarter and without. Accordingly, they have different formulas for calculating sizes.
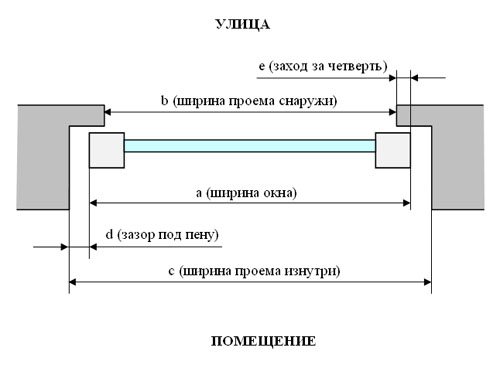
For the first case, we must measure the width of the opening between the existing quarters, this is done at the narrowest point. And then add 3-4 cm to the obtained figures - this will be the width of our plastic frame. In addition, it is important to check: the largest distance between vertical quarters should not exceed the calculated block width.
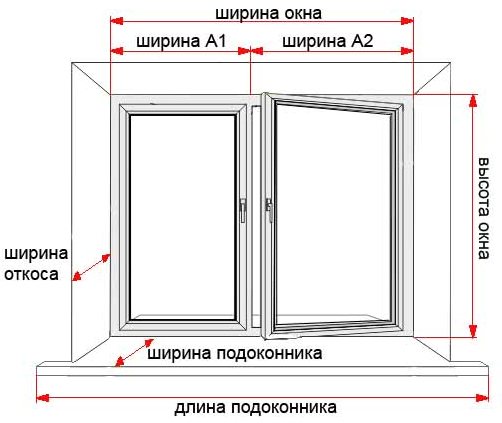
The height is determined by measuring between the upper quarter and the lower surface of the window opening.
General requirements
There are a lot of rules and regulations for the installation of the product. If they are observed, the profile will be assembled in accordance with GOST, for the installation of plastic windows. The company that will do the work must have special instructions available.
They are developed by special institutions. After that, the memos are checked by the organizations of the construction management.
The design must correspond to the building design or be approved by its author. Before starting the process, check the condition of the walls, heating and ventilation systems.
The regulations state that organizations regularly test the assembly seam. Unfortunately, if such systems exist, then no one adheres to this rule.

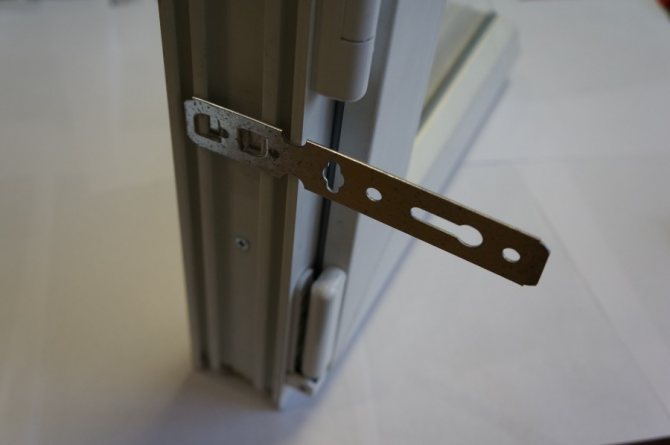
Anchor plates
I have already written about fastening a glass unit to anchor plates in this article. This is one of the most popular types of fastening in window companies.
Anchor plates are:
- swivel;
- non-reversible.
How to use this fastener for PVC windows, read the article to which I gave the link above. Everything is detailed in it.
It is worth noting the advantages of anchor plates:
- You do not need to drill through the frame, as is done with an anchor or screw;
- The presence of reinforcement in the wall will not affect the fasteners in any way. The plate can be rotated.
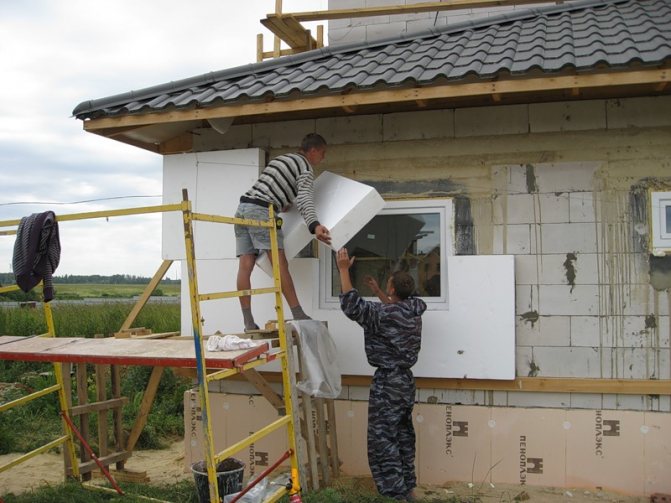
- Plating helps out in "complex" houses. For example, the same P-44 series.
Standard plate size 100-200 mm. Since the plate is attached to the outer edge of the frame, the 130 mm length is enough “for the eyes” for any home.
I note that each manufacturer of PVC profiles has products with different widths, therefore, plates of the appropriate size are needed. It is not a problem to find products in large construction hypermarkets. But my advice to you - it is better to order the fasteners together with the window.
Installation
It is recommended to entrust the installation of plastic windows in accordance with GOST according to the instructions to professionals.
Before starting, you need to make the right measurements. It is better to entrust this procedure to the masters who will later take on the installation.
In addition, there is a significant remark in the measurements. It is much better to measure a clean window opening, without plaster or other materials, so that the readings are as accurate as possible.
After that, they acquire a profile and proceed to dismantle the old frame and glass unit. Further, a clean window opening is prepared for the installation of a new structure - they are putty, cracks and irregularities are repaired.
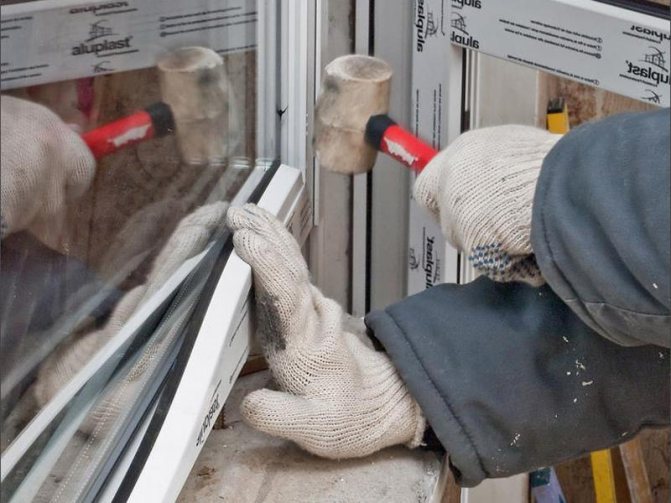
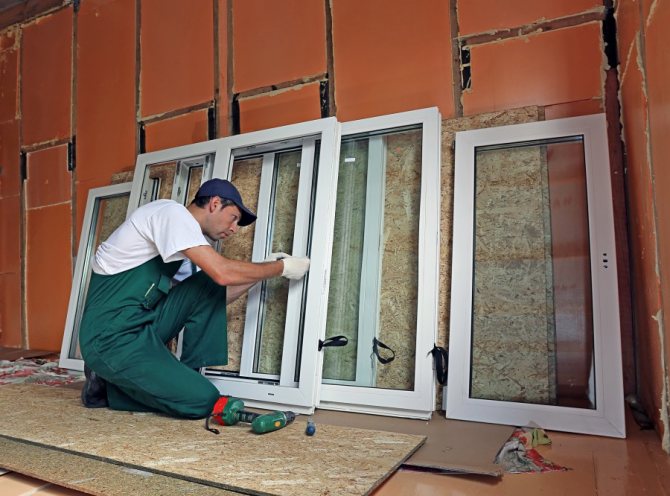
The new product is pre-assembled by removing the glass. This assembly has its advantages and disadvantages. The glass surface of the bag may be damaged if it is first removed and then reinserted. In addition, a product with glass is several times heavier.
Before working with the profile itself, the inner and outer window sills are mounted. They also adhere to the rules prescribed in the instructions.
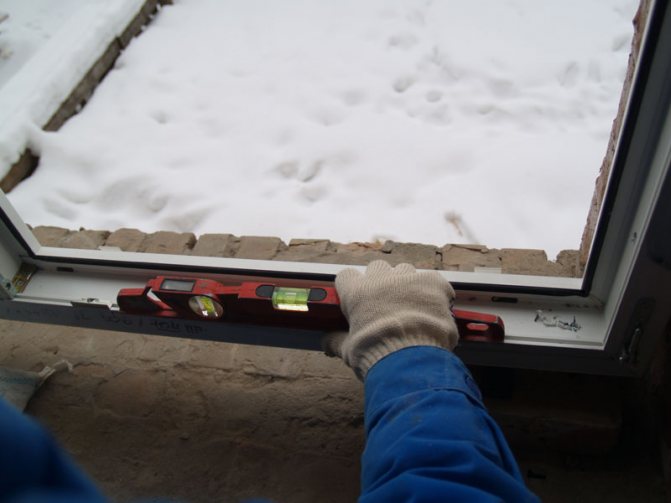
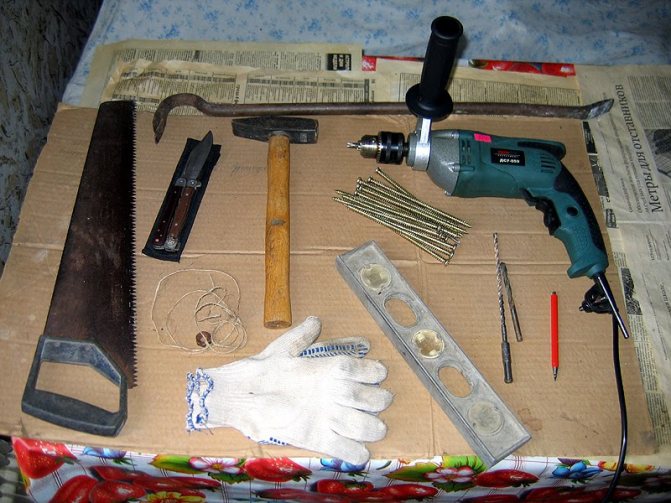
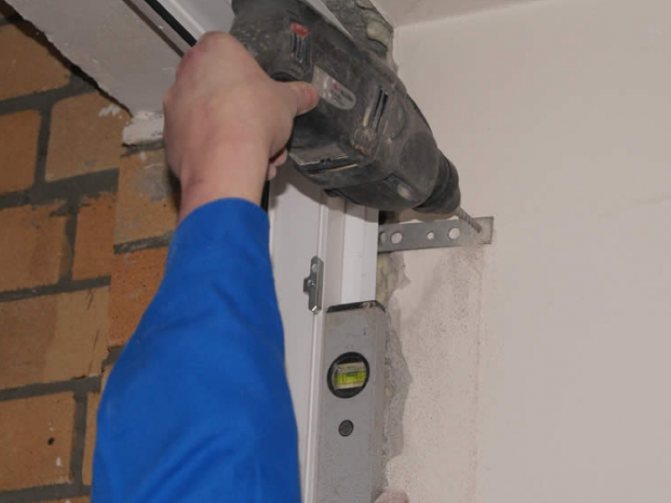
Required tools
Even if the window opening is prepared in accordance with all standards, a level will be needed. It will determine if the structure is level.
You will also need:
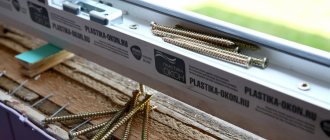
- screwdriver and self-tapping screws;
- polyurethane foam with a gun;
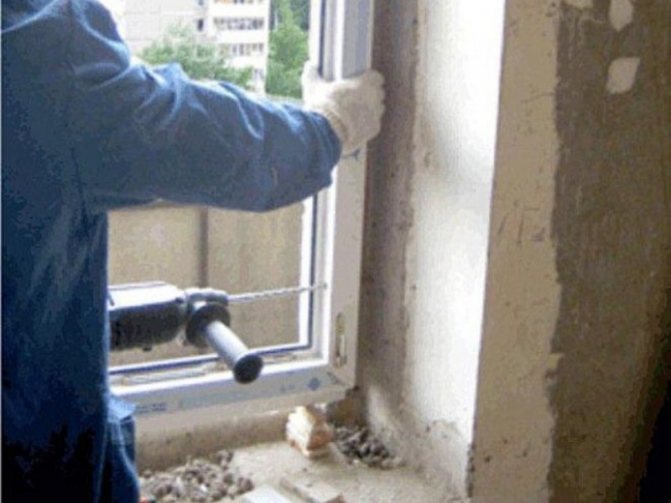
- puncher;
- a simple pencil or marker;
- roulette;
- paint brush;
- primer.
Some of the tools may not be needed. But it is better to take care of their availability.
Preparation
It is much easier to prepare a window opening if the house is just being built. Then, all surfaces will be intact. For preliminary work, you only need to process the surface and check its level. The opening is cleaned and then the system is installed.
If the profile is being replaced, difficulties may arise with the opening itself. Depending on how much time has passed since the previous installation, the surfaces could be damaged.Wind, temperature fluctuations, large amounts of moisture have a negative effect on bricks, plaster and other materials.
Therefore, before the main stage, you need to make sure that all surfaces are completely restored. After that, they are processed and basic manipulations begin.
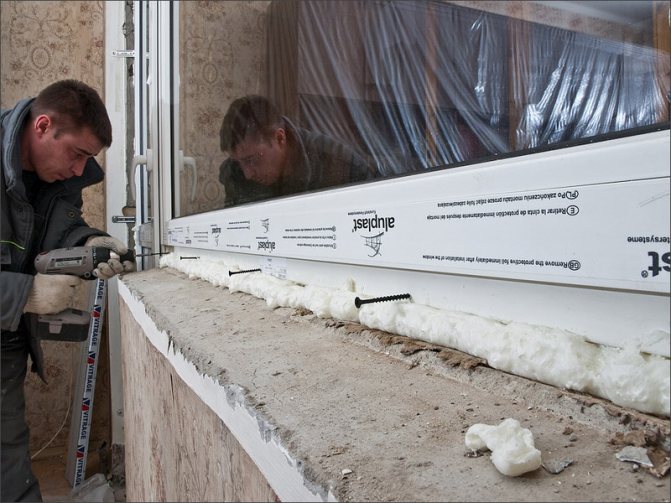
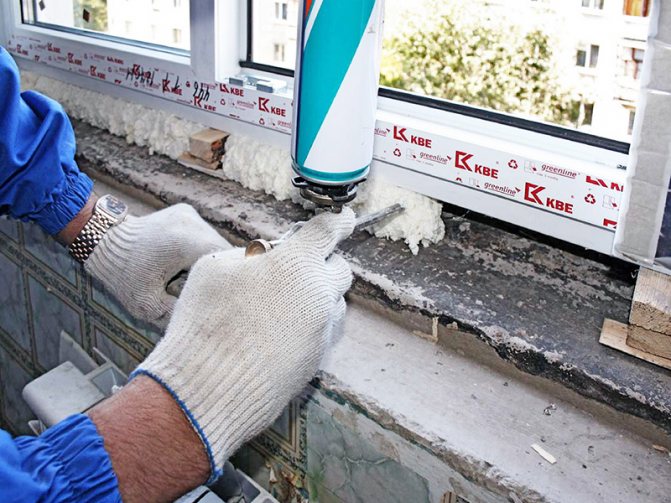
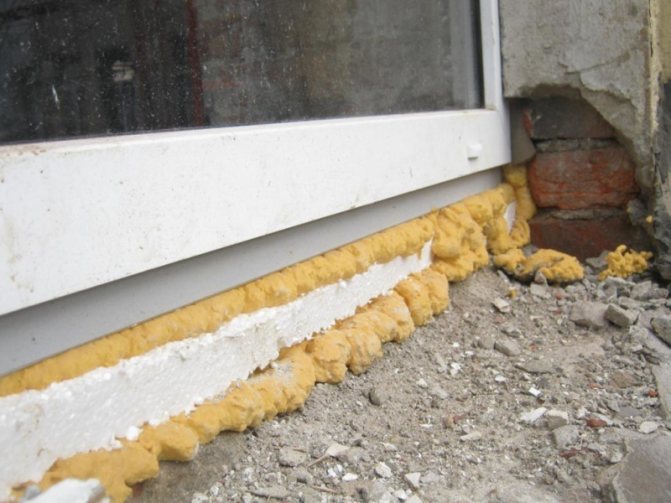
Seam filling
When assembling plastic windows, GOST assumes special instructions for filling the assembly seam. With the correct sequence of actions, water will not linger in the seams. This will allow the foam itself, and as a result, the system, to last much longer.
Sequencing:
- Lay two layers of foam around the entire perimeter.
- Push it between the gap and the quarter.
- Close the seam from the outside. Then there will be no bubbles, and the structure of the filler will become more uniform.
- The last step is interior decoration. When all the slopes are foamed, they are closed with a special corner.
What should be the gap
The mounting gap has its own dimensions. They are determined depending on the surfaces themselves and the distances.
If any deviations occur, then the opening or other components do not meet the requirements of the standards.
Anchoring
The quantity and quality of fasteners play an important role when installing windows in accordance with GOST. They are placed in the right places, depending on the type of glass unit.
The most popular system will be one in which one sash does not open or is deaf, the second has a swing-out mechanism. 14 anchors are used on such a product.
The type of fasteners is determined depending on the condition of the wall and the materials from which it is made.

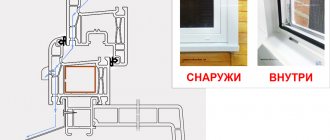
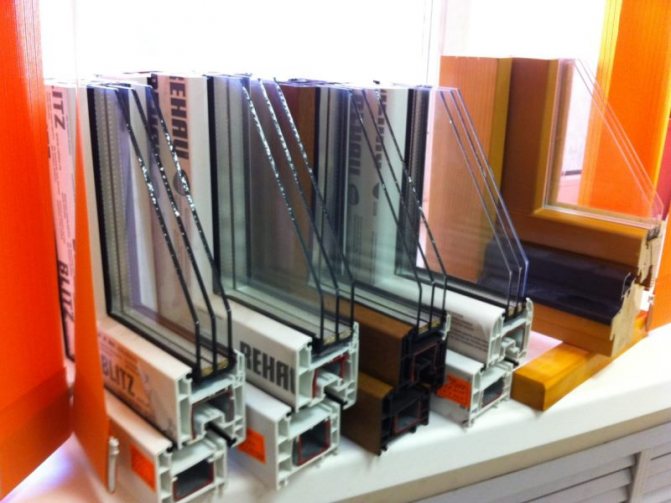
Plastic window construction
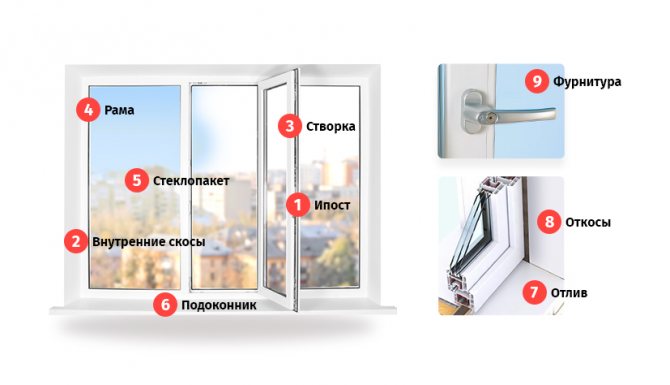
There are three main elements:
- frame;
- double-glazed window;
- fittings.
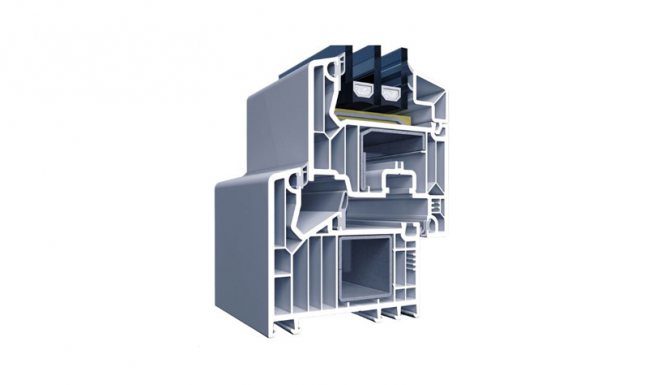
Frame
- load-bearing part of the structure. Inside there is a solid profile - the base, which can be plastic or metal (in the latter case, the window is called reinforced). The space around the profile is divided into sections (chambers). There can be two of them (two-chamber profile), 3, 4, maximum 7. The more, the different and warmer the PVC product.
Glass unit
- consists of 2, 3 or more glasses. The space between 2 glasses is called a chamber (there can be at least 2 of them). The air in the cells does not allow noise and cold to pass through. The chambers can be filled with inert gas - it copes better with heat conservation and noise.
The glass unit is held inside the profile with glazing bead
- flexible plastic bar.
Fittings
Is a set of locking mechanisms, handles and other elements necessary for locking and unlocking the doors.
The movable part of the window unit is called sash
... It can be swivel or swing-out. At the junction of the sashes, they are laid
seals
- rubber, rubber or silicone tapes required for hermetic closure.
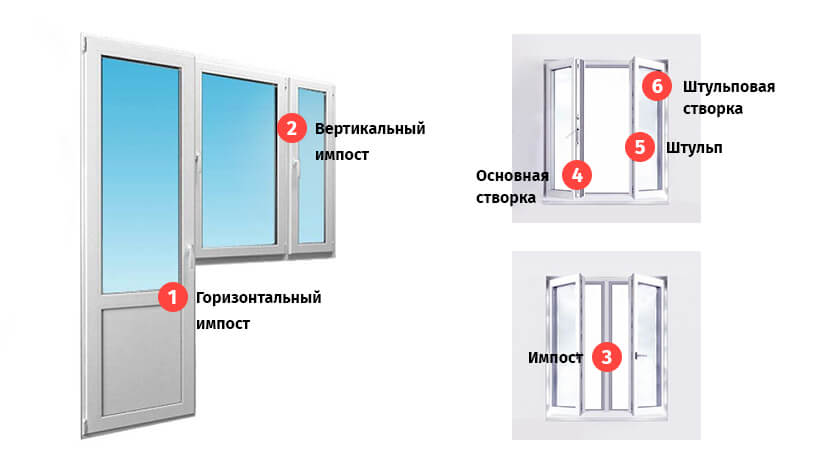
The blind (non-opening) part can be divided into sections imposts
- uprights made of plastic.
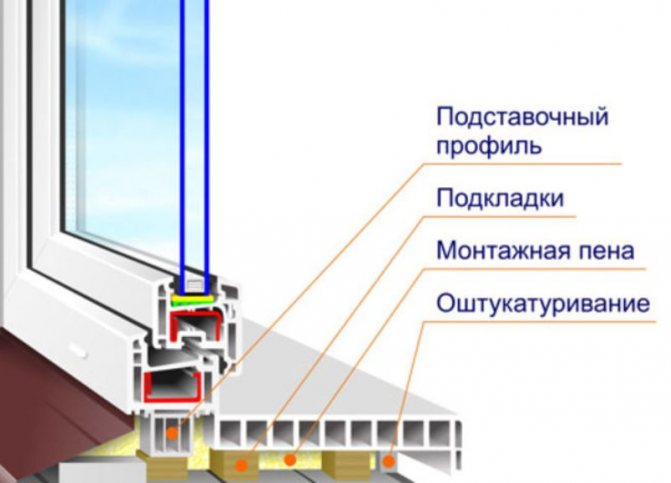
The window structure stands on stand profile
- PVC support separating the bottom frame and the wall part. Prevents the formation of "cold bridges". Reduces the risk of condensation.
Additional elements
Slopes
- decorative strips on the sides and at the top, covering the wall around the plastic box. They are made of plaster or removable materials - drywall, plastic panels.
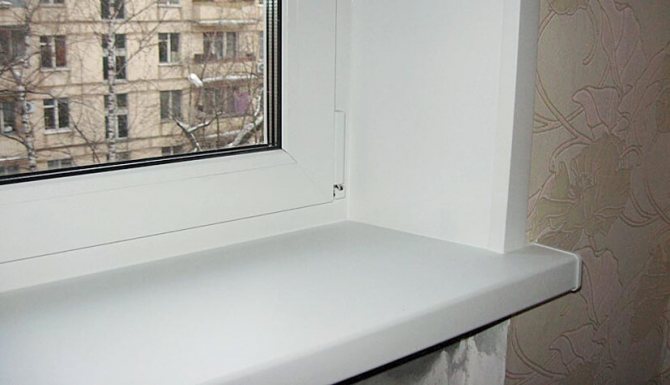
Window sill
- a ledge at the bottom of the window.
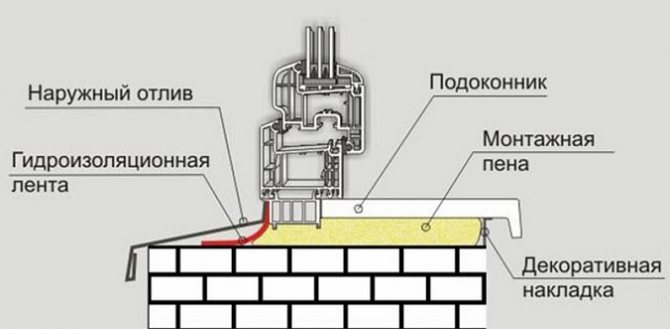
Low tide
- "window sill" from the street side. Protects the assembly seam from moisture, rain.
How long does it take
Compliance with all norms and standards takes a lot of time. Thus, it will take several days to replace the windows. It will take 1 to 3 days only for the plaster to dry.
As a result, it will be difficult to change windows in compliance with all the rules in apartments. It is easier to do this in a private house.
The standard states that all materials are required for the condition of ventilation and other systems.This will also take time. In addition, the approved profile must fit into the architectural design of the building.
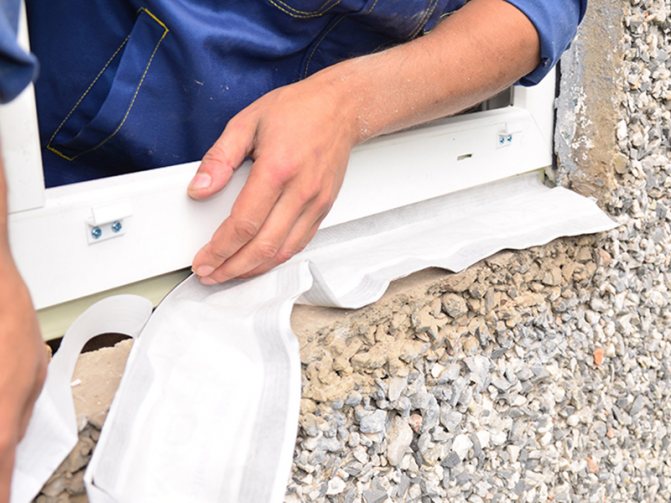
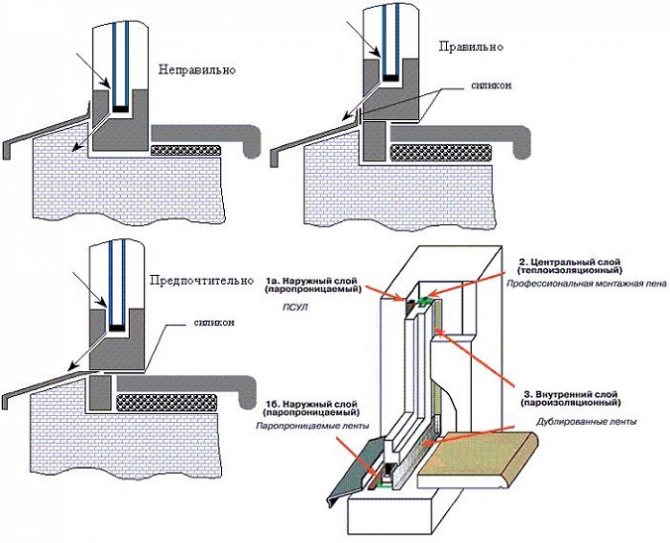
Drainage
The next step in installing a plastic window with your own hands is to mount the drainage system. It must be put in any case. Without this external window block, all the rain will fall on the foam and under the frame. The inevitable result will be the destruction of the assembly seam and the formation of gaps between the profile and the wall. The ebb is fastened with self-tapping screws not to the window itself, but to the support profile under the frame. In this case, the waterproofing tape is first laid. And then a drain is placed on top of it and fixed in place. Then, polyurethane foam is sprayed under this metal strip.
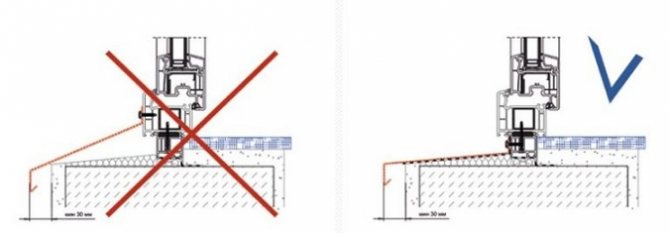
How to properly position the drain
By the way, if you don't have electricity in your country house yet, then we advise you to read the article about gas generators for your home, as well as what is good about a gasoline generator for a private house.
Documents for registration
Usually only contracts and acts of performed services are prepared. They are also accompanied by sketches of buildings, and a list of work.
But, according to the norms, the performer is responsible for many other things. However, few people want to take on unnecessary responsibility, to keep track of which surface the assembly will be carried out.
A standard list of documents is created in order to secure the assembly of mechanisms. They also issue a guarantee for their services, which does not imply the failure of the entire structure due to the condition of the building.

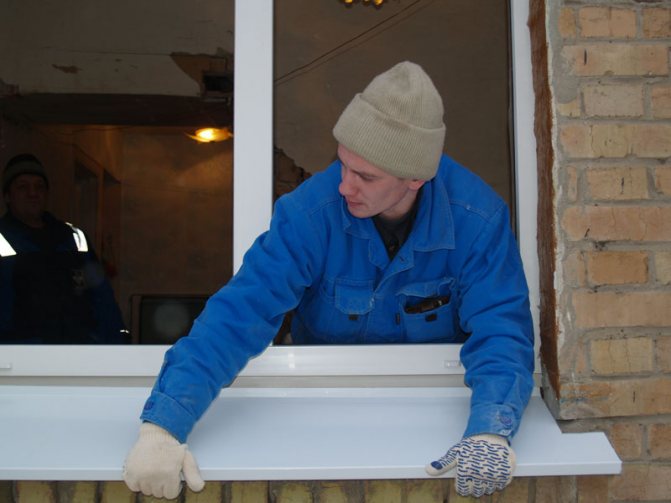
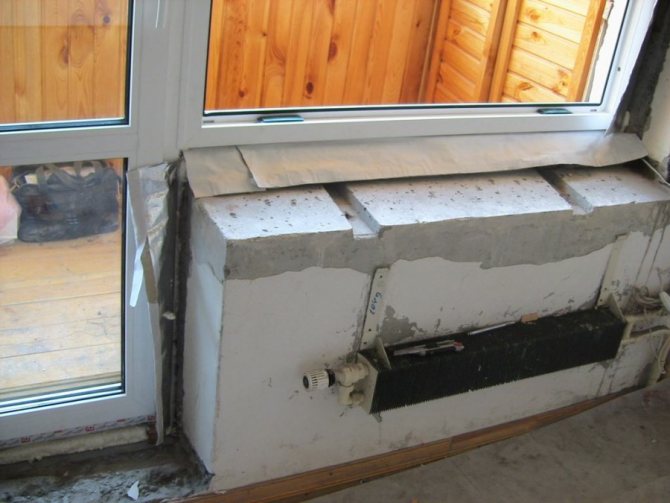
Installation of a window sill
Installation on a window sill in many ways repeats the installation of drainage technology. Only instead of a waterproofing tape, a vapor barrier is used inside the room. If the waterproofing on the outside prevents moisture from entering the assembly seam, then the vapor barrier on the inside is intended to evaporate it into the house.

Installation of a window with and without waterproofing
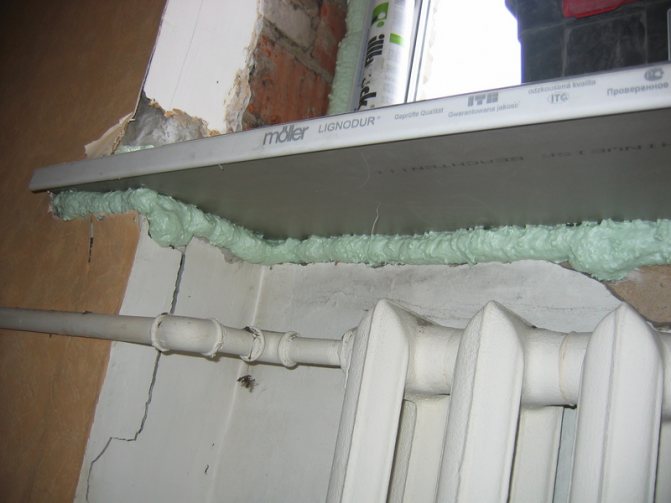
The foam in the gap should not get wet and freeze in any way, this will instantly destroy it. the window sill is laid on wooden support-guides, located perpendicular to the window and along its entire length from steps of 30–40 cm. In this case, a slope inside the room of 2–3 degrees must be observed. This is necessary so that the resulting condensation drains from the window sill, and does not stagnate in the corners.
Waterproofing joints
After aligning and leveling the window sill, it is inserted with pressure under the lower edge of the frame. Then the gap is foamed from below and weight is set on top of the plastic plate. Once the foam has set, it is firmly in place.
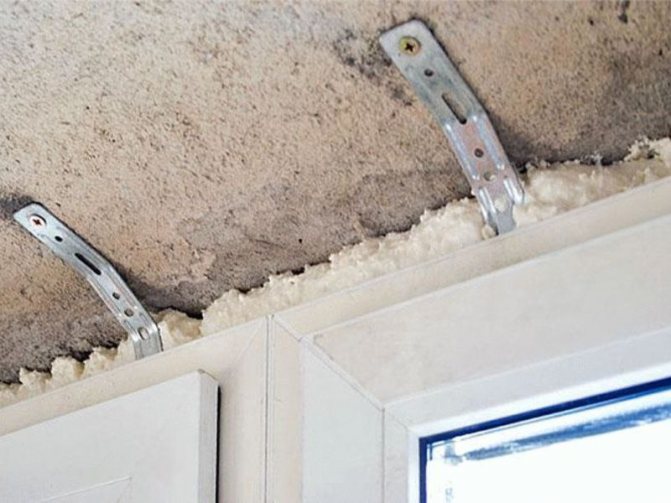
Frame mount options
It is attached to metal plates or anchor bolts.
The first option is more reasonable, because:
- the chamber inside the profile will not supply excess voltage to the glass block;
- water will not flow into the holes in the profile, waterproofing will not be broken.
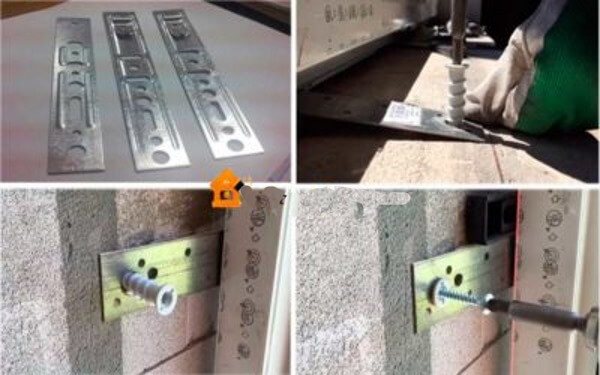
The fixing plate is fixed with self-tapping screws to the installation profile or to the anchor.
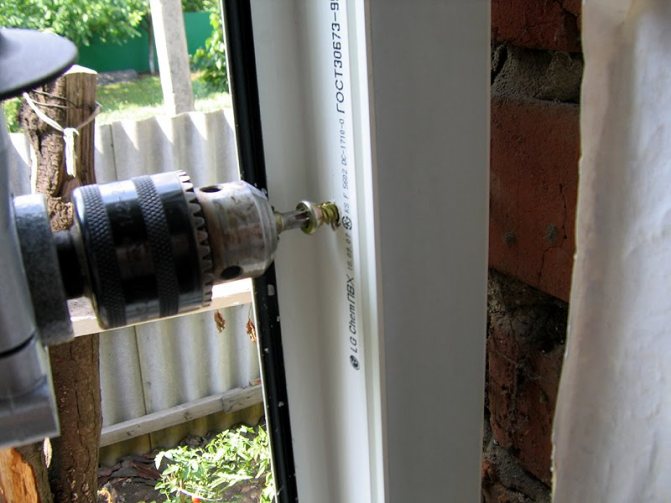
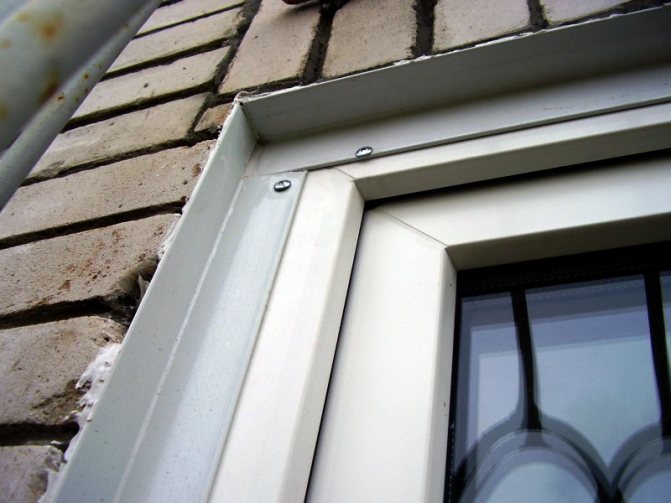
Anchor bolts are a simple, inexpensive option. It is often used by installers. Holes are drilled in the frame, anchors are introduced to secure the frame. Although drilling through and through causes a deterioration in the thermal insulation properties of the window profile, a decrease in the tightness of the chamber. In this case, the aesthetics of the transom is violated, tk. the heads of the screws will stick out of the profile when the window is open.
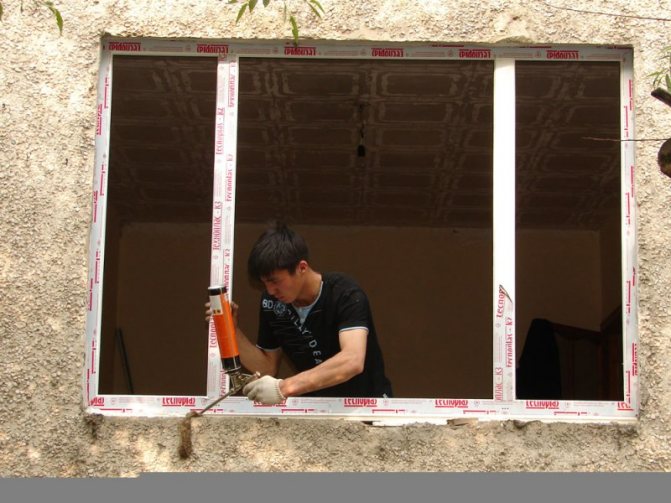
How the window unit should be mounted
When installing the window unit, ensure that there is a sufficient gap between the window profile and the wall opening. The gap will not only make it possible to carry out all the work on filling the joints with high quality, but also compensate for possible changes in the geometry of the window caused by temperature fluctuations.
There are rules for the location of fasteners:
- for white PVC window boxes, the maximum distance between them is no more than 700 mm;
- if the window box is colored, then this distance is reduced to 600 mm;
- fasteners must be located at a distance of at least 150 mm from corners and joints;
- wooden blocks used to pre-fix the window must be pre-treated with antiseptic materials, their height must be at least 20 mm;
- in most cases, window frames are fastened with dowels and anchors, which are driven into the wall to a depth of 40 mm.
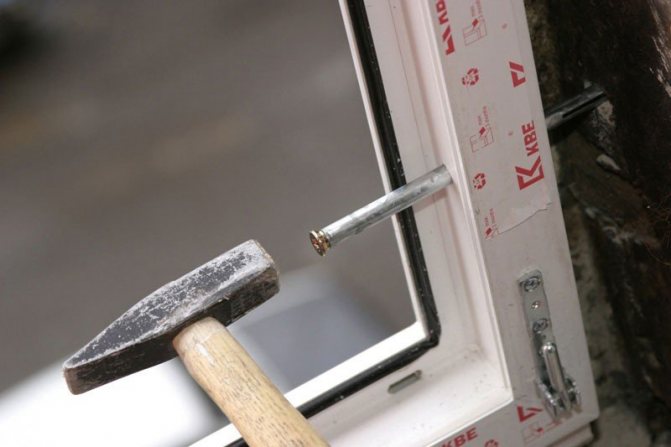
Important! All fasteners must be anti-corrosive, usually stainless or chrome plated steel.
The main stages of preparation in a private house
Preparation can be done in 2 ways:
- using support fittings;
- by one-piece fastening.

Actions:
- Remove the old glass unit together with the glazing beads. Number them in order to install in the same order during installation, to prevent the appearance of gaps.
- Tilt the frame slightly towards you, remove the glass.
- Remove the plugs from the awnings, unscrew the bolts.
- Turn the knob to ventilation mode, open it slightly. Remove the transom so that the special jumpers for separating the leaves do not come off the frame.
- Mark the points for the anchors, 2 at the bottom and at the top of the glass package, 3 on each side. Drill holes.
If the walls are made of aerated concrete ((in a panel house), i.e. fragile, then it is important to perform fasteners from anchor suspensions. Fix to the wall with hardened self-tapping screws. If the old elements (for example, metal) cannot be removed in any way, then you can saw them Next, clean the working area from dust.
All adjacent surfaces are treated with a primer immediately before installing a new glass unit. It is not necessary to lay a waterproofing layer when installing a PVC product.
Preparatory activities
Before you start installing PVC windows, you need to prepare a workspace. Before starting events, there are several aspects to remember:
- In order not to deviate from the standards of GOST, it is necessary to observe all stages of work accurately and accurately.
- For better adhesion, the work does not use water, but a primer.
First of all, you should clean the window sill, remove the curtains from the windows and remove all furniture located in the immediate vicinity of the window. It is advisable to cover the furniture with any convenient material, and the space under the window on the floor with newspapers or cardboard to prevent possible contamination.
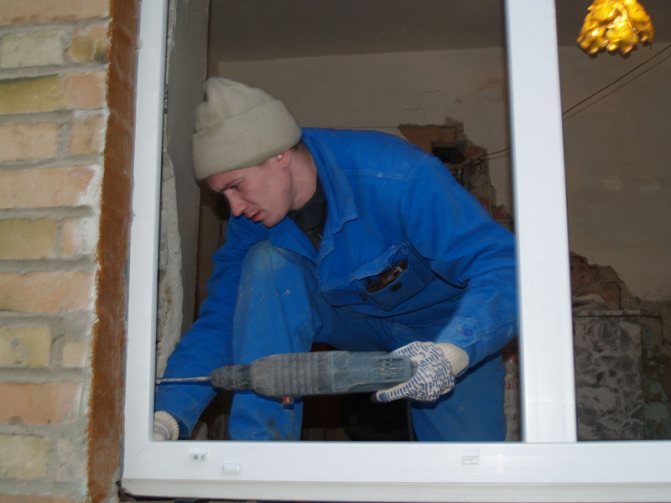
The next goal is to eliminate the window, which must be replaced with a plastic one. You will need a hammer drill and an electric jigsaw to help you easily clean the surface down to a concrete or brick base.
Then you can start priming the slopes.
At this, the preparatory activities can be considered completed.