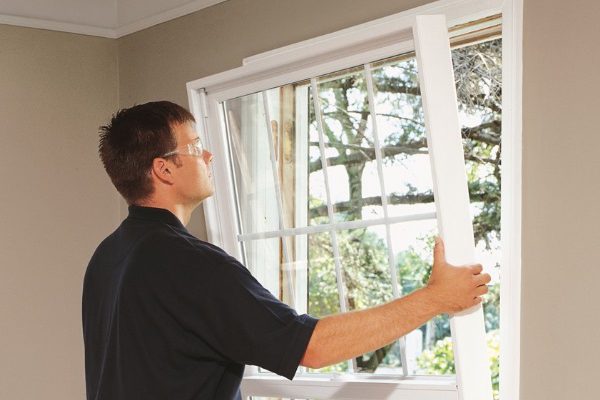
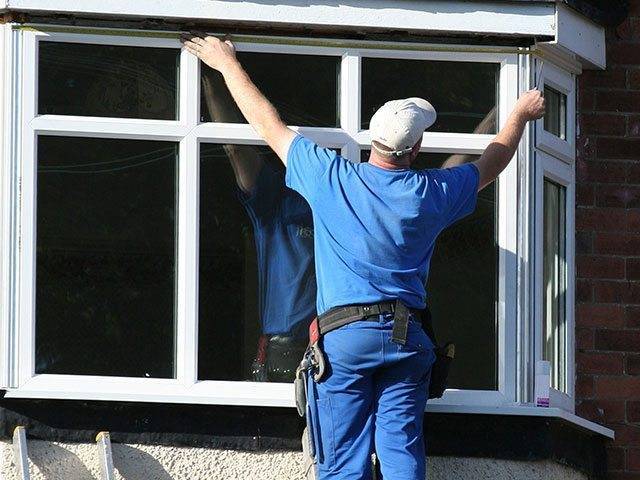
Do-it-yourself installation of windows has not been a surprise to anyone for a long time. A few years ago, plastic structures have just begun to come into widespread use, today, almost all window openings of buildings under construction and already standing buildings are equipped with them. The installation process of such systems is complex, requires attention to the smallest details and strict adherence to the subtleties and sequence of the technological process. Otherwise, the likelihood of noise, dust and cold entering the room increases. When there is self-confidence, there is a desire to strictly follow the instructions, you can do this work with your own hands.
What is a stand profile
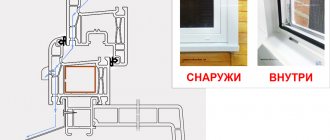
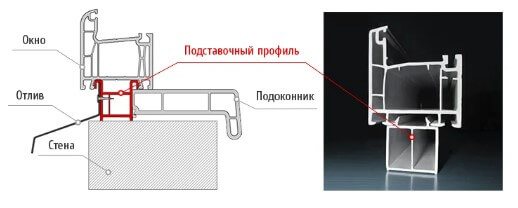
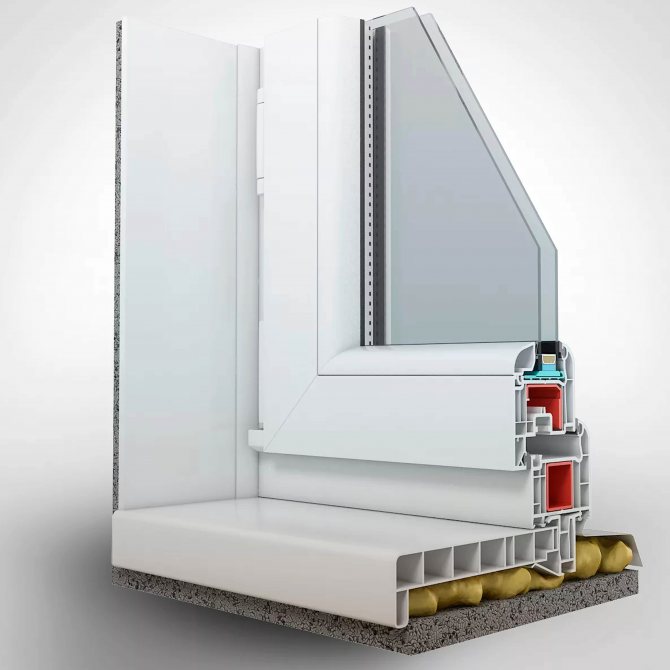
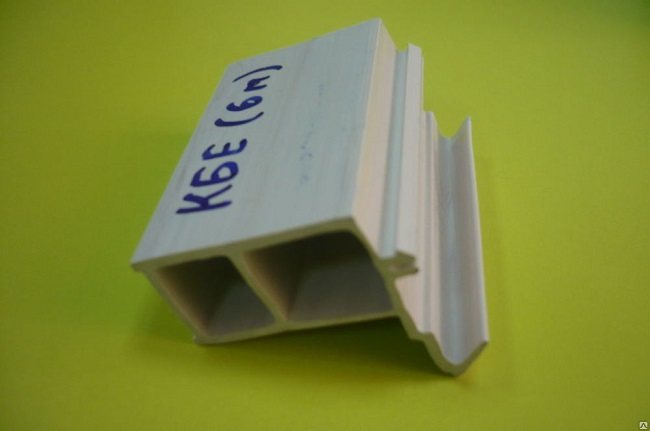
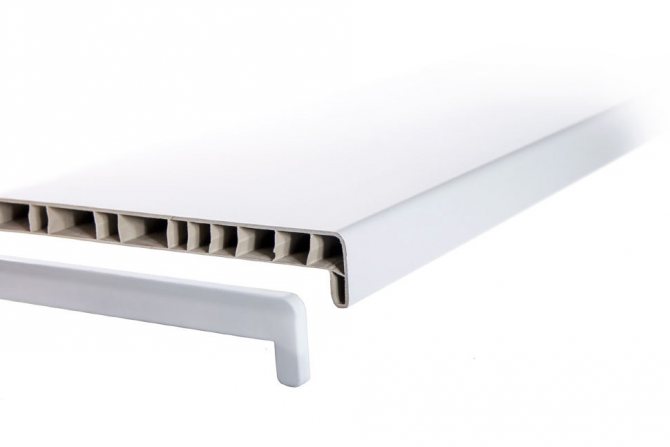
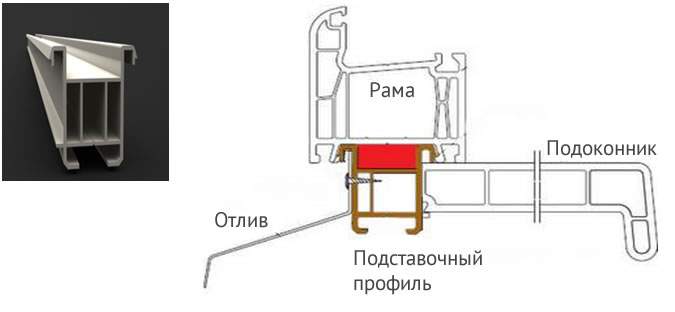
The support profile is an auxiliary plastic element, the purpose of which follows from its name. The base bar is placed under the lower ends of the metal-plastic to simplify installation, then removed after installation work.
Main characteristics:
- length - from 6 to 7.5 cm;
- width - 2-10 cm;
- number of chambers - from 1 to 5;
- thickness - from 2 mm;
- internal partition - from 1 mm.
The material for the production of coasters is plastic, the color of which differs by one or two tones from the opening. Often, a support strip is needed to mount a window in an opening, after which the mount is not removed, but is finished with plaster together with a plastic bag, which does not affect the overall appearance.


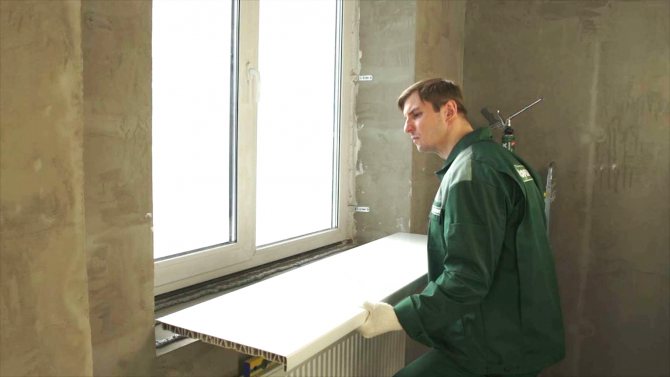
Window sill installation
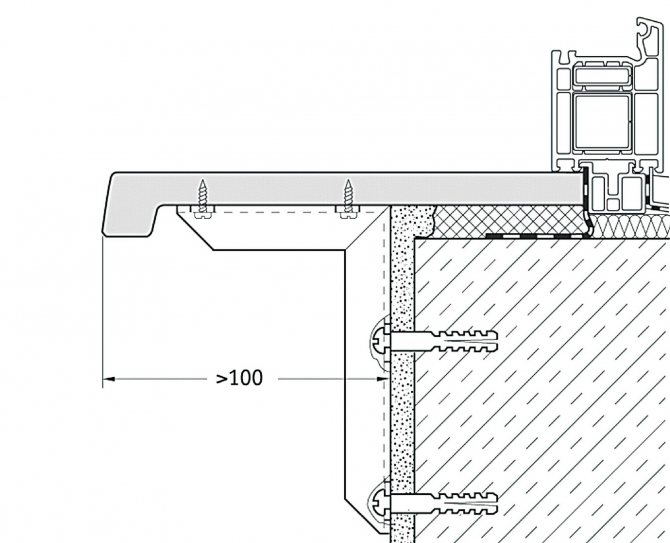
If the installation of a window sill with a thickness of 18 mm or more without a trailing edge is carried out, then the thickness of the foam from the bottom must be added.
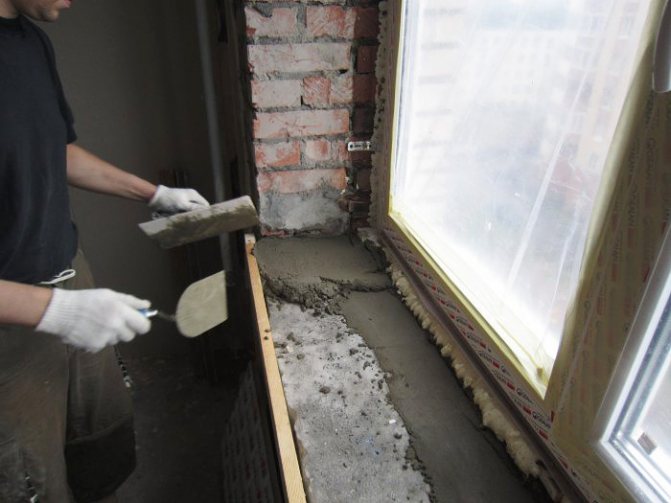
Also, in the lower part of the slope, vertical notches are made in the wall 30 mm wide, 20 mm deep and about 120–150 mm high. The step of the notches is no more than 80 cm, the number of notches is at least two per window sill.
Leave a request for a FREE call of the measurer and find out the cost of installing your window!
All stages are treated with a high degree of responsibility. At each step of the installation of windows, compliance with the parameters and requirements for the quality of the installation is monitored. The work is carried out using modern equipment and tools.
You can get a free consultation and place an order by phone:
Why do you need a support profile for a plastic window?
There are many reasons to use a plastic sill profile. Installation of the closure simplifies installation work, eliminates the risk of damage to the frame.
Other reasons to use a proxy:
- transportation - stands simplify the delivery of windows to an apartment in a multi-storey building, eliminate the risk of accidental damage;
- fastening the window sill - without a stand, fastening the window sill and drainage lasted several hours, installing the supports simplifies the work, eliminates additional work;
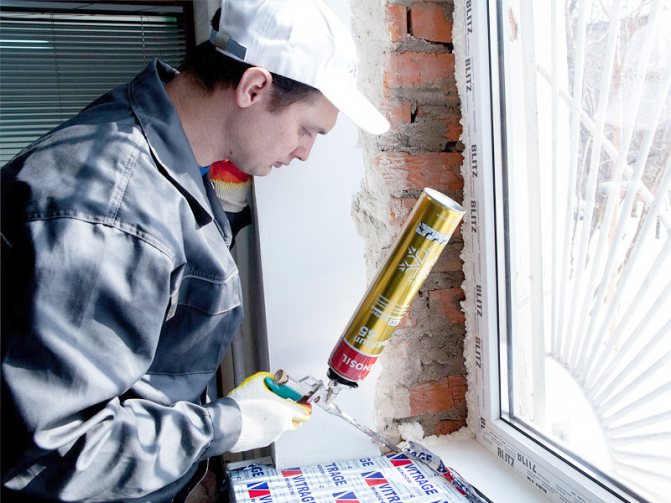
- sealing of the assembly seam - the seam between the window, the wall is blown out with foam, but such material does not exclude misfires, the formation of a cold bridge, the base clover provides complete sealing, heat insulation;
- window fastening - mounting of the pedestals fixes the window in level with the safety of all fittings and accessories.
Part purpose
So, a wildcard profile is required:
- to protect the main profile during storage, lifting to the installation site and transportation;
- fast and high-quality leveling of the main structure for reliable fastening;
- ensuring the absence of cold bridges under the windowsill;
- installation of additional window parts.
It is worth noting that the installation of a support profile enhances all the listed advantages when using polyurethane foam. Together, the bar and the foam ensure maximum energy savings and the reliability of the installed profile.
Interestingly, experienced specialists in big cities do not consider the cost of this element separately. Each custom-made window already has a price taking into account the cost of this profile. Less experienced companies rarely use the element in question in their work by default, so you can still purchase a window sill profile as a separate element.
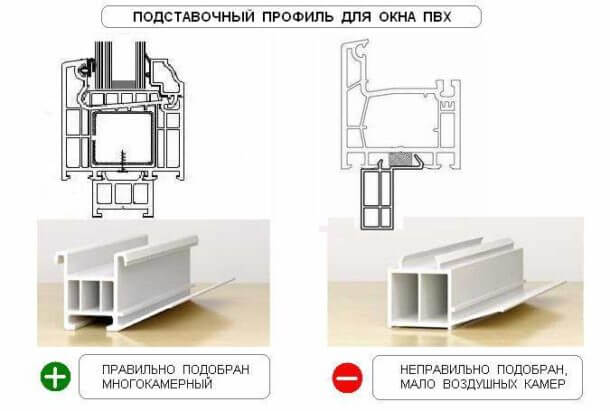
Selection requirements
The backing strip is a part that cannot be blindly ordered from the online store. So that it fits under the new PVC box, it is selected taking into account all the requirements. Wall thickness - more than 2 mm for reliable insulation. It is better to choose a sweet clover equipped with at least two cameras.
Please note: the shade of the base detail always matches the color of the window or is 1-2 tones darker than it.
Recommended size of the base part: width 2-4 cm, height - 2-3 cm. The length of the part corresponds to the length of the opening. It is not recommended to attach a window sill or ebb directly to the frame without a profile. This will lead to its damage, depressurization. The exclusion of the clover when mounting the box will lead to problems, possible damage to the frame.
Top manufacturers
Window profile systems from large manufacturers, as a rule, are equipped with a support profile.
Their separate purchase may be required if:
- The complete profile does not fit or does not suit the customer in terms of its characteristics (lack of heat-insulating filler, number of chambers).
- In case of loss (it happens quite often with domestic installers) or breakdown;
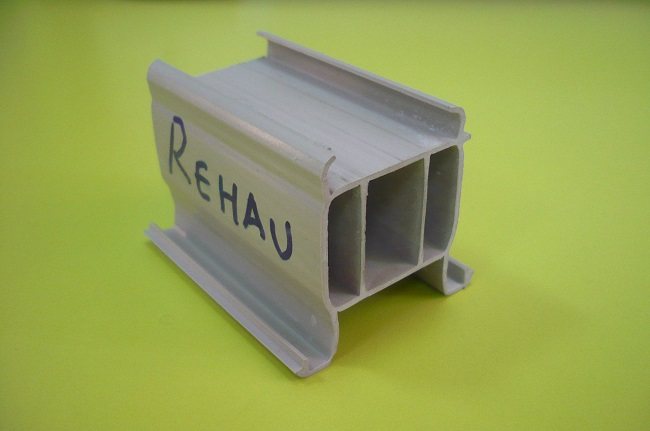
The most common manufacturers on the market today:
- Rehau. Popular models: energy-saving five-chamber profile - 561910 and two-chamber with reinforcing filler - 561790;

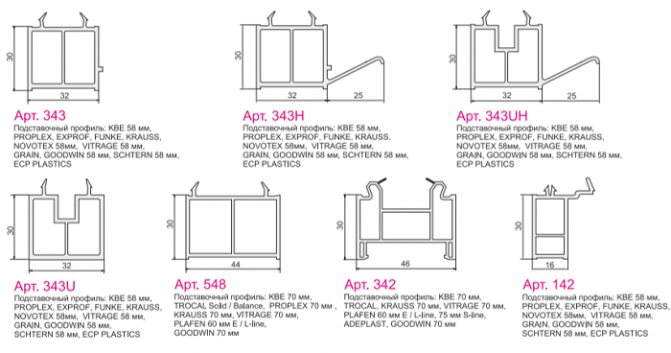
- KBE. A three-chamber version (article 342) 46 mm wide, 3 cm high and its counterpart with a hold-down wing (article 343) is often used.
- Veka. The products of this company are represented by models of the Softline line - a two-chamber profile with a hold-down wing and Euroline - a three-chamber version without filler.
Also, high-quality products are made by Wintech, Enwin, domestic Novotex and Brusbox. The products of the latter two are more affordable, but the quality is not always comparable with foreign counterparts.
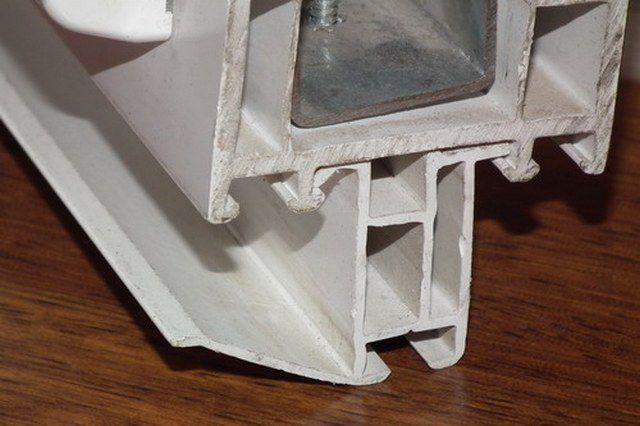
Types and parameters
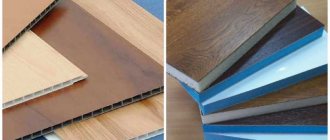
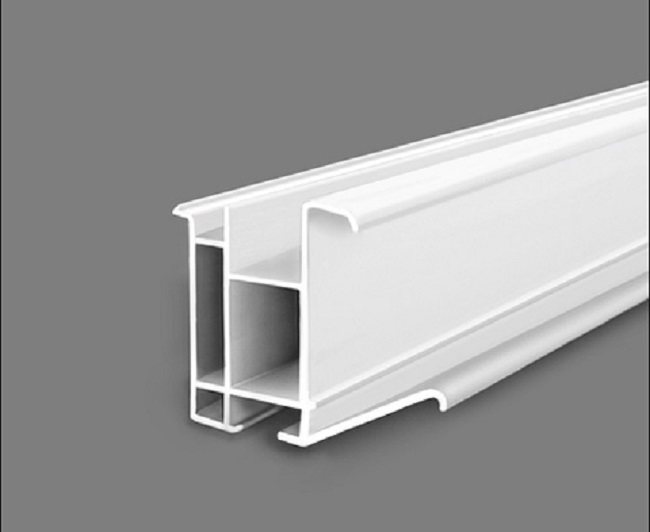
The basic bottom profile differs in size, cross-section, number, filling of chambers, length, height, thickness of outer walls, intersection partitions. There are differences in compatibility with production systems.
Based on this, the bars are:
- single-chamber - a simple base element for fastening a PVC structure with low weight, thickness of the outer walls, low cost;
- two-chamber - a durable element with two chambers, designed for glazing balconies, verandas, loggias, for cold glazing;
- five-chamber - endowed with high thermal insulation, energy-saving property, rarely used for domestic purposes;
- prefabricated modifications - a part of an unusual design, from 10 cm and more, endowed with vertical, horizontal sections at the same time, have compartments for collecting sealant.
All types are intended for indoor installation, not visible after finishing work. Sophisticated planks completely replace windows. The cost of such models is higher, and skill is also required to mount them correctly.
What functions do the support elements perform?
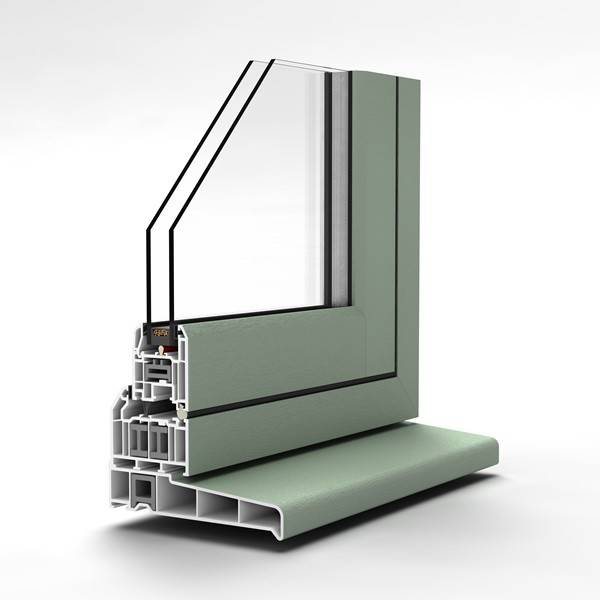
The support profile for windows can also be called basic, and for all its technological simplicity, it surprises with the number of functions it performs:
- protects the window from damage during transportation of the product to the installation site - in this case, the base profile serves both as a shock absorber and an additional gasket between various surfaces and the window frame;
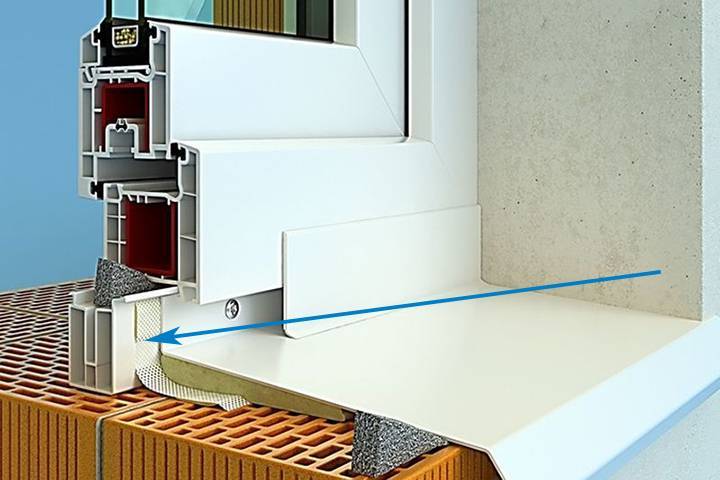
eliminates "cold bridges" in the lower zone of the opening - a support profile with hollow internal chambers significantly slows down the heat transfer processes between the cooled walls and the window;
allows you to aesthetically install the outer window sill - during its installation, the base support element makes it possible to neatly bring the canvas directly under the frame profile;
ensures tightness and eliminates the blowing of the window from below - the joint between the frame and the support profile does not allow air and water to pass through, due to which the likelihood of condensation and the appearance of mold with mold is extremely reduced in this zone;
eliminates the possibility of distortions of the structure - the presence of a solid base part in the lower binding area gives the entire window additional stability;
allows you to compensate for minor shrinkage - in this case, the plastic part, hollow from the inside, performs a shock-absorbing function;
is the basis for a secure fixation of the bottom flashing - this ensures the integrity of the main frame profile.
In addition to all of the above, the support profile for PVC windows allows you to almost perfectly accurately level the structure. Thanks to this, it is possible to achieve the correct operation of the fittings for a long time, since the absence of distortions allows for a long time not to adjust the opening mechanisms. Some manufacturers include these elements in the estimate, but do not install, therefore, after delivery of the windows, it is recommended to check the windows for the presence of support profiles. It is very simple to do this - an additional element must be present at the bottom of the frame, which is narrower than the main profile.
Installation methods
For the correct installation of the base plate, it is important to take into account the features of the walls, building material, ebb, opening, the part itself. The base element is mounted in two ways. The choice of mounting method depends on the characteristics of the room.
Option one
It is characterized by an increased level of complexity, therefore it is rarely used for self-installation at home. The method consists in the stage-by-stage fastening of a stand, a box.
Let's analyze this method step by step:
- Layout of the support strip in accordance with the parameters of the frame.
- Cutting the stand to the desired length.
- Placing the prepared part at the bottom of the opening according to the level.
- Measurement of the distance from the top of the opening to the plank.
- Preliminary fitting of the block.
- Adjusting the size of the gaps between the glass and the frame.
- Sealing gaps with foam.
Option two
Suitable for beginners, experienced installers.
It implies mounting the opening according to the following algorithm:
- Removing the sweet clover attached to the box.
- Inserting an extra warm layer into the stand chamber.
- Filling the abutments of the lower element with polyurethane foam or adhesive tape for sealing.
- Fastening the base stand to the bottom of the frame.
- Installation of the block using a level.
- Using foam to blow out gaps.
- Cut off excess foam.
- Preparing a place for a window sill and mounting it.
Preparatory work
Dismantling
If it is necessary to dismantle the old window, do the following:
- Remove all leaves from their hinges.
- Remove the glazing beads and remove the glass from the fixed sections of the window.
- Detach the trims, drain and sill from the frame.
- Remove the mortar and foam between the frame and the window opening.
- Using the grinder, cut off all frame fasteners.
- Pull the frame out of the opening.
- Remove the remaining foam and mortar at the location of the frame.
Window preparation
Before installing a plastic window in the opening, it is necessary to carry out a number of preparatory work:
- Remove the window sashes from the hinges by knocking out the awning rods with a hammer and screwdriver.
- Remove the glass units from the fixed sections of the window. To do this, you need to knock out the glazing beads from the fastening grooves; this can be done with a rubber hammer and a wide chisel, or a spatula.
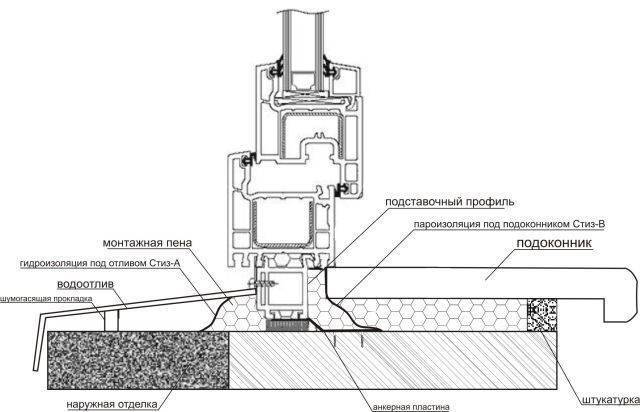
- Attach the stand profile to the bottom crossbar of the frame. When connecting the profile and the frame, use - PSUL as a gasket between them.
- Install anchor tapes around the window perimeter. The straps are screwed to the frame and base profile with screws. For ease of installation, bring the ends of the anchor strips inside the room. Depending on the size of the window, from 2 to 4 fasteners are installed on each side of the frame.
- Glue PSUL on the top and side posts of the frame, so that the tape protects the outer seam after filling it with polyurethane foam.
- Stick the diffusion tape to the base profile on the outside of the window.
- To protect the inside of the seams, glue vapor barrier tape to the frame.
Base profile - addition or necessity?
If desired, the box can be installed without the use of bottom elements. The exclusion of this detail helps to save resources, but has a detrimental effect on further operation. It is important to remember that a window sill is attached to the bottom bar inside the room, the ebb is from the outside of the wall.
If this element is completely abandoned, the structure will suffer, since there will be nothing to fix it. The absence of spacer elements increases the risk of damage to the frame, deformation, depressurization, the development of fungus, mold. The frame will become unstable, fragile, with a low weight, it may shrink or break off along with the slopes. Therefore, the use of auxiliary parts when assembling the box is recommended.
Simplification of fixing ebb and sill
There is no need to drill holes directly in the window frame, which, by the way, is prohibited by manufacturers. This can lead not only to the ingress of water into the frame profile, but also to the appearance of cracks in the frame.
USEFUL INFORMATION: Bosch GSR 1440-LI screwdriver: review and reviews
There are other ways of attaching these window elements, for example, by placing a window sill under the frame and screwing the ebb tide to its outer part facing the street. Also, the drainage and the window sill can be installed in special grooves, but here there are nuances and difficulties with the location of the linings when installing the window block, clearing the foam seam, etc. With the support strip, the process is greatly simplified.
Professionals recommend attaching an external aluminum window sill to a special profile with a “cap”. It will facilitate installation and protect against inflowing water.
How to install a window sill without a support profile?
Installing a window sill and drainage without a stand is a task of increased complexity. Eliminating bottom parts requires careful attention to surface preparation and selection of fasteners.
To install, you need the following tools:
- PVC corner;
- level;
- pencil;
- roulette;
- sealant / foam;
- screws;
- self-tapping screws;
- puncher;
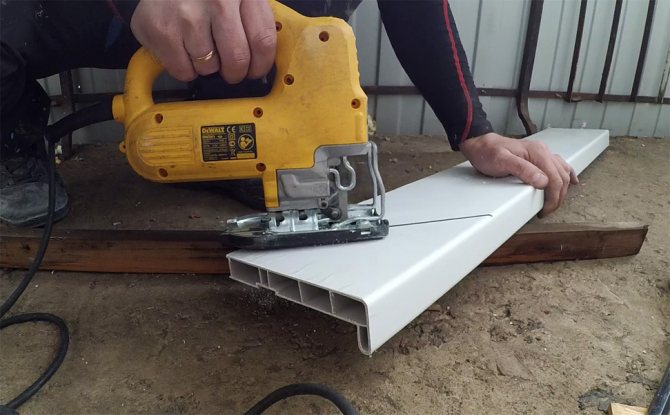
- jigsaw.
Preparation phase
First, the surface must be prepared for the windowsill. The opening is leveled and cleaned, measurements are taken for the future structure, the markings are left with a pencil. Using a jigsaw, the product is cut to the required measurements. When the overlap is ready, proceed to the main stage - installation.
Installation of a window sill without profiles
If the use of bottom elements is excluded, wooden beacons up to 80 cm are used instead. They guarantee the strength and stability of the structure in a horizontal position and are easily controlled by the level. The window sill is installed in a prepared place, under the slabs of which wooden blocks are installed at a distance of 50 cm from each other.
When lowering the structure, the wooden elements should not go beyond the level of the wall, and their distance from the side walls should not exceed 10 cm. Before fastening, it is advisable to perform a preliminary check of evenness using a level.
Without stand profile
Please note: the weight for fixing the window sill should not be too large, so as not to provoke deformation.
Foam is used to fix the coasters. After fastening, a small load is placed on the surface to avoid lifting and deformation of the plane. The free space under the windowsill is filled with foam. In a fixed position, the structure is left for 3 days until the foam completely hardens.
Excess material is removed with a clerical knife, the surface is leveled and finished with plaster. If cracks are found, they are sealed with a sealant. The final stage of installation is painting to match the color of the opening.
Preparation for the installation of plastic windows

Installation of plastic windows begins with preparation for installation work. You should not start them until the blocks are delivered to the apartment, otherwise, you will have to do without windows at all for some time.
Before plastic windows are installed, a place is prepared for their installation. It is necessary to move away from the opening all objects that may interfere with the work process. Cover the floor and heating devices with a special foil to prevent dust and dirt from getting on them.
Preparing a window profile
The windows should be installed after the preparation of the window. The scheme recommended by professionals involves the dismantling of sashes and double-glazed windows.
This process goes like this:
- insert the chisel under the glazing bead and, with gentle blows, remove it from the grooves. First remove the vertical ones, then the bottom one, the last top one (it holds the glass);
- mark the removed glazing beads so that you know where to mount them during the assembly of the structure;
- tilt the frame;
- take out the glass of their grooves;
- put it against the wall with a slight angle, putting it to the side, so as not to inadvertently damage;
- remove the decorative plugs that are on the canopies of the swing doors;
- unscrew the clamping bolts;
- if the system is fanlight, turn the handle to the center, while the sash should be turned for ventilation. Remove the hook from the lower canopy;
- make holes on the frame, into which the anchoring connections will then be fixed (along the perimeter): two points at the bottom and at the top and three points on the side surfaces;
- for drilling, use drills for working on metal;
- use anchors with a diameter of 8 to 10 mm.
If you need to install windows on fasteners with special ears, you do not need to disassemble the entire unit. The included mounts are simply attached to the frame.
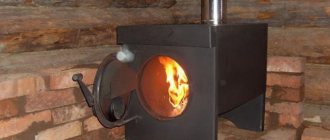
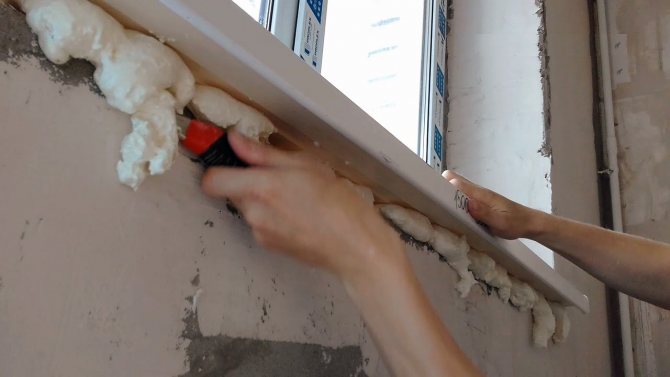
Filling the support profile with foam
Installation of plastic windows cannot be carried out without foaming the support profile. However, masters do not often carry out this procedure, moreover, it is not included in GOST.
To eliminate the likelihood of the formation of so-called "thermal bridges", where the lower part of the opening of metal-plastic windows is located, where the support profile is attached, it is necessary to apply foam. The entire internal space of the profile is sequentially filled with polyurethane foam used for construction and installation work.
It is best to carry out this procedure about a day before the main installation phase to give the foam enough time to completely fill the space and harden.
Dismantling the old window. Opening preparation
When the day comes for the installation of a new window unit, it is time to dismantle the existing structure. The step-by-step process looks like this:
- Remove the sash from the canopies holding it.
- Saw the box and frame from several points.
- Pry each component with a crowbar or nail puller and remove it from the opening.
- Remove the size 200 nails and carefully remove them.
- Dismantle the insulation, sealant and other materials under the box.
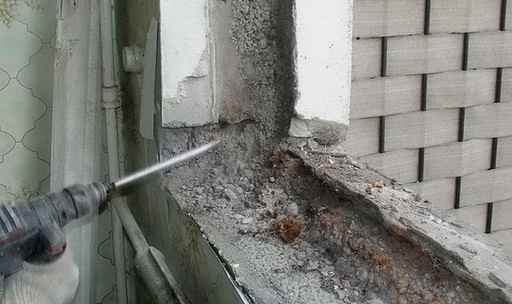
- Put a paddle-shaped nozzle on the perforator, remove part of the slopes, or dismantle them completely.
- Pry and remove the window sill.
- Using a puncher, remove the backing that is at the bottom of the opening, as well as under the windowsill.
Do-it-yourself installation of windows involves increased attention to cleanliness. Therefore, all construction waste should be immediately collected in packages and taken outside the apartment. It is also necessary to remove the remnants of the old structure, this is necessary to free up enough space for further installation work.
Now it is necessary to put things in order by removing dust and accumulated dirt from the ends of the window opening. The entire surface is carefully primed.
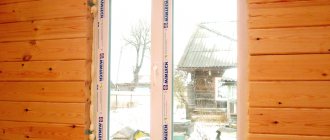
When it comes to replacing double-glazed windows in an old house built of wood, it is impossible not to lay a waterproofing layer around the perimeter of the window block. This is necessary to prevent moisture from entering the polyurethane foam. In such houses, it may be necessary to strengthen the opening by installing a box made of solid wood.
When carrying out repair work in buildings located on the central streets of the city, you should remember about the possibility of a ban on changing the size of window boxes. It is especially important here that all openings remain in the same size and style, without changing the appearance of the facade.
In such situations, it may be necessary to restore the previous size of the window, by carrying out restoration work or re-laying a cement screed, on the sides and bottom sides.
The importance of correct measurements
The manufacturer usually offers the services of its own measurer. This service is free. The product is manufactured on the basis of a measurement sheet, where the measurer indicates all the necessary parameters. If, during the installation of the window, difficulties arise with an incorrectly manufactured product, the manufacturer will be held liable.
As a rule, the measurements of the windows are carried out by the manufacturer.
If the customer himself provides the dimensions, then at the stage of signing the contract for the provision of services for the manufacture and installation of plastic windows, he signs in the measurement sheet, which is drawn up by the manager on the basis of the dimensions provided.
With his signature, the customer confirms the correctness of the dimensions indicated in the measurement sheet, from his words, which means that if the window does not fit during installation, the customer will be responsible and all financial costs for altering the product will fall on his shoulders
Carrying out measurements on your own, it is important to take an extremely responsible approach to this matter.
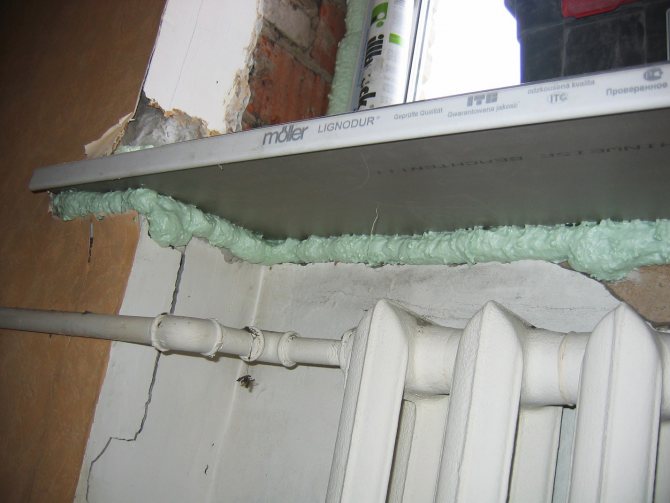
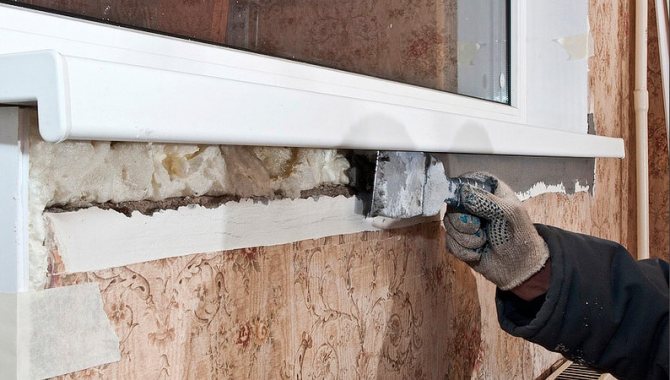
How to close up the foam under the windowsill
Foam not only impairs the aesthetic qualities of the window system, but also needs additional protection. The material shows excellent thermal insulation performance, but is destroyed by moisture. You can seal up the foam in two ways:
- The cut foam is closed with tile adhesive. Before painting the walls, the area treated with glue must be sealed with putty. If there are wallpapers on the walls, then it is better to treat the surface with an acrylic-type primer.
- The second method involves the use of a vapor-permeable tape. The product must be cut according to the required dimensions and secured in free space. A decorative strip made of wood, aluminum or PVC is mounted on top of the system.
Each technology has a number of undeniable advantages, but their combination will give the maximum result. The cost of consumables is insignificant, so you can easily use two methods at the same time.
Installing a window sill is a complex process that requires a set of tools, consumables and special skills. Many home craftsmen fix the window sill correctly on their own, and the quality of the result is at a height.
Did you manage to solve your problem according to the recommendations from the article?
Yes!
100%
Not. More answers required. Now I will ask in the comments.
0%
Partially. There are still questions. Now I will unsubscribe in the comments.
0%
Voted: 1
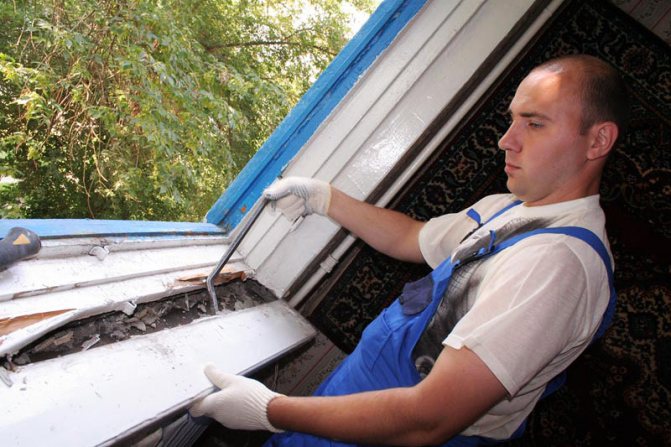
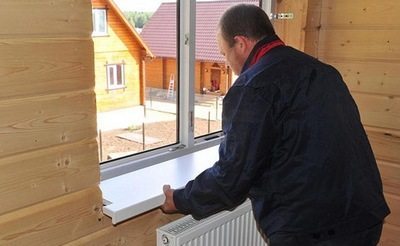
Replacing a window sill in a wooden house
The installation scheme for a plastic window sill in a wooden house is very similar to the process performed in an apartment. First, the old wooden window sill is dismantled, the foundation is being prepared. The side slopes must be put in order so that the plastic part can freely take its place.
In order not to cut and freely fasten the plastic window sill, it is better to cut the sides out of wood. For this work you will need a chisel, a hammer. This is how the grooves are obtained where the fastening will be made. It happens that they may already be ready and there was a wooden window sill in them.
The window sill panel is installed in the grooves
Once the grooves are ready, linings are placed on the base of the opening. Do-it-yourself installation of a plastic window sill in the opening is done only on them. The position of the supports can be fixed so that they do not move under the mounted element. Before fixing the product, you need to check the position of the plate. After it is fixed and the voids under it are filled with polyurethane foam... Many people ask the question of how to put the windowsill in a different way. But foam is the best and most effective option.