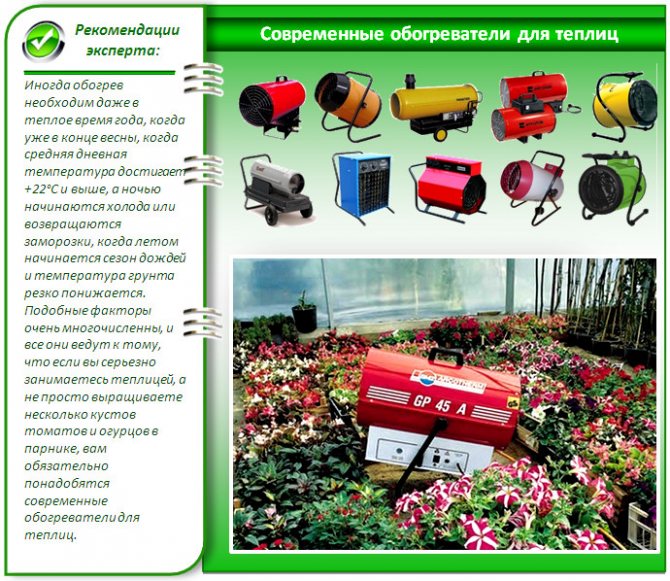
Greenhouse heating options and their comparison in the table
Not every greenhouse needs heating. The system should be installed if it is used throughout the year or if you practice early cultivation of garden crops.
| Heating method | pros | Minuses |
| Solar heating
| This is a fairly simple and easily feasible option. Of course, you won't build everything for free, but it won't require expensive materials. Heating occurs naturally, heat is released gradually. | This method directly depends on the climate and weather conditions. It will not work to increase or decrease the temperature. |
| The method lies in the fact that biofuel is laid under the fertile layer, which heats up the earth due to natural decomposition processes, heat is given off gradually. Due to it, less feeding and watering is required. | This method also depends on the climate; without additional heating of the air in the winter season, the plants will not survive, and in the summer they can rot. The temperature cannot be adjusted. |
| Air heating
| The system is easy to build, the greenhouse heats up quickly. There is no condensation as there is constant air movement. | When the system is turned off, the temperature drops sharply, so the process needs to be maintained for all the necessary time. |
| Water heating
| The system works reliably and safely. The air does not dry out. The temperature can be changed as needed. | It will be optimal to arrange a separate boiler room or heating water using electricity, so this method cannot be called economical. |
| Steam heating Friends! As part of our portal, we launched a book on how to make a lawn with your own hands. If this topic interests you, then READ MORE >>
| The required temperature is reached very quickly. Fuel is economical. The materials are inexpensive. A large space can be heated. | Heating devices and components get very hot, so they often need to be replaced. |
| Furnace heating
| Inexpensive, easy to build with your own hands, efficient, temperature can be changed, fuel is available. | Such a system must be monitored all the time. |
| Gas heating
| The air heats up quickly and evenly, the system does not require a lot of money and is practical to use. | The operation of the system must be constantly monitored, since the gas is quite dangerous. In addition, it is necessary to coordinate the project with special services at all stages of the construction. |
| Electric heating
| There is no need for control, no need to build a chimney, the process can be automated, there is no danger of ignition, there are no problems with the purchase and storage of fuel. | The air is dry, a power source is required. This is a rather expensive option, as it will consume a lot of electricity. |
DIY greenhouse heating ideas
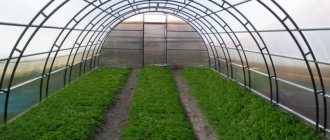
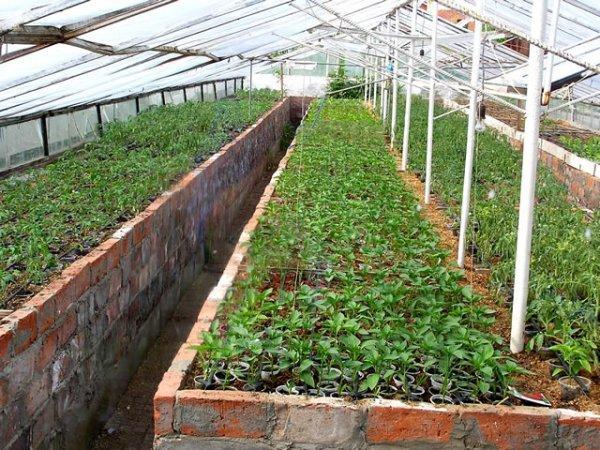
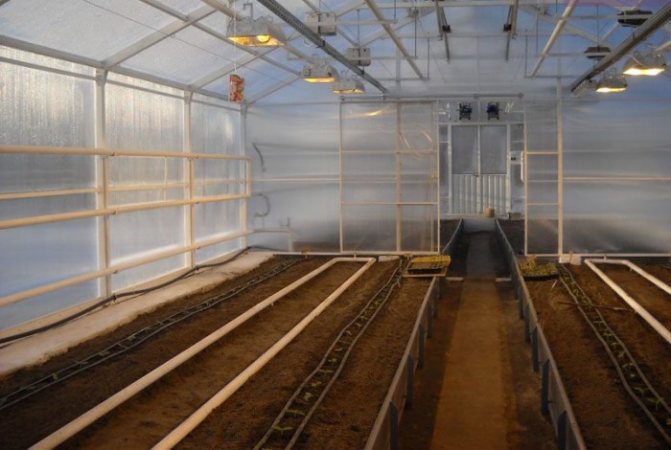
Many summer residents install greenhouses or greenhouses on their plots in order to grow seedlings in them and get an earlier and richer harvest. But if such a structure is equipped with a heating system, then you can get a harvest of vegetables, herbs and even strawberries all year round. But making heating in a greenhouse will take preparation and some building skills.
Greenhouse heating methods
There are several types of indoor heating for growing vegetables all year round. Each of them has its own pros and cons.
Possible types of heating and their advantages:
- Stove heating is characterized by high efficiency, simple construction technology, availability of fuel and the ability to regulate the temperature. Installation of a furnace or boiler will not require large financial costs.
- Air heating can quickly heat any area, while the technology for its construction is quite simple.
- The water system is reliable, safe and temperature controlled. When using such devices in the greenhouse, there will always be a suitable air humidity for growing plants.
- Solar panels are a natural, affordable, simple and inexpensive heating process. On a sunny day, the release of heat from them is gradual.
- Gas heating is notable for its practicality, relatively low cost, fast and uniform heating when using a heater.
- Electric heating for greenhouses and greenhouses is practical, simple and efficient. The devices can be used around the clock, and portable equipment can be installed in any convenient place.
But each of these heating systems has its own disadvantages. Among them:
- Stove heating requires constant monitoring.
- In an air system, the heating process must be constantly maintained.
- Hot water heating may require electrical water heating equipment or even the installation of an entire boiler room. All this is not cheap.
- Solar panels are only effective in good sunny weather. When using them, it will not be possible to regulate the air temperature.
- The gas system requires constant monitoring as there is a risk of ignition. To install it, you need permission from special services.
- Electrical equipment requires a power source, dries the air and is quite expensive to use (energy costs).
A specific heating system is suitable for each building. For example, for standard greenhouses with a small area, you should not choose expensive equipment. And in large industrial greenhouses, infrared heat carriers, heat pumps and other advanced technologies can be used.
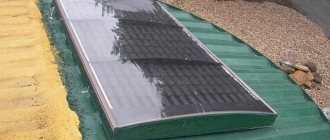
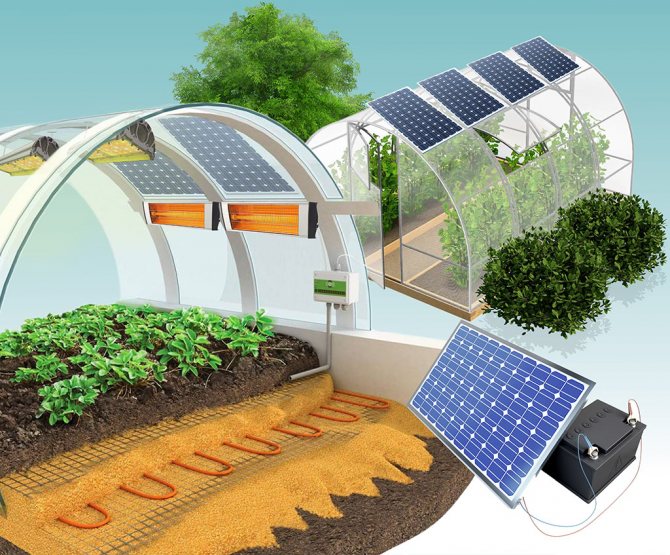
Greenhouse solar heating (solar air collector)
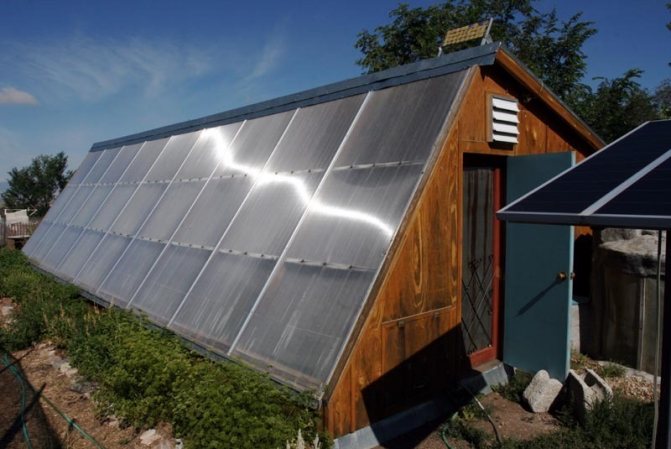
To create such a system, it is necessary to consider the location of the air manifold to ensure air circulation. In order for the air masses to move independently, the inlet must be positioned higher than the outlet. Then the warm air will rise and enter the greenhouse, and the cooled air will return back to the collector, there it will warm up and repeat the cycle.
Friends! As part of our portal, we launched a book on how to make a lawn with your own hands. If this topic interests you, then READ MORE >>
If, however, to organize air circulation forcibly, it is necessary to install fans near the inlet. Thus, the soil will warm up more evenly.
To keep the air warm at night, an additional circuit is needed, for which a fan heater can be used.
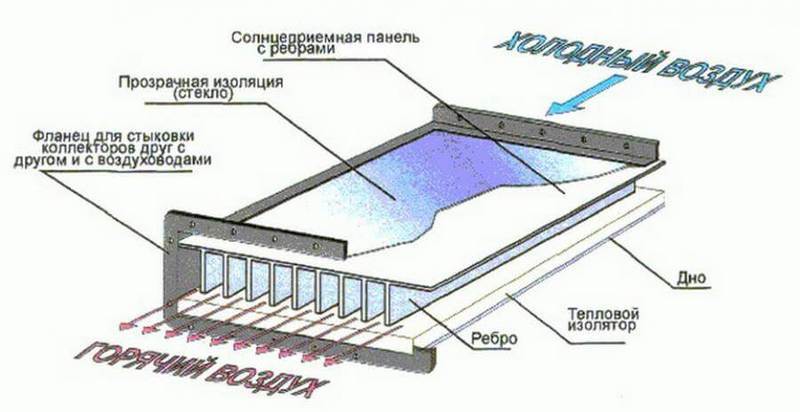
It is not difficult to make a collector. To do this, you need to assemble a box made of fiberboard, the height of which should be about 15 cm. You can strengthen it with the help of stiffeners. A layer of mineral wool should be placed on the bottom, which should be covered with an absorber.
All seams must be sealed and the inner surface painted black. The sides must be equipped with pipes through which air will enter and exit. Then the box is closed with tempered glass and the joints are again treated with a sealant.
The box is fixed on the roof, the air ducts are directed into the holes in the walls of the greenhouse. You can supply several similar collectors. The air temperature in them will be about 50 degrees.


Economical heating of greenhouses in winter with an air solar collector
Installing Solar Fox solar air collectors to heat greenhouses is the ideal solution.Air circulation in greenhouses can be carried out in two ways - natural or forced, which directly depend on the installation and location of the collector.
For natural air circulation, the outlet of the collector must be located lower than the greenhouse inlet, which will ensure the rise of heated air from the collector through the duct directly to the greenhouse. The cooled air will be forced back into the duct, allowing continuous air flow throughout the day.
For forced air circulation, the solar collector can be placed in any convenient place, since the greenhouse will be heated by running fans that provide constant and uniform heating of the room.
In both cases, in order to prevent rapid cooling of warm air streams, it is advisable to cover the air ducts with thermal insulation, which will allow more efficient heating of the premises. In addition, to maintain a comfortable air temperature at night, it is worth taking care of an alternative source of heating - air heaters, heat fans or other heaters.
Biological heating of the greenhouse
Such heating is laid when decorating the beds in the greenhouse. 30-60 cm of biofuel is placed under a 20-30 cm layer of earth: manure, peat, straw, and other organic material. It gradually burns inside, giving off heat and supplying plants with nutrients.
Previously, horse manure was used as biofuel, as the hottest, but at the same time they were afraid not of frost, but of the fact that the plants would rot. It was impossible to ventilate on a very windy day, the heat was immediately blown out. The manure burns all the time, increasing the temperature, it is impossible to adjust it. You can mix it with straw, this will slow down the combustion process, lower the temperature, and the biofuel will last longer.
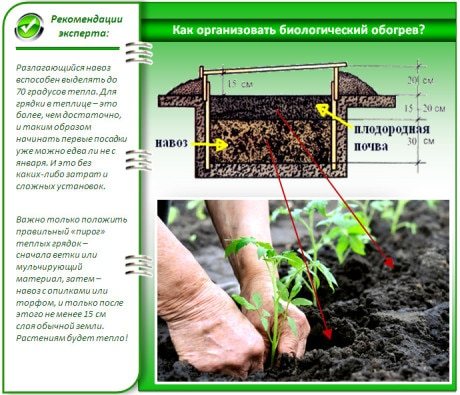
Another disadvantage is that this is a rather laborious process that involves a lot of earthwork. But if everything is done correctly, the soil will be warm even in cold weather.
The advantage of this fuel is not only warmth for the soil, but also in nutrients for plants. In addition, moisture occurs during evaporation, which will reduce watering.
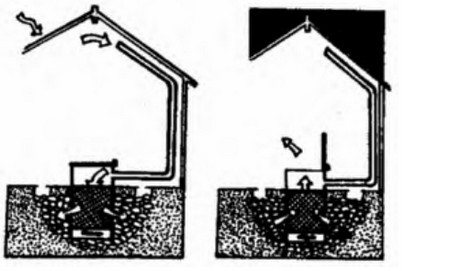
Greenhouse heating with solar collector
Left
: A properly designed greenhouse does not require powerful heating in winter.
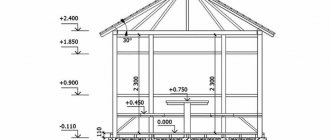
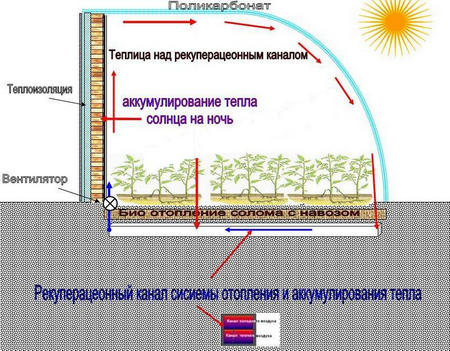
A properly designed greenhouse does not require powerful artificial heating. Different geographic latitudes require different amounts of additional heating, but the bulk of the heat in the greenhouse is obtained from the sun. Even in 35-degree frost in a good greenhouse on a sunny day (and the following night) it will be warm as in summer. New materials - such as polycarbonate and special films - "keep" heat ten times better than glass, and are distinguished by low thermal conductivity. After all, the task of the greenhouse is not so much to get the sun's heat during the day (glass copes with this quite successfully), but rather to preserve it at night, without allowing a large temperature drop, which is destructive for plants.
Heating farm greenhouses To keep the heat received during the day, people use heat accumulators, that is, they put something in the greenhouse that heats up by the sun during the day and gives off heat at night. In part, the greenhouse soil itself can serve as a heat accumulator, but it is usually not enough. Heat is well accumulated by ordinary water. For such a liquid heat accumulator, sometimes something like a shallow pool is made in the greenhouse, which at the same time regulates the air humidity. Of course, the location of the "pool" should be such that the sun heats the water all day long.
But not everyone can afford to arrange a pool in a greenhouse and there is not always enough space for this.Therefore, a heat accumulator is made of stones, pebbles, crushed stone, etc., solid materials that can accumulate heat. Often they are placed under the ground (no deeper than 50 cm), and the greenhouse air constantly circulating through the pipes delivers heat there. The pipes pass under the ground, in contact with the heat storage material, and go to the upper part of the greenhouse, where the warmest air accumulates. Circulation is provided by a low-power fan, and the fan can operate from a small solar battery even without any converters, if the power of both is precisely matched.
Left
: Diagram of a subsoil cable heating device in a greenhouse.
If solar heat is not enough, additional heaters can be installed, including them on particularly cold winter days. Powerful heating is not needed - the sun will still give the bulk of the heat, and you can bring the temperature to the desired level using PLENs (film electric heaters) powered by solar panels, subsurface cable heating (see the figure above), a free-standing solar collector (in including homemade) or other low-cost method.
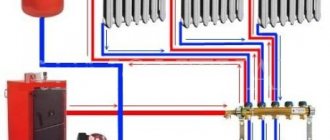
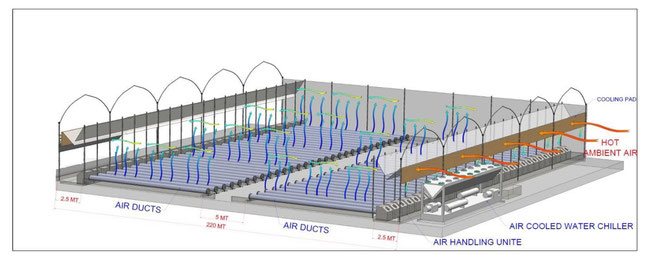
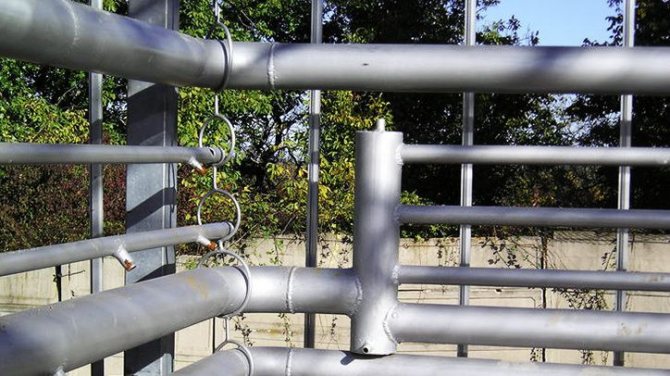
Heating system for industrial greenhouses In an industrial greenhouse, the heating system is the most important component. Heating is usually provided by hot water circulating through steel pipes. The circulation is forced and is carried out by pumps, the power of which is calculated depending on the configuration of the industrial greenhouse.
Large greenhouse complexes use a multi-circuit heating system. For example, the upper heating circuit is designed to regulate the temperature regime in the upper part of the greenhouse in order to exclude the penetration of cold air into the plant zone when the outside temperature drops sharply (creating a warm air "cushion" in the upper part of the greenhouse volume). The bottom heating circuit is the main one and is designed to create a given thermal regime in the greenhouse. In addition, the circuits of subtray heating, zonal heating, heating of the substrate, etc. can be used. Temperature regimes are controlled along the circuits from an automated microclimate control system.
Left
: Heating system in an industrial greenhouse (distribution unit).
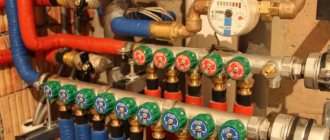
Hot water is used as a heat carrier with calculated temperatures in the range of 50-95 ° C. Temperature parameters are set autonomously in each section of the greenhouse according to the requirements of agricultural technology. The distribution of the coolant supply in the heating system of greenhouses is carried out using temperature control units (distributors) to the branches of the greenhouse block. The control unit consists of a circulation pump, a mixing valve, as well as pipelines and instrumentation.
The transport and distribution parts of the heating system are made of steel pipes of various diameters.
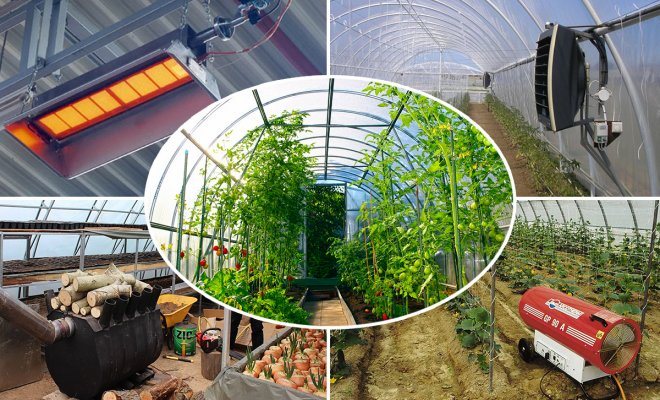
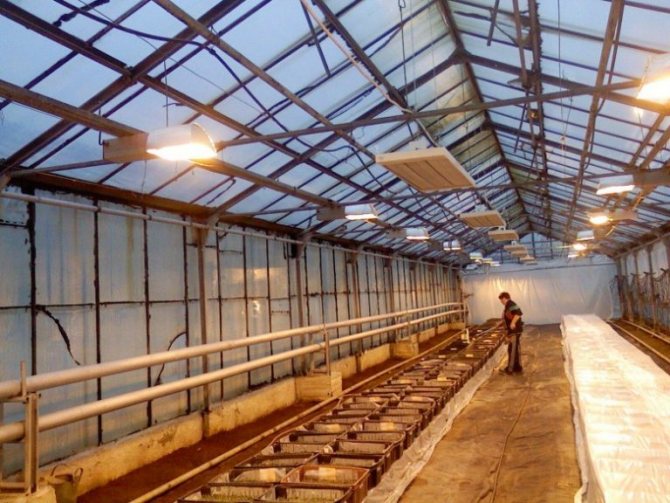
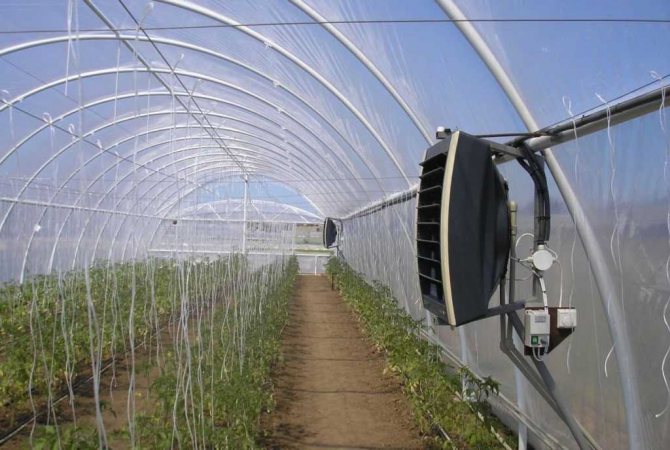
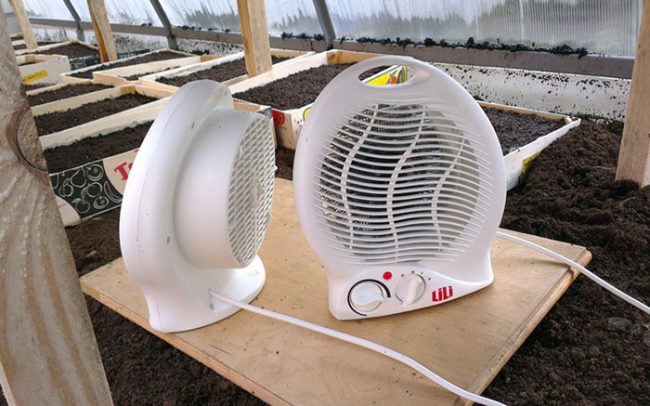
Greenhouse air heating
Air has very good thermal insulation properties, so when building a greenhouse, it is worth using polycarbonate or considering double glazing.
In the greenhouse, it is necessary to install air ducts for uniform heating of the soil and air.
Air heating circuit
It can be heated with wood, gas or electricity. There are several ways to set up such a system.
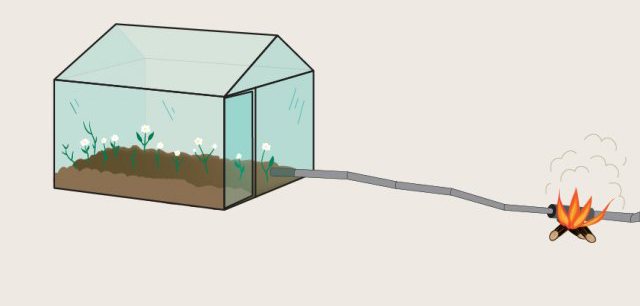
- The simplest and most primitive option would be air supply heated from the fire... To do this, a pipe is installed in the center, the diameter of which should be about half a meter, and the length - 2.5 meters. One end extends outside the greenhouse and hot air is fed into it.
- Can be used heat generatorwhich supplies warm air thanks to a polyethylene sleeve. It is fixed to the ceiling and is complemented by perforations. The main disadvantage of this option is the inability to perform high-quality heating of the soil with air.
- Another way is to use gas convector... It creates an air stream that circulates around the greenhouse. The disadvantage of this method is that it is necessary to lay out the gas pipes, and place the landings at a sufficient distance from the convector. In addition, this method burns oxygen, so ventilation must be considered.
- You can use thermal devices - fan, heat gun... So that the plants do not suffer, the pipe is laid under the beds and in a certain place is brought out, where a heat source is attached to it.
Do-it-yourself heating in a 5th generation greenhouse
The innovative technology in the 5th generation greenhouses provides for the distribution of air flows through the air hoses, ensuring precise climate control. The concentration of CO2 is uniform throughout the greenhouse, temperature deviations in both the horizontal and vertical planes are 1-2 ° C, which in itself is a serious technological achievement.
Distribution of air flows in the 5th generation greenhouse
This technology reduces heating costs by 25%.
Heat storage options
Greenhouse heat accumulators are solar heat storage devices. They are divided according to the materials from which they are made. the main element is a heat accumulator.
Water heat accumulators
In them, the accumulation of heat occurs in containers with water located inside the greenhouse. Tanks can be both open (pools) and closed (barrels). In the latter case, it is necessary to understand that several compact containers with water show much higher efficiency than one large one.
This is due to the fact that solar energy is not able to penetrate through a large layer of water and heats the battery only from above and near the walls. The rest of the water remains cold for a long time.
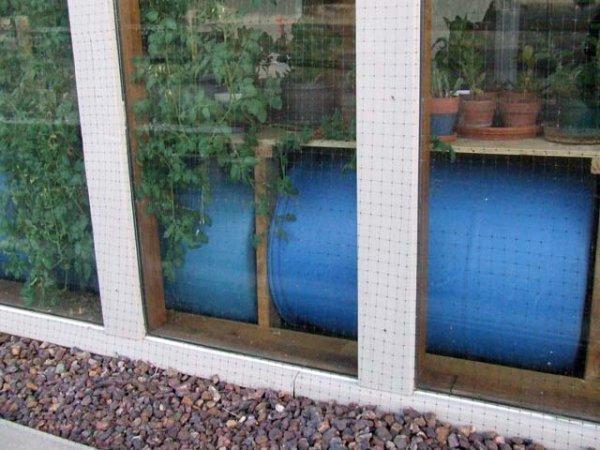
Heating efficiency can be improved by installing a large number of small closed water heat accumulators. They should be placed evenly over the entire area of the greenhouse. This will allow them to warm up faster, and in the future, give off heat more evenly.
Open water accumulators have one important feature: their efficiency depends on the volume of air above the pool. The water heated by the sun will inevitably begin to evaporate, taking away the much-needed heat. The evaporation process will take longer as more dry air is available. So it makes sense cover the pool with a film, thereby getting rid of energy consumption to evaporate water.
IMPORTANT! If you paint the container from the inside with black paint, this will speed up the heating of the water many times over.
If you abandon self-production and buy a ready-made solution, then a water heat accumulator with a capacity of about 300 liters and with an internal heat exchanger will cost about 20,000 rubles. A 2000 liter model can cost from 55,000 rubles or more.
Heat accumulation by soil

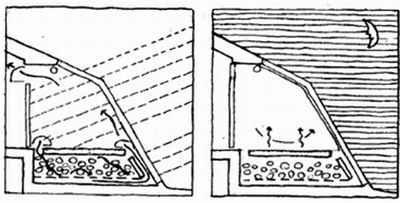
The soil available in any greenhouse is also capable of accumulating heat in itself, so that after sunset it can be used for heating.
In the daytime, the soil is elementary warmed up by the sun's rays, absorbing their energy. At night, the following happens:
- inside horizontal pipes laid in warm ground, it gradually heats up;
- warm air begins to move towards a higher vertical pipe, where the thrust is greater. The air coming out of this pipe just heats the greenhouse room;
- through a low vertical pipe, the air that has cooled down enters the ground and the cycle repeats.
Stone heat accumulators
Natural stone has a significant heat capacity, which allows it to be used in greenhouses as a heat accumulator.
Most often the back wall of the greenhouse is laid out with a stoneaccessible to sunlight.In the simplest case, a stone heat accumulator is a greenhouse wall lined with stone.
More complex options involve laying or filling the stone in several layers. However, in this case the battery must be equipped with a fan to create air circulation inside the masonry. This improves heat dissipation.
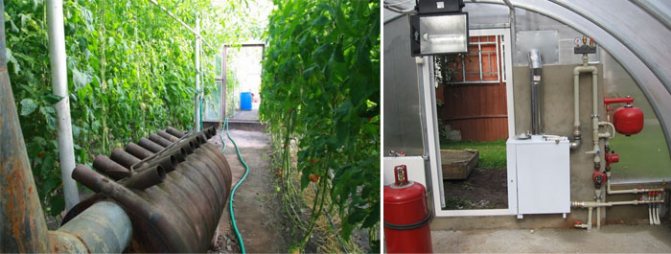
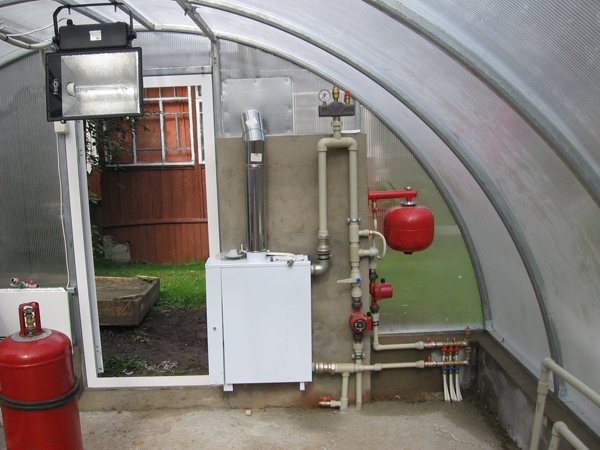
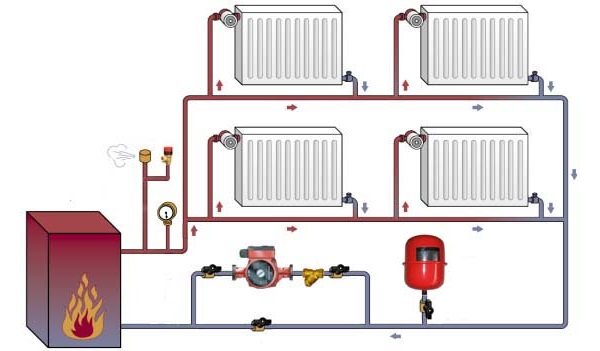
Greenhouse water heating
There are two methods you can use. If the house is heated according to the same principle, the greenhouse is connected to the house system.
Scheme of water heating of a greenhouse with connection to a common system (for example, using a solar collector)
The possibility of shutting off and draining water is necessarily provided.
Another option is to install a separate boiler.
If a separate system is installed for heating the greenhouse, then it is necessary to install a boiler that can run on gas, electricity or solid fuel.
Greenhouse heating scheme using water heating
The cheapest to operate is a gas boiler. You can configure automatic maintenance of the desired mode. In order for the combustion products to be removed from the greenhouse in a timely manner, it is necessary to install a chimney.
The fuel for a solid fuel boiler can be coal or wood. This design requires constant monitoring.

An electric boiler has only one drawback - electricity is expensive.
If the site is gasified, then it is better to stop at a gas boiler. If this is not possible, then you have to make a choice between the other options. It should be noted that it is better to heat a large greenhouse with a solid fuel boiler, but if the area is small, then a small electric boiler can do it.
To determine how many radiators you need to install, you must first calculate the area of the greenhouse by multiplying its length by its width.
Then the calculated thermal power is calculated, for which it is necessary to multiply the area of the greenhouse in square meters by 120.
After that, the thermal power of the greenhouse must be divided by the thermal power of one section of the radiator (this parameter can be found in the product data sheet). The result will be the number of sections that need to be evenly spaced inside the greenhouse.
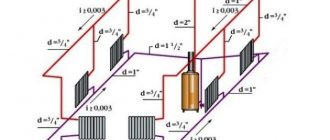
Water heating is always assembled according to a specific scheme. The system includes the following components:
- boiler;
- circulation pump;
- coarse filter;
- balancing valve;
- pipes and radiators;
- expansion tank;
- collector unit (needed if there are several circuits in the system); heat accumulator (for solid fuel boilers).
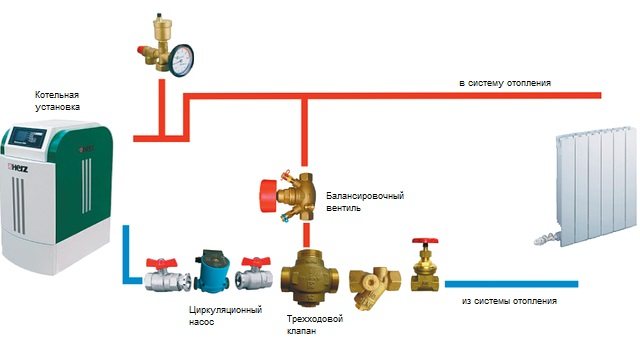
Boiler connection diagram
Do-it-yourself water heating of the greenhouse: step-by-step instructions
Let's consider connecting the system in stages.
Boiler installation
Boiler installation
This will require either a separate boiler room or a small vestibule. If the boiler runs on gas or electricity, it can be installed directly in the greenhouse.
Two options are possible here - strengthening the boiler on the wall, which must be permanent, or installing it on the floor. This requires an even base. The foundation is ideal.
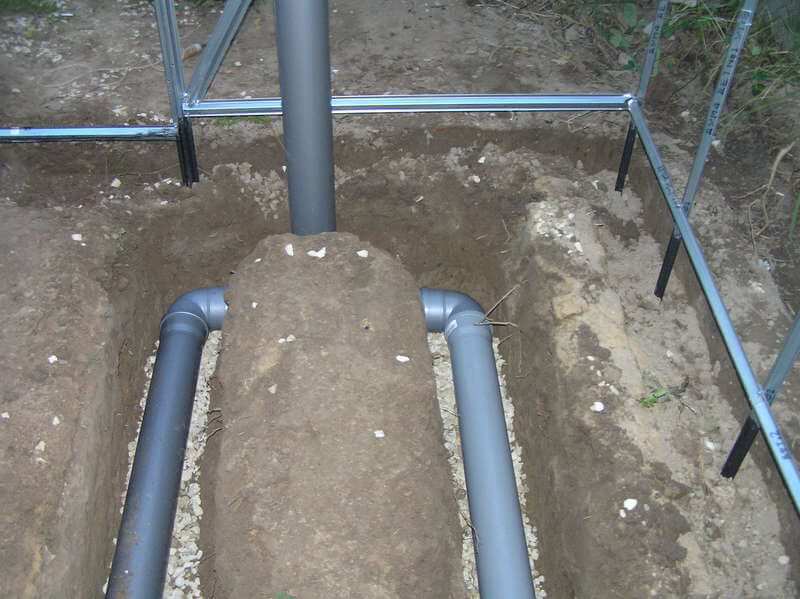
Chimney connection
This step is necessary if the boiler runs on solid fuel or gas.
The chimney for solid fuel boilers is made of stainless steel and is brought out.
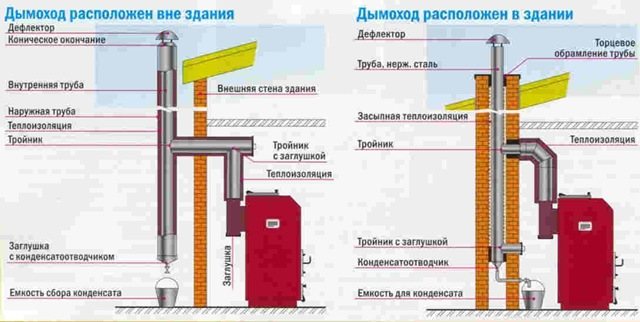
Connecting the chimney to the boiler
If you plan to use a gas boiler, then the chimney must be coaxial. The outlet to the outside is mounted directly next to the boiler.

Connecting a gas boiler to a chimney
Connecting radiators
They are mounted on walls at approximately equal distances for even heating. Each radiator must be equipped with a Mayevsky tap and an individual valve to shut off the water. The section of the pipe should be 20-25 mm.
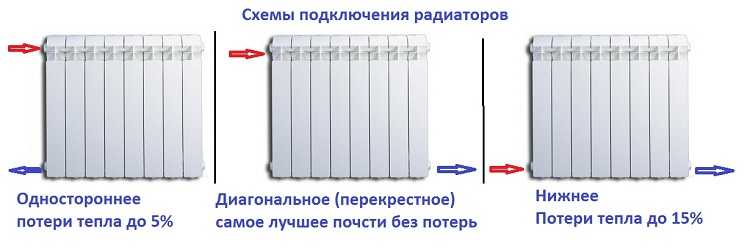
Radiator connection diagram
Expansion tank installation
If forced circulation of water is planned, then a closed membrane expansion tank is required.It is needed to maintain constant water pressure in the system, which is achieved by compressing air using a membrane inside the tank.
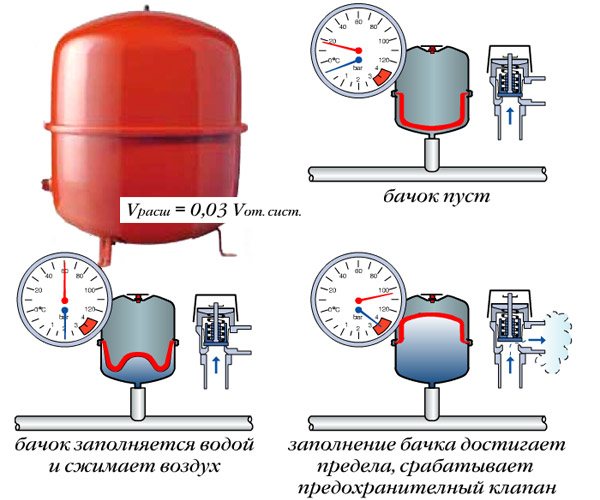
The tank can be installed anywhere, and it is connected from below by means of a valve.
Expansion tank connection
Installation of the safety group
It includes a pressure gauge that controls pressure, a safety valve and an air vent. All this is placed on a special metal manifold, which is connected to the system with the help of a clutch. This structure should be located immediately after the boiler in the place where the temperature and pressure reach the highest values.
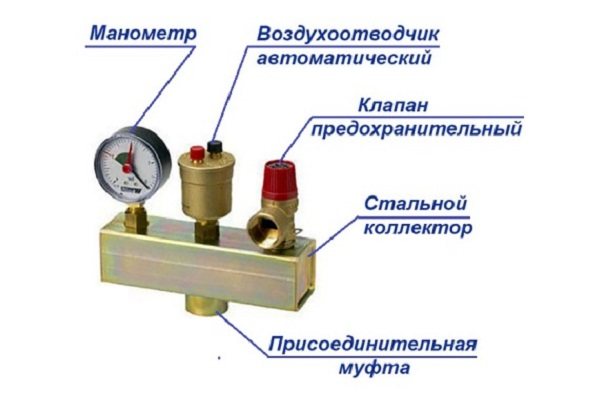
Security group
Circulation pump installation
It is necessary for the pressure in the system to be stable and correct. The pump is mounted on the return pipe before it is introduced into the boiler. In order for the pump to last longer, a coarse filter must be placed in front of it.
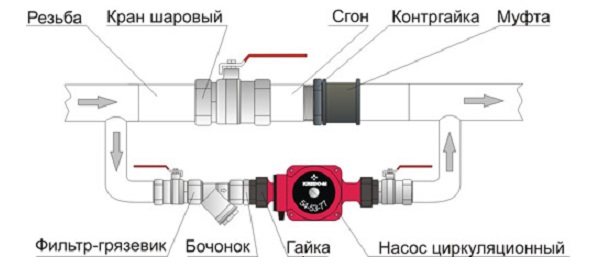
Circulation pump installation diagram
Air pressure testing
This is a test that is designed to detect errors and defects in the assembly. After the system is assembled, a compressor is connected to it and pressure is applied. Before doing this, all valves and valves must be shut off. The pressure must be brought up to those indicators that are indicated in the technical data sheet for the equipment. After the pressure has stabilized, all joints and assemblies must be checked for tightness. This can be done using regular soap suds that are applied to where the joints are. If bubbles appear, this place is leaking.
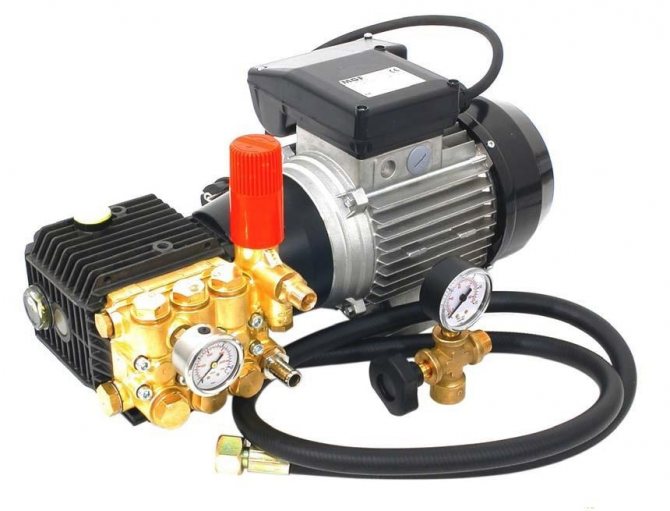
Compressor for pressure testing
If the pressure test was successful, then the entire system is filled with water and a test run of the boiler is carried out. At this time, it is necessary to bleed all the air from the system using Mayevsky taps and balance the pressure using balancing taps.
Alternative sources of heating for greenhouses
Greenhouses are usually heated with:
The main disadvantages of using gas heaters and solid fuel boilers include burning oxygen and reducing air humidity in the greenhouse, which negatively affects plants. Electric convectors do not warm up the soil enough, heating cables can, on the contrary, overheat the root system of plants, and water heating is expensive, difficult to install and maintain.
Solar air collectors reduce the cost of using and maintaining a greenhouse heating system down to zero. Solar heating of greenhouses eliminates huge costs for gas, electricity and firewood. The equipment is easy to install, and it functions autonomously in winter and all year round.
Greenhouse steam heating
The main advantage of this method is the uniform heating of the greenhouse, which has a beneficial effect on the plants. The air is heated by steam, which appears after the water in the boiler boils.
Hot air enters the radiators connected by pipes.
Steam heating system composition:
- boiler for heating water;
- Exhaust valve;
- radiators;
- pump;
- pipes;
- firebox.
Connecting the furnace to the greenhouse foundation through cutting
The system can be of two types - closed and open. In the first version, the condensate is returned to the boiler using a special pump. If the second option is used, the pipes are made with a slight slope and the condensate enters the boiler on its own.
The system can be high pressure (from 170 to 600 kg / m2), low pressure (from 100 to 170 kg / m2) or vacuum-steam. This parameter is influenced by the length of the pipes and some other characteristics of the system.
Pipe routing can be single-pipe, when both steam and condensate are in the same pipe, or double-pipe, when steam and condensate are separated, but both pipes form a closed loop. The second option is preferable, because it is possible to regulate the temperature by turning the valve.
Such a heating system can run on wood, coal, fuel oil, diesel fuel or natural gas. The boilers also differ. They can be gas-tube, with low power, or water-tube, which are safer.
Water tube boilers can be vertical (drums are located at different heights) or horizontal (drums are equipped with collectors). The boiler consists of a burner, a furnace, an ash pan and a drum.
What to look for during installation
- It is necessary to install only metal pipes, since plastic pipes will not cope with a heavy load.
- Particular attention must be paid to reliability. All components must be manufactured in a verified factory.
- It is necessary to correctly calculate the boiler output.
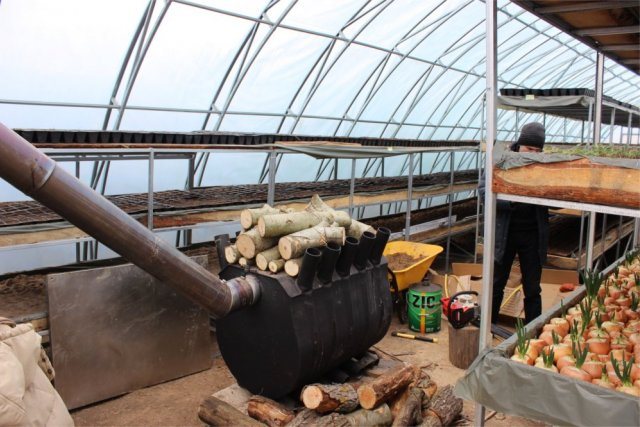
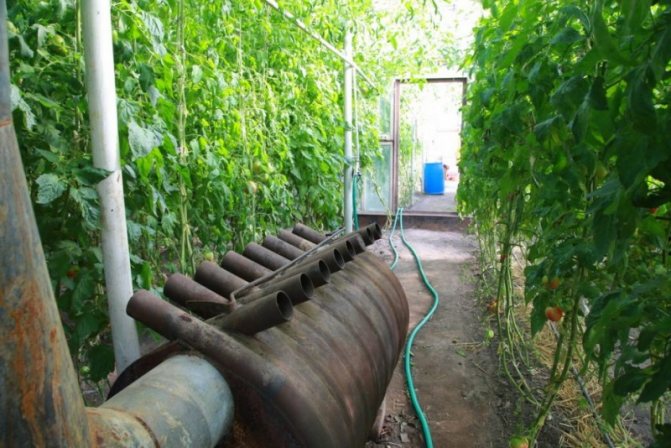
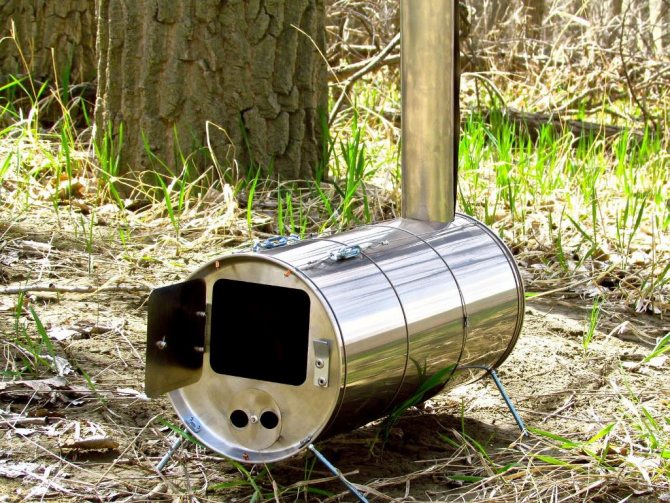
Greenhouse stove heating
The main source of heat in this case is a solid fuel boiler that runs on wood or coal (recently, Buleryan-type stoves have been popular).

Greenhouse oven
The easiest way is to install a boiler and a pipe that will remove smoke and combustion products. You can add pipes and radiators, then the quality of heating will increase significantly. It must be remembered that the chimney must be cleaned of ash and soot in a timely manner.
One of the disadvantages of this option is excessive air drying. To maintain the required humidity level, you can simply place a large container filled with water in the greenhouse.
Furnace heating
An important plus of such a system is the ease of installation, which even an inexperienced master can handle. In addition, stove heating is much cheaper than electric heating.
Furnace heating of the greenhouse: step-by-step instruction number 1
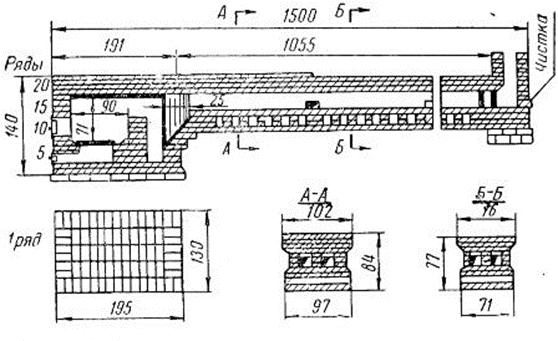
Greenhouse ovens
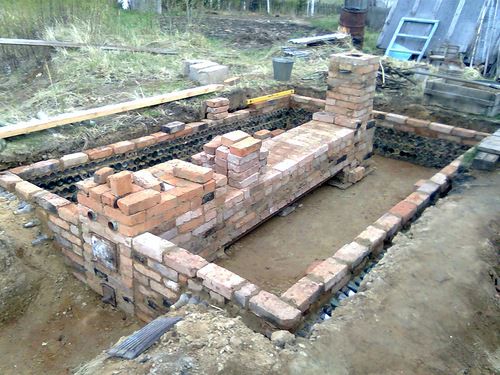
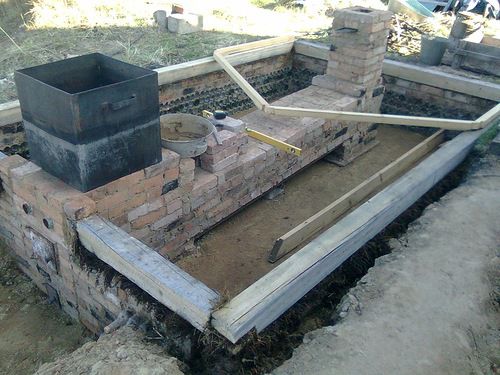
First stage... In the vestibule of the greenhouse, it is necessary to build a foundation, on which then lay out a brick firebox.
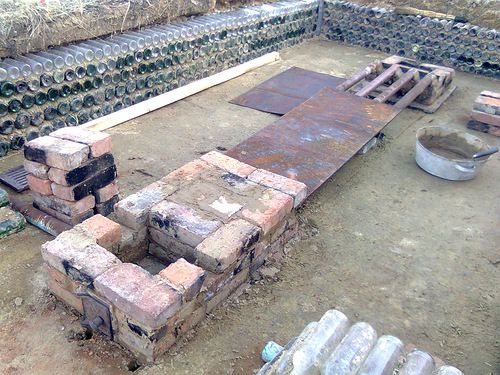
Brick oven with hog
Second phase... A chimney is laid out along the entire length.
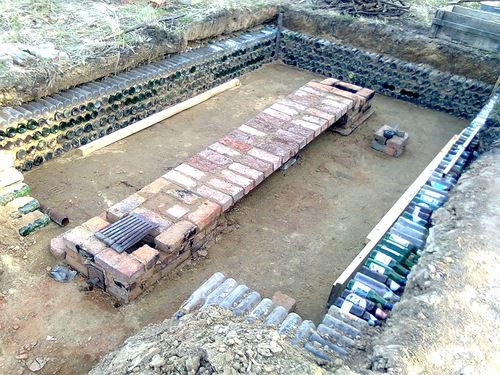
The hog base and blower chamber with side air intakes
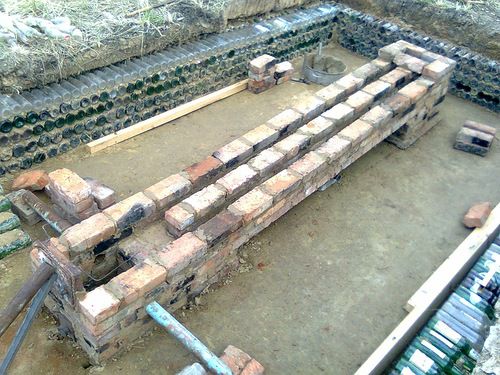
Firebox and chimneys
Stage three... From the opposite side of the greenhouse, a pipe for exhausting smoke is brought out. Thanks to this design, all combustion products will be removed, and heat will remain in the room.
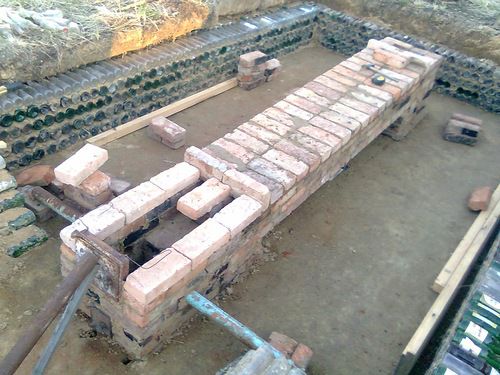
Continuation of the furnace and overlapping the hog Connection of the furnace with the greenhouse foundation through cutting
Water tank mounted above the firebox
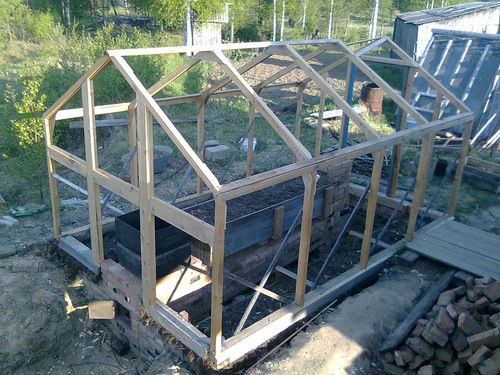
A bed located directly on the stove
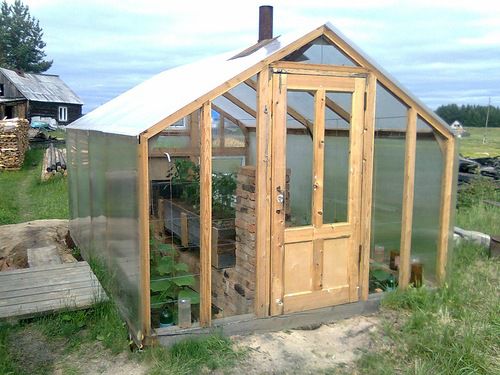
Ready oven in the greenhouse
Furnace heating of the greenhouse: step-by-step instruction number 2
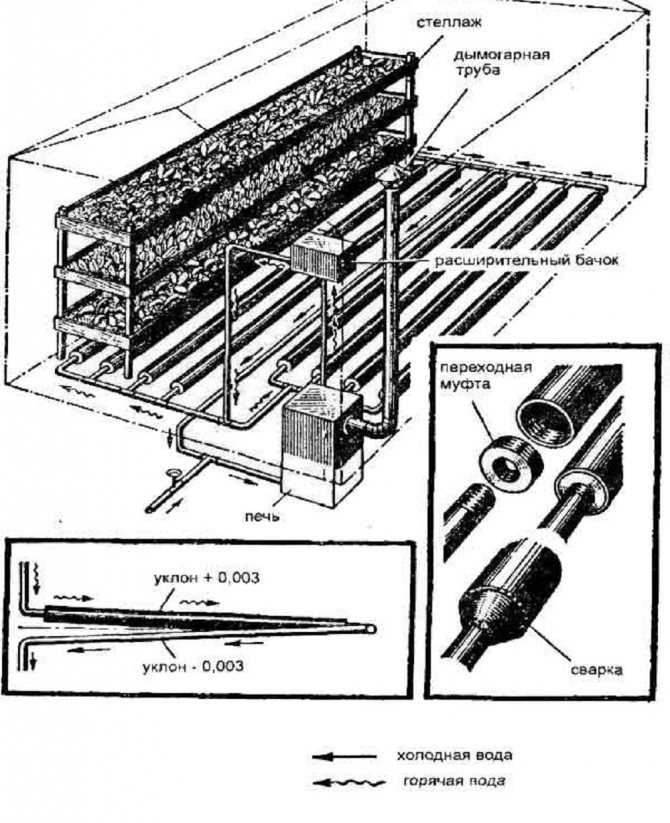
Heating system diagram:
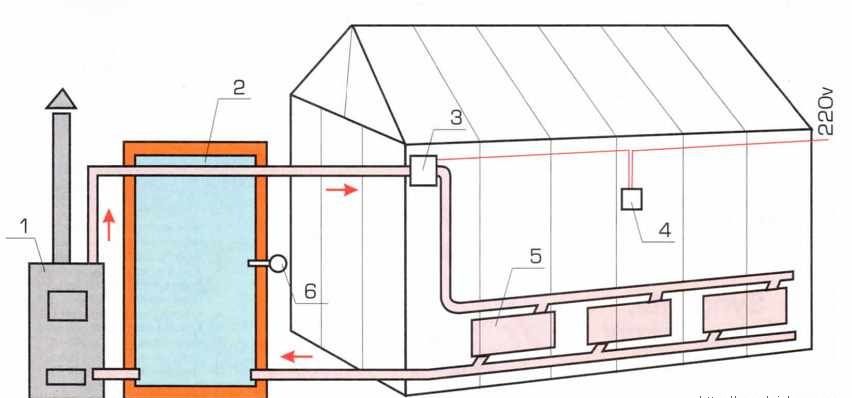
- 1 - heating boiler;
- 2 - thermos tank;
- 3 - circulation pump;
- 4 - relay-regulator;
- 5 - registers;
- 6 - thermocouple.
First stage... You will need a large metal barrel. Its inner surface must be protected against corrosion. To do this, it must be painted, preferably in two layers.
Second phase... Several holes are punched in the body. One of them will be needed to connect the chimney, the others - for the tap and the expansion tank.
Stage three... It is necessary to weld the stove itself, for which sheet metal is used. Then it is inserted into the barrel.
Fourth stage... A piece of pipe is welded to the hole in the barrel intended for the chimney. The total length of the smoke outlet structure must be at least 5 meters.
Fifth stage... An expansion tank is mounted on the barrel. The optimal capacity is 20-30 liters.
Sixth stage... Pipes are installed throughout the room. They can be laid out directly on the ground, observing a step of 1.2 meters.
Seventh stage - a pump is installed to ensure the movement of water in the system.
Solid fuel boiler in a greenhouse
After the entire system is assembled, you need to turn on the water and check the tightness of all joints.If there are leaks, they must be repaired immediately. After that, you can check the operation of the oven.
Heating the greenhouse with a stove
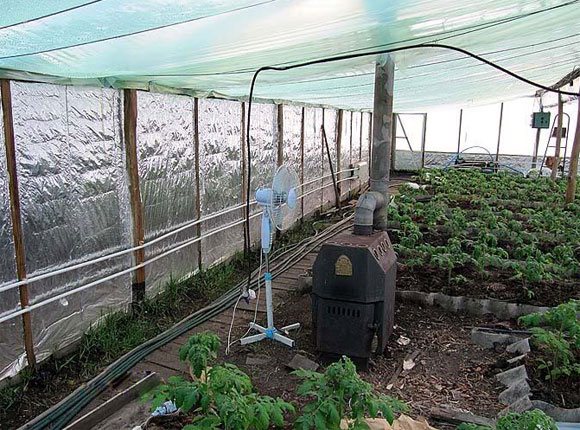
Often, a stove-stove is also installed in greenhouses. It heats the greenhouse space well, protects seedlings from temperature fluctuations, solid fuel is suitable for it. Well, the combustion products, the same ash and ash, can be used as fertilizer.
The entire heating structure consists of:
- Potbelly stoves;
- A horizontally located chimney;
- Chimney.
A good option for heating a greenhouse is a potbelly stove.
The principle of operation of the building is as follows: it works on wood, during the combustion of which a lot of heat is released, heat enters the chimney. There it is accumulated, and along the way the air is heated around the chimney. Well, the smoke will be discharged through the chimney.
An important detail of a country potbelly stove is a water tank. Install it either on top of the oven, or it is removable. If necessary, it is installed near the heating walls. It turns out that the optimal humidity is maintained in the greenhouse, and even in cool weather you have warm water for watering the plants.
Well, the fuel for such a stove is ordinary firewood, also fuel briquettes, and old rags, and various packaging materials. Just keep an eye on the moisture content of the fuel, otherwise wait for condensation and deposits on the pipes, the structure will have to be cleaned. To build, to build such is a budgetary way of increasing yields, protecting the crop from external unfavorable conditions. In the northern regions, such a building is used very often.
Greenhouse gas heating
Systems providing this type of heating can be divided into three types:
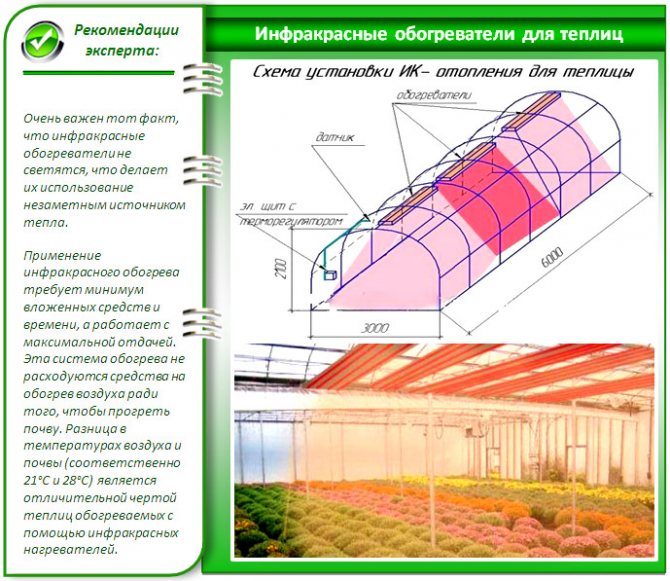
- Infrared.
- Catalytic.
- Convection.
Gas-air and gas-water systems can also be distinguished. Heaters with open burners, convectors and systems with infrared burners are ideal for greenhouses.
Heaters with open burners
The structure includes a thermostat, main and pilot burners. The system is connected to a gas cylinder. The disadvantage of this method is that oxygen is burned, so ventilation is required.
Gas convectors
Such equipment consists of the following parts:
- Fireproof housing. It must be heat resistant.
- A heat exchanger that heats the air.
- Gas burner inside the heat exchanger.
- Combined valve that regulates pressure.
- System that removes combustion products.
- A thermostat that controls the microclimate.
- Automation that controls the operation of the system.
Combustion products can be discharged using two different systems.
The chimney system includes a vertical chimney, which is used to remove combustion products outside.

Parapet system - combustion products enter the coaxial pipe, which is laid through the outer wall.

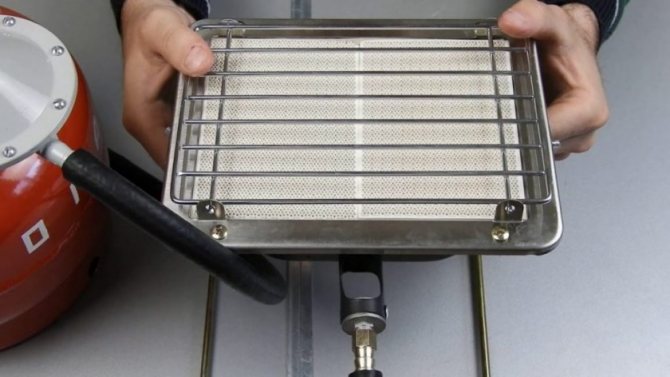
Gas heaters with infrared burners
This design is ideal for heating a large room. When choosing equipment, it is necessary to focus on those heaters that are intended for the street.
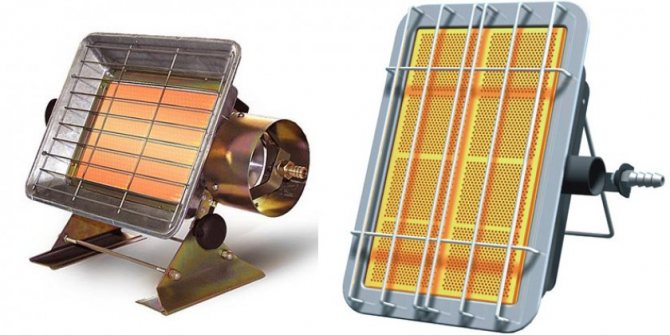
Such an apparatus consists of the following parts: a body in the form of a cylinder, into which a gas cylinder is built; stand and hose for connecting the cylinder and the burner; a grid with a large section and a cylindrical handicap, a control panel is attached to it; gas burner umbrella.
The device is powered by propane. Just 11.5 kg will provide 15 hours of uptime.
An important difference between heaters of this type is that it is not the air that heats up, but objects that are at a certain distance.
How to conduct gas into the greenhouse with your own hands
It is important to remember that the connection to the main gas pipeline should be carried out only with the involvement of the appropriate services. Any independent actions are prohibited here.
To mount gas heating in a greenhouse with your own hands, it will be optimal to dwell on the option with infrared burners. First you need to think about where the device will be mounted - on the floor, walls, parapet.
Then ventilation is mounted, which can be assembled from PVC pipes.
After that, the equipment is installed. It is important to follow a few rules:
- There should be a distance of 1 m from the soil to the device.
- A similar distance is maintained from the plants to the device.
- Several infrared devices are located no closer than half a meter from each other.
After that, a hose is connected to the reducer on the cylinder, the other end of which is fixed to the device. The joints are reinforced with clamps.
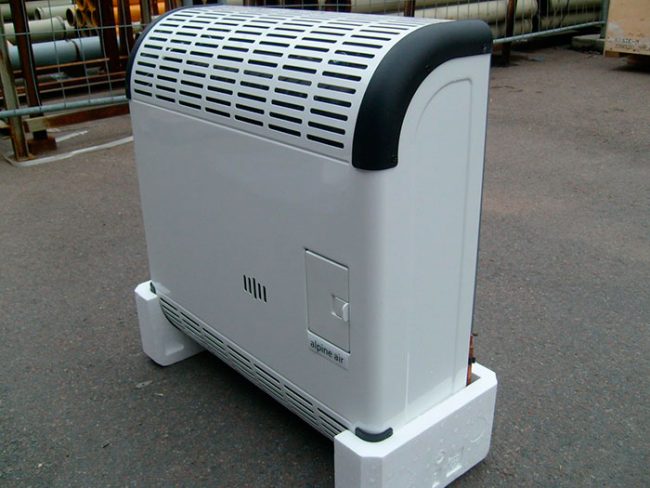
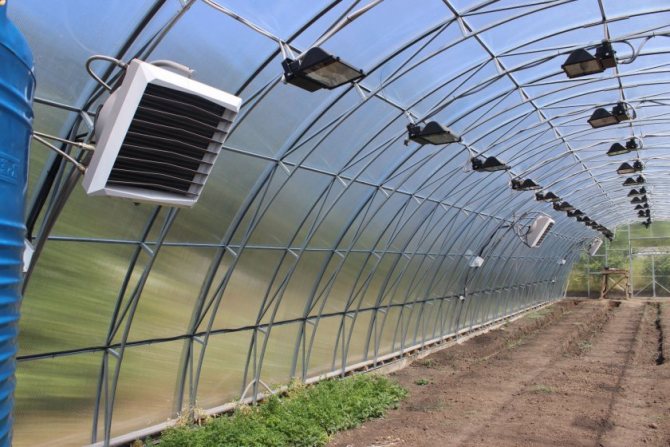
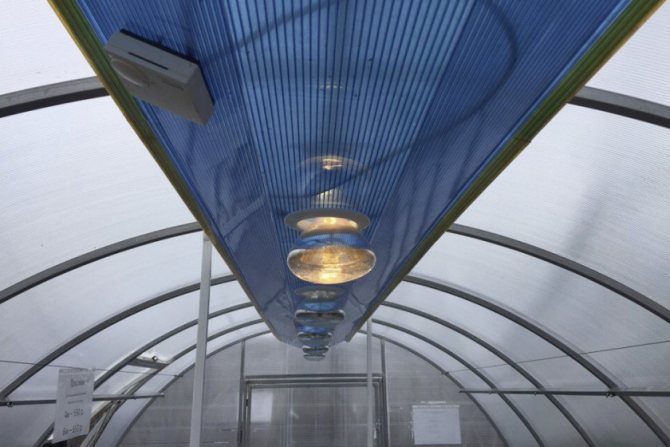
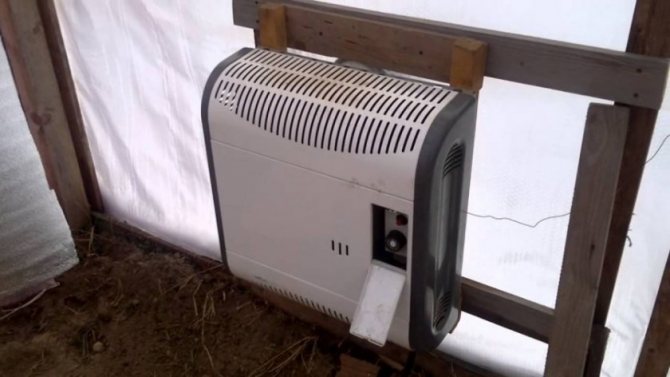
Greenhouse electric heating
There are several options:
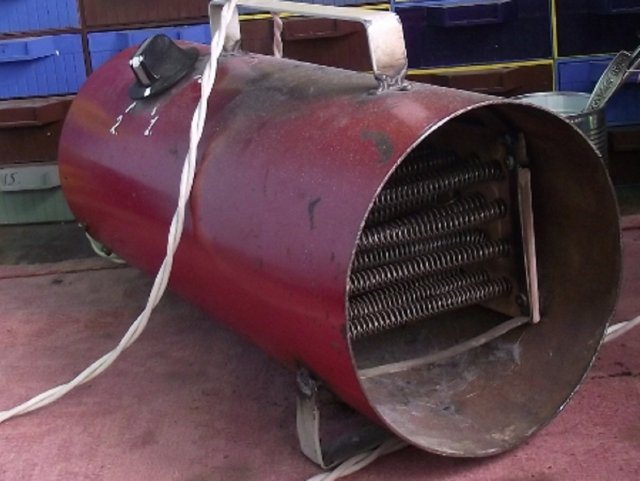
- Air: heat guns, fan heaters or oil coolers.
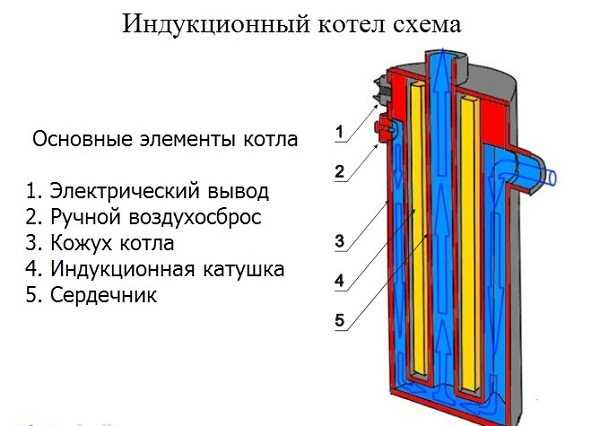
- Water: boilers with heating elements, working on electrodes or on the principle of induction.
- Electric infrared heaters (differ in that they do not heat the air, but directly objects, reducing electricity costs by 30%);
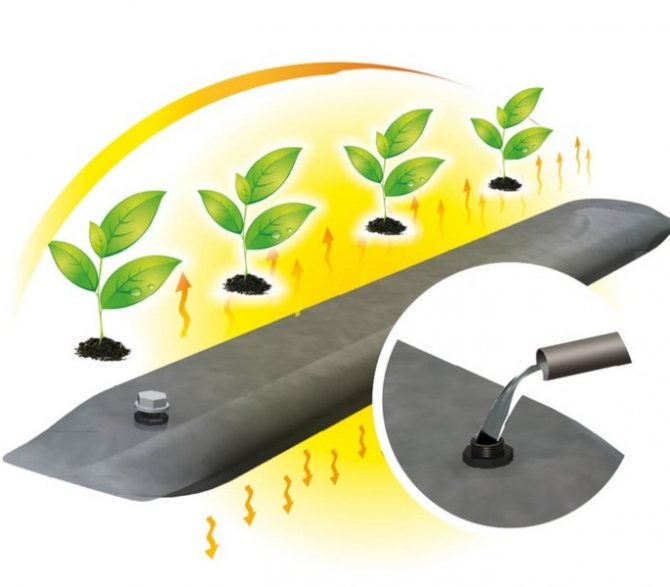
- Heating cables that are laid directly in the soil.
We already talked about the first three options earlier in the article, now he will consider the last method of heating the greenhouse - using a heating cable.
Heating cables can be of various types:
First type - resistive cables. They are quite inexpensive, but can lead to either overheating of the soil or insufficient heating.
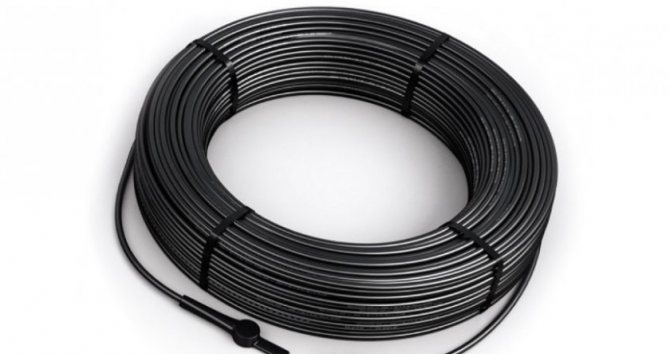
Resistive cable
Second type - self-regulating cable. It consists of two carbon fibers separated by a semiconductor. It saves energy and doses the heating of the soil.
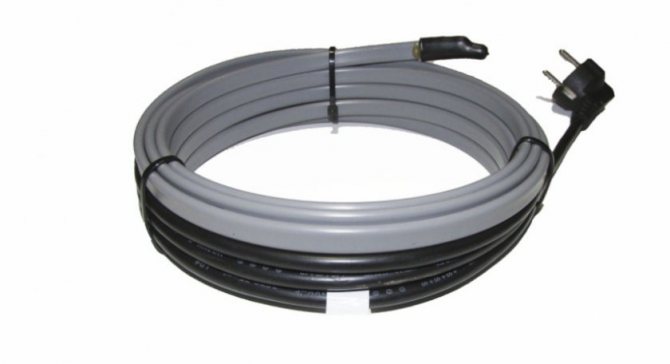
Self-regulating cable
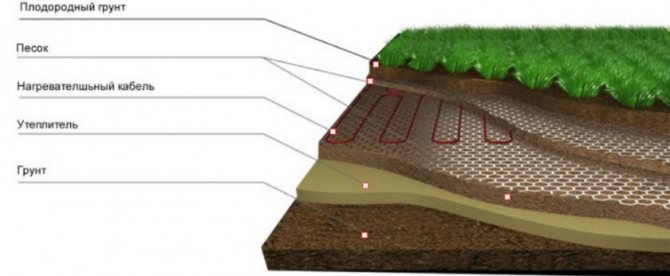
Installation of the cable system
The better the cable is laid, the more efficient the system will be. Its arrangement includes the following stages:
- It is necessary to remove a layer of soil about half a meter.
- Add some fine sand. The thickness of the pillow should be about 5 cm.
- Install thermal insulation, for example, penoplex.
- Lay waterproofing - polyethylene.
- Pour another 5 cm of sand on top.
- Install fine-mesh metal mesh.
- Then the cable is laid in the form of a snake. It is important to keep a step of about 20 cm.
- The cable can be secured with plastic clamps.
- After that, 5 cm of sand is poured again.
- The structure is closed with a protective mesh made of plastic or stainless steel.
- Now 40 cm of soil can be laid.
- The sensor, with the help of which the temperature will be controlled, is mounted about a meter above the soil surface.
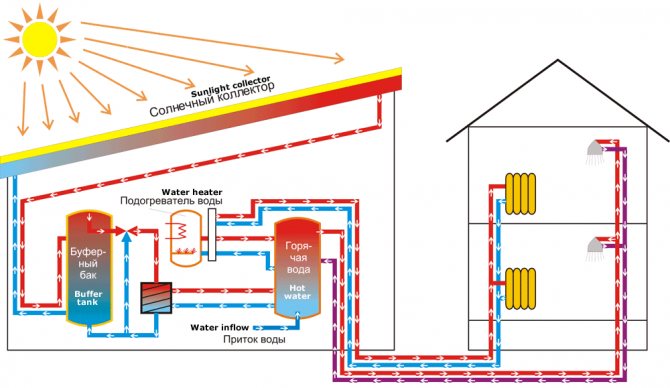
The solar plant is necessary in the summer season for the shower and kitchen, and in the spring and autumn season to provide the greenhouse with heat, in fact, as well as the water heating column.
Figure 42 shows a solar plant. It is not so difficult to manufacture and contains only two basic parts - a heat accumulator and a solar collector.
At the same time, the most difficult to manufacture will be solar collector
... It is constructed as follows: a wooden box is hammered together using planed boards. The dimensions of the box should be 1500x750x100 millimeters. In place of the upper edges of the box, it is necessary to select a quarter of the total area in order to later insert the glass in this place. Iron strips are nailed from the outside of the box in order to install the second glass. These steps are illustrated in Figure 42, A. The walls and bottom of the box must be pasted over with foam, the layer thickness of which is about twenty millimeters. This can be done using ordinary PVA glue.
The entire cavity of the box is painted black with oil paint. At the same time, before painting, one third of a piece of laundry soap melted in a small amount of water is added to a jar with one liter of paint. This is necessary for the oil paint to become matte.
The outer part of the wooden box is painted with ordinary paint for outdoor use in any color convenient for you. As shown in Figure 42, B, a solar collector radiator is fixed inside the box. This is a copper or brass tube in the form of a spiral (serpentine) with an inner diameter of 15 millimeters or more. On all knees of the tube, 15 or 20 corner strips of the same copper or brass are put on. All two outlets must be connected to water pipes.
The beginning of work on a solar collector radiator involves the creation of sections of tubes in the shape of the Latin letter U. These tubes are bent using a special device designed to bend metal pipes for plumbing.
In order for some parts of the U-shaped tubes to remain straight when bent, two additional tubes are used, the diameter of which is relatively larger than the original tubes, that is, the lever effect is triggered.
Next, you need to prepare the corner strips, which we have already talked about. The workpieces must be cut and folded into an even bundle on top of each other, fixed in a vice. At this stage, the workpieces are still straight and not bent into a corner. Now, with the help of a drill, the diameter of which is equal to the diameter of the U-shaped tubes, one hole is made to begin with. And in order to achieve a strong position and density of the pack, a small tube is placed into the hole made, which just coincides in diameter with the hole. The workpieces are leveled so that their pack is even on all sides, clamped in a vice from the side where there is no hole, and another hole is made with a drill. And only now, in a vice, each workpiece needs to be bent to make it angular.
Time to start working on assembling the section. The corner strip is slid over the U-shaped plug at both ends. Then you need a highly active flux, like LETI-120, to fix the corner bars. As shown in Figure 42, B. with the help of a flux in both joints, the strips and tubes are soldered to each other. This will secure each bar. In this way, about seven to eight sections are usually made in the manifold. The sections are assembled in turn, secured by soldering together with tubes for connection.
The sleeves that connect the water pipes and faucets, i.e., which are self-centering, are soldered to both outlet pipes. Next, the collector and pipes for the water supply are connected through the couplings.
Collector glasses are placed on a special putty. At the same time, the putty consists of sifted chalk, dry iron red lead and natural drying oil in a ratio of 50: 30: 18-20, respectively.
An ordinary barrel with a volume of twenty liters will become a heat accumulator. The barrel is placed in an empty wooden box and is tightly and qualitatively insulated for heat, as shown in Figure 42, D. Insulation is carried out as follows: a stand in the form of a cross is placed on the bottom of the box, and all empty free space is filled with ordinary cotton wool or mineral felt. The barrel is placed in the box on a stand, and all the free space between the walls of the barrel and the box is filled with the same material: cotton wool or felt. At the same time, for effective heat preservation, the thickness of the felt should be at least eight centimeters on all sides.
The lid of the barrel, which will be removable, is insulated with mineral felt (a mattress is created, the thickness of which is also at least 8 centimeters).
The improved barrel will have five pipes: two from the radiator located in the greenhouse, two from the solar collector and one from the water pipes. When powering the kitchen and shower, the pipe at the top should be closed off with a valve, and the pipe inside the barrel is equipped with a rubber hose with a float. An inlet valve is placed on the pipe to the water supply, which is used in the mechanism for draining the toilet bowl. In this case, the pipe that diverts the water must be lengthened to the bottom of the barrel.
The solar collector should be located near the heat accumulator, stand on a special stand and be protected from strong winds (see Figure 42, E). At noon, the surface of the solar collector should be directly perpendicular to the sun's rays. It is because of this that the solar collector is not rigidly connected to the pipes for the water supply, and 2 suitable rubber hose diameters are placed in their gap.
When a greenhouse or greenhouse is heated with a solar plant, you need to create pipe outlets and place plate radiators inside the structure. The type of radiator, their number and a comfortable climate in the greenhouse are found out in the course of experiments. The heated water is supplied to the greenhouse and regulated by a valve, as shown in Figure 42, D.
Each of the pipes that goes from the heat accumulator to the solar collector and from the collector directly to the greenhouse or greenhouse must be qualitatively insulated with insulating materials. This can be achieved by wrapping all pipes with mineral felt, and the thickness of the felt should be about five centimeters. Then the pipes with felt are wrapped with tar paper with a second layer, after which all this is fixed with flexible wire.
It should be remembered that all activities carried out with the aim of heating the greenhouse and preserving heat in it must be carried out in conjunction. First of all, the greenhouse itself is well supplied with biological fuel - manure. Secondly, a solar plant is connected to the greenhouse.
Thirdly, the greenhouse must be equipped with an electric heater, which will not work all the time, but will only protect against emergencies. An electric heater must have a temperature sensor in order to start the heating mechanism when the temperature in the greenhouse drops below the critical one.
Previous article Greenhouses, greenhouses Next article
| See on the website | |||
| Fireplace masonry | Simple greenhouse | Stove Shvedka | Unusual beds |
| Frame greenhouse | Rabbit breeding | Furnace ordering | Growing tomatoes |
Criteria for choosing a heating system
What needs to be considered before installing a greenhouse heating system?
- Finance. We must be aware that a winter greenhouse will require certain expenses.
- Plants. It is necessary to take into account which crops will grow in the greenhouse, what level of heat is needed for them.
- Fuel availability.
- Features of the climate.
- Arrangement of the greenhouse and its purpose.
- The size of the heated room.
- Location of the greenhouse.
- The ability to carry out constant monitoring.
Internal thermal insulation
To make heating more efficient and cheaper, you need to pay attention to thermal insulation.
The plinth can be sheathed with a suitable material - foam or foam. Then polycarbonate is mounted on top, which is pasted over with foil insulation or just foil.
Wall decoration in a greenhouse with foil
The frame part can be thermally insulated with double glazing. Polycarbonate will be used optimally. The inner part can be additionally covered with bubble wrap.
Friends! As part of our portal, we launched a book on how to make a lawn with your own hands. If this topic interests you, then READ MORE >>
Friends! As part of our portal, we launched a book on how to make a lawn with your own hands. If this topic interests you, then READ MORE >>