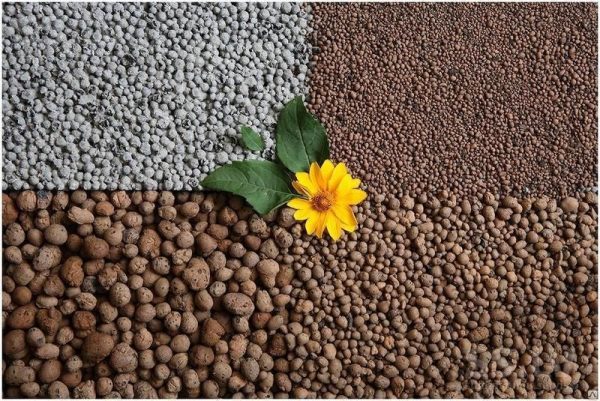
Floor insulation technology using expanded clay
Korovin Sergey Dmitrievich
Master of Architecture, graduated from the Samara State University of Architecture and Civil Engineering. 11 years of experience in design and construction.
Anyone with a construction education is familiar with heat engineering. This is a whole science that studies the protection of buildings from the penetration of cold and is based on the laws of physics. With the help of calculations, experts find out the thickness of the insulation, selected from a huge range of modern materials. It is important to protect all structures from the cold: walls, floors, roofs. Warming the floor with expanded clay can be one of the options.
How insulation works and why is it needed
Air is the most effective thermal insulation material. Only inert gases, which practically do not react with the environment, can compete with it. Such gases are used, for example, when filling the chambers of double-glazed windows, but it is impossible to ensure complete tightness in the main building structures.
All thermal insulation materials have a porous structure. It is in the pores that air is retained and prevents heat loss. The lower the density of the material, the better it will perform its function. Insulation can be used roll, plate, spray or bulk. Bulk is one of the most budgetary and easy to do-it-yourself laying, but it also has the lowest heat-shielding characteristics.
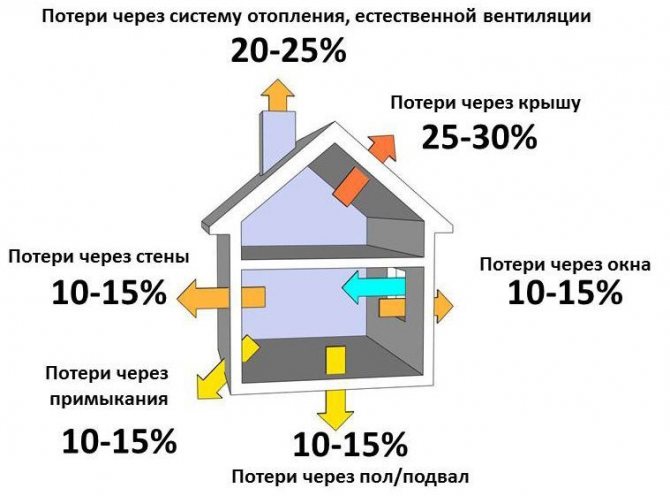
The main heat loss at home. Through the floor - 10-15%.
It is necessary to insulate the floors above the basement, on the ground or in the ceiling of a cold attic for the following reasons:
- ensuring a comfortable stay in the house;
- reduced heating costs;
- protection of structures from condensation, which leads to the formation of mold and mildew;
- increasing noise insulation.
If you do not perform insulation, serious problems will arise during the operation of the house.


Pros and cons of expanded clay as insulation
During the construction of apartment buildings, the thermal calculations of the building structures, along with the strength calculations, are checked by an examination. In this case, floor insulation with expanded clay is not used, since this material cannot be classified as highly effective. It is most profitable to lay bulk insulation in a private house.
Its advantages include:
- ease of styling with your own hands;
- low cost;
- environmental Safety;
- creating an even base for the floor cake;
- resistance to temperature extremes;
- the possibility of using for floor insulation, which in the future will be subjected to heavy loads, for example, the floors of industrial facilities.
The negative characteristics include the fact that this material has a lower thermal insulation capacity compared to mineral wool and expanded polystyrene.
Before insulating the floor with expanded clay, it is necessary to determine which layer of thickness will be used. Bulk material has twice as much thermal conductivity as mineral wool, so its thickness should be doubled. In most cases, the best option would be 200 mm.
Faction selection
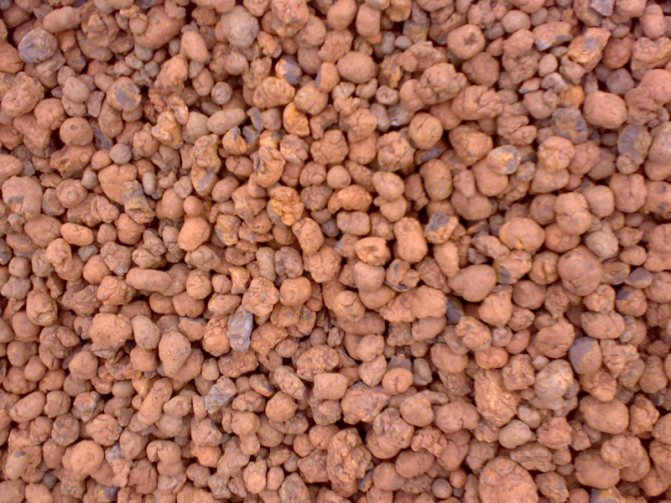
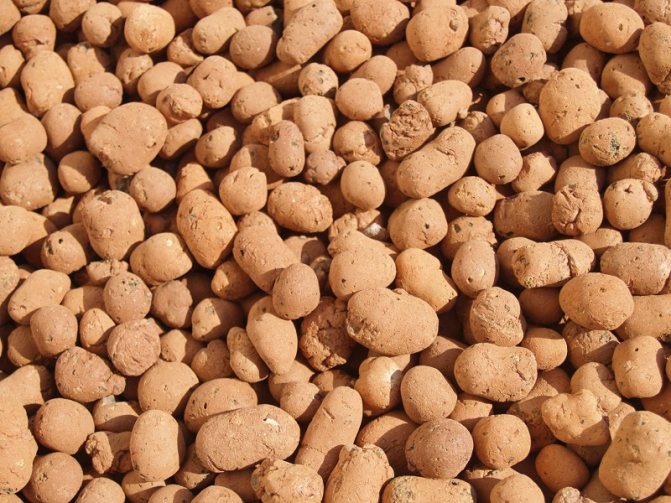
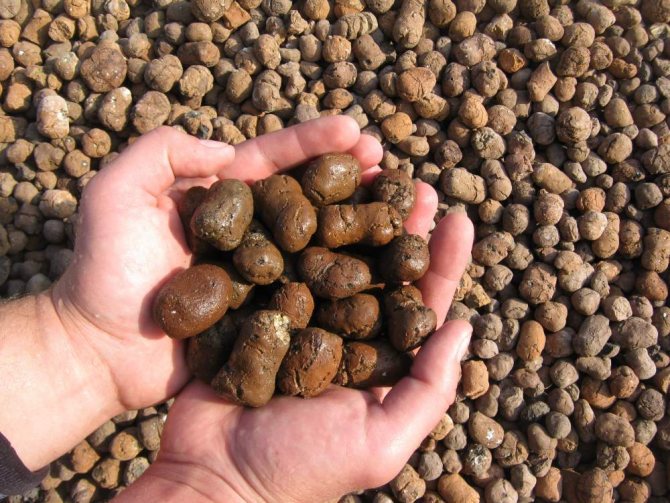
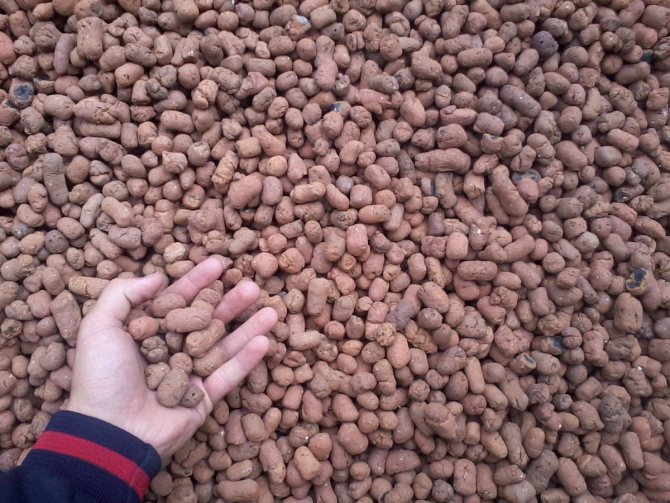
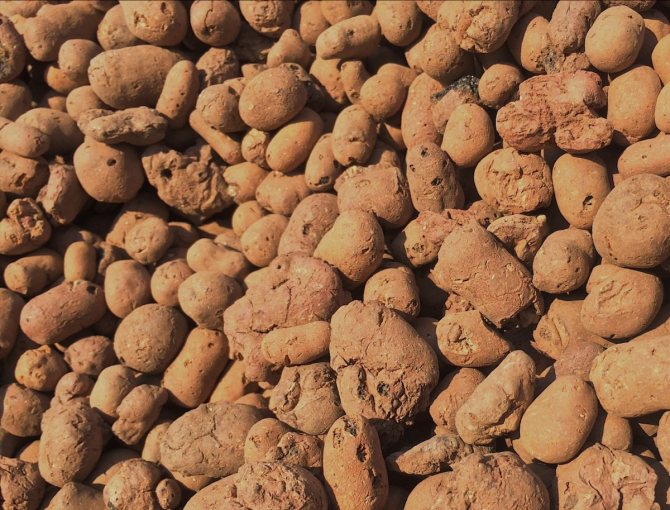
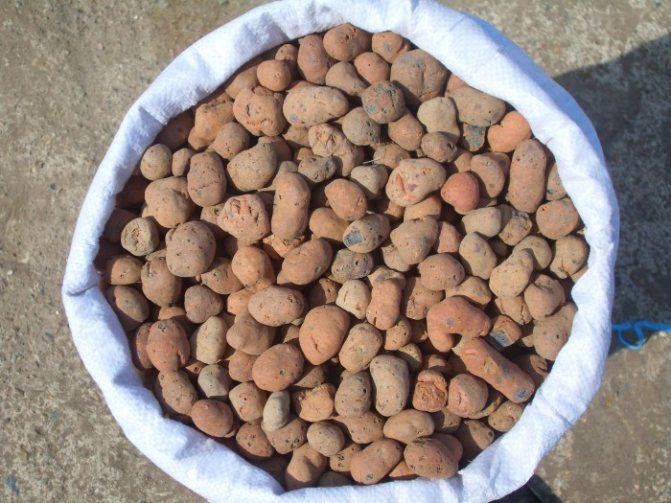
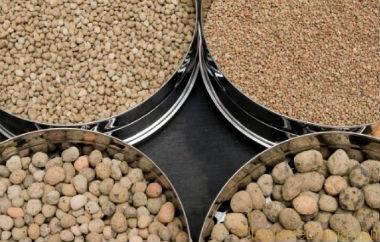
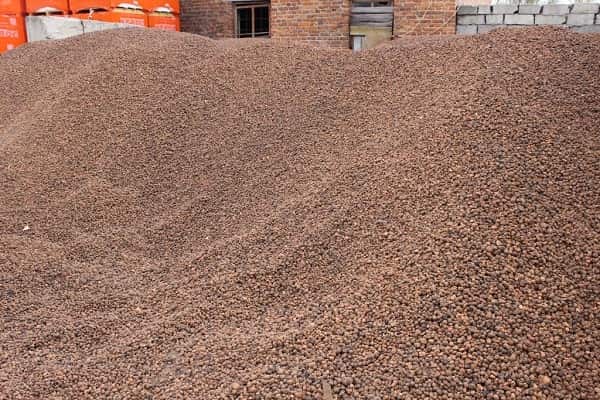
Expanded clay is made from special clay, which swells when heated. It is represented by three factions:
- Expanded clay sand. It is added to dry mixes to improve their thermal insulation characteristics;
- Expanded clay crushed stone. It is a larger particle with sharp edges;
- Expanded clay gravel.It is the best material for insulation in a private house. It has the same size as crushed stone, but in a rounded shape. The pores are protected from the outside by a layer of caked clay.
It is recommended to purchase expanded clay with granules of different sizes, as this will ensure its penetration into all hard-to-reach places.
It is important to ensure that there is a minimum amount of damaged granules in the total volume, in which case the insulation will become most effective.
Application area
There are a lot of options for using the material when insulating floors in the house:
- insulation of floors on the ground under the screed;
- backfilling the space under the boardwalk when arranging floors along the logs;
- insulation of the attic floor.
It is important to remember that in all three cases, the floor cake is quite different. Insulation of the attic with expanded clay depends on the design of the floor, it can be performed both along the logs and under the screed.
Manufacturing and characteristics
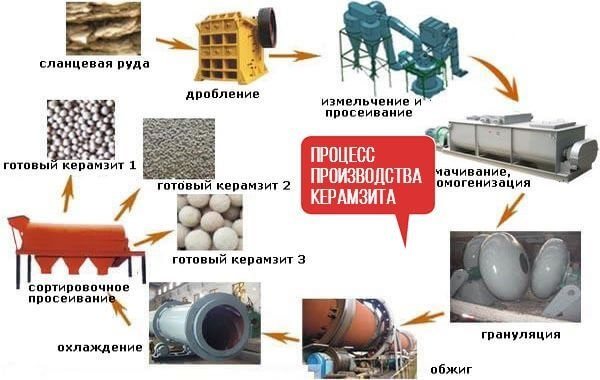
For the production of expanded clay, montmorillonite, hydromica rocks with a quartz content of not more than 30% are used, or special low-melting clay, which is fired in a rotary kiln. The furnace is installed at a slight slope, and by adjusting the speed of its rotation, the temperature of firing the material and its loading, ready-made expanded clay is obtained at the exit.

The size and density of the granules depend on the rotational speed of the kiln: the crushed clay begins to roll into lumps, compressed and sintered. This is how oval-round granules (crushed stone, gravel) or expanded clay sand are obtained.
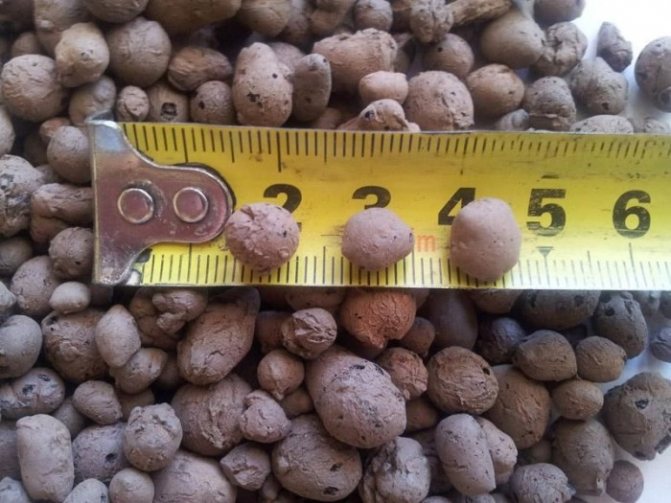
By size, expanded clay is divided into five groups: from 10 to 40 mm (the error is not more than 5% of the declared parameters for the entire batch).
The density of the material is divided into ten categories: from 250 to 800 kg per cubic meter.
The strength of the product is determined by crushing the granules. This indicator is very important in construction, as it allows you to calculate the loads transferred by structures.
Insulation technology
In order to competently carry out measures to improve the heat-shielding characteristics of the floor with your own hands, it is necessary to follow the order of work. Depending on the type of floor to be insulated in the house, the layers and their arrangement differ.
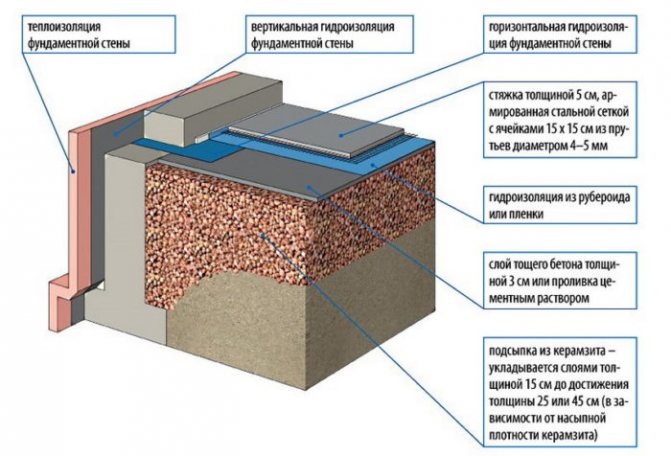
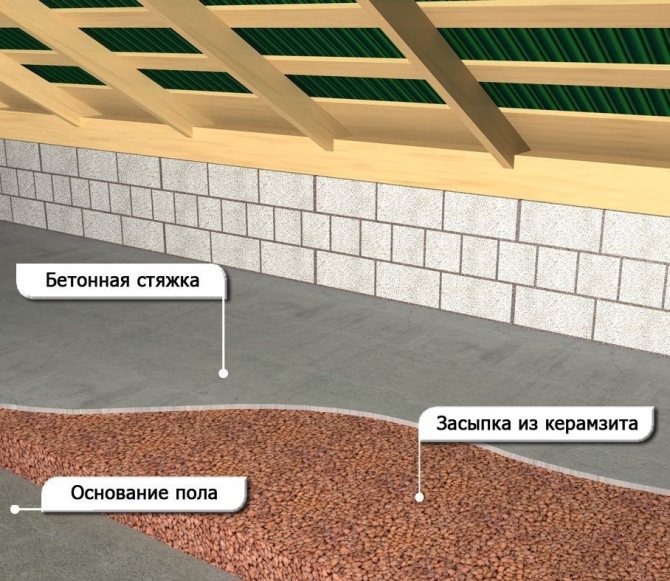
Floor on the ground
The work is carried out in the following order:
- compaction and leveling of the base;
- adding sand and gravel for additional compaction and leveling;
- laying of waterproofing material (in the case of a high level of groundwater);
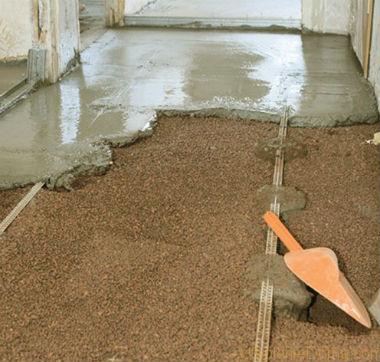
- laying and leveling a layer of expanded clay;
- Lean concrete footing device;
- laying of a vapor-waterproofing material, which can be used as an ordinary plastic film;
After performing insulation on the ground, a reinforced cement-sand screed is poured with their own hands, on top of which a clean floor covering is laid.
Insulation of the basement or underground floor
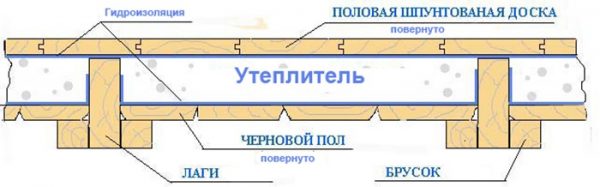
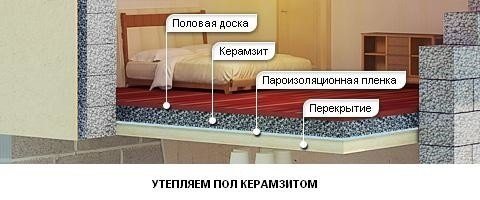
Warming of a wooden floor with expanded clay can be done both on logs and without them. It is necessary to lay each layer in the order presented:
- floor installation;
- laying a layer of waterproofing;
- if necessary - installation and fixing of the lag;
- bulk material is laid;
- leveling expanded clay;
- vapor barrier layer - polyethylene film;
- installation of a clean floor or screed.
It is very important when working with insulation to lay the waterproofing and vapor barrier in the correct order.
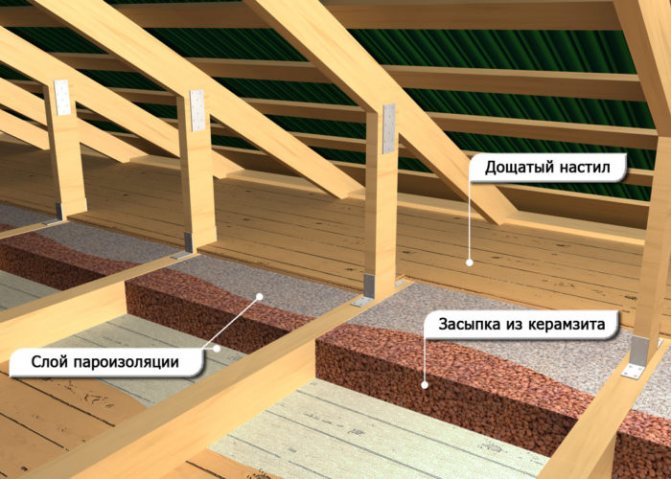
Insulation of the attic floor
For the attic, each layer is arranged in a slightly different order:
- floor structure;
- vapor barrier - polyethylene film;
- when laying insulation on logs - installation of wooden blocks;
- backfilling of expanded clay;
- waterproofing;
- clean floor or cement screed.
Options for floor insulation using expanded clay
The choice in favor of expanded clay is made by fans of natural materials, because expanded clay contains no chemical ingredients.This is an absolutely natural material, it is harmless to health, as it is produced from clay by firing. Under the influence of temperature (1000 ° C), the clay acquires a porous structure, and the rolling technology in the kiln drum gives the material the shape of rounded fragments, which are convenient to work with and form the required layer thickness in the floor sandwich.
https://www.youtube.com/watch?v=Vn_6FL3ZJlw
For the production of competent independent measures to strengthen the thermal insulation of the floor surface, a certain procedure must be strictly observed. The thickness of the layers, their number and order may vary depending on the type of surface to be insulated.
Floor on the ground
The work should be carried out as follows:
- The base must be compacted and leveled.
- For this purpose, it is necessary to fill in a layer consisting of sand and gravel.
- If the groundwater at the site is close to the surface, then the material for waterproofing is laid.
- The expanded clay layer is backfilled and leveled.
- The foundation is made of "skinny" concrete.
- The material is being laid to protect it from moisture and steam. An ordinary polyethylene film is perfect for this purpose.

The order of laying the layers is as follows:
- Arrangement of the floor surface.
- Installation of a waterproofing layer.
- If necessary, lags are mounted and fixed.
- Backfilling and leveling of expanded clay insulation is carried out.
- A polyethylene film is used as a vapor insulation material.
- On top of it, work is performed on pouring the screed or installing a finishing floor covering.
When working on thermal insulation of the attic, the arrangement of the layers will differ from that described above:
- The overlap is being constructed.
- A vapor barrier is laid.
- Arrangement of insulation along the logs will require the installation of wooden bars.
- The thermal insulation is backfilled.
- A waterproof layer is laid on top.
- The final stage is the pouring of the cement screed or the installation of the finished floor.
Features of laying expanded clay
When carrying out activities for the heat protection of the floor with your own hands, it is necessary to take into account the features of the material used. Carrying out floor insulation with expanded clay, you need to know:
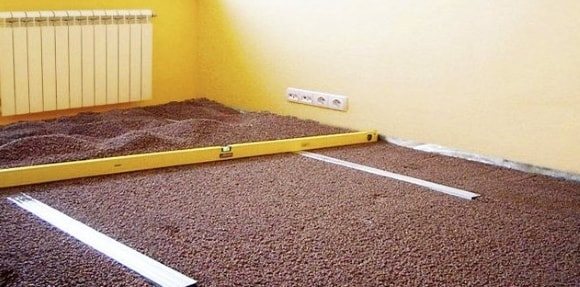
- To obtain a flat surface, beacons are used. The smaller the step of mounting the lighthouses, the more chances you have to perfectly lay expanded clay with your own hands.
- When laying on logs, all wooden elements must be treated with antiseptic compounds.
- The minimum layer of material is 10 cm.
- It is best to install a wooden floor covering when using expanded clay.
- The floor can be used 7 days after the completion of construction or repair work.
Screed laying technology on expanded clay:
Do-it-yourself insulation with expanded clay allows you to carry out work with minimal costs without compromising quality.
We insulate the floor: general recommendations
Air-filled pores inside the granules increase the thermal insulation properties of expanded clay - it is lighter and warmer than concrete.
In construction, the material is mainly used as a filler, as well as insulation. Expanded clay is often used for floors, especially in wooden houses.
The floors are insulated with expanded clay because of its undoubted advantages: good heat and noise insulation, environmental friendliness, resistance to temperature extremes, fire resistance.
Insulation thickness
If the floor is insulated with expanded clay directly on the ground, it is necessary to make a base from the granules with a thickness of at least 10-15 cm (and in a more severe climate - up to 40 cm). The floors are warm, withstand mechanical and temperature influences well.
The effectiveness of such insulation is noticeably higher than that of woodworking products, and if we compare the cost of expanded clay and other materials, then a significant financial saving is obtained (almost ten times).
For floor insulation in a wooden house or on the first floors of buildings, a mixed option is considered optimal, when foam crumbs are added to expanded clay. In this case, the effectiveness of thermal insulation is even better than that of the popular mineral wool.
Strength
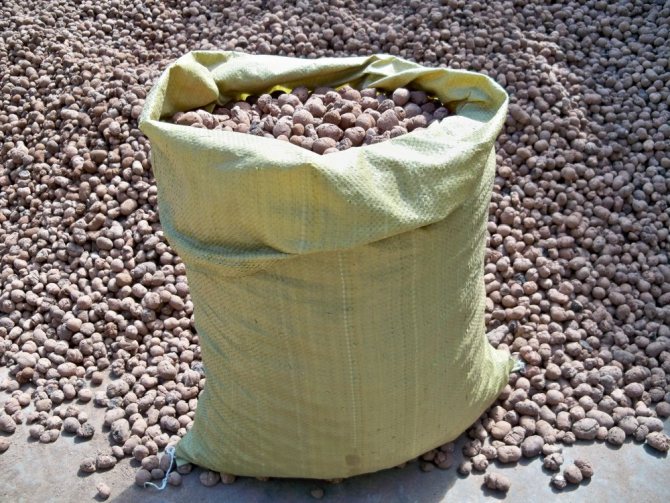
Usually expanded clay is delivered packaged in bags, but one point should be taken into account here: during transportation, part of the granules may break (crumble), which will lead to natural shrinkage, so it is recommended to purchase a little more material.
If the floor must have significant strength in order to withstand serious loads, before pouring it with a concrete screed, a layer of expanded clay is spilled with a liquid cement mortar - this will prevent the material from creeping.
Laying technology
What to choose the technology for laying expanded clay - depends on the floor itself: it is unpaved, wooden or concrete; located on the first or other floors of the house.
Basic recommendations for floor insulation with expanded clay or its components:
Do not mix with concrete and take into account the load
In the case of thermal insulation, expanded clay is used without mixing it with concrete - only backfill, which makes it possible to achieve greater thermal insulation.
It is necessary to take into account the load that will act on the floor, and based on this, calculate the required thickness of backfill and screed.
Waterproofing
Even if the expanded clay layer is not laid on the ground, then in order to exclude the ingress of moisture, a waterproofing film should be laid.
The places of its connection are glued with tape, trying to bring the edge of the film above the intended layer of expanded clay - the excess material will simply be cut off.
The completeness of the layer and the evenness of the backfill
For better adhesion of expanded clay fractions with each other and to exclude material movements, it is recommended to use different sizes of material: large granules with smaller ones.
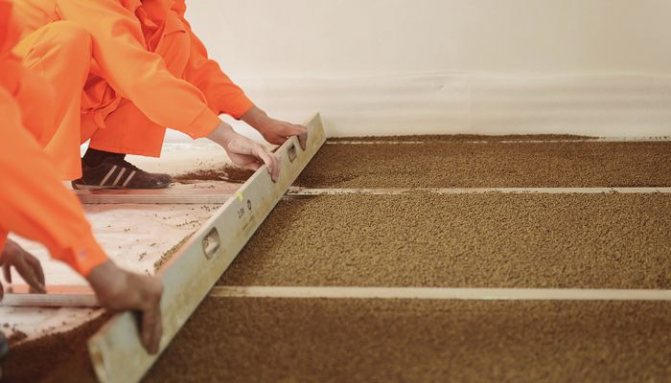
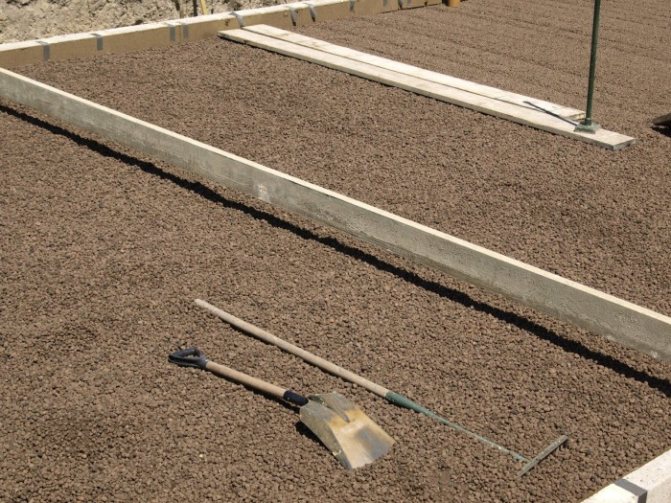
For the evenness of the backfill, special "beacons" are placed, guides are installed along them to level the screed. Fixation of the "beacon" occurs with cement, alabaster mortars. After the solution has hardened, they begin to backfill expanded clay, trying to avoid irregularities and slopes.
Density
To give a greater density, expanded clay is spilled with a liquid cement mortar - this will help to avoid its movement when working with a concrete mixture. In some cases, it is recommended to carry out reinforcement with a metal mesh, which reduces the risk of deformation and maintains the integrity of the house structure.
Layer thickness and curing time
If the height of the insulation layer is supposed to be more than 20 cm, then expanded clay is laid directly in bags with holes made (the height of the bag laid flat is about 18 cm), more expanded clay is poured on top and everything is poured with concrete screed.
Although the floor can be walked on after a week, it gains maximum strength after 28 days. Only after this period you can carry out finishing work in the house.
Thickness calculation
In all these cases, when filling, the thickness is selected approximately, the layer is taken 15-20 cm. But if necessary, you can carry out a simple calculation. In this case, specialists use the Teremok program. It is very simple and freely available. You can calculate the layer online or offline by installing the software on your computer.
Bulk insulation is available in the database, you just need to find it. For building a house with your own hands, this program will be able to make professional heat engineering calculations for any floor structure: on the ground, on the ground floor, in the attic.
What is expanded clay
Expanded clay is a loose insulation consisting of granules of different sizes. It is made from low-melting types of clay by the fast firing method. The result is a material with a porous surface, which provides good thermal insulation properties. It is highly durable and lightweight.For construction work, expanded clay of three fractions is used, information about them is presented in the table.
| Expanded clay fraction | Density tons / cubic meter m | Weight 1 cub. m |
| Sand fraction 5-10 | 0,45 | 0,45 |
| Gravel fraction 10-20 | 0,4 | 0,4 |
| Crushed stone fraction 20-40 | 0,35 | 0,35 |
The operational properties of all fractions are approximately the same, each is used where it is more convenient. For example, gravel and crushed stone are usually chosen for floor insulation.
Methods for insulating the floor with expanded clay
One of three possible methods can be chosen for arranging thermal insulation of floors. Let's consider each of them in more detail.
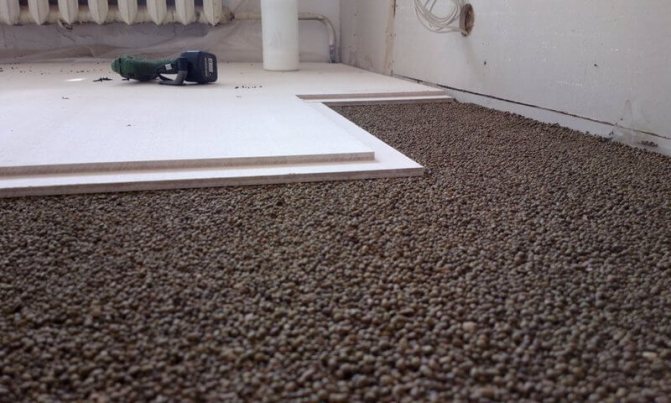
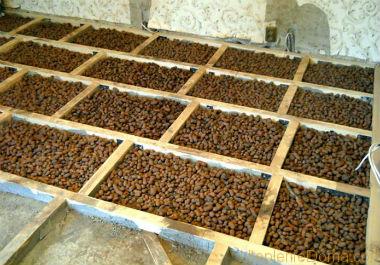
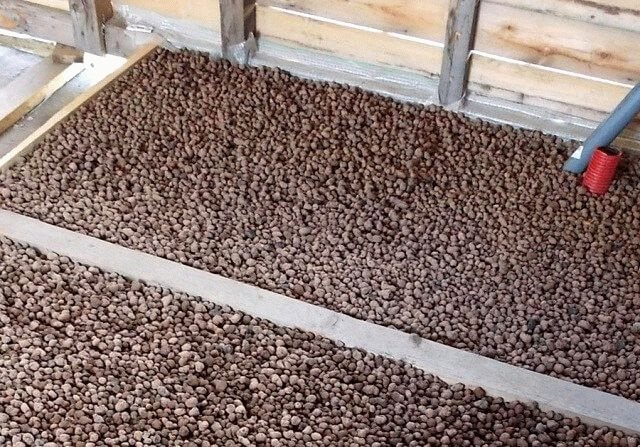
Dry laying of expanded clay
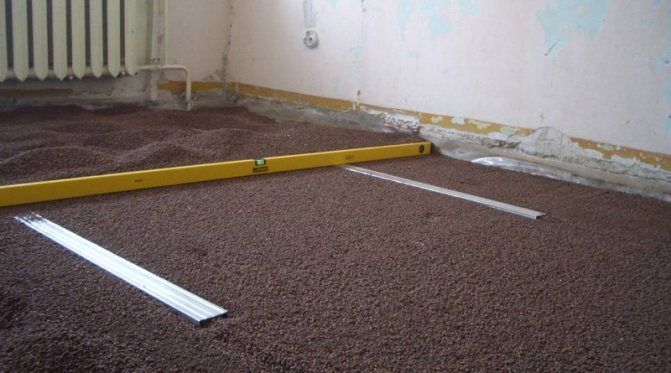
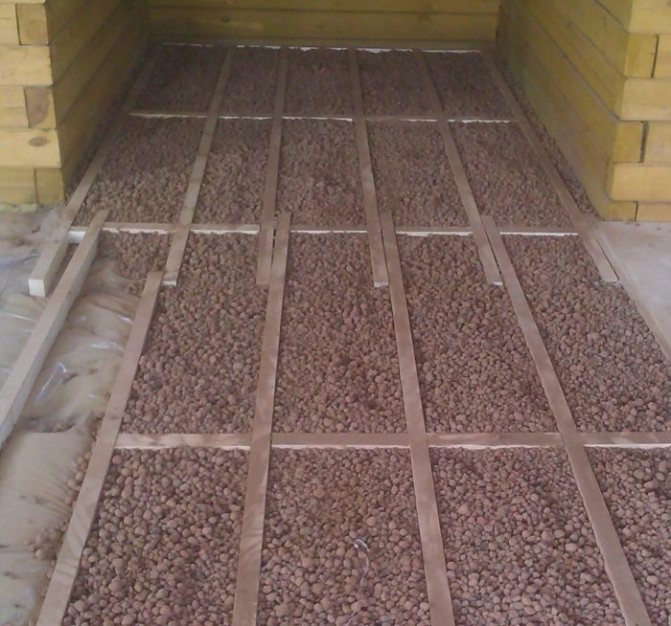
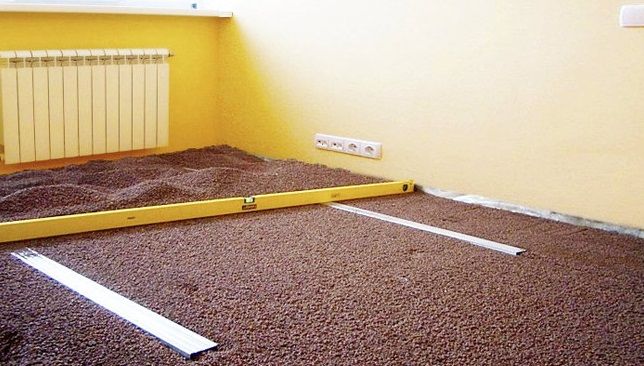
The fastest and least time consuming option. It involves backfilling expanded clay on the base under the subfloor. The insulation can be laid loose throughout the room, but in this case it will be quite difficult to align it. Therefore, logs or beacons are installed on the base and expanded clay is poured between them. A sub-floor is laid on top of the insulator layer, which must be at least 10 cm. Already, the topcoat is being mounted on it.
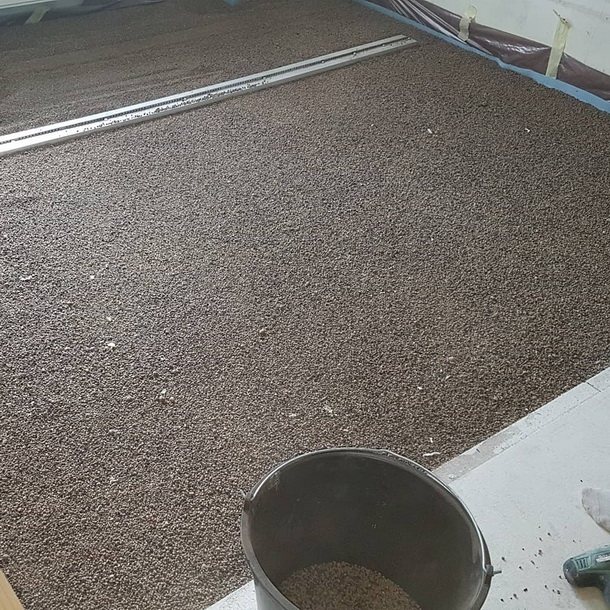
Photo: Instagram brigadaspb
Stages of work:
- Preparing the base. If necessary, we dismantle the old floor covering. We clean, remove debris and dust. We close up large defects and cracks, joints between the walls and the floor.
- Install lags. If the old ones have survived, we carefully inspect them, remove the unusable ones. We set the beams exactly at the level, so that their upper edges form a flat surface.
- We install waterproofing. We lay the membrane or ordinary polyethylene in such a way that they cover the logs. We overlap the resulting joints and glue with special tape. We fix the material on the logs with a stapler.
- We mix expanded clay of two fractions to make the coating more dense. We fill up the space between the lags with the resulting mixture. We tamp the granules and level the backfill layer.
- We lay the top layer of waterproofing, attach it to the logs.
Now you can lay the subfloor and proceed with the installation of any topcoat.
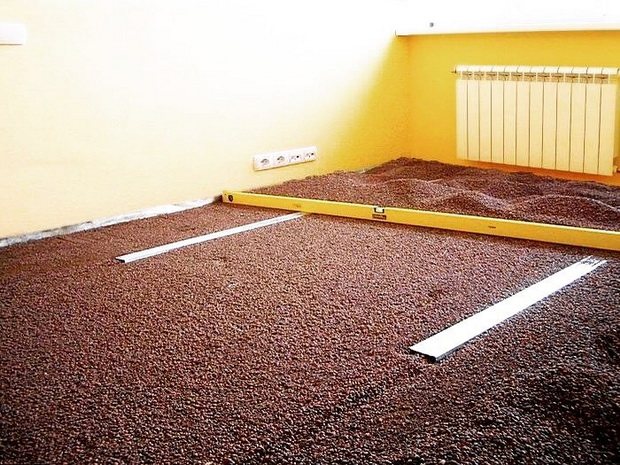
Photo: Instagram sk_tehnologiya
Wet laying of expanded clay
It involves mixing expanded clay with liquid concrete. The resulting mixture is placed on beacons similar to a conventional screed. This method is especially good for foundations with significant elevation differences. The main disadvantage is a decrease in the insulating properties of expanded clay in concrete.
Stages of work:
- We prepare the base, freeing it from debris and dust. We repair defects if necessary.
- We set beacons strictly according to the level. The operation is carried out in the same way as when laying a conventional leveling screed.
- Mix in portions expanded clay with a cement-sand mixture. There are no exact proportions, approximately 1 part of the filler is taken for 2 parts of the solution. The main criterion is that all granules must be wetted with liquid concrete.
- We spread the resulting mixture between the beacons using a trowel. We immediately level the upper part with a long rule.
The expanded clay concrete screed will dry out in two days, but it will be possible to lay the topcoat on it not earlier than in a month.
Combined method of warming with expanded clay
The insulation is poured between the logs and leveled. Then the top layer of the material is fixed by spilling it with cement mortar. The concrete screed is poured after the prepared base is completely dry. The advantage of this method is to preserve the insulating properties of expanded clay. The material can be laid directly on the ground, for example in a country house, or on a concrete base.
Stages of work:
- Preparing the base. We carry out, if required, dismantle the old coating, remove the debris, close up defects and cracks.
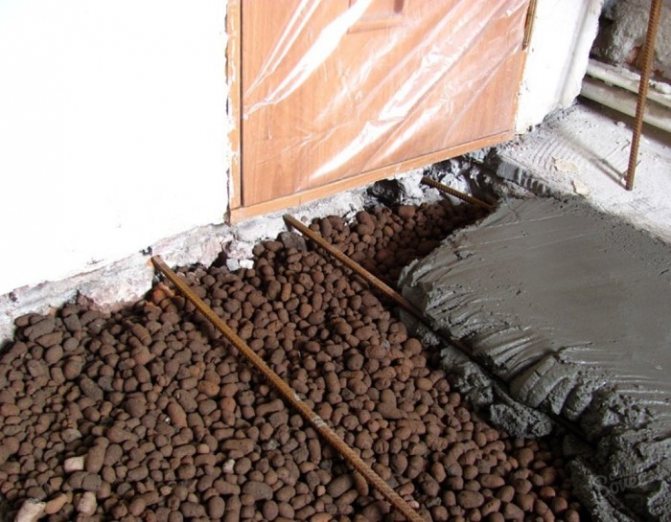
- We lay the waterproofing under the insulation. This can be a membrane or a film or a layer of liquid insulation.In any case, the material should cover not only the floor, but also the lower part of the walls like a "box". After that, at the level of the future screed, we fix the damper tape.
- We expose metal beacons. Aluminum T-bars are ideal. We put them strictly according to the level, fixing them to the solution.
- We mix expanded clay of two fractions for better filling density. We fill the space between the beacons with this mixture, paying special attention to the joints and corners. Gently ram the granules, maximally compacting the insulation layer.
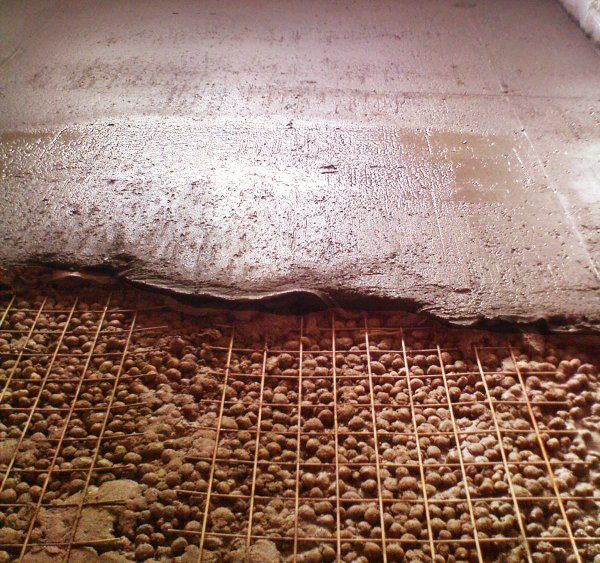
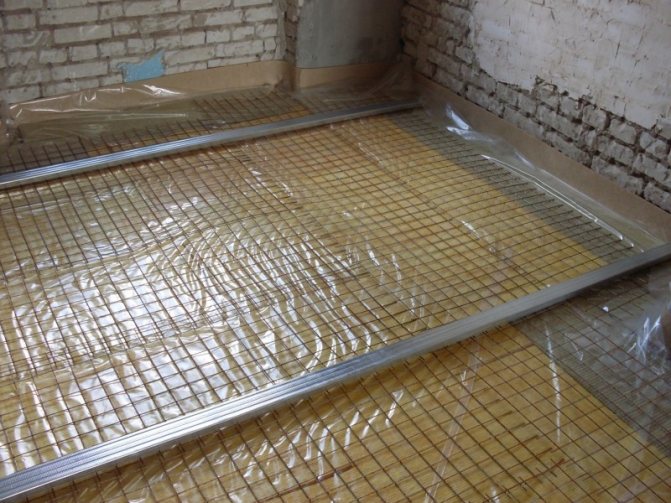
- We carry out reinforcement. We lay a coarse-mesh metal mesh over the expanded clay. It should be free of dents and sharp edges.
- We lay the screed directly on top of the expanded clay. We apply a sand-cement mixture, level it with a long rule.
After the mortar has completely dried, it will be possible to lay the topcoat.
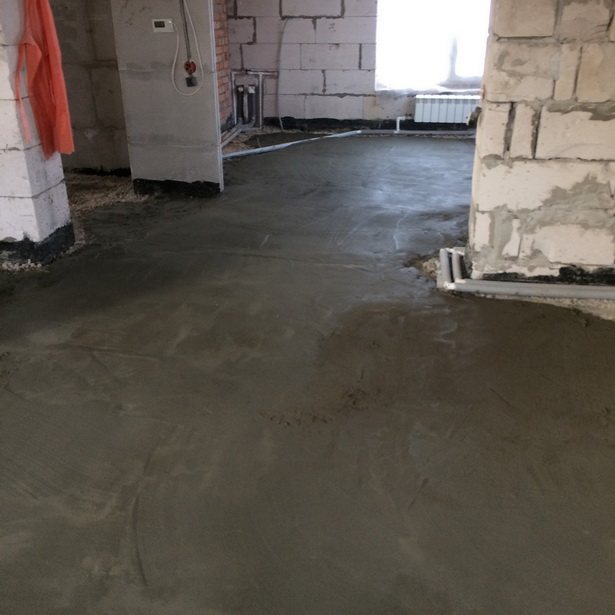
Photo: Instagram pravremont.ru
The use of any of the described methods of floor insulation with expanded clay, provided that it is performed correctly, guarantees effective protection from the cold.
- Prepared by: Inna Yasinovskaya
No comments yet. Start a discussion!
IVD. 2-room apartments
Found a bug? Select it and press Ctrl + Enter
The IVD.ru website is a leading Internet project dedicated to the reconstruction and interior design of residential premises. The main content of the site is the archive of the Ideas for Your Home magazine - exclusive author's articles, high-quality illustrations, practical advice and lessons. A team of professionals is working on the project in close cooperation with renowned designers, architects and leading experts of the publishing house.
On our site you can find complex design solutions; view detailed reviews of the market for building and finishing materials, furniture, machinery and equipment; compare your own ideas with the design projects of leading architects; communicate directly with other readers and editors on the forum.
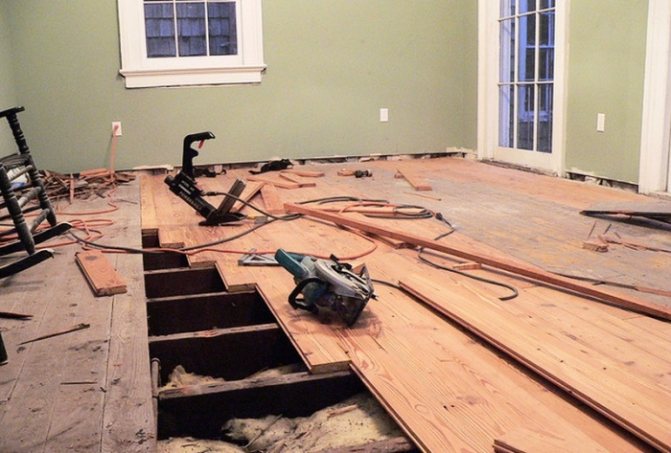
Do-it-yourself thermal insulation of a wooden floor with expanded clay
For insulation you will need:
- nail puller;
- hacksaw or jigsaw;
- roulette;
- marker or pencil;
- building level;
- shovel;
- a hammer;
- electric drill;
- self-tapping screws;
- sand;
- waterproofing film or coating materials;
- damper tape.
The option of arranging a wooden floor on a concrete base is being considered.
Floor boards are removed and taken out of the room; the logs are carefully examined and checked by the level.
Check lag and partial replacement of rotten ones
We set new lags by level
If the bars are in good condition, do not have deflections or other deformations, they are left in place. With minor damage, individual bars are replaced, and if the logs are very old, loosened and rotten, they remove everything down to the concrete base.
If the lags are very old, loosened and rotten, they remove everything to the concrete base
Cleaning the base from debris
The floor is cleaned of debris, small cracks are rubbed, and the corners are examined.
Repair of small cracks
Deep cracks in the corners are covered with mortar or blown out with foam.
Also, joints around the perimeter of the floor and walls are foamed. The surface is covered with a layer of sand, which is well compacted. When using waterproofing coatings, no sand is needed.
Polyethylene or a special membrane is spread on the floor so that the edges of the material cover the walls around the perimeter by 7-10 cm; in this case, the lags also appear under the film. If the whole canvas is not enough, the pieces of film are overlapped and the joints are fixed with construction tape. On the bars, the waterproofing must be fixed with a stapler, carefully distributing the film in the recesses between the lags.
Waterproofing coatings
When using a waterproofing coating, the mixture is applied to the concrete, free of dust, with a paint brush or roller, capturing the walls to a height of 15-20 cm.In this case, the logs are installed on top of the protective layer. For coating, bitumen mastic, liquid rubber, bitumen-polymer mixtures and mastics on a cement-polymer basis are suitable.
So, if the lags have been completely dismantled, you need to install new ones. To do this, take strong wooden slats or timber, cut it to the size of the floor, primed with an antiseptic solution and dry it. The height of the wooden frame for the floor should be at least 10 cm. The extreme slats are fixed at a distance of 2-3 cm from the surface of the walls, between the rest they make a gap of 0.5 to 1 meter. Each rail must be level and parallel to the others so that no part protrudes from the horizontal plane.
Fixing corners for logs
To organize thermal insulation you will need:
- electric jigsaw or hacksaw;
- nail puller;
- level for construction, as a rule;
- roulette;
- marker or pencil;
- electric drill;
- shovel;
- a hammer;
- damper tape;
- self-tapping screws;
- sand;
- film or liquid materials to protect against moisture.
The floorboards must be removed, taken out of the repaired room and carefully inspected the logs. You need to check them with a level.
All debris must be removed from the floor, small cracks must be rubbed and the corners must be inspected. Large cracks can be filled with polyurethane foam or repaired with mortar.
Installation of lag
If the old logs have been disassembled, it is necessary to install new ones. As the main material, slats or timber made of wood are used, cut according to the dimensions of the floor. They are treated with an antiseptic and dried well. The timber frame for the floors must be at least 10 centimeters. The bars located at the edges of the structure are fixed a couple of centimeters from the wall.
Waterproofing
A specialized membrane or plastic wrap must be spread on the floor in such a way that the material also captures the edges of the walls around the entire perimeter to a height of about 10 centimeters. If the canvas is not large enough, the strips must be overlapped with sealing of the joints with tape for construction. The waterproofing is attached to the beams with staple staples.
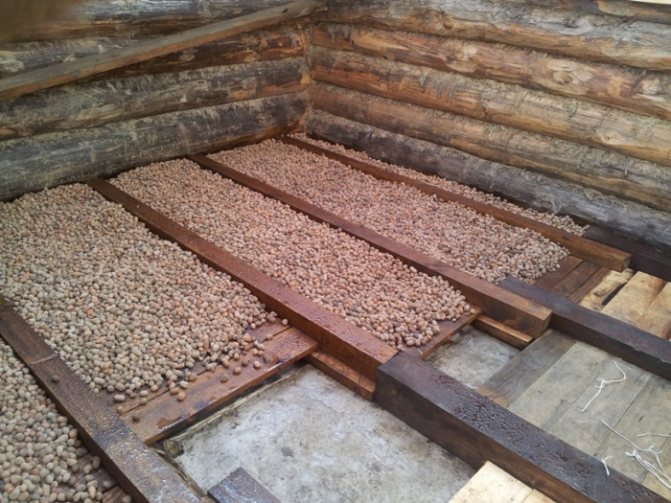
Backfill of expanded clay
The coarse fraction of expanded clay is mixed with the finer material and poured into the space between the logs or guide rails. Particular attention should be paid to filling the corners, the formation of voids in this area is unacceptable. Then the material is gently rammed.
A sub-floor is mounted on top of the beams that rise above the surface of the insulation. The material for it can be boards, sheets of chipboard or plywood. The final coating is laid on top. Excess fragments of waterproofing are simply trimmed, skirting boards are installed.
When working with a plank base, in most cases expanded clay acts as a heater - as an environmentally friendly material for living quarters.
The procedure includes the following steps.
- Dismantling the floor. The wooden surface of the flooring is removed, freeing up access to the logs that hold the base.
- Checking and replacing lag. Before proceeding to the next stage of work, all logs are subject to mandatory checks for integrity, the absence of rot and fungal formations. Damaged logs must be replaced. The level and hard stability of the lag is checked.
- Surface preparation of concrete or soil base. The concrete base on which the expanded clay fractions are supposed to be backfilled is cleaned of debris, leveled with mortar or foam, chips, potholes and cracks are sealed. The soil is rammed and compacted with sand.
- Laying waterproofing. Polyethylene or other waterproofing materials are laid on the base in such a way that the 7-10 cm film covers the walls of the room along the entire perimeter. The insulating material is attached to the lags that are under the film with an ordinary stapler and evenly distributed in the recesses between the lags.
- Backfill of insulation.To achieve a tighter compaction and ensure the absence of free space, expanded clay of different fractions is mixed. Expanded clay is poured between the logs with a thickness of 15 to 25 centimeters and carefully tamped in the corners to prevent the appearance of empty space. From above, the backfill is covered with a waterproofing material.
READ MORE: Waterproofing the bathroom floor - do it yourself

Work on a concrete surface, just like on wooden flooring, involves a certain step-by-step procedure.
- Dismantling the old concrete base if it is laid on the ground and is not floor slabs on the floors of the building. In the process of work, in addition to dismantling, cleaning and leveling of the surface is carried out.
- Laying waterproofing. Waterproofing material for concrete floors can be liquid solidified or film and must be wrapped on the walls.
- Fastening a damper or mounting tape. It is carried out along the perimeter of the room at the level of the future screed.
- Installation of metal beacons. To determine a uniform level of insulation filling over the entire surface of the prepared base at a certain distance from each other, install beacons identical in height with the level of the tape. To do this, use cords stretched between the walls and determining the height. Lighthouses can be ordinary self-tapping screws rigidly fixed in the floor, metal strips or corners guiding along the floor.
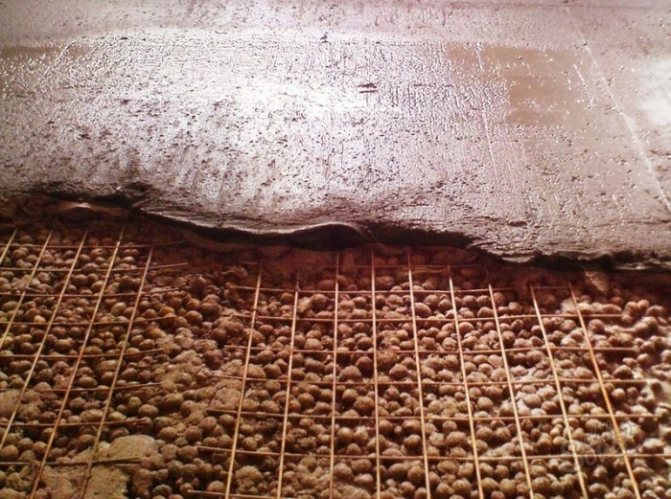
- Backfill of expanded clay. The insulation is evenly laid between the beacons, leveled at the level of the guide beacons and slightly compacted.
- Reinforced mesh laying. To achieve the greatest strength, a metal mesh is placed on a leveled expanded clay surface with a 5 cm deviation from the walls.
- Screed. Cement and sand are mixed in a ratio of 1: 3 with water to a certain density and poured onto expanded clay, starting from the corner along the guide beacons. The screed is leveled by removing excess mortar.
Expanded clay as floor insulation: pros and cons
Expanded clay fractions are different (from sand to crushed stone).
The technique of floor insulation with expanded clay in a wooden house, as well as under a screed on a concrete floor, has been used for a long time. It cannot be said that this is the most effective heat-insulating material, since its characteristics are rather modest:
- lambda thermal conductivity 0.1-0.18 W / m * K;
- water absorption 8-10%;
- density up to 500 kg / m. cube;
- does not burn;
- does not contain any harmful substances, all natural.
Despite this, expanded clay as a floor insulation is a perfectly acceptable alternative, given its low price. This is foamed and baked clay, which comes in different fractions: from sand to crushed stone. Compressive strength depends on the density of the material, the higher the density, the stronger the material. For insulation of the floor with expanded clay, according to reviews, thermal insulation of the middle fraction (balls with a diameter of about 1 cm) is most suitable. Despite the low degree of moisture absorption, this material, although slowly, saturates water, after which it does not remove it. It is difficult to dry expanded clay, this process takes a very long time. During installation, dust may appear - these are small chipped particles of baked clay.
Today, gas heating of a private house is cheaper than any other energy source.
Read more about gas heating in the apartment (reviews and opinions) here.
Expanded clay as insulation
Warming of the floor or walls with expanded clay can be carried out in three ways. They are conventionally called:
- wet insulation;
- dry insulation;
- mixed method of insulation.
Wet thermal insulation with expanded clay implies the production of a concrete mixture with the addition of expanded clay as a filler. Thus, screeds are poured to insulate the floor or paved paths near the house or in the garden.The dry method of warming involves backfilling expanded clay onto the prepared surface, and the finishing coating is laid on top, usually this method is used for walls or a wooden floor. The mixed method is produced in the same way as the dry one, only a concrete screed is poured on top.
Thermal insulation of a wooden floor with expanded clay
The wooden house is in many ways a model for thermal insulation. But floor insulation with expanded clay in a wooden house does not lose its relevance. It can be done in several ways. But you will have to start not with laying the insulation, but with dismantling. The first step is to make a thorough assessment of the condition of the subfloor. If maintenance was not carried out for a long time, then putrefactive processes could develop due to moisture, which is detrimental to the tree. For this, the finishing coating is dismantled and an inspection is carried out. If necessary, all growths are knocked down and cleaned with a grinder. It is necessary to work in a respirator so that spores do not enter the respiratory tract.
Further, all beams are treated with an antiseptic, as well as a primer. Focusing on the lags, it is necessary to create cavities where it will be possible to pour insulation. If this has not been done before, then boards can be stuffed onto the beams from the bottom side, which will serve as a shaped bottom of the box. Since the insulation perfectly absorbs moisture, it is necessary to close access to it. This can be done by creating a shaped waterproofing bag. For these purposes, the entire surface is covered with a 200 micron film or membrane. Expanded clay insulation is poured onto it. To achieve a high-quality distribution of insulation, you can use various fractions or additionally fill the cavities with expanded clay sand. The total height of the pillow should be at least 10 cm.
On top of the insulation, another layer of waterproofing is laid so that moisture and steam from the room do not get onto the insulation. This cake is closed with the help of slabs of rough chipboard, gypsum fiber boards, MDF or plywood. Finishing flooring is laid on them. In such a floor, mice do not start, since their favorite insulation is expanded polystyrene or polystyrene foam.
Note! If the insulation of a wooden floor with expanded clay is carried out in an apartment or a brick house. Then the process will be similar. But after dismantling the old floor, it is necessary to evaluate the concrete substrate and repair all the flaws with tile glue or a sand-cement mixture. Rotten logs will also need to be replaced.
Warming with expanded clay on the ground
In old dugouts, which were built without a foundation, it may be necessary to insulate the floor with expanded clay on the ground. This is a relatively cheap way that allows you to kill two birds with one stone: make a screed and make insulation. For work you will need:
- shovel;
- rammer;
- roulette;
- rule with level;
- concrete mixer or mortar container.
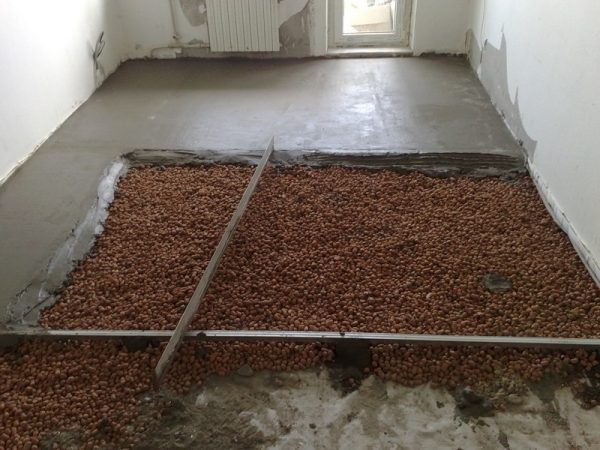
Dismantling of the coating and inspection with maintenance is carried out, as in the previous case. The ground level is assessed. If it almost reaches the boards, then you need to go deeper. You should dig in at least 50 cm. The bottom of the resulting hole is carefully rammed. If the ground is wet below, then it needs to be dried. To do this, you can use heat guns or leave the windows open for several days. On the prepared surface, rubble is laid in a layer of 15 cm. It is leveled to occupy the entire area. The same layer is filled with sand of medium grain size. It ramps well, but you also need to bring it under the level so that the surface is horizontal.
The next step is to install a waterproofing membrane. Instead, you can use oilcloth. If you cannot put everything in one piece, then the individual parts are glued together with tape. The overlap between them should be 15 cm. It is also necessary to observe the overlap on the wall.It must be such that it ultimately ends up above the finishing screed. A damper tape is glued along the edge of the wall. It will act as a thermal compensator. Its height should be the same as the waterproofing. Next, a layer of expanded clay insulation is laid. It can be made larger than 10 cm if space permits. Expanded clay is leveled so that there is no subsidence anywhere. The remaining cavities can be closed with expanded clay sand.
A metal reinforcing lattice or a fiberglass lattice is mounted on the expanded clay insulation. It must be laid on small supports so that it rises slightly above the expanded clay. Level guide beacons are installed. Next, a concrete solution is prepared with a ratio of three buckets of sand to a bucket of cement. Expanded clay insulation can also be used as a filler. The finished solution is laid out on a reinforcing grid and leveled well. The beacon rule is used to pull together. The finished base should gain rigidity and strength. This will take from two weeks to a month. After that, you can install the underfloor heating system or finishing flooring.
Insulation of concrete floors
Concrete floors are reliable supporting structures, but up to 30% or more of the heat from the dwelling can be dissipated through them. This is due to the presence of reinforcing components in them. In such cases, floor insulation is required with expanded clay under the screed. But expanded clay is suitable only if there is enough height to the ceiling to lay a screed with a total size of more than 10 cm. If the ceiling above the basement is insulated, then waterproofing will be required.

The surface is carefully examined, all potholes and cracks in the seams are sealed with tile adhesive mortar. Next, waterproofing flooring is performed, as described in the previous version. Beacons are placed using the level. In their capacity, you can use a profile for drywall. It is leveled and fixed to the floor surface using the same tile adhesive. Expanded clay insulation is poured into the formed cavities. It lends itself well and compresses. A screed mortar is prepared with the same ratio as for laying on the ground. It spills out on expanded clay and is pulled together by the rule. In this case, it is constantly necessary to monitor the level. After standing and curing, the floor is ready for use. An electric underfloor heating can be laid on it in the form of a heating cable or a film. More information on installation can be obtained from the video:
Note! Instead of a combined screed with expanded clay, you can use a wet screed. This will slightly increase the heat transfer coefficient, but will reduce the overall height of the screed.
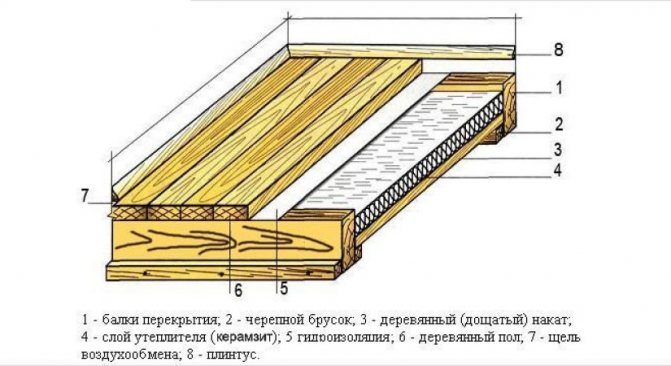
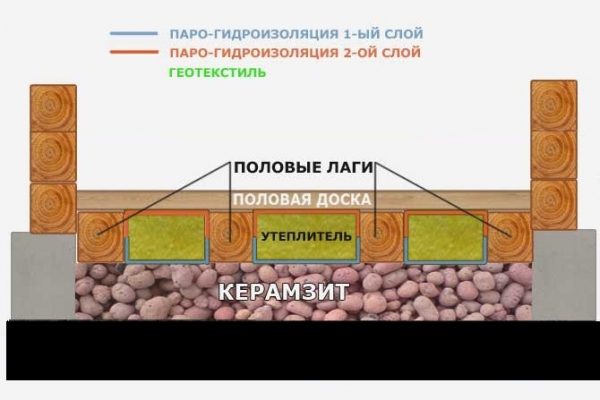
Thermal insulation of wooden floor with expanded clay
The method of laying expanded clay on the logs (do not forget to lay the waterproofing).
Thermal insulation of the floor with expanded clay in a private house is preceded by the calculation of the required thickness of the thermal insulation cake. At the same time, it will not work to fill in more material than the distance between the rough and final floor. If this distance is not enough, you need to choose another insulation, or somehow increase the buffer zone.
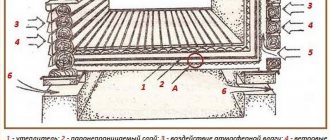
Before insulating the floor with expanded clay, you need to lay waterproofing on the subfloor - this is a diffusion membrane that allows air and steam to pass through only in one direction. The membrane should be placed with the advertisement facing down and the rough side facing the thermal insulation. Laying is carried out with an overlap, there is a special line on the rolls, then all joints are glued. The main task is to prevent moisture from the ground from getting into the thermal insulation layer.
In addition, the insulation must be protected from steam that comes from the room. This is especially true when insulating the floor in a bath with expanded clay.For protection, a vapor barrier film is used - it is a polymer material or reflective insulation that does not allow steam and water to pass through, and foil materials also emit infrared radiation. Therefore, reflective insulation must be installed with the mirror side inward. The vapor barrier is completely sealed. Bottom layers:
- rough floor;
- diffusion membrane;
- expanded clay;
- vapor barrier;
- air gap (desirable);
- clean floor.
In addition to protecting the insulation from moisture, films have another function. Thanks to them, a layer is created in which the air is in a state of relative rest, that is, it does not move. This somewhat reduces the coefficient of thermal conductivity of the enclosing structure, since air (more precisely, vacuum) is the best insulation. Naturally, there is no question of any vacuum in the heat-insulating cake, but, nevertheless, the absence of convection has a positive effect on the quality of insulation.
Having installed a smart home system, heating and all appliances powered by electricity can be controlled from a smartphone.
Read here why a two-pipe heating system of a cottage is better than a one-pipe heating system.
Which expanded clay to give preference to for floor insulation
The material is used not only as a heat insulator, but also for leveling surfaces, for example, through it, you can create a warm and even screed for the floor in an apartment.
According to the size of the fraction, it is divided into 3 varieties:
- Sand. The smallest expanded clay, which is used to create a thin screed. Its fraction reaches up to 10 mm.
- Gravel. It is used when erecting a claydite-concrete screed with a thickness of more than 5 cm, as well as when insulating floors during filling. Its fraction varies from 10 to 20 mm.
- Crushed stone. The most demanded and used option when insulating wood floors. Ideal for filling the space between flooring and foundations. Its fraction reaches 40 mm.
The type of material is chosen depending on the needs. If necessary, you can combine several of them.
Warming with expanded clay under the screed
It is necessary to level the expanded clay layer along the beacons for the screed.
Insulation of the floor with expanded clay under the screed can significantly save money, since the modern material that is used for these purposes is expensive. They also read: "Is it worth it to insulate a wooden house with Penoplex". The screed is poured both on a concrete base and directly on the ground. Naturally, floor insulation with expanded clay on the ground is typical for private houses or outbuildings. In apartments, thermal insulation is laid on a concrete base. Let's start with him.
The thickness of expanded clay for floor insulation in an apartment rarely exceeds 5 cm. Of course, the heat-insulating and sound-insulating characteristics of this material are clearly inferior to polymers. Let's make a small calculation, the thermal resistance coefficient of a five centimeter layer of expanded clay will be 0.5 (thickness in meters, divided by thermal conductivity lambda). For comparison, for EPS with the same thickness, the coefficient will be 1.56.
Do not confuse the thermal resistance coefficient of the building envelope with the thermal conductivity coefficient. In the first case, the higher the value, the better the structure retains heat, and in the second case, the higher the value, the better the material conducts heat.
The technique of floor insulation in the apartment with expanded clay under the screed:
- a damper tape is glued around the perimeter;
- polyethylene film is laid;
- expanded clay is poured, then leveled;
- beacons are installed and the screed is poured.
It couldn't be easier. Expanded clay as a floor insulation under the screed on the ground is also used everywhere. First, the soil must be leveled and covered with a layer of sand. The sand is well rammed, roofing material or bitumen roll waterproofing is laid on top of it with launching on the walls at the height of the screed.Damping tape is glued around the perimeter of the room. Expanded clay (10-15 cm) is poured onto the waterproofing and concrete is poured. The method is also quite simple.
How, in practice, is the floor insulation with expanded clay under the screed?
There are a lot of insulating materials with which you can insulate the floor surface in the room. And among them a special place is occupied by such heat-insulating material as expanded clay. The device of an energy-saving design with its participation is an economically profitable investment, since it is inexpensive, but at the same time it has high heat and sound insulation characteristics. How to insulate the floor with expanded clay under the screed and what is needed for this, you will learn from our article.
That's how. First, it is the turn of the vapor barrier. This layer must be laid on concrete or ground. They can serve, for example, a polyethylene film or, say, roofing material. Of course, a special vapor barrier film will also work. This material is not put just like that, but with an overlap and fastened with ordinary tape.
Now we proceed directly to the thermal insulation, but do not forget about the faithful helpers - "beacons". We attach them with a cement mortar and fill in our wonderful expanded clay, but not before the cement hardens. Try to use at least two expanded clay fractions: it will be stronger and warmer this way, because smaller granules will neatly occupy the spaces between the larger ones.
When all the above manipulations have been done, expanded clay is poured with cement diluted with water, to which a primer is also added. Next comes the metal mesh, and then the final screed, the so-called finishing. We considered the proportions for the correct screed in the article - the ratio of cement and sand for the floor screed, I advise you to read it. Keep in mind that its thickness should be about 30 mm. Such a base can truly be called very durable and warm.
You will be able to move on the floor pretty soon - after 7 days. But know that the maximum strength "will come" to the work of your hands in 30 days. By the way, one little trick to check when it is already possible to start further work without fear. We take a glass jar and put it on the floor upside down.
The bank does not fog up - go to "water procedures", that is, on the contrary: to waterproofing. And there is not far off the long-awaited finish - the topmost and final coating. Now your floor is ready, and you can invite guests to the warmth and comfort. The main thing is to make a little effort and follow the technological nuances. Otherwise, any repair is like the sea: exclusively knee-deep. Good luck!
How to insulate the floor in a wooden house with expanded clay
Wooden construction is mainly country houses. Moreover, both new buildings and those that were built long ago as summer cottages. Today these buildings are increasingly used for year-round living. Therefore, the issue of warming all parts of the house becomes urgent.
The floor in wooden buildings is one of the coldest parts of the whole structure. According to various estimates, up to 20% of the internal heat in rooms is emitted through the floors in wooden houses. It makes sense not only to design good insulation when building a new house, but also to take care of reworking the floor in an already built one, but without floor insulation. Moreover, usually a residential wooden house is installed on a relatively high foundation. And this allows insulation from below without changing the level of the finished floor and without reducing the height of the room.
When erecting ancillary wooden buildings, the floors can be located close to the ground or even be laid directly on the ground. In this case, the insulating layer is still necessary, only it will have to be laid, burying it into the ground.
Any insulation of wooden floors must be carried out in compliance with the following rules:
- Compulsory laying of waterproofing in two layers. The bottom layer protects the insulation from moisture from the ground. The top layer - from water penetration through the boards of the finished floor.
- Rough and fine wooden floor elements are treated with special anti-rotting agents.
- For insulation, a material is selected that does not change its properties upon contact with wood.
Despite the recent appearance of modern insulation materials, expanded clay insulation of a wooden floor is still used. And there are reasons for this.
Use cases
There are many options for using expanded clay, for example:
- You can use this building material under the screed. The presence of a porous structure characterizes the good thermal insulation properties of the floor. You can use it to insulate the floor in a wooden, stone private house, in the insulation of a loggia, attic and balcony.
- Expanded clay is used to fill the foundation of the house and finish the basement to insulate the first floor and form a blind area around the house.
Wooden construction is mainly country houses. Moreover, both new buildings and those that were built long ago as summer cottages. Today these buildings are increasingly used for year-round living. Therefore, the issue of warming all parts of the house becomes urgent.
The floor in wooden buildings is one of the coldest parts of the whole structure. According to various estimates, up to 20% of the internal heat in rooms is emitted through the floors in wooden houses. It makes sense not only to design good insulation when building a new house, but also to take care of reworking the floor in an already built one, but without floor insulation. Moreover, usually a residential wooden house is installed on a relatively high foundation. And this allows insulation from below without changing the level of the finished floor and without reducing the height of the room.
Floor insulation
When erecting ancillary wooden buildings, the floors can be located close to the ground or even be laid directly on the ground. In this case, the insulating layer is still necessary, only it will have to be laid, burying it into the ground.
Any insulation of wooden floors must be carried out in compliance with the following rules:
- Compulsory laying of waterproofing in two layers. The bottom layer protects the insulation from moisture from the ground. The top layer - from water penetration through the boards of the finished floor.
- Rough and fine wooden floor elements are treated with special anti-rotting agents.
- For insulation, a material is selected that does not change its properties upon contact with wood.
Despite the recent appearance of modern insulation materials, expanded clay insulation of a wooden floor is still used. And there are reasons for this.
Expanded clay: pros and cons
Insulating expanded clay - granules made by foaming and subsequent clay firing.
Scheme of production of expanded clay granules
It has a number of advantages when used as thermal insulation.
- Low thermal conductivity. The clay itself, from which it is made, is considered a good heat insulator. And the pores created inside, filled with air, further reduce the thermal conductivity. As a heat insulator, it is several times more effective than clay bricks and twice as good as wood.
- Light weight. An increase in the thickness of the expanded clay layer does not lead to a significant load on the floors.
- Cheapness. Despite the fact that it is inferior in thermal conductivity to many modern materials, its use saves money, losing insignificantly in the quality of insulation.
- Fire safety. This material not only does not burn, but even does not emit any toxic substances under strong heating.
- Resistant to temperature extremes. Thermal insulation properties do not change in heat or frost.
- Resistant to household chemicals and moisture.Even when wet, mold does not form on it.
- Complete environmental friendliness. Made from natural material, it is not completely harmless.
- In addition to thermal insulation properties, it is also a good sound insulator.
- Convenient to use. To work with it, you do not need to have special skills, and no special tools and devices are required. The fact that expanded clay is a bulk material excludes any requirements for observing the exact dimensions when laying.
- Long term of use. It is believed to retain its properties for decades.
disadvantages
Expanded clay also has disadvantages. But their list is incomparable with the merits:
- Large volume of heat-insulating layer. To create high-quality thermal insulation, the thickness of the expanded clay cushion should be at least 10 cm. But in practice, the expanded clay layer is usually 20 - 30 cm, rarely 40 cm. In some wooden floor structures, such insulation leads to a decrease in the space between the floor and the ceiling.
- Low moisture resistance. When a large amount of water gets on it, it absorbs it. This leads to an increase in the weight of the thermal insulation. Over time, moisture will evaporate from expanded clay granules, but this is a long process.
- Laying expanded clay, for all its simplicity, is a tedious task. Filling a thick layer, leveling with the obligatory accuracy, so as not to destroy the shell of the granules - all this takes a lot of time.
Varieties of expanded clay
The quality of expanded clay as a heater also depends on the options for its production. Depending on the size, there are three main groups of expanded clay granules. And although there are recommendations for each group for its use, usually a mixture of granules of different sizes is used in one layer.
Expanded clay fractions
- Crushed stone - granules with a diameter of 20 to 40 mm. Recommended for backfilling the main layer of thermal insulation.
- Gravel - 10 to 20 mm. It is used to create thin layers.
- Sand - the smallest granules with a diameter of 5 - 10 mm. Suitable for insulating small voids in floor structures. Mixed with coarse fractions, it can be used to fill the gaps between the granules. It is used to create a "wet" concrete heat-insulating screed.
In addition to size, expanded clay insulation varies in density. Commercially produced expanded clay is divided into several categories with a density of 200 to 800 kg / m3.
When to choose expanded clay
The range of heat-insulating materials on the modern market is so large that it is difficult to stop at any one. However, it is worth learning the whole range of properties of this unique material in order to understand that there is no better option than to insulate the floor with expanded clay.
The list of properties due to which this simple material is leading among competitors:
- Low thermal conductivity - the porous material contains air bubbles, which provide high-quality thermal insulation. A layer of expanded clay 10 cm surpasses a similar wooden surface in terms of thermal conductivity by 3 times, and brickwork by 10 times.
- Sound insulation - the property is in demand in apartments of multi-storey buildings, the expanded clay floor will serve as a reliable obstacle to the penetration of noise from neighbors below, at the same time preventing the propagation of sounds in the opposite direction.
- The strength of the material allows it to be used in the lower layer of the floor cake without additional supporting structures (expanded clay is produced in different strength grades from 250 to 600).
- Resistance to decay and fungi, mold (as opposed to wood-based materials) increases the service life of the floor, its durability.
- Chemical inertness - expanded clay is a natural material, does not emit any substances into the environment, and is itself resistant to chemicals.
- Heat resistance - quality is relevant in terms of fire safety.
- Frost resistance - expanded clay does not lose its properties at extremely low temperatures.
- Light weight - allows you to insulate the floor with expanded clay under the screed in houses where a large load on the floors is undesirable (read: "We make the floor insulated under the screed - practical advice").
- The granular fraction of the material ensures the convenience of working with it - one person who does not have construction skills can handle the filling.
- Low cost is an additional bonus for a material with a set of excellent qualities.
READ MORE: Subfloor in a wooden house: we make a strong lagged base for a finishing coating
The only drawback of expanded clay is its ability to keep moisture for a long time. This disadvantage can be easily leveled, observing the technology of flooring with expanded clay, carefully gluing the waterproofing layer.
The price range of materials in this category is as wide as their variety:
- Bituminous mastics;
- Polymer mixtures;
- Rubber hydro-barriers;
- Polyethylene film;
- Roll materials of various compositions.
Methods for creating heat-insulating layers of expanded clay
In general, the construction of expanded clay insulation differs little from the use of other materials. Expanded clay is located under the finished floor with the use of moisture-proof materials.
Warming with expanded clay, general principle
Depending on the location of the insulated floor (on logs laid on a foundation, on the ground or on a concrete base), the technology by which expanded clay is laid under a wooden floor also differs.
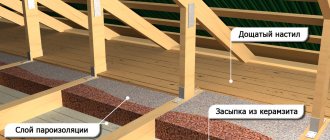
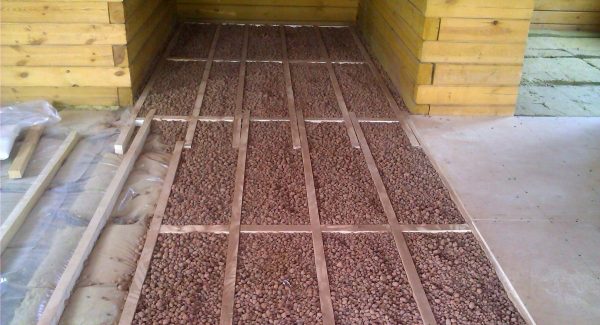
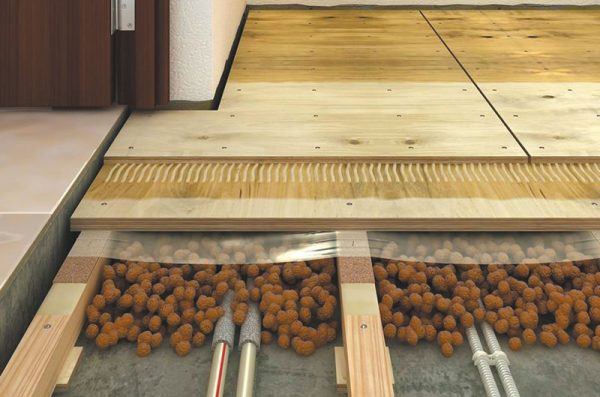
Backfill between lags
This is the easiest way to lay a claydite cushion. In this case, wooden logs serve as the basis for the floor. If they are on the foundation, then shields or sub-floor boards are attached to them. They can be hammered to the logs from below or attached to bars nailed to the logs from the side. The use of lightweight expanded clay is an advantage - the load on the subfloor is low.
Further actions are as follows:
- The logs themselves and sub-floor boards are recommended to be treated with anti-rotting agents. This is especially necessary when creating new insulation in a long-built house.
- The space between the lags is lined with a waterproofing film. As its substitute, you can choose polyethylene or roofing felt. If transverse bars are installed between the lags, then each cell is covered separately.
- Expanded clay granules are poured into the prepared intervals between the logs. It is recommended to mix coarse and fine fractions of expanded clay for full volume filling.
- After backfilling, the expanded clay layer is leveled along the upper edges of the log. Lags act not only as a support, but also as an indicator of the level of the insulation backfill.
- It is advisable to tamp the leveled layer of expanded clay lightly. When tamping, you must not damage the granules, since they will absorb moisture through the cracks.
Expanded clay, covered on a wooden sub-floor along the logs
The installation of the floor along the logs can also be carried out on a concrete base as a sub-floor. The expanded clay backfill technology in this case is no different.
Backfilling of expanded clay on logs on a concrete base
Backfill of expanded clay for a wooden floor on the ground
Such floors can be installed in utility rooms or garages. But the expanded clay pillow is not laid out directly on the ground. The procedure is as follows:
- The top layer of the earth is removed.
- A layer of gravel is filled up. It will perform the function of waterproofing, protecting expanded clay from moisture from the ground.
- The gravel is covered with sand, which must be carefully tamped.
- A protective film is laid over the sand.
- The insulating layer of expanded clay is poured onto a sand cushion, leveled and lightly rammed.
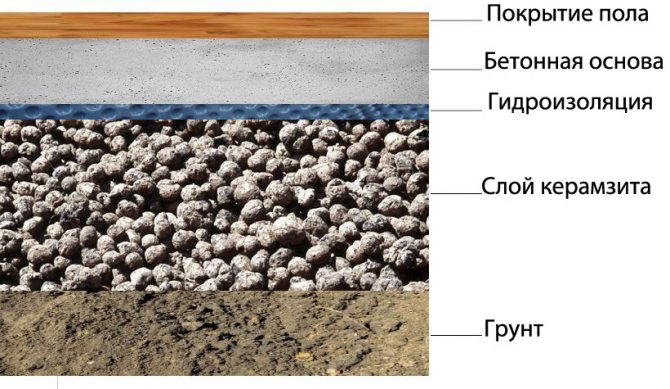
- Further flooring depends on the wishes of the builder. You can lay the floor directly on top of expanded clay, you can fill the expanded clay layer with concrete, forming a "wet" screed.And you can use a layer of expanded clay as a rough insulation, creating another insulating level above it, on top of which to lay a finishing floor.
Expanded clay bedding as a subfloor on the ground
Concrete screed using expanded clay
If a concrete base is supposed to be installed under floorboards, then such a floor can be insulated by "embedding" expanded clay into a concrete screed:
- The base prepared for the screed is closed with waterproofing.
- The entire surface is covered with expanded clay. Small fractions are predominantly used.
- The expanded clay layer is leveled and compacted.
- For greater reliability, a reinforcing mesh is placed on top of the expanded clay.
- The last stage is concrete pouring.
Concrete screed on expanded clay pad
Dry expanded clay screed
This method of flooring has recently become known. The preparatory part depends on the base on which it is planned to arrange the screed - on the ground, on a rough wooden floor or on a concrete slab.
The base is covered with a protective film on which expanded clay is poured. After leveling the expanded clay cushion, it is covered with sheets of plywood or gypsum fiber. Fastening sheets - with glue, or self-tapping screws.
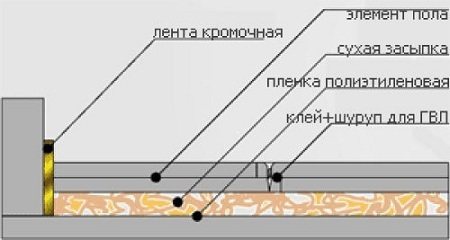
Dry screed with insulation
Final work
Any version of the construction of expanded clay insulating layer means the completion of the rough stage of flooring. The insulating layer must be covered with a hydro or vapor barrier material. And already on top of this insulation made of plywood or other sheet material, a substrate is fixed, corresponding to the selected floor covering.
With the option of a floor on logs, a wooden finishing floor can be installed directly on them, without creating a separate substrate.
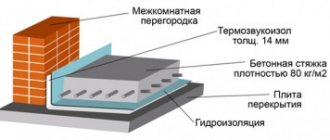
Section of a wooden floor with expanded clay insulation