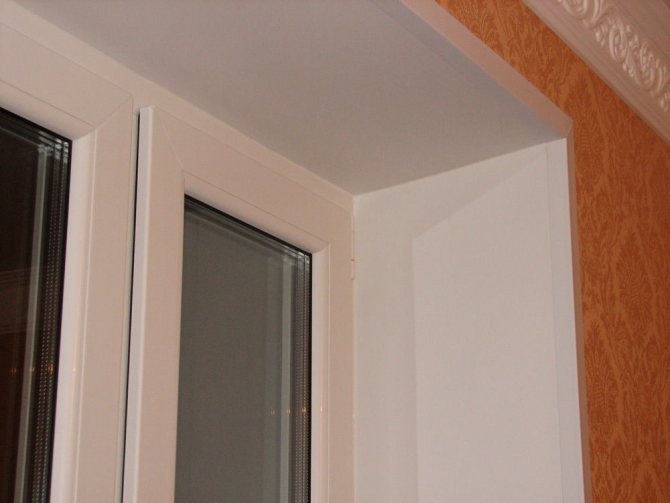
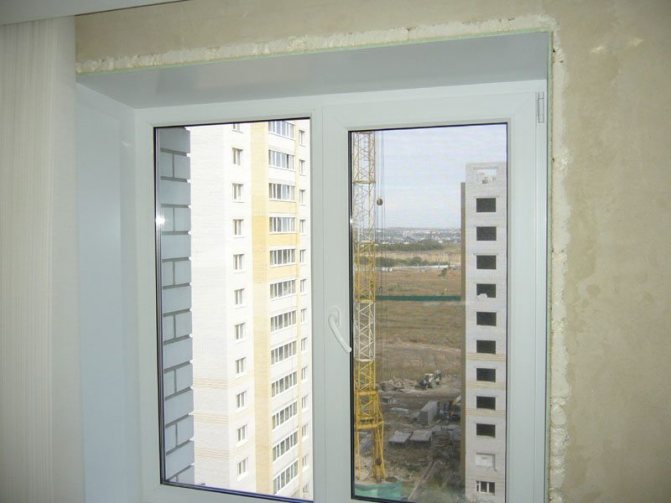
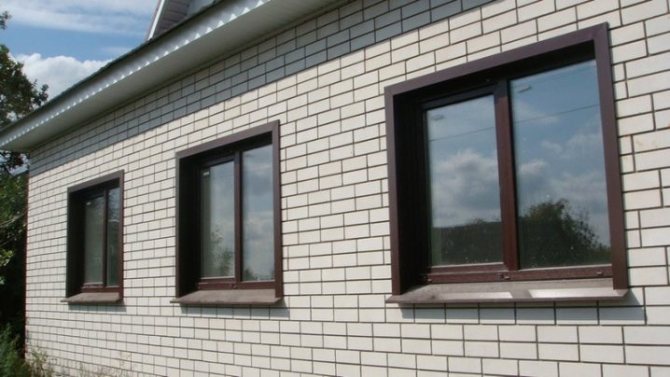
One of the pressing issues when renovating or buying a new home is the quality of the installation of windows. And in particular, their appearance and level of decoration.
You may not like the way it is done in a new apartment, or it needs to be done during the renovation.
Here even the question arises that the internal slopes can be trimmed in different and very different ways: plaster, plastic, siding, wood. All this will also be below.
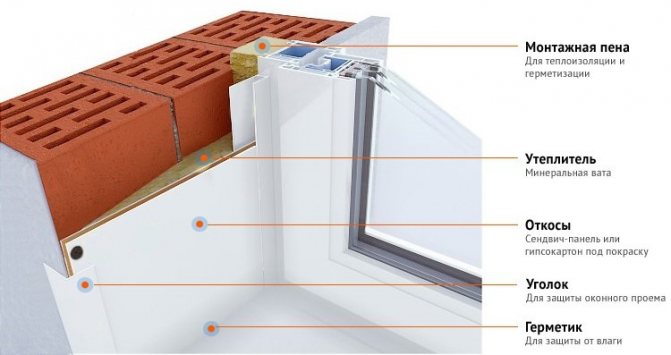
Do not think that the slopes perform exclusively an aesthetic function. They also help improve soundproofing and heat retention performance. Accordingly, you need to approach the issue of installing slopes no less responsibly than installing the windows themselves.
Indoor slopes for a plastic window yourself
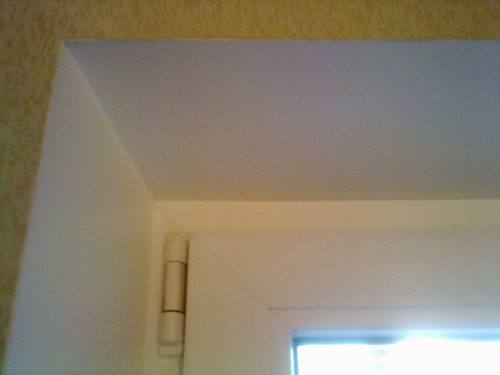
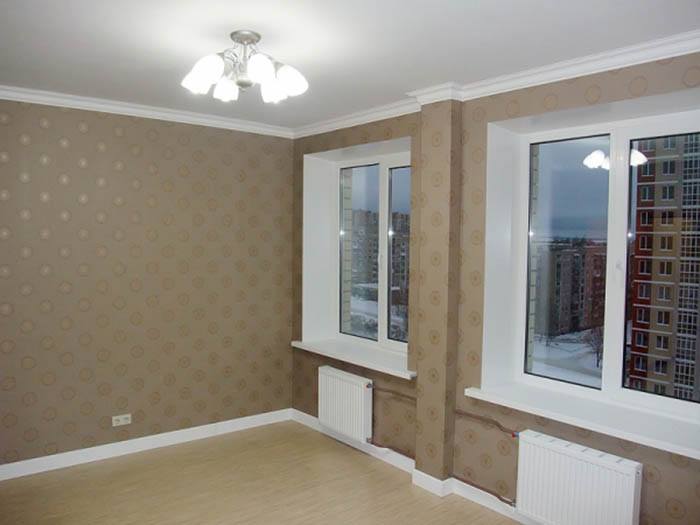
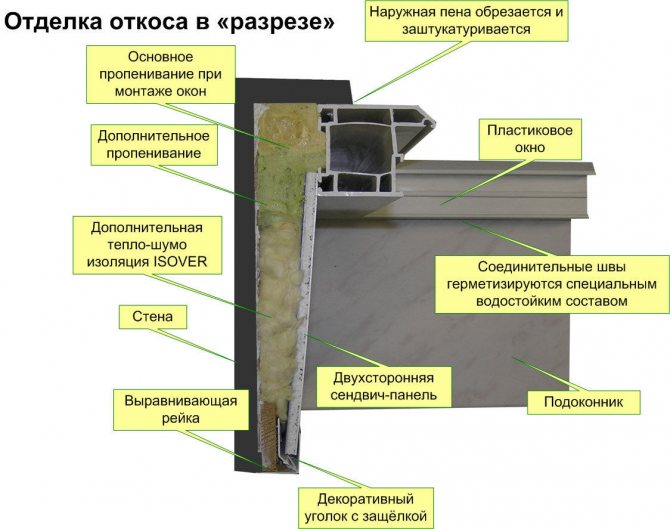
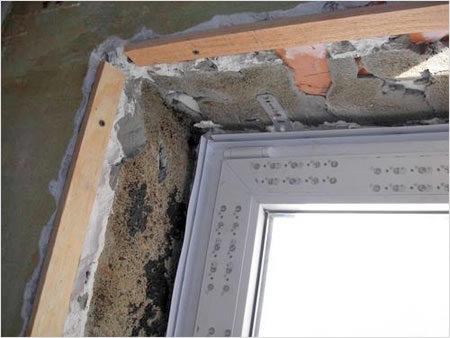
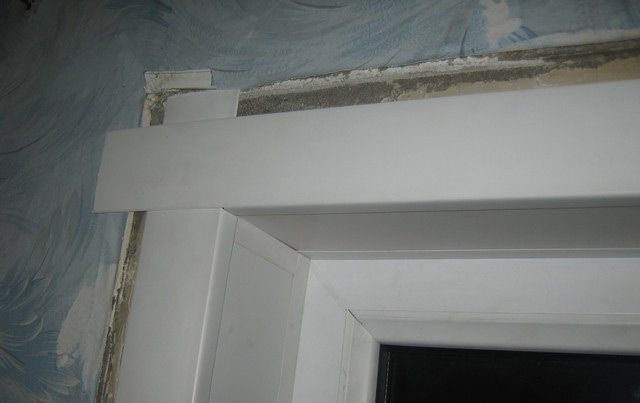
Let's figure out what a slope is. This is the side and bottom of the window niche. The lower one is very familiar to us because a window sill is installed on it. All that is on the sides of it is the slope.
Window installation is impossible without finishing it. It can be simpler and cheaper, or more sophisticated and designer. The design of the slopes can even become a feature of the interior in the house. But they also perform a protective function, for example, they prevent moisture from entering under the assembly seam.
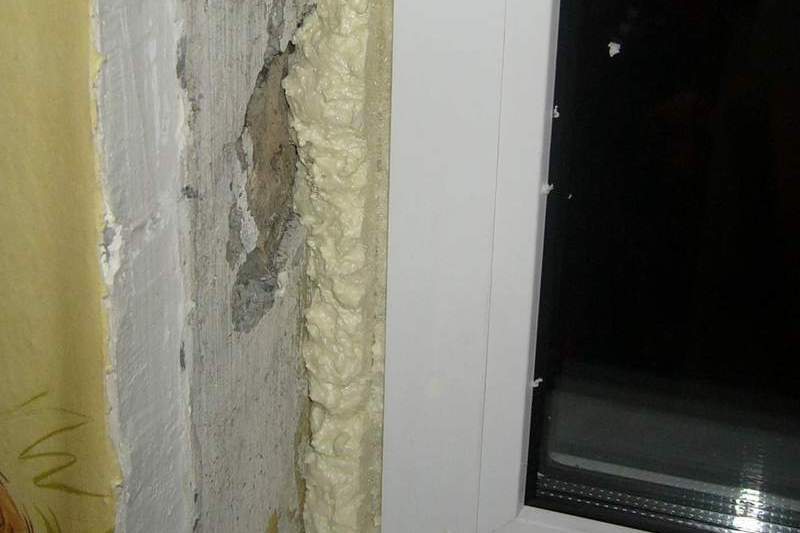
If you decide that by hammering the seams with polyurethane foam you can completely prevent heat from leaving the apartment, you are mistaken. The structure of the foam is such that it absorbs moisture and is susceptible to external influences. In a very short time, it will begin to lose its integrity.
Namely, the slopes provide the foam with the necessary protection, increase insulation, and also play the role of decoration.
Positive traits
The sandwich is used in the manufacture of blind elements for balcony and street doors, as well as balcony enclosing structures. The doors, with sandwich panels at the bottom, prevent heat from escaping. This is due to the fact that the panels for the slopes of windows and doors have the following positive qualities:
- The sandwich is lightweight with sufficient strength.
- Thanks to the expanded polystyrene filler, heat loss is eliminated, the energy efficiency of the room is increased and optimal microclimatic conditions are created. No wonder expanded polystyrene has established itself as a reliable insulation.
- The ability to laminate the surface to create a single composite integrity with the window system makes it a modern, versatile finishing material.

With the help of laminated panels, you can finish the window for any interior - The choice of the size of the material is possible depending on the parameters of the window opening.
- Plastic slopes are resistant to moisture, temperature extremes and biological substances.
- Warm slopes for plastic windows are not subject to rotting and the spread of mold.
- Finishing the slopes of plastic windows with this material allows you to increase the noise insulation properties of the window system.
- Ease of installation and maintenance of window slopes.
What are the slopes for PVC windows
In the process of installing a double-glazed window, professionals will do everything necessary from measurements and installation work to the "settings" of the window. And they will also gladly put slopes for you. But you will have to decide on their type.
Excluding extremely expensive and designer finishes, there are offers on the market for the following types and materials of slopes:
- Plastic,
- Drywall,
- Wood,
- Metal,
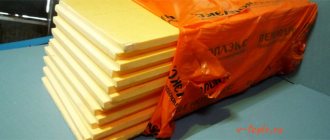
- Styrofoam,
- Plaster.
Let's get acquainted with some of them in more detail.

Plastered slopes
| Buy |
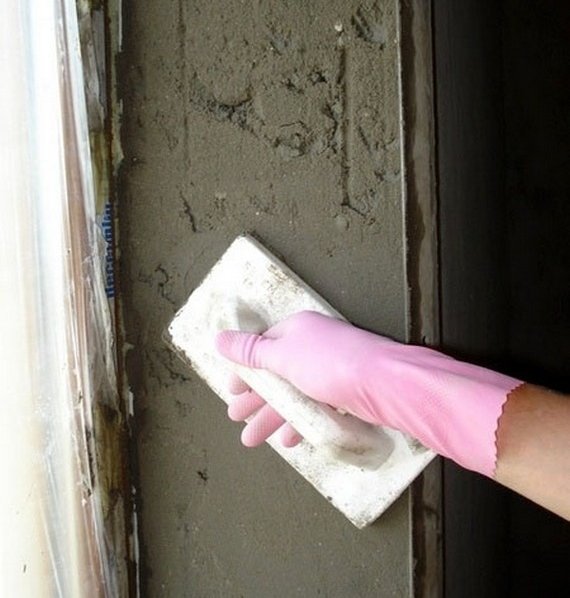
Treatment of slopes with plaster is considered the most economical option for protecting window openings. Dry mixtures based on gypsum or cement are mixed with water, after which the material is completely ready for use. On average, finishing takes at least two days, and after applying the mixture, the slopes must be putty, covered with primer and paint.
Plaster slopes on windows are rarely used, since during operation they can become covered with cracks and lose their original color. Most often, this method is used to restore existing slopes during cosmetic repairs. For major repairs and complete replacement of the window, it is recommended to choose other materials.
Plaster slopes
In fact, this is one of the most difficult, and at the same time, not the best finishing options. The process itself is split into several parts. First you need to cover the entire surface with a primer. This is necessary so that subsequent materials adhere well.
Then comes the actual plaster. The slope is covered with it from 2 layers, and the next one cannot be applied until the previous one has dried. The layers are separated by a special mesh, and the cracks and gaps near the window are clogged with silicone.
Plaster will cope with the function of decoration, but it will not protect the seams from external influences, windows from fogging, and the room from heat loss.
Advantages of PVC panels
The use of PVC panels is the best option, with a number of positive sides, which are shown in the table:
| Environmental friendliness: | The plastic profile has no toxic substances and does not affect human health; it can be used in any room. |
| Easy to care for: | Just wash the slope with a damp cloth. |
| Range: | Huge selection of panels, in texture and color, even under a tree. |
| Beauty: | The type of PVC panels is not worse than natural materials and plaster. |
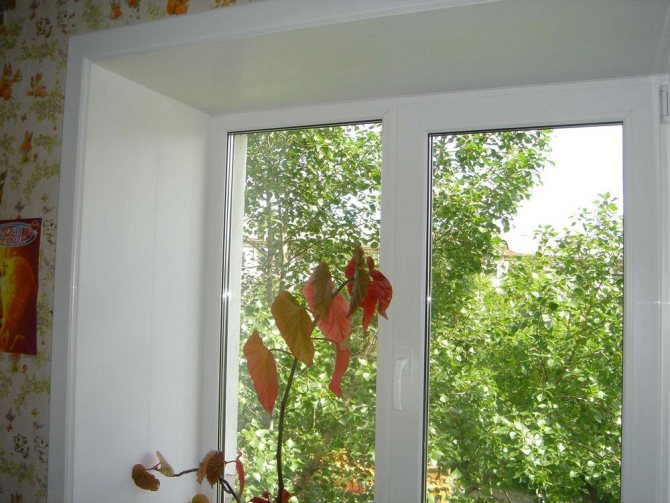
| Lifetime: | The installed plastic slope will serve for decades, decorating the room and protecting the window. |
Installing plastic slopes is simple, with your own hands, of course, there are nuances that you need to know. Installation step by step and material details will be presented below.
Plasterboard option
When installing drywall slopes, no fewer steps are taken than when puttingty:
- Insulation is laid,
- A slope is being mounted,
- Primer and putty are applied,
- After complete drying, the slope is painted.
If all this is done with high quality, such slopes are durable, attractive in appearance, and retain heat well. This, and sound insulation, will also depend on the quality of the cotton wool or foam that is placed under the drywall.
A noticeable disadvantage of this material is that it does not like water. It is best not to use it in rooms where high humidity is expected or outside the building.

Technical specifications
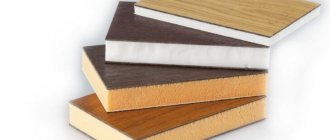
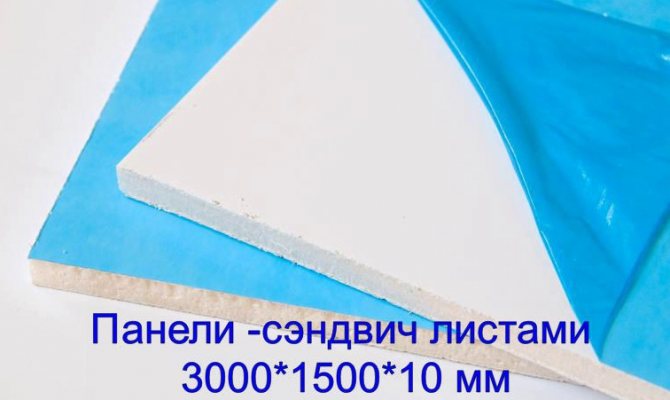
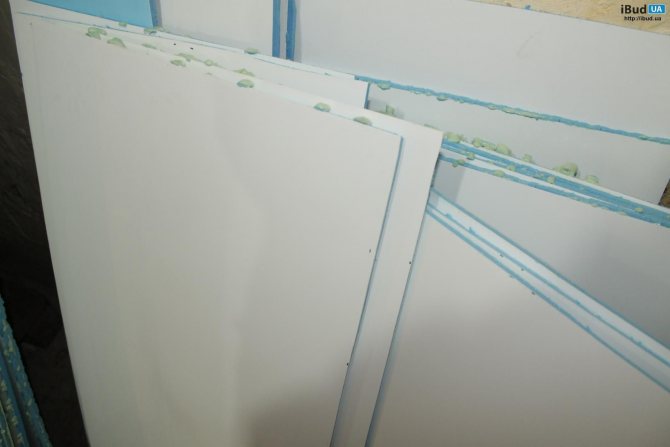
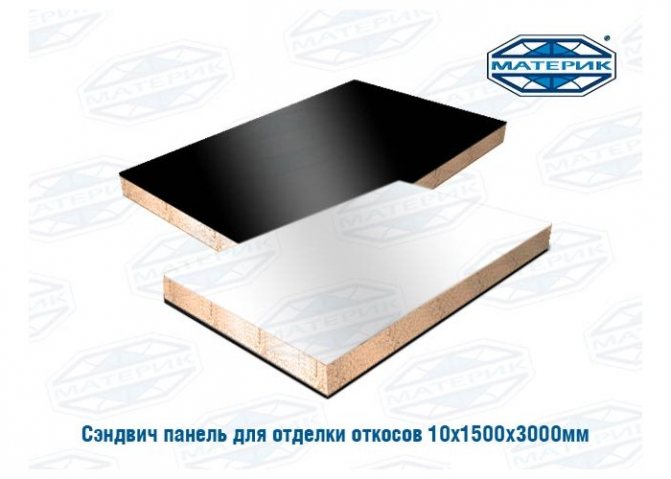
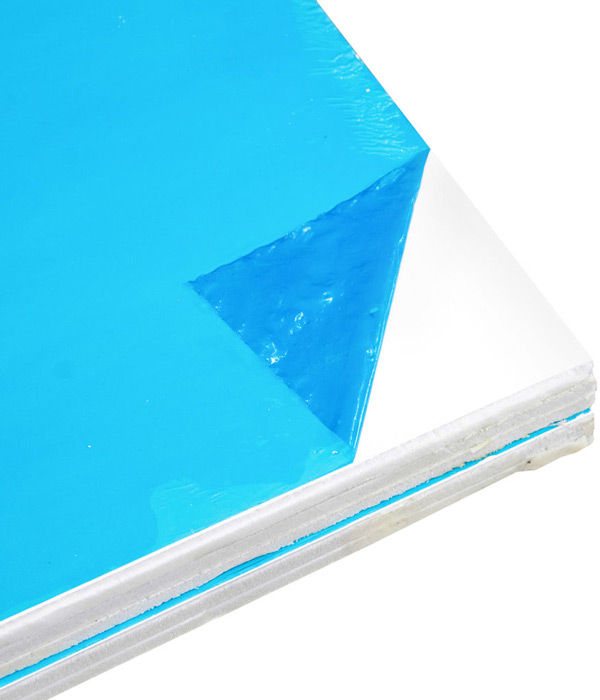
Pvc sandwich panels of 24 mm, 10 mm and 8 mm are in practice multi-layer frameless building structures of various sizes and thicknesses.
Products, in the production process of which pvc sheets are used, are considered a relatively new type of building and finishing materials. Despite this, consumers have expressed quite flattering reviews of such products. And every year the interest in it in the domestic construction market is growing inexorably. And all because they have excellent performance parameters.
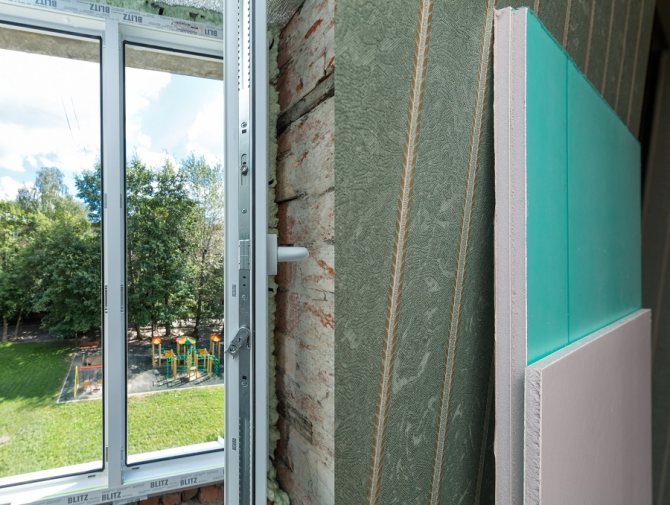
In the manufacture of pvc cladding of this nature, insulation materials such as polyurethane foam are used. This is an environmentally friendly material that has an excellent ability to retain heat, and also provides the room with excellent steam and sound insulation.Similar performance characteristics of polyurethane foam allowed modern manufacturers of facades for buildings and structures with various purposes to actively use it in the process of manufacturing multilayer sandwich panels.
Additional advantages of this kind of insulation are its low cost and ease of use. This is a durable and reliable option that practically does not deform during its operation. Therefore, it is so actively used in the production of pvc sandwich panels.
Additional advantages of PVC sandwich panels, which help this kind of material outperform its competitors, are their low weight, various sizes and prompt installation. We emphasize that the cladding, as in the next photo, has a rather low cost, while being very attractive in appearance.
Sandwich panels are really beautiful and modern building envelopes. Decent appearance and wide possibilities in terms of color scheme of the facade of the house provide designers with a flight of imagination.
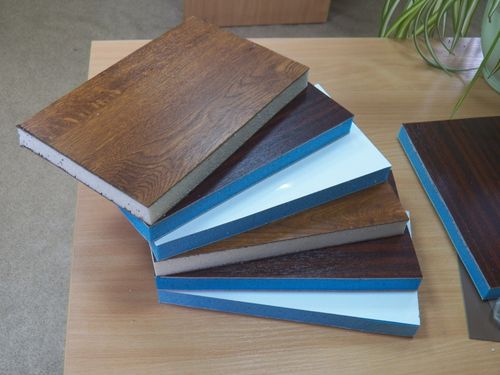
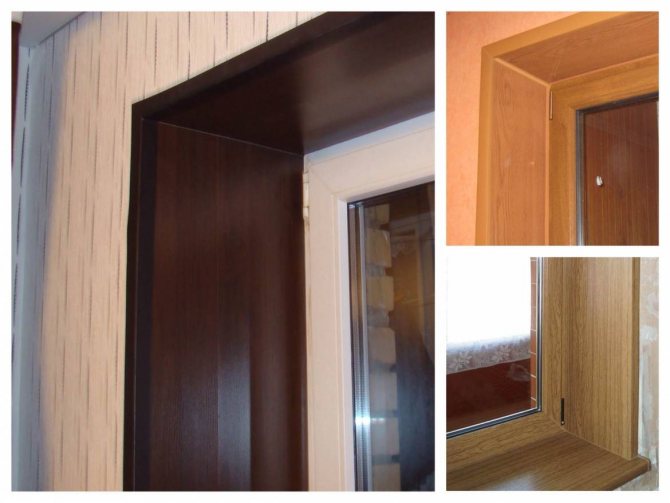
Plastic slopes

At the moment, this is the most popular slope option. This is explained:
- Affordable prices,
- Easy to install,
- Strength and lightness of the material,
- High level of insulation against noise and heat loss,
- Great views.
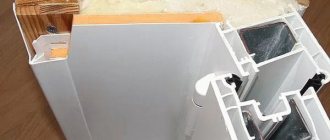
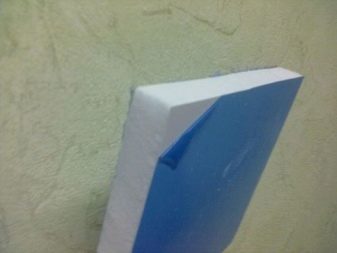
This material can be called universal for this mounting solution. You can also use it outside the building. A kind of plastic slope is a "sandwich panel". She has practically replaced now the classic plastic for these needs.
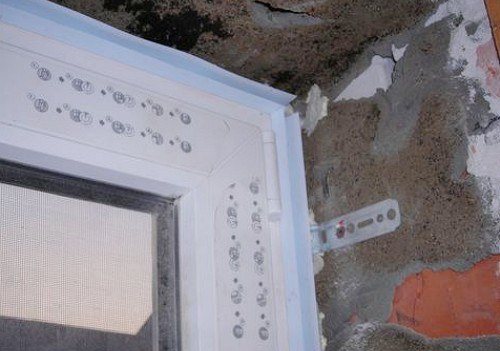
The panel is well suited for the side walls of the window niche. "Sandwich" has three layers: two outer ones, and an insulated layer between them (expanded polystyrene). It practically does not differ externally from the frames of the plastic window itself. Therefore, no additional decor is needed anymore.
A huge number of decorative solutions will also be an unambiguous advantage of this panel. Unless it will be difficult to choose from a variety of colors. They are also sold in the form of a "semi-finished" ready-made slope, for those who decided to start the installation on their own.
But this robot is painstaking and requires at least minimal knowledge and understanding of the procedure. But you can also cope with it yourself.
Separately, one can single out such a type of material for embedding a slope, such as PVC foam panels. They have almost all the same qualities as plastic with a "sandwich".
Properties and structure: are there any downsides?
The outer layer of the structure can be made from different materials.
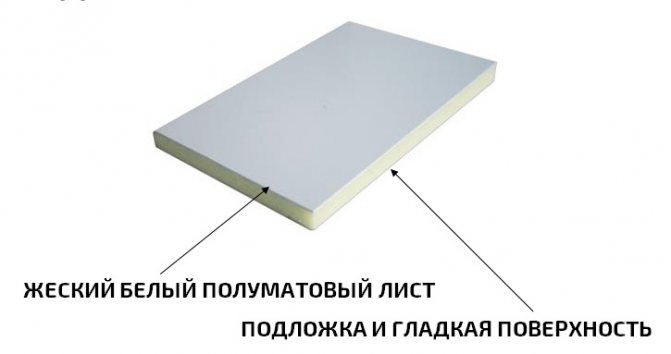
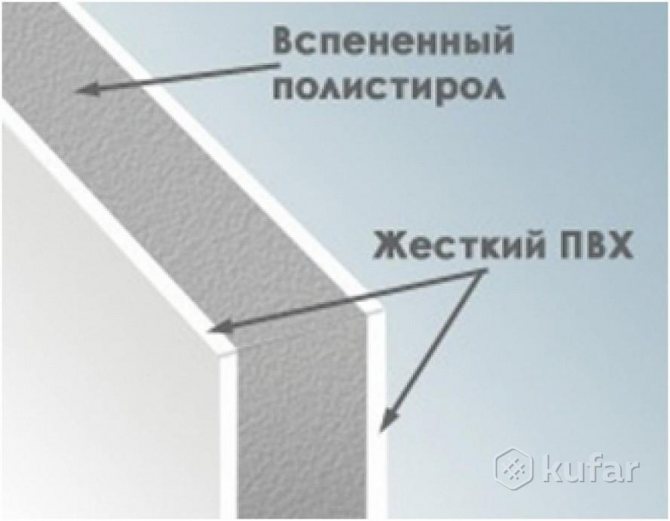
- Made of rigid PVC sheet. For the production of multilayer material, white sheet material is used. The thickness ranges from 0.8 to 2 mm. The coating of such a sheet is glossy and matte. The density of the sheet is 1.4 g / cm3.
- Made of foamed PVC sheet. The inner part of the structure has a porous structure. Foamed sheets have a low material density (0.6 g / cm3) and good thermal insulation.
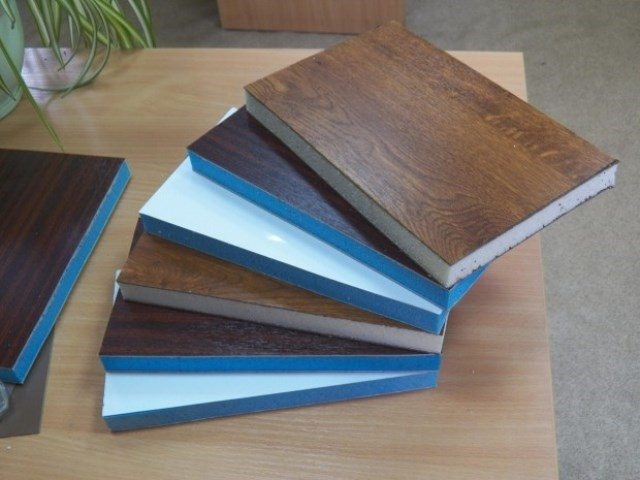
- From laminated plastic, which is created by impregnating a pack of decorative, overlay or kraft paper with resins, followed by pressing.
Multilayer panels can be supplied as ready-made systems that do not require preparatory work for the assembly of the material. The finished structures are attached to the facing material with glue. The second design variation - such panels are assembled using self-tapping screws before the installation technology.
Plastic slopes for interior decoration
When the installation of the windows is complete, it is worth starting to the slopes. You can choose from several finishes. But if you settled on plastic, study in more detail the options for materials for these needs.
Now they offer mainly two options for plastic slopes: the so-called sandwich and conventional PVC panels. They vary in price, and have differences in characteristics.
Helpful hints
When making slopes from sandwich panels, you must adhere to the following recommendations:
- For hot climates, it is better to choose a material with a renolith coating. Such a film will protect the slopes from high temperatures and deformation.
- When working, it is important to consider the coefficient of linear expansion.
- To prevent cracking of the top layer of the panels during cutting, it is worth using a circular saw with a small tooth pitch.
- Do not cut parts at a low room temperature (below +5). Such conditions lead to brittleness and cracking of the material.
- When choosing a starting profile, it is necessary to take into account the recommendations of the panel manufacturer.
- Before installation, wooden slats must be dried and treated with antiseptic impregnation.
- The joint sealant must match the color of the panels exactly. Once dry, the difference in shade will be striking.
Finishing window slopes with sandwich panels is an easy option to complete the installation of new windows. This material is characterized by high performance, ease of installation and ease of maintenance.
Slopes for the interior of the room from PVC panel
The PVC panel for walls is also suitable for finishing the slope. It is a cheaper material compared to a "sandwich". It will provide excellent appearance, uniform color, and smooth surface. At the same time, the panel does not need additional painting or other treatments.
The structure of this material is simple, it consists of two strips of plastic, which are separated in the middle by another "corrugated" layer. It is called stiffeners. It is important to remember about them because a poor-quality outer layer can "imprint" this ribbing on itself after installation. Poor quality will also make the panels yellowish over time, or even warp them.
In general, speaking about a PVC window and all structural parts, parts necessary for its complete installation, it is important to remember about savings. Rather, about the fact that it is on this that you should not be greedy. If you expect that the purchase will serve you for a long time, then choose quality, not cheapness.
Returning to PVC panels, it is worth noting that it comes in a standard width size - 25 cm. If the side walls are wider, it is better not to use the panels butt-end, but to give preference to a different type of plastic finish - sandwich panels.

Installation of windows in accordance with GOST
Well, first of all, what is GOST. In short, this is a state standard or a certain norm that must be met by enterprises.
At present, GOST for the installation of PVC windows has been canceled and is advisory in nature. But self-respecting companies did not recognize this cancellation and continue to work in accordance with GOST.
By the way, there are several GOSTs for PVC windows. For those interested, the list can be viewed here. But in my opinion the most correct and useful is this "GOST R 52749-2007".
Installation of windows in accordance with GOST will cost customers about 1.5 - 2 times more than the so-called conventional installation. Therefore, many managers do not even offer GOST, and do not explain its advantages, fearing that customers will not buy anything at all.
What is the main principle of this expensive installation of windows in accordance with GOST?
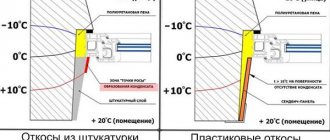
And the principle is simple and it is also used in the construction of frame housing construction (the insulation must remain dry, but if the insulation has absorbed moisture, it must be able to go outside).
It's all about polyurethane foam - the main window insulation. And this foam is hygroscopic, that is, it absorbs moisture well. And if this moisture is not removed, the polyurethane foam loses its energy-saving properties.
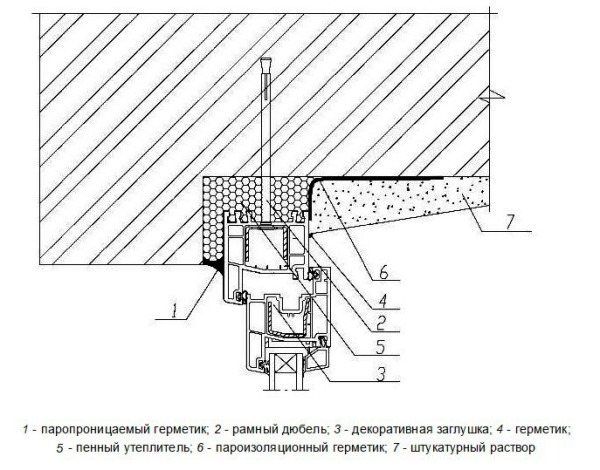
What does GOST offer us for the installation of windows? And he offers a system for removing moisture from the polyurethane foam and protecting against this moisture, both from the premises and from the street.
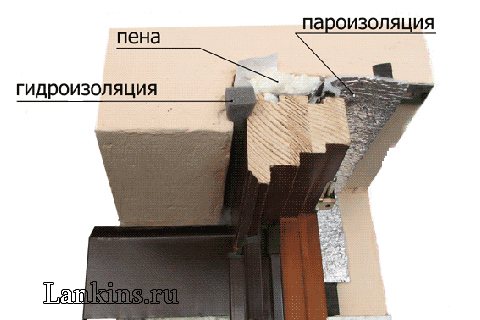
A moisture removal system is either:
- PSUL is a vapor-permeable self-expanding universal tape. It also protects the foam from external factors (rain and snow).
- Mastic, for example the most popular STIZ - A. It has high vapor permeability.
From internal vapors from the room, the foam is protected by a vapor barrier foil tape.
What are the disadvantages, or, more precisely, what should be taken into account when choosing this type of window installation?
The most important thing here is:
- The quality of PSUL (To be honest, I have not yet met a PSUL that would not crumble over time. You can simply pierce it with your finger without much effort. That is, I assume that the resistance to ultraviolet in a low-quality PSUL is low. Here is my recommendation for the manufacturer that you can trust - illbruk (they can buy a full set of materials for installation in accordance with GOST).
- The layer of mastic application should not exceed 3 mm. If on the street side of the window, you will be smeared with a thick layer of foam, the steam will not be able to escape from it.
- In the old fund, it is impossible to work in accordance with GOST, without additional financial costs and losses in time. The vapor barrier tape should be of the maximum width, which is still not enough. Because a quarter is deep. And it is either reduced with the help of masonry (which is expensive and time-consuming), or the tape is calculated in double or even triple size and glued together (most often).
Installation of windows not according to GOST
And what is it all about - ordinary installation (not according to GOST). And why, this option seems to be wrong, but it is in this way that most windows are installed in our country?
This method is considered incorrect for one reason:
if the polyurethane foam does not provide moisture removal, it is fraught with the formation of mold
But why is this mold and mildew only special cases, and not universal? Let's finally figure it out.
How is a conventional window installation done? In the same way, polyurethane foam is used as the main insulation. Instead of PSUL, the external seam is sealed with facade plaster. And the vapor barrier tape is not used at all.
For some reason, everyone talks about the physical properties of PSUL and vapor barrier tape, but no one says that:
- facade plaster has good vapor permeability
- and PVC sandwich - panels that serve as slopes of windows - are vapor tight
By the way, the fungus is most often found on drywall slopes and on plaster slopes. Because these materials have good vapor permeability, that is, steam from the interior penetrates into the polyurethane foam, destroying it.
And you should not seal the outer seam with conventional sealants. This blocks the escape of steam from the foam to the outside. You can read about the main mistakes of installers here.
The conclusion suggests itself. There is an alternative to the installation of windows in accordance with GOST - this is a conventional installation using 3 layers of insulation:
- Vapor-permeable facade plaster
- Mounting foam
- Internal slopes of PVC sandwich panels
Use of sandwich panels
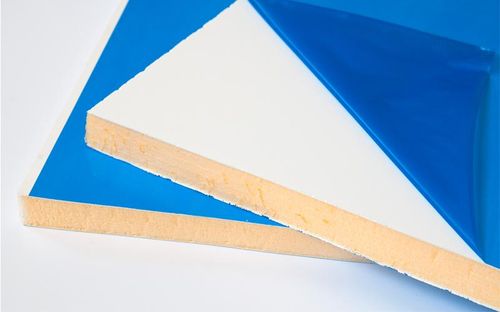
The structure of the sandwich panel speaks for itself. It's like a two-piece sandwich with a layer in the middle. In this, it is similar to a conventional PVC wall panel. But if the latter has hollow ribs between the outer sheets, then the sandwich panel is filled with special foam. As a rule, it is polystyrene or foam.
With this "filling" the panel has the highest thermal insulation performance. "Sandwiches" are available in different thicknesses and, what is important, in a variety of colors. They also have a significant size, so they are suitable for window niches deeper than 25 cm.
The disadvantages of sandwich panels include instability to excessively aggressive environmental influences. This means that you cannot use them outdoors. For exterior finishes, take an interest in metallic materials.
As for the price of a "sandwich" - it is more than for a regular PVC panel. But the difference is about 300 rubles for a regular window with two sashes.
Subtleties of mounting plastic slopes for a window
In practice, the window and the slope are inseparable. This is roughly the same as a window without glass. Without a high-quality slope, the service life of the fittings is reduced. Since the main function of this element can be called not even an aesthetic moment, but a protective one.
The slope closes the seams from external influences: temperatures, damage, sunlight.
It is important to remind and emphasize these points once again, because at some point, a person can "lead" to beauty, instead of quality.
Subtleties of installation
Installation of multilayer PVC panels can be carried out independently, the main thing is to follow all the rules and instructions for installing such materials. Using the example of window slopes, we will consider the technique of mounting plastic panels at home.
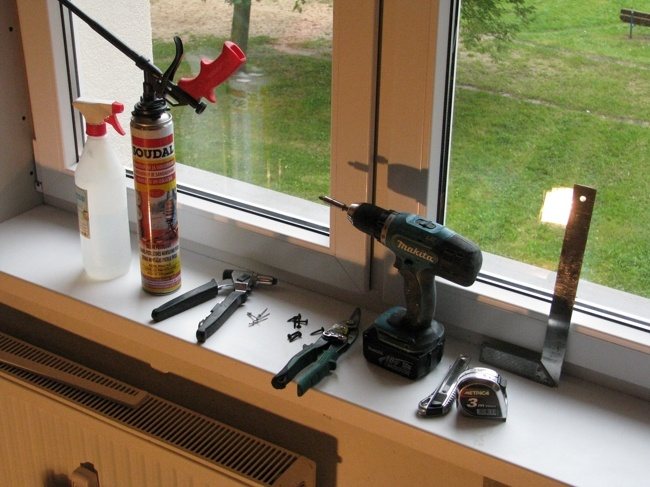
Required tools for installation:
- self-tapping screws, liquid nails, sealant;
- mounting profiles;
- polyurethane foam;
- sandwich panels;
- mounting level;
- cutter knife, electric jigsaw, scissors for cutting metal materials;
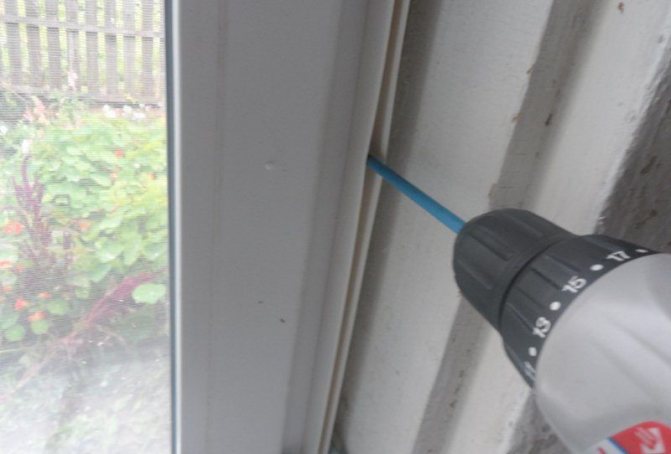
- electric drill;
- in some cases, experienced craftsmen use a grinder to cut panels.

Novice builders need to use such a tool with caution, because overdoing it with pressure, the material will break. Before proceeding with the installation of sheets, it is necessary to get rid of dirt (dust, paint, foam)
Sandwich materials are only laid on a clean base. If there is mold, it must be removed, and the surface should be treated with a special impregnation
Before proceeding with the installation of sheets, it is necessary to get rid of dirt (dust, paint, foam). Sandwich materials are only laid on a clean base. If there is mold, it must be removed, and the surface must be treated with a special impregnation.
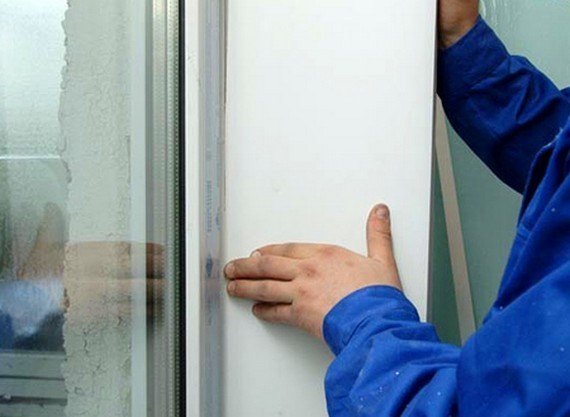
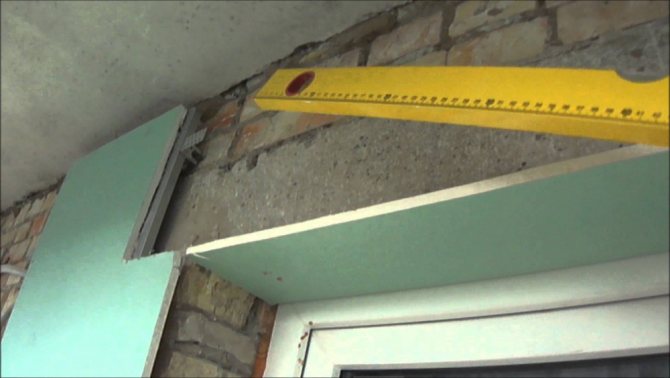
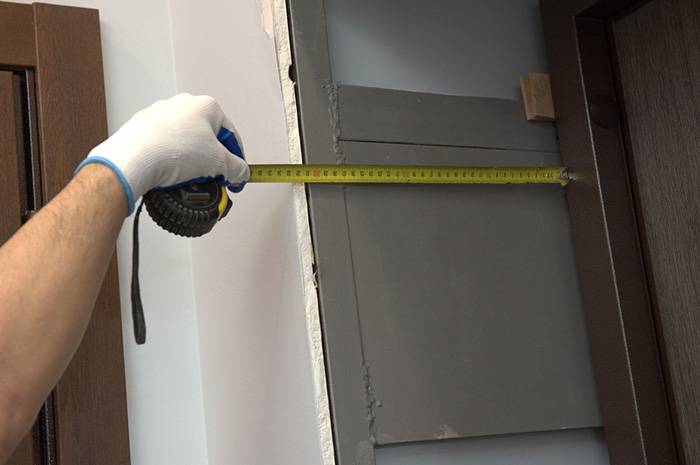
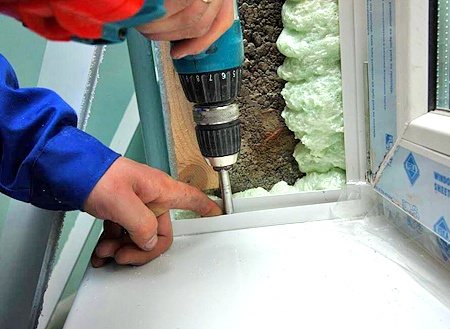
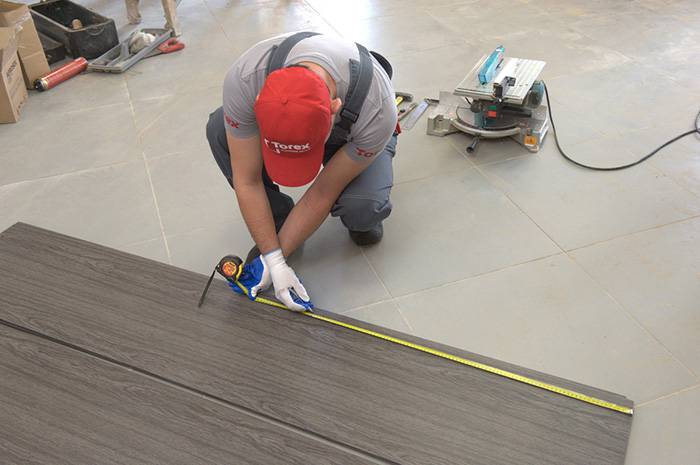
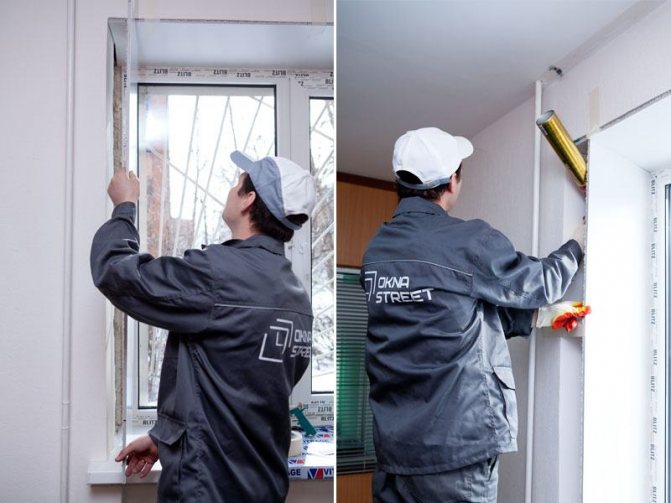
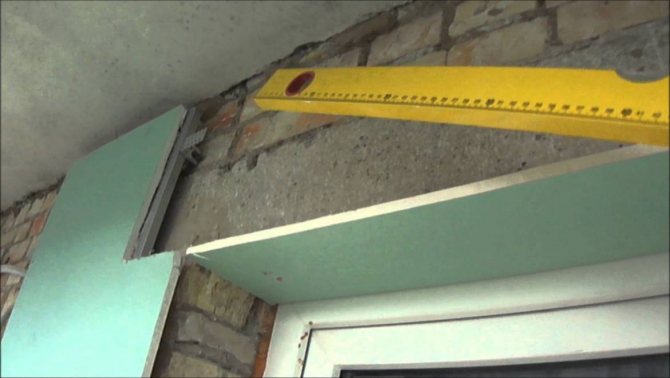
- Preparation and measurement of slopes. Using a tape measure, the length and width of the slopes are measured in order to cut the panels to the size of the slope.
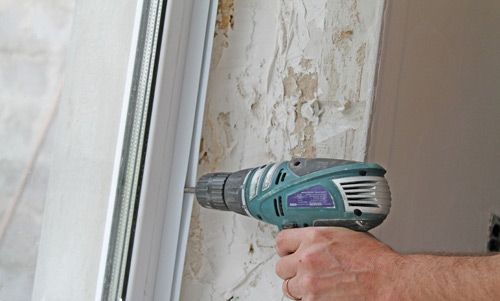
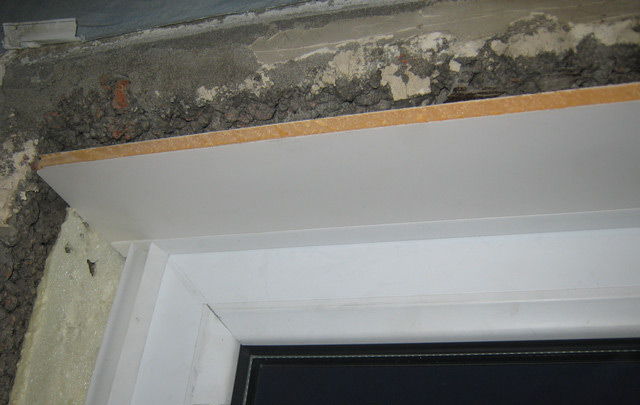
- Installation of profiles. The initial U-shaped profiles (starting profiles) are cut and fastened with self-tapping screws, which are installed along the edges of the profiles, leaving a gap of 15 cm between them.
- The side sections and the top PVC panel are installed in the plastic profile. The sections are fixed to the wall with liquid nails or polyurethane foam.
- Areas of abutment to the walls are covered with facing material from the L-shaped profile. The edge profile is installed with liquid nails.
- Finally, the contact areas are sealed with white silicone sealant.

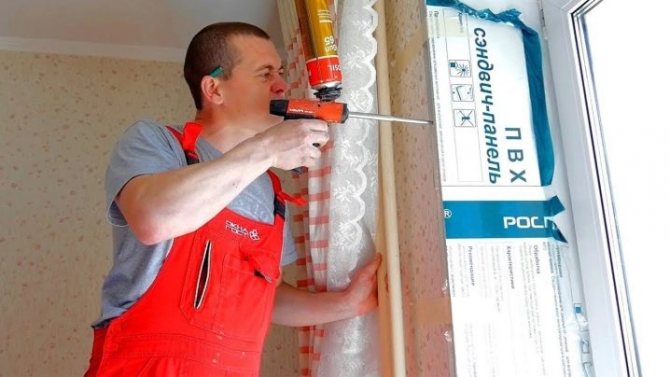
It is necessary to use polyurethane foam with extreme caution, because it doubles in volume upon exiting. Otherwise, large gaps will form between the laminated sheets and the wall, and all the work will have to be redone
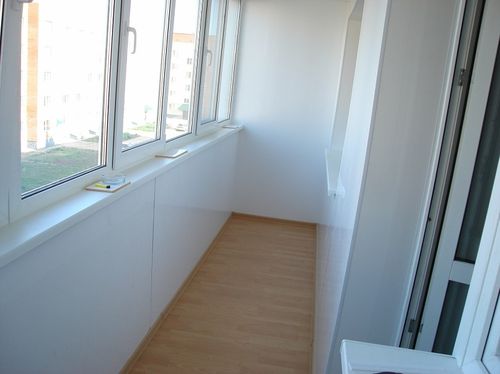
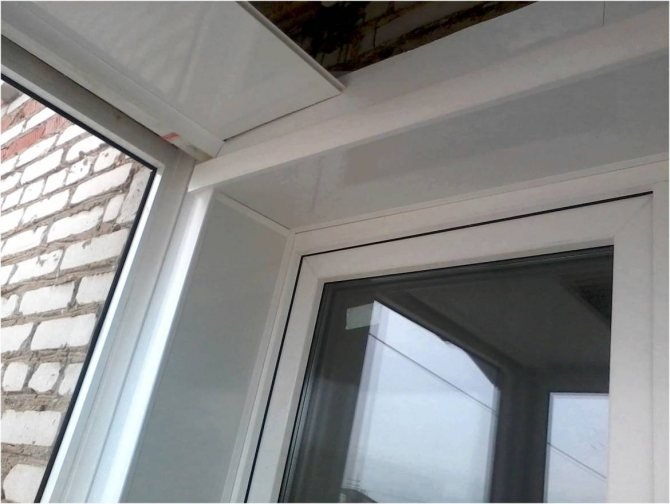
Slopes on balconies and loggias made of sandwich slabs are made similar to the slopes of metal-plastic windows in an apartment.
Slope definition and its purpose
It is unlikely that the literary concept of a slope is spelled out in the dictionary. But it can be formulated as a whole. And in fact, this is a profile with which the side parts of the window niche are finished.
But it is worth noting that this is not a complete designation. So, as in this article we are talking about PVC windows, so we will stop there. And the slopes are just as successfully and often installed on the door. The most striking example is the balcony. The same finish of both windows and doors to the balcony is often found, and is also beautiful and logical.
Therefore, everything said above, and what will be said below about window slopes, is automatically applied to door slopes. Certainly in the context of interior decoration. If the opposite is indicated.
And so, as already mentioned, the slopes serve two important purposes. The one we think about more often is window decoration. And the one that is still more important is protective.
Due to such a distribution of priorities, some have a question - is it possible to carry out the installation of slopes not simultaneously with the installation of the window itself. The issue is controversial. Here we will recall the exterior decoration. It is precisely this that must be done urgently. If the seams in the room do not succumb to such an active influence of the environment, then outside it will be enough to rain and hit the frost, and the integrity of the polyurethane foam will suffer.
First, she really does not like direct sunlight, and begins to collapse under the influence of ultraviolet radiation almost on the very first day. Secondly, it is not friendly with moisture, which reduces its ability to heat insulation.
Material features
It is important to purchase high-quality material, since otherwise, under the influence of direct sunlight, the panels may lose their shape and turn yellow
When working with this material, care should be taken with mechanical stress, such as cutting. The material is quite fragile and the sheet can be damaged if the forces are not calculated
The material is quite fragile and the sheet can be damaged if the forces are not calculated
When working with this material, care should be taken with mechanical stress on it, for example, cutting. The material is quite fragile and the sheet can be damaged if the forces are not calculated
Sandwich panels should be handled with care to avoid material damage.
If there is not enough space between the window hinge and the wall, this material cannot be installed
It is important to take into account that when using this material, the window opening will decrease on both sides by the thickness of the panels.
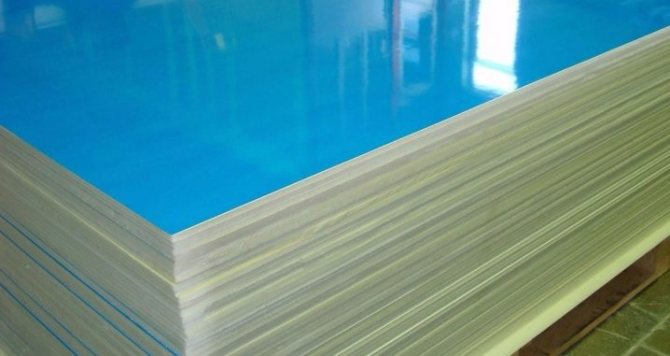
Transportation of products can be difficult as the sheets are large. However, some stores cut them into smaller pieces.


Advantages of plastic slopes for PVC windows
The current market provides a good selection of materials and options. It also swings and slopes. Many people prefer plastic and its varieties. It is quite easy to understand such a choice, especially after familiarizing yourself with the advantages of a slope from this material.
Let's not discount the fact that, having decided to install a plastic window, people also take a plastic window sill. Why not put in this case and a slope of the same or similar material?
This choice of slopes complements the appearance of the window to a "complete set". And it does an excellent job with protective functions. It should be noted the ease of installation and maintenance of such an element. And also its practical eternity:
- Do not respond to ultraviolet radiation,
- Are not afraid of moisture
- The temperature difference is not scary,
- Does not deteriorate from most acids and solvents,
- Do not need special care,
- Mold and insects are not scary.
For the manufacture of both the material itself and the slope itself, as we know it, use the latest materials. They are durable, safe, and practically non-conductive.
Features of the
Unlike old wooden frames, modern plastic windows are equipped with special ventilation equipment. For this purpose, the upper part of the window frame is folded back to form a narrow opening for fresh air. As a result, air turbulence with sharp temperature changes occurs.

Plasterboard is often used for this purpose, but such building material can freeze through in winter, and caring for it requires a lot of effort.
If the room is built of bricks or reinforced concrete blocks, only sandwich panels can be used for maximum insulation of the slopes.
The advantages of using sandwich panels are as follows:
- additional noise and thermal insulation is performed. Additional insulation is carried out by means of polyurethane foam for a better connection of the material with the slope;
- does not require constant care and maintenance.Any kind of contamination can be easily washed off with a cleaning solution without damaging the structure;
- high vapor permeability. Unlike plasterboard material, sandwich panels do not get wet and do not crack when exposed to moisture;
- low weight of the structure (weight of 1 m² with a product thickness of 24 mm is 3.9 kg);
- high resistance to mechanical damage;
- resistance to ultraviolet radiation;
- stylish design appearance;
- mold and mildew resistance;
- acceptable cost of the product;
- do not require additional registration. The surface of the panels has a structure similar to the surface of plastic windows;
- environmentally friendly material. Does not emit harmful substances, thus does not harm living organisms during operation.
Despite the fact that multi-layer panels have many advantages, some consumers have negative reviews about this building material, such as:
- under the influence of high temperatures, the product turns yellow and deforms;
- improper installation of the material can lead to the formation of gaps and cracks;
- finishing of slopes with sandwich panels cannot be performed if the distance between the hinge and the wall is small. Otherwise, the structure will walk around the perimeter;
- only low quality materials have such disadvantages.
How is the installation of plastic slopes

We have already determined that most often customers choose plastic slopes, and among them they prefer sandwich panels. The latter are often filled inside with a foamy, frozen substance "Penoplex". It is also used for thermal insulation on large-scale construction sites because it is one of the newest materials.
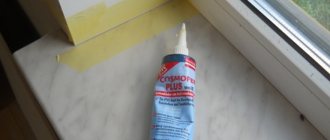
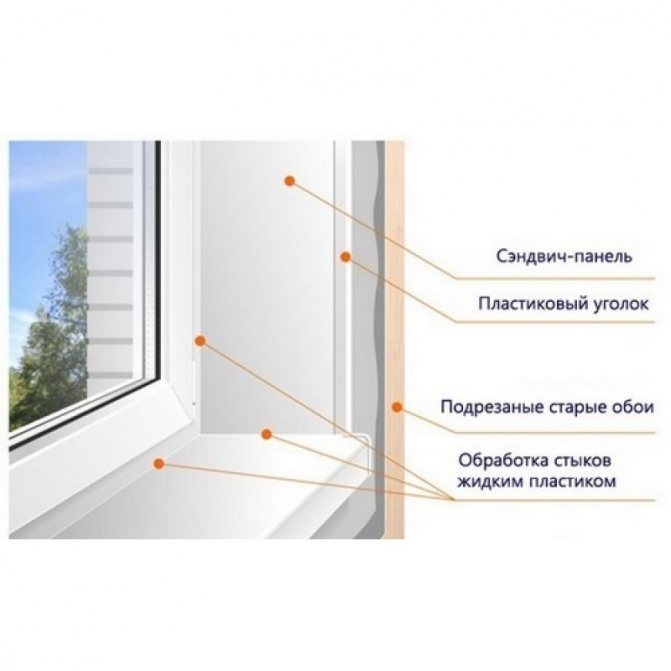
The distance from the window itself, to the plastic slope, is filled with liquid plastic. This is a PVC glue that has recently appeared on a large market. It definitely outperforms silicone, putty, or other materials that can be used for the same purpose.
The peculiarity of this substance is that it acquires an appearance similar to plastic on the window, down to color and texture. For a "complete" window, corners can be added that cover the cut of the slope and cover the corner. They are also matched to color and blend completely with the rest of the design.
But this does not mean that we are talking exclusively about classic white materials. Now there are a huge number of colored panels that will help complement any design. In addition, there is such an element as laminated film. The German brand Renolit is mainly used. It is "pulled" over the panel, and the latter takes on any desired color.


The importance of standards in production
State All-Union Standards (GOST) ... Common enough in the USSR. At one time, everyone adhered to them, but unfortunately, this does not apply to the present time. A huge number of new materials have appeared on the market now. In the production of which they often do not adhere to any rules and regulations. These circumstances could not but affect the quality of the products.
Construction is no exception. Today, almost all manufactured building materials do not undergo mandatory certification before. Only often large firms, for which the image - first of all, is provided to the buyer, only the goods of suitable quality are certified.
Preliminary preparation before installation
It is not for nothing that professionals trust the installation of PVC windows because it is a laborious and delicate process. It is necessary to carry out measurements, cleanup, carry out the installation itself, adjust the fittings. With all this, the installation technology should be adhered to. At least after a series of all these actions, the customer will be able to count on a certain warranty period.
But some points, such as the installation of slopes, can be laid on your own shoulders.
First, you will need to figure out their types, choose colors, decide on the material. As for what slopes can be made from, they are:
- Wooden,
- Metallic,
- Plastic (sandwich and wall panels),
- From plaster
- Plasterboard.
But for several reasons, plastic options are the most common. One of these reasons is that after the end of the entire procedure, the window, along with the slopes, visually merge into a single whole.
For the rest of the reasons for the popularity of the plastic slope, we include: competitive cost with high quality, ease and speed of installation, unpretentious care, a variety of colors.
Before starting self-installation, you must first determine what is needed for this. Before this list, it should be filled in once again that there can be no savings here. Low-quality materials will not last long, deteriorate, and as a result, you will spend much more money.
First, select and purchase plastic panels and corners. Give preference to plastic no thinner than 8 mm. Carefully monitor the dimensions of the panel, the depth of the slope and the width of the plastic must match.
Second, we collect the necessary set of tools. In general, this is a completely standard "repair kit" of a tape measure, a hammer and a screwdriver, a drill and self-tapping screws, silicone foam and a device that will allow them to be used, a trowel and / or spatula, and rags.
Third, we collect all building materials. Here you can not do without an F-shaped profile, a starting strip and adhesive tape, insulation, a mixture with cement for construction work, self-tapping screws and paper clips.
Only by collecting all of the above, independent installation of slopes becomes possible. And note that only after 1.5 is better than 2 days after the installation of the window, you can start installing the slope. During this period, the polyurethane foam must completely dry.
How to choose slopes: the best finishing option
There are several options for finishing slopes. For this, materials such as plaster, drywall, gypsum fiber, plastic panels and sandwich panels can be used. The price for window slopes of the latter type of material is the highest compared to other options.
The traditional way of finishing the slopes is to plaster the side and upper niches of the window frame. The technology consists in leveling the surface by applying several layers of plaster, followed by priming and painting the surface. This method has a number of distinctive advantages. First of all, it is versatile. You can plaster the slope in a room with any humidity and temperature conditions. The mixture itself is an inexpensive material.
Plaster slopes are characterized by resistance to mechanical stress, ultraviolet radiation and moisture. This finish does not contain seams or joints. The surface is perfectly flat and smooth. In the event of a decrease in aesthetics, such slopes can be easily updated or repaired.
For slopes, drywall, plastic and sandwich panels, as well as gypsum fiber are used.
Despite its many advantages, this method of finishing slopes has its drawbacks. Plastering side niches is a time-consuming and laborious process that requires breaks in work to dry each new layer. In addition, to get a good result, you must have the appropriate skills. Plaster slopes are characterized by low thermal insulation properties. They are prone to freezing and condensation.
How plastic slopes are made
First you need to prepare the window and wall surface. Remove the adhesive tape that remains on the surface of the plastic window. Thoroughly coat any irregularities and cracks that you see from the outside.
This is necessary in order to protect the outer seam and polyurethane foam, which does not like direct sunlight and is destroyed by ultraviolet radiation.
If you have not purchased a cement mixture specifically for such a case, you can get by with another mortar intended for outdoor decoration. When all the materials are dry, paint the slopes on the outside with the recovered paint for you, and start working on the inside.
The first step is to establish a base, the role of which will be played by the starting strip. To do this, take measurements, and do not forget about "measure 7 times - cut one", and cut the desired piece. Using self-tapping screws, attach a strip to the profile in a circle. This will be our plastic slope base.
Then proceed to the "creation" of the panels themselves. Start with the one that will be located on top, then go down to the sides. Using the measurements of the upper opening, cut a piece of plastic to the desired shape. Insert it into the grooves on the starter strip. Repeat the same for the two side panels.
Even if you have a "diamond eye", it is better to arm yourself with a level or a plumb line. There are several fundamental requirements for our resulting design. These include:
- Leave a gap of about 2 centimeters between the plastic and the base to fill it with foam,
- Measure the profile with a corner in different places so that the turn of the side parts does not turn out to be the same from different sides,
- Anything that protrudes, sticks out and is not in size - correct immediately and only with an assembly knife,
- At the joints of the panels, it is advisable to cover the cuts with the help of the remnants of the starting profile.
Recommendations for use
Sandwich paneling is possible in all conditions, but installation in the rain is not recommended. Mineral wool insulation can get wet, and this will reduce the quality characteristics of the products.
In the process of using sandwich panels, you need to periodically check the appearance of the products. Fittings, fasteners must be sealed. If this is not the case, then the inner part of the panels can be additionally planted with glue. Dirty exterior surfaces are best cleaned with a soft brush. If the top coating of the panels is lamination, do not use abrasive cleaners.
Possible damage can be cut off and replaced with new ones, or it can be repaired with a suitable repair paint if the type of polymer coating of the panel is known. Alkyd enamel or latex acrylate paint can be used as paint options.
Subsequent stages of work on the plastic slope
Continuing work on finishing the plastic slope, we take on the F-shaped profile. You need to make special edging from it.
The system does not change - first make the top element, then the two remaining ones. There is one more subtlety here. Where the profile will be joined, you need to make "mirror" cuts at 45 degrees so that they converge.
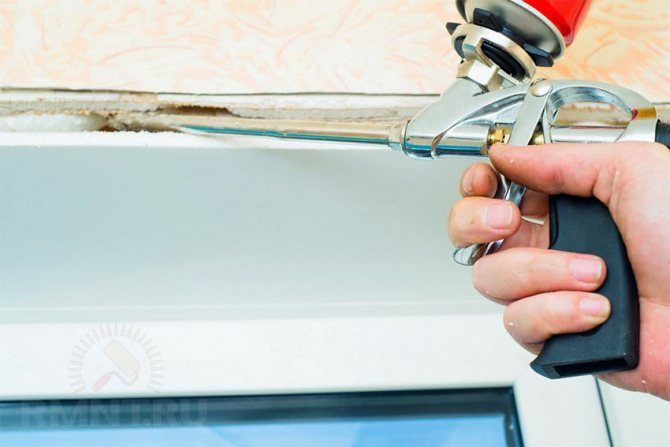
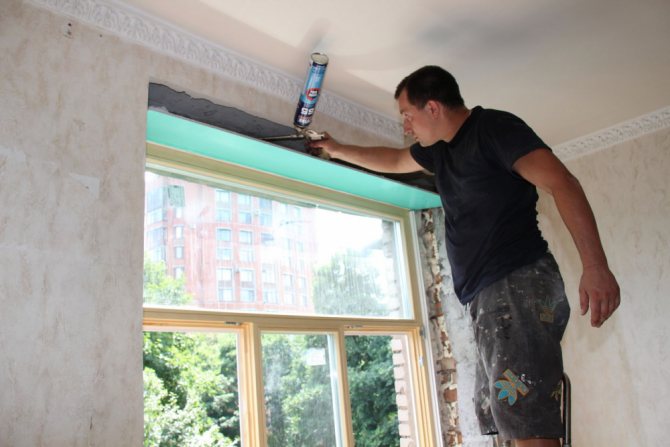
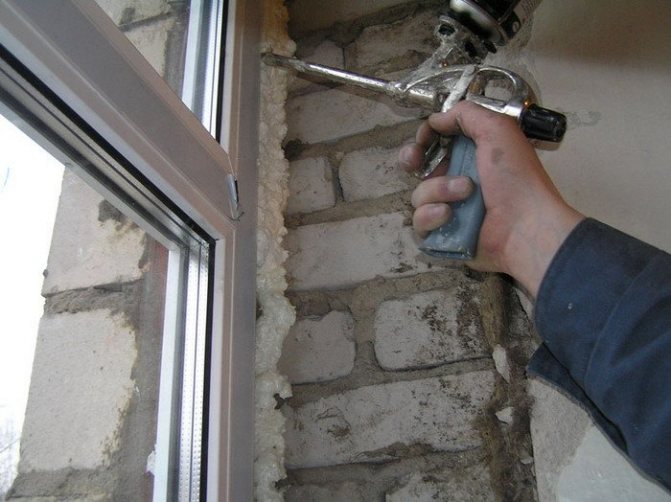
Having done such a piece of work, you will come to a very crucial part. It will be necessary to fill all the cracks and voids with foam. The difficulty is that a middle ground is needed here. If air accumulations remain, this can subsequently harm the slope. But keep in mind that the foam expands as it cures. And if you apply too much of it, it will open and deform the plastic.
Apply foam from the base of the window around the entire perimeter, and preferably in the form of lintels between the panel and the previous slope. Apply the next ball of foam to the corner of the slope, and place the previously made F-shaped profiles in the resulting space.
You can securely glue them with tape. And so that the foam sticks well to the surface, it can be slightly moistened. But not too much.
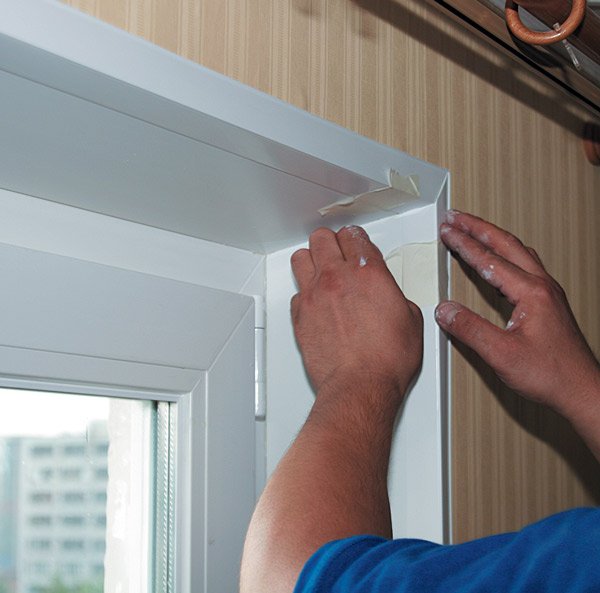
In a little less than half an hour, the foam will harden so much that everything we have done will become stable. All that remains is to seal the cracks with silicone or sealant.
The last thing that will remain is the cleaning and aesthetic moments.That is, it is necessary to close up all the flaws that most often arise near the windowsill and clean the surfaces.
A few more necessary tips that will help to cope with the task easier and much better.
- Never skimp on the quality of plastic,
- Carefully match the shades of the profile to the window, preferably in daylight,
- The panels have a special spike, it must be cut off before starting work,
- Cut the plastic exclusively with an assembly knife, or with a jigsaw,
- Choose foam with a low expansion rate, and also fix the slope until the foam dries a little,
- If you want to add extra insulation, do it before foaming,
- If the tape left marks on the plastic, remove them with a little acetone,
- The opening that will be under the windowsill needs to be plastered.
There are a lot of processes, and some require hands. But you can do everything yourself. In addition, every time you look out the window, you will understand that this is your job.
Cons and pros of sandwich panel slopes
Main advantages and disadvantages
The specified type of slopes is performed using polyurethane-based polyurethane foam, a high-quality sealant. The material is spread centrally between two small sheets of PVC construction.
Among its main advantages are the following:
- No additional processing and decoration of the surface after installing the slopes is required, because the plane has a structure that is exactly similar to metal-plastic products.
- Drywall over time is susceptible to cracking and getting wet under the influence of moisture, presented in the form of condensation. Sandwich panels for window slopes always remain waterproof and do not collapse.
- If insulation of sandwich panels is needed, then this is more likely a measure of reinsurance, because the material does not let the cold pass at all. Specialists more often carry out such activities in order to immobilize and strengthen the structure on the window.
- It is not difficult to clean the sandwich panels, dust, dirt and even coffee stains are wiped off with a cloth dipped in soapy water. If this does not help, it is allowed to use a detergent that is usually used for washing dishes, but without the presence of an abrasive substance in the composition.
- Installation is reduced to a simple and straightforward procedure, so even a beginner in the construction business can cope with the installation.
- The service life declared by the manufacturer ranges from 15 to 20 years. The slopes are not afraid of hail, strong wind and rain.
It's time to discuss the disadvantages of sandwich panels. Rather, they are associated with the low quality of the proposed material, so when buying, pay attention to the manufacturer, do not be afraid to ask the sales consultant uncomfortable questions and demand to show certification.
Pay on the quality of the panel material
It is in your interests, because low quality panels, under the influence of hot weather and high temperatures, acquire a yellow tint, which cannot be removed, and are deformed, therefore, they are considered extremely unreliable and brittle.
Much depends on the diligence and responsibility of the one who set about installing the sandwich panel slopes. Careless attitude, haste and inadequacy of installation technology can subsequently lead to the formation of voids between the panels and the window sill.
Sandwich panel slopes
The study of the internal structure allows us to conclude that the slopes of the sandwich panels are very similar to the usual plastic ones. If you pay attention to the functional component of these two copies, you will understand that their technical characteristics are also identical.
To make slopes from sandwich panels with your own hands, you will have to assemble several components of the product into one whole, namely:
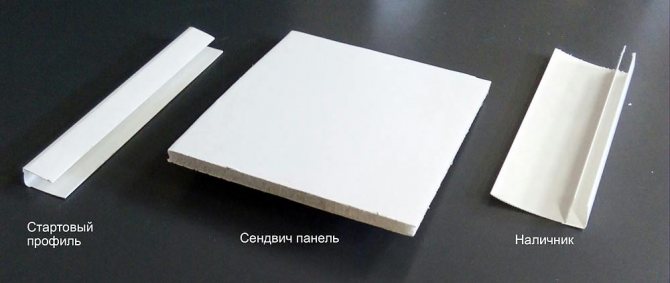
- Profile made of plastic, presented in a U-shape. Its other name is the starting profile, because it is from its installation that the installation of the device begins.Fixation takes place directly along the perimeter of the window frame, creating the desired connection of the slopes with each other and with other important details of the window.
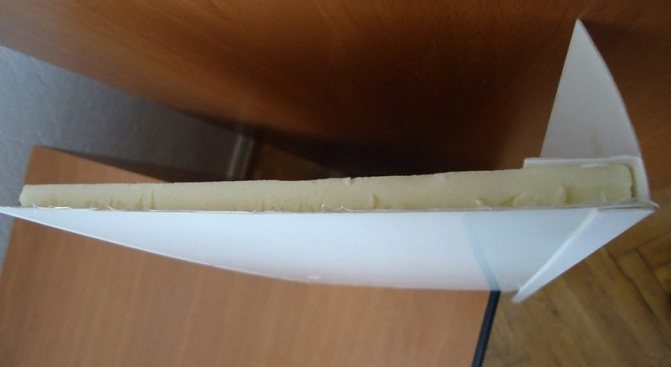
- A sandwich panel is a composite where polyurethane or polystyrene is centered between plates made of plastic. The thickness of the panel can be very diverse - from 10 to 32 mm inclusive. Which model is suitable in this particular case depends on the free area extending from the edge of the window frame to its end. Experts recommend using a universal device with a thickness of 24 mm.
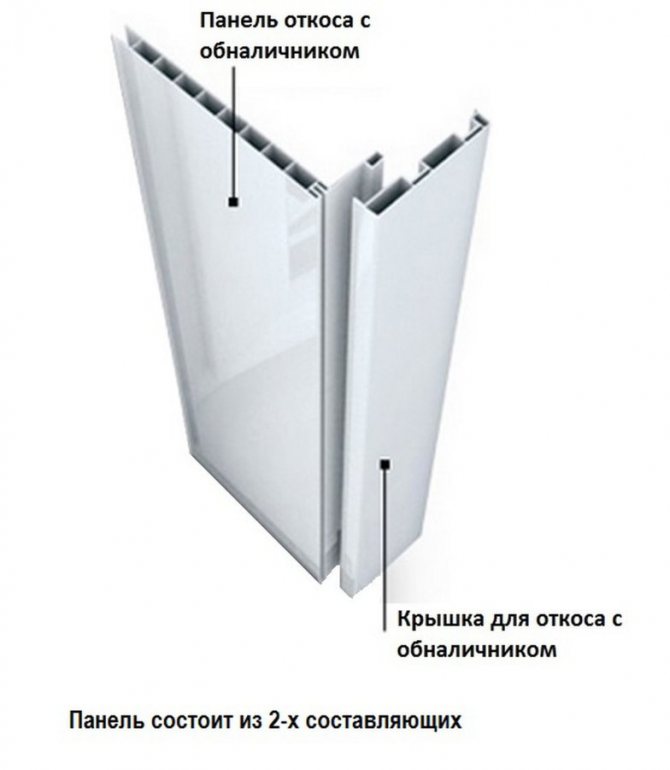
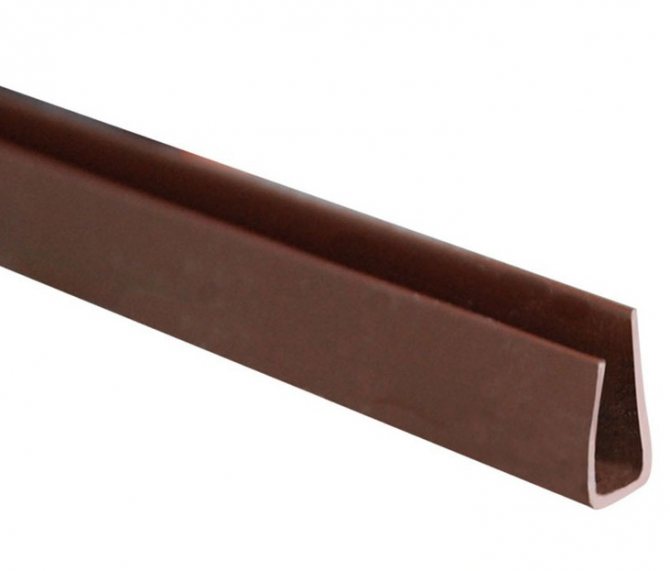
- The platband is a plastic profile that takes an F-shape. The difference from the starting profile is that the casing additionally has a protruding wide part that overlaps the joint formed during installation of the structure between the sheet and the corner of the window, which is located on the outside.
Masters use other methods of arranging sandwich panels. In most cases, brackets are used that fix the front part of the panel by attaching plastic casing like a rail. This type of slopes is called European, and the assembly process is more like a constructor, which allows you to turn the installation of slopes from sandwich panels into an easy and quick procedure.
Types of slopes, and which one is better to choose?
There are several main types of slopes. Each differs in installation mechanism, price and characteristics.
- Plaster slopes are one of the oldest. They are quite ordinary and cheap. The price can also be specified as one of the main advantages. Also on the plus side is that it's easy to do. For the disadvantages, we write down a short service life. Without additional care and protection, it has little strength. But the main drawback of plaster as a slope is poor heat insulation. Because of this, the structural integrity of the surface may be violated, condensation will appear on it. And ultimately this will lead to cracks.
- Wooden slopes are placed mainly under a wooden frame. Against the background of plastic, the tree will not always even look advantageous. Most often, beech, oak or larch wood is used. These slopes are not very popular. Firstly, they are expensive, and secondly, they are supplied with wooden windows, which are even more rare now.
- Plasterboard slopes are not particularly expensive, but need additional treatment, such as an anti-fungal coating. Then the surface must still be primed and putty. Before this, the wall should be cleaned of pieces of plaster. After the putty dries, the slope can be painted or wallpaper pasted over. But when starting to work with drywall, it is better to have preliminary skills in working with this material.
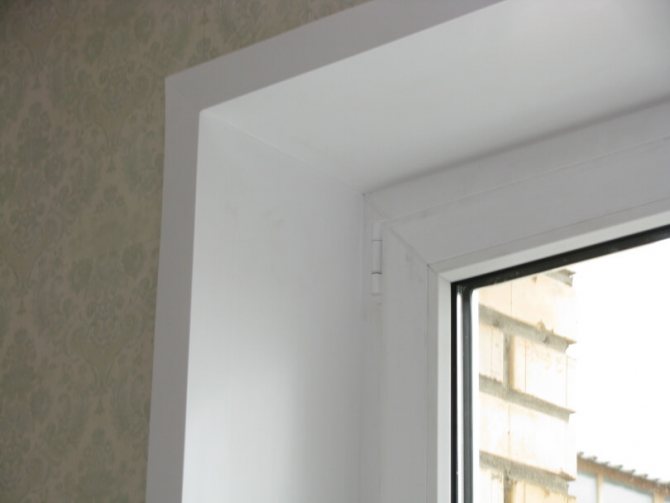
- Finally, there are plastic slopes. May deserve the title of the best choice in many respects. They are the most convenient to operate, and very easy to assemble. Moreover, they are ideal for plastic windows. If you choose the same tone of plastic for the slope as in the windows (which is very easy to do in view of the variety), they will merge into a single harmonious structure. Another advantage of high-quality plastic slopes is their resistance to external influences: ultraviolet light, temperatures, not critical mechanical damage. They also retain heat well and isolate sounds well. No liquid building materials are needed to install the plastic. And for everything about everything 3-4 hours are enough.
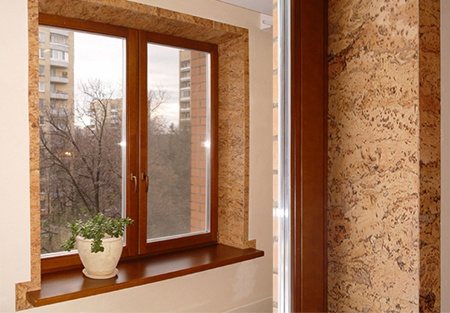
- There are more interesting options for sheathing slopes. For example, cork panels. They are made of cork oak, and will suit an interesting interior. They are, of course, absolutely environmentally friendly, have an exotic look, are interesting to the touch and are presented in a fairly wide range of colors.
How to finish window slopes in accordance with GOST 30971
As such, there are no slopes in GOST, but there are types of nodes, which partially include these elements. There are some types of solutions in the recommended Appendix B. We remind you that slopes are decorative elements that cover the inside of the window opening from above and from the sides. GOST recommends making it out of plaster or moisture-resistant drywall. There is also an option with insulation, which can be covered with ... anything?
Let's see how this or that finishing option can be bad in order to find the right one among them.
- For example, in figure B.2a of the standard, a variant of the assembly of the junction of the window frame to the quarter with a slope made of plaster is shown. We see that the insulation layer is surrounded on both sides by a vapor barrier material. From the inside it is a self-adhesive film, and from the outside it is any plastic compound that meets the requirements. The frame is fastened to the anchor by drilling through the profile. We see that it is proposed after that to simply apply the plaster at an oblique angle, and you can calm down on this. What is the trouble here? There are even several of them. First, the coefficients of thermal expansion of plastic and concrete do not match. For plastic, the value is much, very much (5 - 6 times) higher. Therefore, at the border of the formed seam near the frame, after some time, a crack is guaranteed to form. And no matter how you close it up, it will not give an effect. In addition, any plaster is not very durable or abrasion resistance. As a result, in places of collision with an open sash, pieces will soon begin to break off, and anyone who accidentally leaned against it will scrub their clothes for a long time. But that's not all. Anyone who has tried to level the wall with putty or other building mixture knows how difficult it is to do it purely technically, even with free access. This means that the plaster slope is guaranteed to come out wavy. And it will be noticeable from the outside. And it is very difficult to maintain exactly right angles. Consequently, the slope will probably also be slightly crooked. Well, since most people put the windowsill also made of plastic, like the frame (and not made of artificial or natural stone), then soon cracks will also form above the expansion gaps at the ends. No matter how silicone you are, it is almost never taken on the plaster.
Warming in this case is carried out in any available way. By the way, PVC fabric can be decorated beautifully from all sides: from a window, a window sill, a wall. Another thing is that it is not always possible to do this with your own hands, and sometimes you have to place an order. The downside is the relative vulnerability of such a technical solution to sharp objects. Well, and, of course, you can lose the warranty, because the installation is not in accordance with GOST.
Installing plastic slopes with your own hands
You will have to free up quite a lot of space in the room in order to comfortably fit and place all the necessary materials. In the process of preparation, purchase and prepare everything according to the list:
- Plastic for slopes not thinner than 8 millimeters,
- U-shaped and F-shaped profiles,
- Starting strip,
- Insulation, can be either foam or cotton wool,
- Reiki and level,
- Roulette,
- Drill and self-tapping screws (some are about 95 mm long, others 4.5 mm),
- Spatula and scissors for metal,
- The stapler, of course, not a clerical one,
- Assembly knife,
- Mortar with cement and silicone sealant.
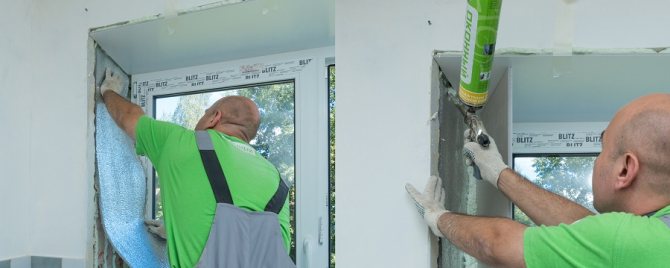
Before starting work directly, you need to bring the wall to the desired form. They need to be cleaned of everything: wallpaper, pieces of plaster, paint. Strong recommendation to walk on the wall with an antifungal solution.
Be sure to look out what's going on from the outside. All cracks must be covered with cement mortar. If the integrity of the external seams on the outside is broken, the UV foam will suffer, and the strength of the seam itself will be in question.
Step-by-step installation
- Prepare the slopes for finishing - clean, level.
- Before cutting the sandwich panels for the slopes, carefully measure the dimensions of the window, markup on the sheet.
- The material is cut out with a cutting tool according to the basting. The temperature when performing work is not lower than + 5 °, in order to exclude chipping of the material at the cut.
- Installation can be carried out both with the use of special profiles (starting P and F), and without them. The profiles are attached along the perimeter to the window profile with self-tapping screws. Sandwich sheets are inserted into the grooves, fixed to the wall with mounting foam, and fixed with masking tape.
- When installing a sheet without a profile, its edge is inserted into the gap between the wall and the window frame to a depth of 1-1.5 cm. Further actions are the same as when using profile fasteners.
- After the foam hardens, the joints are sealed and a decorative plastic corner or F-profile is attached.
Affordable price, lightness of material, ease of installation and ease of use made it possible to use sandwich panels very widely in the decoration of window openings.
Source: kvartirnyj-remont.com
What steps need to be taken to install plastic slopes yourself
This is no longer a preparatory stage, but the installation itself does not begin with screwing the rails. At the window openings, where the future slope will be, a rail is placed. For this we need the aforementioned longer screws.
They should not stick out from behind the edge of the wall. Insert the screws into the holes previously prepared with a drill. And do not screw them all the way in until you have checked that they are perfectly flat. For this, we previously stocked up with a level.
Only after careful checks, drive the screws completely.
Step one is the starting strip.
The starting strip must be taken u-shaped. It should be screwed on with bugs along the outer edge of the window. Make sure that the stripes dock evenly. If there are irregularities on the cut, they are removed with a previously prepared knife. Also, do not damage the groove on the profile, it is into it that our slope will later be driven.
Step two - F-shaped profile.
This profile is mounted strictly against the groove of the starting strip. Rather, the groove of this profile. We do not need anything that goes beyond the window, and we remove it with a knife.
When working with a profile, first leave the ends with a margin at the top. Only by double-checking the correctness of the docking, the remnants can be removed. To do this, use metal scissors.
Fastening to a wooden rail is carried out with a stapler. It is most convenient to pin on the part of the end of the profile, which is closer to the wood.
Step three - plastic panels.
We will even start writing with the fact that you first need to take measurements, and after checking the measurements again, proceed to cutting the slope. This plastic will need to be driven into the grooves of our profiles.
If you decide to additionally insulate the slope with cotton wool, you also need to work with it at this stage. Needless to say, the quality of the insulation also needs to be monitored.
After placing the panels, slight gaps at the joints may occur if they have not been measured exactly to the millimeter. Don't worry - use a silicone sealant.
The fourth step is sealing the seams.
Liquid plastic will not be superfluous in this installation process. Basically, preference is given to the "Cosmofen" option. They need to process all seams and joints for complete tightness. Remove unwanted splashes and drops from the surface immediately. After finishing the installation, clean all surfaces.
Step five - for those who install sandwich panels
Sandwich panels are mounted slightly differently. We install the starting profile, as in the first version, but then already measured and cut panels are introduced into it. And the free side is screwed directly to the wood rail with self-tapping screws. This should be done diagonally.
Only then the F-shaped profile is placed, and the seams and joints are sealed. You can also do without a start profile. In this case, the sandwich panel is placed directly on the foam.To do this, make a slight indentation in it along the entire perimeter.
This and all the differences from the instructions above.
But it will not be superfluous to leave a few more tips:
- Always place the top slope first,
- Do not overdo it with the amount of polyurethane foam, which swells and can deform the plastic,
- Only quality, no savings,
- Do not remove the film on the window until you have done everything,
- Do not "disturb" the slopes for at least 12-16 hours so that everything dries up and hardens,
- Only after studying the whole process and understanding it - proceed with the installation.
The essence of voluntary certification
As mentioned above, some companies that monitor the image of their products undergo voluntary certification in order to obtain a certificate of conformity for it. The certification process indicates not only ambitious intentions, but also the quality of the products. From the date of receipt of such a certificate, all relevant products must be manufactured in the same way with an approved quality system.
At an enterprise with such a certificate, first of all, there must be a strict order. Each department that takes part in the production process is expected to fulfill its responsibilities precisely. The presence of the slightest disagreement is unacceptable, all employees should clearly carry out their work in strict accordance with the received documentation.
Also, in order to comply with these rules, there is a kind of control department, the work of which is a supervisory function.
Thanks to this approach, there are almost no deviations from the developed certified system, and if, nevertheless, any discrepancies in quality are found, then depending on the reason for the deviation, their importance, the product or material is sent for processing
The functions of the control department do not end there, its competence also includes - to control the quality indicators of all purchased raw materials, which are used for the manufacture of certified products. The described activities are carried out within the company. In addition, on a mandatory basis, the company is sent for inspection once (or twice) a year to the supervisory authority that previously issued a quality certificate.
If, during the passage of such a check, any inconsistencies in the technological process that are spelled out in the previously issued certificate are found, they are brought to the attention of the company's management, the control department of the manufacturer's company, as well as directly to the contractor. After that, the manufacturer is given a certain time to eliminate the defect, and after this period, the company is re-checked. In case of successful completion, the manufacturer receives an opinion on the conformity of the product with the requirements of GOST.
Many enterprises operate under this voluntary certification scheme. Firms engaged in the production of sandwich panels can do the same. Firstly, it is a huge advantage over competitors. A manufacturer who has a quality certificate for its products is always at a level higher than an ordinary non-certified product. And, secondly, it is the presence of such a certificate for products that plays a decisive role in the selection of companies for public procurement.
This is worth knowing when installing plastic slopes yourself.
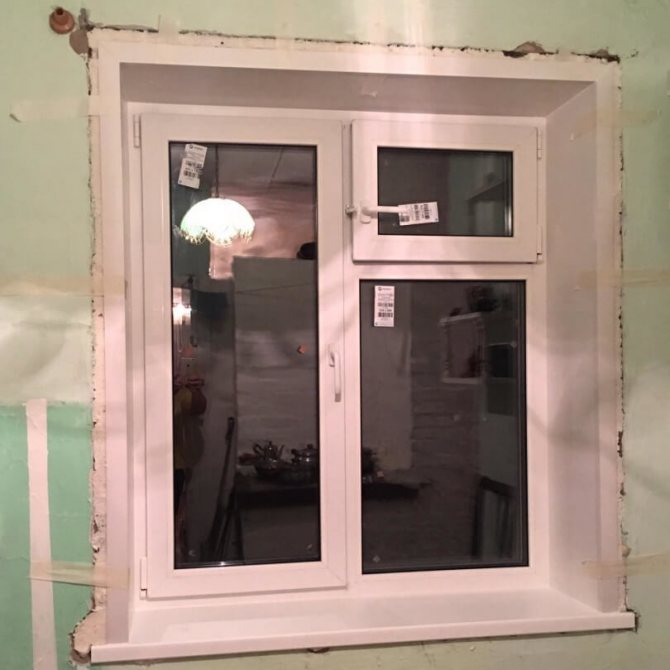
If you decide to install, or have already installed plastic windows, the next moment will be the slopes. Window slopes are, in fact, the walls of a window niche. A window sill is installed on the lower one, and slopes on the other three. These are the so-called internal, and there are also external ones, which are installed from the street.
Self-assembly of internal slopes will be discussed below.
It is a mistake to think that a window inserted "into a bare wall" perfectly insulates heat and sounds.This will be exactly as long as the unprotected polyurethane foam does not collapse under the influence of ultraviolet radiation and rain. To prevent this from happening, they put slopes.
If such an element is made using quality material, and in compliance with the desired mechanism of action:
- The slope will protect the assembly seams,
- Strengthens sound insulation,
- Reduce heat loss
- Prevents fogging.
For example, if there are no slopes, or they are not well-mounted, the room will lose up to 40 percent of the heat.
Plastic panels for window slopes - is it worth trusting?
For many years, external and internal slopes in houses and apartments were finished with plaster, then drywall appeared, which was also adapted for these purposes. The question arises: why reinvent the wheel? Believe me, it makes sense. With the advent of PVC windows, plaster and drywall were far from the most convenient options.
Plaster slopes have quite a few disadvantages. They take a long time to make, create a lot of dirt and dust, crack due to shrinkage processes and changes in temperature conditions, and most importantly, the components of the plaster do not create the necessary adhesion to the plastic, which is why slopes can peel off from PVC windows over time.
Drywall allows you to make the slopes faster and warmer. However, even the moisture-resistant type of this building material does not withstand frequent temperature changes and constant exposure to condensation for a long time. In addition, plasterboard slopes must be painted or putty, or better, both.
The plastic version, especially in combination with plastic windows, looks much more attractive. But the appearance is far from the only advantage of the panels.
- The panels are made of the same plastic as the window frame, due to which the space near the window looks solid, as a single and monolithic structure.
- The panels are easy to insulate by laying heat-insulating materials and vapor barrier under them. With proper insulation, the appearance of condensation is minimized. Most types of thermal insulation also have a high coefficient of sound absorption and sound insulation.
- Installation of plastic panels creates a minimum of construction waste and noise, and takes a minimum of time.
- They can be used both outdoors and indoors.
- Impervious to moisture.
- They have a long service life without changing parameters.
- They tolerate temperature changes, have a minimum value of thermal expansion.
- Plastic products can be washed as many times as you like, using any household chemicals.
Of course, even in a barrel of honey there is a fly in the ointment. In the case of plastic panels, this "spoon" is the impossibility of partial repair - in case of damage, the entire panel will have to be replaced. However, modern slopes are not so easy to damage.
How the installation depends on the selected material
Slope plaster.
We can say that this is an old method of finishing. Plaster is cheap and not very difficult to apply. But it has too many negative qualities.
It cracks, crumbles, changes color rather quickly. With a sufficiently strong physical impact, for example, the subsidence of a wall, it can completely fall off.
The term for finishing the slope with plaster is calculated in weeks. The reason for this is the need for the material to dry. Since plastering is done in several layers, sometimes with a mesh between them, you need to wait until each layer is completely dry. Then prime and paint.
Will not protect the plaster from heat loss and condensation of drops on windows. And without the right skills, there is a risk of making the surface curve.
Plasterboard for slopes.
Drywall in comparison with plaster is gaining more points. It will last longer and it is stronger. And if you supplement the material with mineral wool for insulation, good heat retention will appear.
But the big disadvantage of the material is the hostile relationship with water. For external work, he is categorically suitable.And the rooms should also not have high humidity.
Not in favor of drywall is the need for additional treatment with a primer and paint. Manufacturing and installation also take a lot of time and skills.
Step-by-step installation guide
Preparatory work
To install sandwich panel slopes, you need to arm yourself with the right set of tools and materials. Useful for work:
- Sandwich panel.
- P-profile, which is the starting one.
- F-profile is the so-called device cover.
- Liquid plastic (preferred).
- Construction tape.
- Sharpened knife.
- Self-tapping screws 2.5 * 7 mm.
- Several screwdrivers with different tips, the drill can be replaced with a screwdriver.
Armed with a tape measure, measure the length and width of the slopes, this is the main reference point that determines the final dimensions of the sandwich panels for the slopes. Taking these values into account, cut out several strips with a knife: one will be located in the upper part of the window, and the remaining two will be on the sides.
Now let's talk about how to properly cut the elements of the sandwich device:
- The width of the elements is set 10 mm more from the initial measurements of the window, this will provide a tighter contact with the frame.
- Around the window frame, directly in the hardened foam, cut a hole, the depth of which is 100 mm and the width is 1 mm.
- At the edge where the sandwich panel will be located, measure 10 mm and draw a line. Cut the material strictly along the line, but only grab the upper and insulation levels. How to cut a sandwich panel for slopes? You do not need a special tool for this, you can do with an ordinary kitchen knife.
- Cut from the end, remove the excess layers.
If the finishing of the slopes with sandwich panels is planned in one place, you can try to save money and buy ready-made, cut strips without purchasing a solid panel.
The main part of the work
After preparing the necessary tools and materials, we move on to the main part of the slope installation process. First, we install the frame:
- We carefully process the window frame - we get rid of excess foam, go through the structure with a cloth to clean it of dust and debris.
- We distribute the vapor barrier material over the entire area of the slopes. If you want to insulate the openings even more, use foam strips.
- Using a brush, aerosol or directly from the tube (depending on the packaging), apply an antiseptic agent to the coating, which will protect the window in the future from the appearance of mold, the growth of fungi and other harmful substances.
- Focusing on the inside of the device, following the perimeter, install the lathing made of wood. The dimensions of the rack material are 20 * 40 mm. The rail is fixed with dowel-nails. Observe a distance of up to 40 mm. In the areas of the seams where the side and top battens of the crate dock, lay a gap of 10 mm or more - it will be needed to install PVC elements on the slopes at the top. If the frame cannot be secured, the sandwich panel cladding is fixed with foam.
Outer strips overlap
Panels are always installed from the top of the window frame, going to the bottom. Place the protruding element in the formed groove so that the part fits snugly against the window. Fill the free space with a material that will maintain the temperature and insulate the window structure from drafts, for this it is better to use isover.
The outer side is fastened using self-tapping screws, check the correct position of the upper trim using the building level. The side slopes are trimmed with special edging.
Main types of materials
PVC slopes on plastic windows
Doors, windows, loggias and balconies are decorated with different panel-type materials. The main types are:
- MDF panels.
- Plastic wall panels.
- Sandwich panels.
MDF for windows is not often used, as a rule, they are used for revealing a door, it is used as a cladding. MDF panels have their own characteristics:
- Slopes require meticulous work. Moisture can enter through cracks and crevices, which means that everything must be carefully sealed.
- The size of the panels is factory-made, due to which it will not be possible to use MDF everywhere. If the width of the slope is large, then MDF will do.
- Small selection of colors and textures.
- Plastic windows will not always be combined with MDF.
It is better to use the material by carefully considering the interior in the house. It goes well with wood or woodgrain materials.
Advantages of PVC slopes
Plastic slope panels are the most popular choice of people. They have many advantages:
- The material is cheap compared to other types.
- Installation is simple, even without experience.
- The choice of colors is huge, so you can choose for any design inside or for the facade of the house outside.
There are also difficulties during work:
- If the slope is more than 25 centimeters, then additional clamps are placed, otherwise the cladding will "walk".
- It is recommended to use insulation, because insulation will not allow the cold to pass inside the house.
- Plastic panels are easily damaged.
Despite the disadvantages, plastic panels for slopes are an excellent option for window decoration. Cutting, installation and insulation is very simple, the look is decent. Sandwich panel slopes are a type of plastic material, but the characteristics of such raw materials are better, of course, this differs in the price of the product.
PVC sandwich panels for slopes
Sandwich panels for window slopes have their own characteristics:
- The product is made of two pieces of plastic, and there is already insulation between them. Due to this, there is no need to insulate the slopes.
- Installation work does not require large financial costs, the main thing is to calculate everything correctly and install the slopes carefully.
There is also a drawback of sandwich panels for slopes - if the sealing of the window is poor, moisture begins to penetrate, the material will deteriorate and collapse, in other words, it will exfoliate. Other panel elements can be found on sale:
- Natural wood, distinguished by its high cost and complexity of installation.
- Composite panels based on gypsum, coated with PVC.
- Metal panels are used more often outside and require certain knowledge when installing slopes.
Although the materials are different, their installation instructions are almost always the same.
Slopes from PVC panels and PVC corners (video)
fprofile and its scope

Installation of slopes on PVC windows
For full cladding with pvc panels, various additional elements are used, which help to perform the installation efficiently and correctly. fprofile is one of
of these elements, which outwardly looks like a bar, the cut of which resembles the letter "F". The ends of the plate, during installation, are securely fixed in the grooves of the profile. The F profile serves two functions:
- Decorative design of the ends of the finish
- Common plane alignment
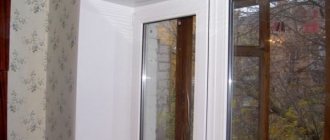
Ready plastic slope
The f-shaped profile is the finishing cladding of the window space, which accompanies the good adhesion of the pvc panels to the walls. It can also be used for doorways. The ease of use of the f strip is due to the fact that its installation does not require the use of an adhesive solution, as is the case with an eraser corner. That is, when I glue the wallpaper, I just need to remove the f strip from the slope, and after the pasting is complete, insert it into place. Using the f profile, not only pvc panels are joined, but also planes of unequal materials. If you use it as a starting profile, then one side of it will press against the wall, and the other against the slope. During the do-it-yourself finishing, the F-shaped profile is easy to cut into the desired strips. To do this, you can use a hacksaw for metal, a grinder or a paper knife.
I have highlighted a sufficient number of advantages of the f pvc profile:
- Does not turn yellow for about 10 years and is lightfast.
- Elastic and not fragile.
- Contains a minimum amount of chalk.
- It has a semicircular tail that fits perfectly even on curved walls.
- Chips and cracks do not appear after cutting the plank.
- Easy installation without glue.
Two-sash window with a vent into a panel house from a 5-chamber profile
I liked that the profile can be used for both pvc and sandwich panels. Being versatile, it is able to serve for a long time.