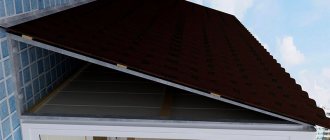
Balcony vapor barrier - is it needed for insulation? Today, the insulation of the loggia and the balcony has become a fairly popular topic for discussion, as well as an excellent way to keep warm, especially when it comes to panel houses and low-rise brick buildings. The insulation procedure itself does not cause problems, since the installation of thermal insulation fits within the framework of the presentation of the heat preservation mechanism.
Is vapor barrier another matter, since in the issue of combating condensates of water vapor, everything is not as simple as it might seem at first. For this reason, before you start laying, insulate yourself on the balcony, figure out whether a vapor barrier is needed when insulating a balcony, if you choose only high-quality insulation materials for insulation.
Preparing the balcony for insulation
The crumbled grout is cleaned out and the holes, crevices and cracks are blown out with foam. Moreover, it is recommended to fill seams with a width of more than 6 cm gradually - in several stages.
Irregularities are eliminated on the surfaces of walls and ceilings. Dust and significant contamination are removed
The floor is thoroughly swept (it is better to vacuum it). If there is electrical wiring on the balcony, it is important to make sure its integrity
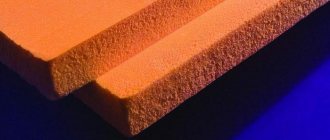
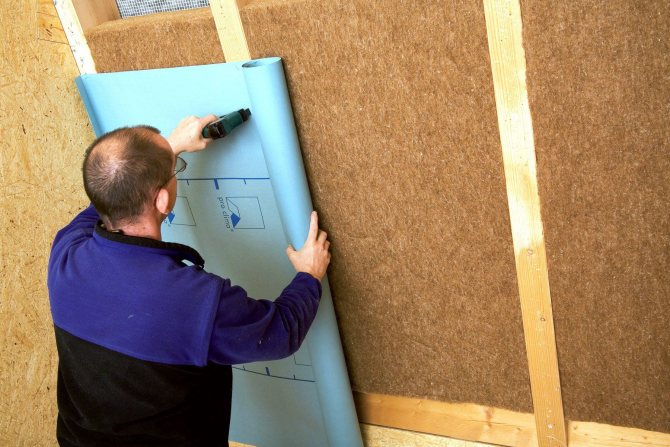
To insulate a balcony with penofol, you will need the following construction tools and materials: a drill, a knife, self-tapping screws, a stapler, disc dowels, polyurethane foam, wooden bars and slats, polystyrene, foil tape, penoplex and others.

Pros and cons
With all the advantages of a modern foam-based insulation, professionals still advise using mineral wool to insulate balconies. This is due to the following advantages of this material:
- Better insulates the room from street noise.
- Does not require a perfectly smooth surface of the walls that need to be insulated.
- Combines with breathable materials such as wood. Therefore, the open balcony can be sheathed with clapboard before installing it.
- Resistant to high temperatures and does not burn when in contact with an open flame.
- When properly installed, minimizes the chance of accidental cold bridges.
- Provides weak convection and prevents long-term accumulation of stale air.
Mineral wool also has disadvantages, compared with foam and similar materials based on foam:
- Thermal insulation properties are lower by 10-15%. Therefore, for similar indicators, it will be necessary to install a slightly thicker layer of material, which negatively affects a decrease in usable space.
- The total mass of the thermal insulation coating is 2 times more.
- The installation process is more demanding in terms of experience and skills.
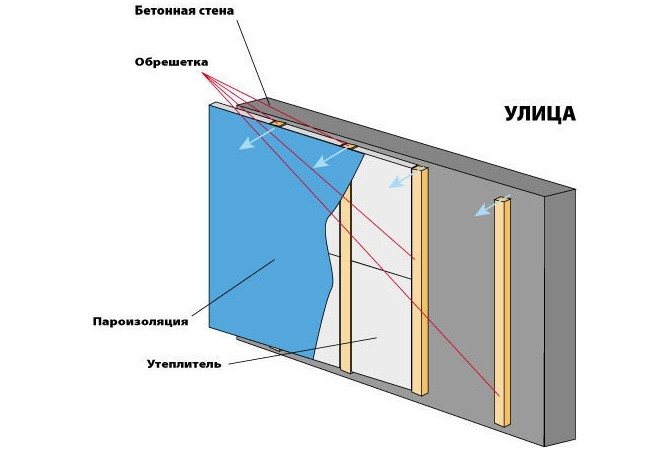
- The installation technology requires an additional installation of a vapor barrier film.
- The material is a source of dust harmful to breathing, therefore, it becomes necessary to use respirators for working with it.
- More stringent technological requirements, since their violation can lead to irreversible loss of thermal insulation properties and the ingress of harmful dust into the living quarters.
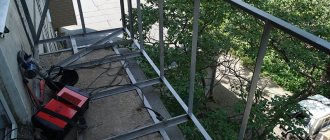
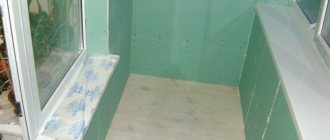
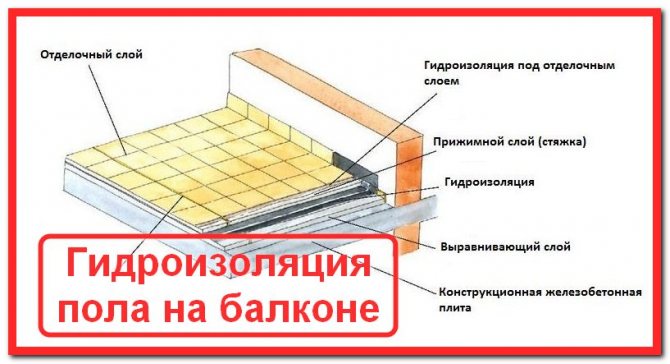
How to prepare a balcony for waterproofing
Arrangement of a moisture-resistant barrier begins with the preparation of the protected surface.
Moreover, the preparation of the balcony for applying a layer of waterproofing can be divided into two stages:
- Preparation of horizontal planes.
- Preparation of vertical planes.
The horizontal preparation stage begins with the dismantling of the weakened sections of the main balcony slab. Moreover, loose inclusions are broken open with a jackhammer, and cracks are expanded with a grinder. After that, the entire surface is cleaned with a wire brush. Indeed, the waterproofing of the main balcony slab involves the penetration of the insulating composition into the very structure of the concrete. And for this it is necessary to destroy all the fat and paint and varnish membranes that prevent the contact of the insulator with the capillaries of the plate.
The stage of preparation of the horizontal line ends with the formation of a new slope-forming layer. To do this, pour over the cleaned slab a concrete screed with a thickness of no more than 3-4 centimeters and a slope of 1-2 degrees (from the wall to the railing).
The vertical planes are prepared after the slope-forming layer has hardened. Moreover, waterproofing on a balcony or loggia involves the arrangement of a hydrophobic barrier, both on the surface of the wall to which the enclosing structure adjoins, and along the perimeter of this architectural element (from the inside or outside).
Therefore, in the process of preparing the vertical, the same softened areas of concrete are removed, cracks are sewn up and a fence is formed (or renewed) around the perimeter of the balcony slab.
At the end of this stage, the vertical plane is re-plastered or simply filled in the embroidered cracks with fresh cement patches.
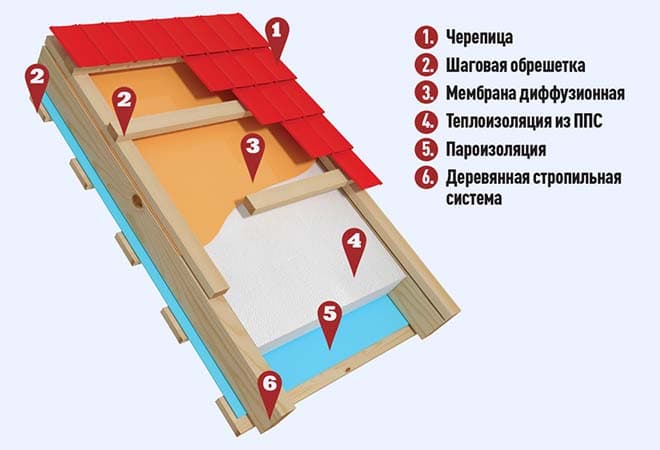
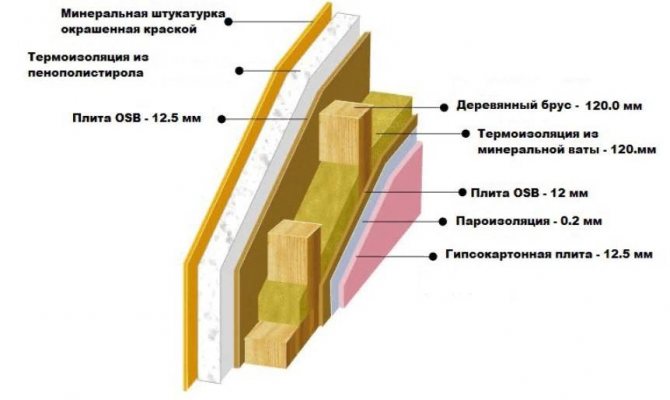
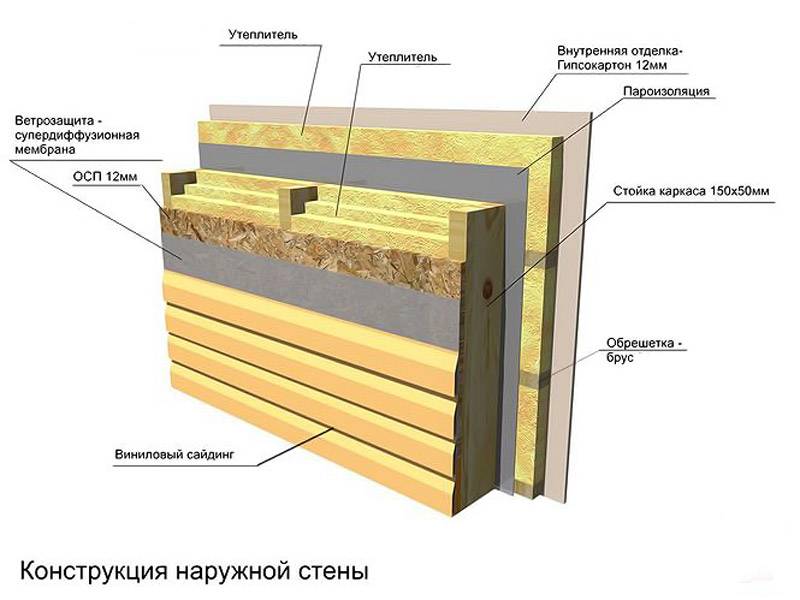
Insulation of cold attic floors: materials and methods
To understand why the insulation of a cold attic floor is needed, let's clarify a little why an attic is needed in a private house and what is its purpose. Our ancestors built houses that could last for over 100 years, while inside it was warm and the wooden roof structure was always dry.
Previously, they mainly built gable roofs with a slight slope of the slopes. This was done so that the snow could remain on the roof in winter. Thus, snow was used as a natural insulation. One or two windows were made in the attic and kept closed in winter so that the trapped air would act as a heat insulator. In the summer, a somewhat different situation took place. The attic windows were opened at night to cool the air, and during the day, in hot weather, they were closed so that the air would not get too hot, thus regulating its temperature.
When snow fell in winter, it lay down on the roof as a continuous cover, at the same time becoming a natural insulation. Even in severe frosts, the temperature in the attic did not drop below zero. Thus, the air in the attic and the insulation of the floor allowed maintaining the temperature in the house at + 20-25 ° C. The roof slopes were not insulated so that the snow on the roof would not melt. The rafter system remained open, making it possible for it to be inspected and repaired if necessary. Therefore, in a cold attic, only the ceiling is insulated.
Now it remains to find out how to insulate the attic floor in a private house, and what materials are used for thermal insulation.
Insulation installation
Despite the ease of installation and versatility, when insulating a loggia with penofol, all technical conditions and instructions for use should be observed. Only in this case is it possible to create an effective thermal insulation circuit. For the installation of penofol, see this video:
Like any finishing work, the installation of heat-insulating material begins with preparatory work.
Surface preparation
First of all, it is necessary to seal up all cracks and through holes in the balcony structure using polyurethane foam or putty. Then the surfaces are cleaned from loosely adhering finishing elements - bubbling paint, crumbling plaster, etc. If necessary, too large flaws in the walls can be repaired with plaster.
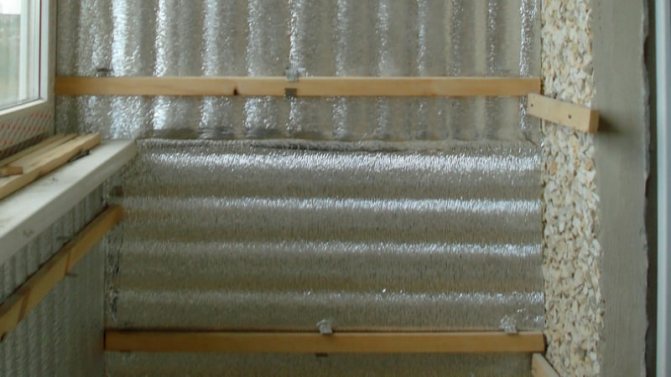
Wall insulation
When installing the material, it should be remembered that the main working element in it is isolated air bubbles. Therefore, in no case should it be allowed to reduce its internal volume, to compress the foam sheet. For this, it is even recommended, after fixing it on the wall, to create a crate of thin slats on top of it. This will prevent the inner lining of the balcony (drywall, chipboard, plywood) from pressing too tightly against the insulation. Penofol is attached to the walls with liquid nails, self-tapping screws or plastic dowels - "fungi".
The rolled material is simply cut into sheets of the desired size using simple scissors. It is recommended to mount such sheets in two layers, with the second layer offset relative to the first. Thus, a greater tightness is achieved due to the overlapping of the joint seams.
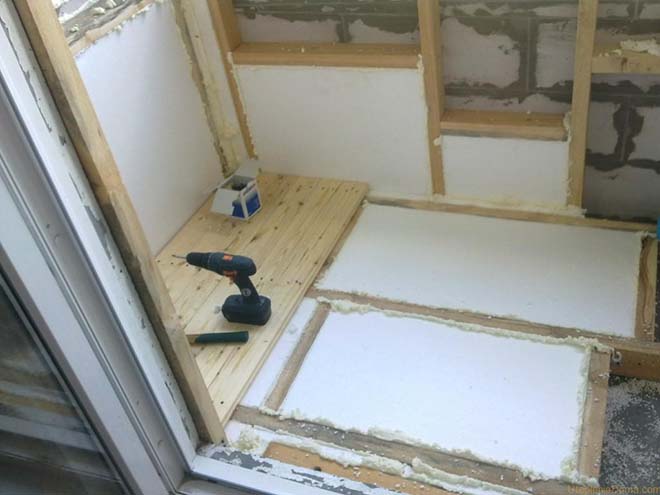
Floor insulation
For effective insulation of the supporting balcony slab, a complex option should be used, consisting of a wooden lathing, polystyrene (as an option - penoplex) and foam sheets. This is due, again, to the fact that it is not recommended to crumple penofol, reducing its thickness. With the help of dowels, we attach the slats or bars to the concrete slab. Then we fill the gaps between them with pieces of foam, and already on top we lay the foam sheets with foil up. We glue the joints between the sheets with tape, and cover them with plywood. As a finish, any floor covering is laid on top of plywood - laminate, linoleum, tiles.
Ceiling insulation
Another mandatory stage of balcony insulation is the installation of insulation on the ceiling. Many owners neglect this, but a lot of heat can go through the top plate. This is especially noticeable if the neighbors' balcony above is not insulated. Also, condensation and frost may form on a cold concrete slab of the ceiling, which ultimately leads to the appearance of dampness, mildew and mildew.
Initially, a frame should be built from longitudinal slats, which are attached to the ceiling plate by means of dowels. Then sheets of penofol are attached to it, in two layers, with an overlap with an offset of the joints. On top of the insulation, a second layer of slats is attached, but already in the transverse direction. This layer of lathing will serve as the basis for attaching decorative cladding - plastic panels or drywall sheets. For the choice of foam foam and its analogues, see this video:
Due to the fact that penofol is a very technological and functional material, its installation will not cause any difficulties even for a non-professional. The interior decoration of a balcony or loggia with this material will allow you to turn them into a full-fledged living space, protected from any external influences - cold and heat, dampness and dust, noise and exhaust gases.

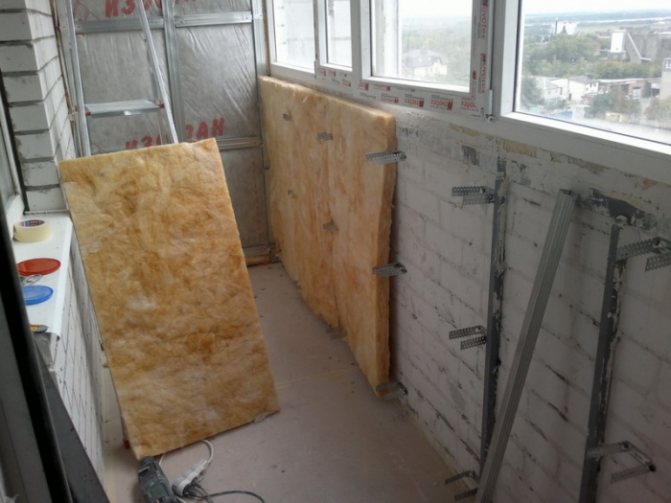
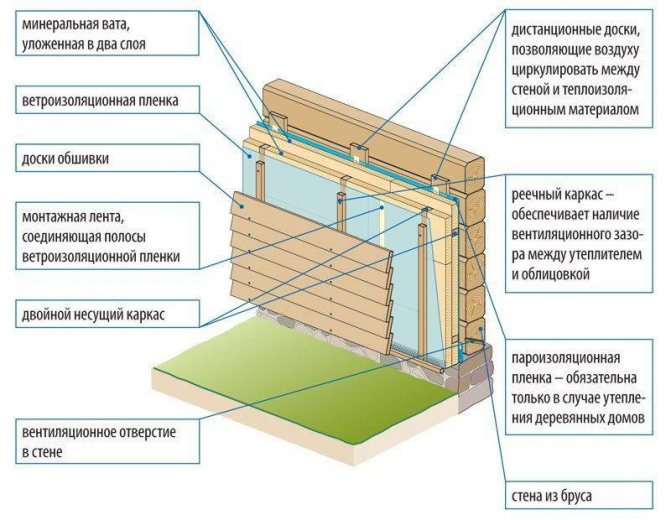
Types of mineral wool and their features
Complete insulation of the balcony with mineral wool does not always help to make a new room warm and cozy. For this purpose, stone or basalt wool is better suited for interior decoration. Its fibers are created from molten rocks and held together with a special synthetic compound that does not emit harmful substances in dangerous quantities. The thermal insulating properties of such a material are the highest compared to cheaper options - glass wool and slag.
Can glass wool be used to insulate a balcony? Despite the low cost of this tool, insulation based on it will not be able to make a new room completely residential. Even a thick layer will still allow cold air to pass inside, and glass dust will definitely get into the atmosphere.
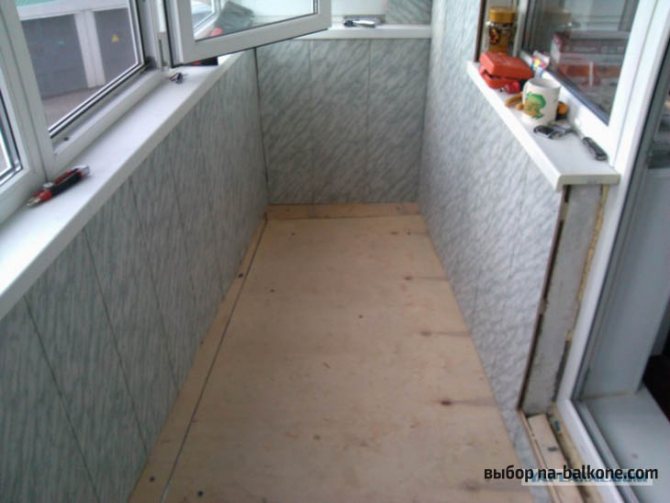
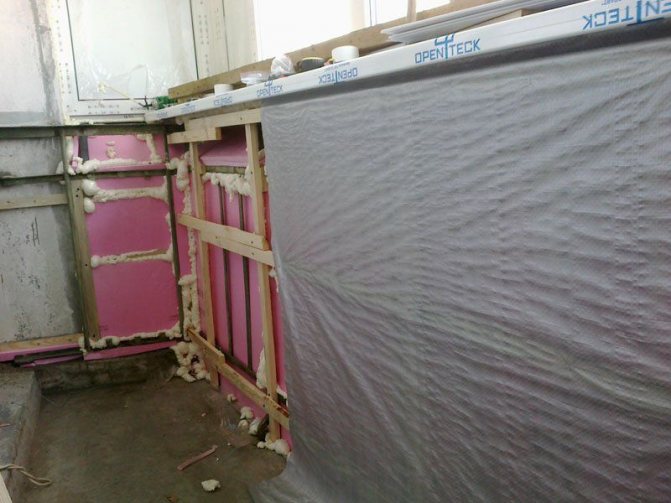
Preparatory work
Before starting the main work, it is necessary to prepare two types of surfaces: horizontal and vertical. The first thing to do is to inspect the ceiling, to determine the places of leakage, traces of mold, destruction.It is these areas that will have to be cleaned of plaster residues, covered with sealant.
It is necessary to remove the coating from the floor, to determine the areas on which the concrete crumbles or flakes off. They should be processed with a perforator, cleaned of dirt and dust.
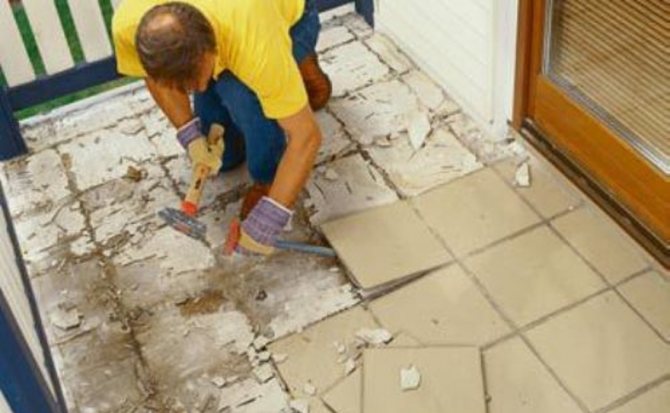
Fig. 3. Preparatory work.
Small cracks are expanded with a grinder, the floor is cleaned again. If the reinforcement is exposed, it is necessary to remove rust from it, then apply an anti-corrosion compound. The concrete is repaired with a cement mortar applied with a slope of 1-2% to the parapet.
After the mortar on the floor has completely dried, part of the concrete that has peeled off is removed from the walls, the fence is updated or changed. Concrete patches can be applied to the walls, but it is better to plaster all the surfaces. If glazing and insulation are planned after repairs, it is necessary to make a base from foam blocks in place of the railing (parapet).
Roof and walls may require external treatment. Surfaces are prepared in the same way as from the inside. Large cracks are filled with polyurethane foam, small ones - with sealant. The concrete roof is covered with a penetrating compound.
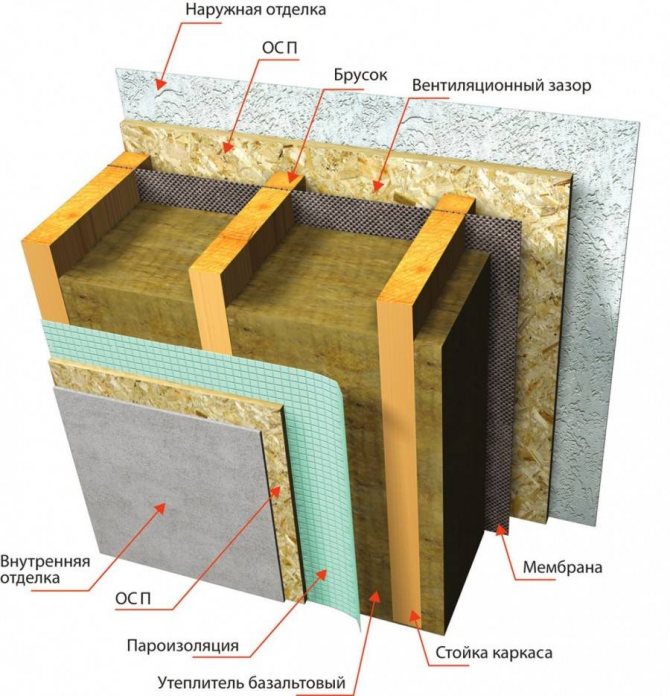
Specificity of insulation technology
To the question of how to insulate a balcony with penoplex, there is a fairly simple solution, which involves the usual gluing of fairly light insulation boards on the floor, ceiling, walls and parapet. Such plates are glued with polyurethane foam, and additional fixation of these plates is carried out using special disc dowels, they are found in different sizes and are selected individually for a specific insulation thickness and wall material.
Polyurethane foam, which is used to process the joints between the plates, allows you to make the joints completely sealed. More detailed advice on additional materials for foam insulation can be obtained at any specialized hardware store.
If you find a penoplex with edges in the form of a curly quarter, then the layer of such insulation will be denser, since the plates will be located closer to each other.
If you choose such a heater with smooth edges, then it will need to be glued in two layers, and with an offset of the seams between the plates. Such gluing helps to eliminate the so-called "bridges of cold", which may arise during the not tight junction of the insulation to insulate the balcony.
The wooden crate, which is needed to insulate the balcony, is made of beams and installed using a level, and in a strictly horizontal and vertical direction.
During the work on thermal insulation and finishing of the balcony, one must not forget about the insulation of the insulated floor, ceiling and walls. A vapor barrier layer with a foil coating is glued to Penoplex to reflect heat. After all the above work, it will already be possible to start finishing the premises with clapboard or drywall.
It is worth noting that the ceiling is insulated in the same way. We also process cracks with a gun and polyurethane foam. Please note that the foam must not contain TOLUENE. Usually the boards fit very well and tightly, but there are bad joints, which should also be well treated with foam.
After such a review, we hope you will have no doubts about the insulation of your additional room in the apartment and the choice of the right material.
Source: ultra-term.ru
Warming of different surfaces on the balcony
Floor
The subfloor is laid out and fixed with a crate of bars. It is imperative to maintain gaps of at least 20-30 mm between the wall / parapet of the balcony and the outermost elements of the lathing structure. In the intervals between the lags, foam is laid
At this stage, it is important to avoid the appearance of gaps between the parts of the insulation (visible gaps are filled with foam, the excess is carefully cut off) and the protrusion of the covering sheets over the crate.On the walls, markings are left according to the location of the log. Penofol sheets are laid along the balcony (300-350 mm are added in length for adjustment). It is better to fasten the material to the frame with a furniture stapler. Insulation strips are cut with a knife and placed end-to-end
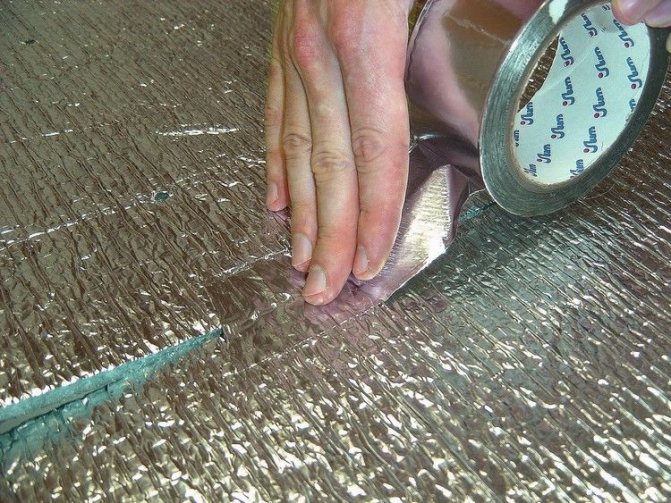
Seams are glued with aluminum tape. Sheets of plywood or chipboard are laid and fixed with self-tapping screws (for the correct location of the fasteners, they are guided by the markings on the wall). Surplus insulation is trimmed. A decorative coating is being laid.
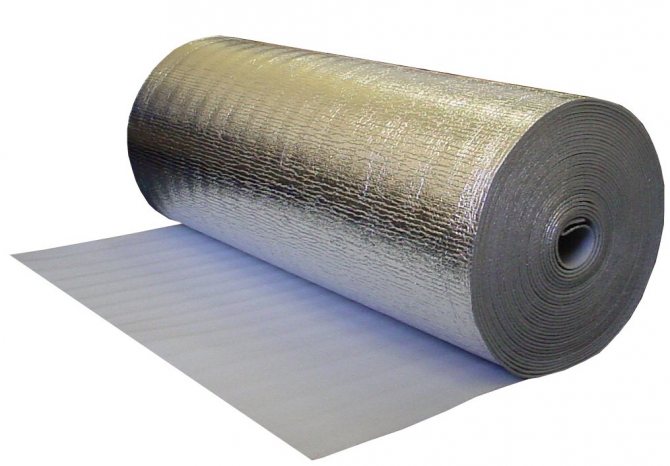
Penofol with one-sided foil is laid with foil inside the balcony. Slices of the canvases are mounted end-to-end, the joints are closed with foil tape

The joints of the penofol strips are closed with foil tape
Walls
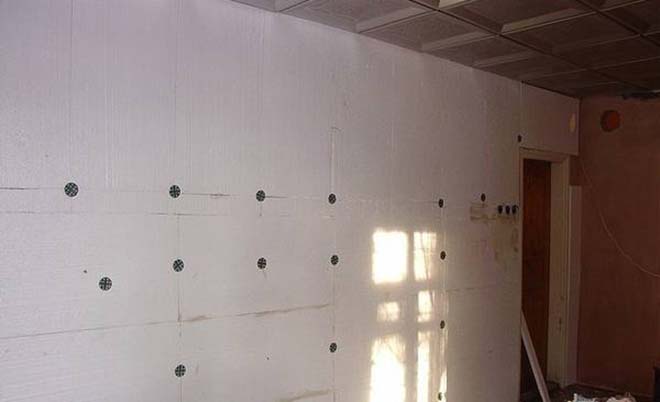
- Penoplex sheets are attached using disc dowels. In order not to form long vertical seams, each subsequent level of sheets is laid out with an offset (like brickwork). Penoplex sheets are cut to size and contours of the walls.
- The joints of the plates are filled with foam, and the protruding parts are cleaned.
- A roll of penofol is cut into the necessary pieces, which are applied to the walls.
- The insulating coating is fixed with self-tapping screws with wide caps. The joints of the plates are glued with foil tape.
- On the walls sheathed with foam foam, a slatted lathing is mounted (the size of the slats is 20 × 40 mm), the fixing strips are located parallel to the floor, at a distance of 400-450 mm from each other.
- Covering surfaces with decorative material.
To preserve the insulating properties of the insulation, it is recommended to glue the sections of the sheets with tape on a flat surface (avoid joining the sheets in the corners)
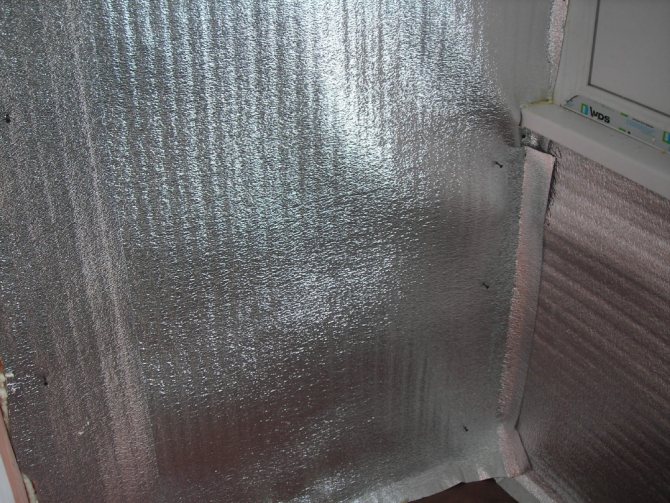
Penofol is fixed on the walls with self-tapping screws
Ceiling
- The first layer of penofol is fixed with slats directed across the balcony.
- The second coating layer is fixed with slats, placing them in the longitudinal direction. One line of slats fixes the insulation in the center of the ceiling, the other two lines are placed in parallel, at a distance of 100 mm from the borders of the ceiling. The covering is cut taking into account the allowances, which are fastened end-to-end with the lines of the canvases on the wall with foil tape.
- The slats are first attached loosely so that it is possible to level the surface (they serve as the basis for the subsequent decorative coating). The correct location of the crate is set using a level. Wooden wedges will help provide the right height in the required places.
- Then the strips are fixed firmly.
- In the future, the ceiling is clad with a decorative layer.
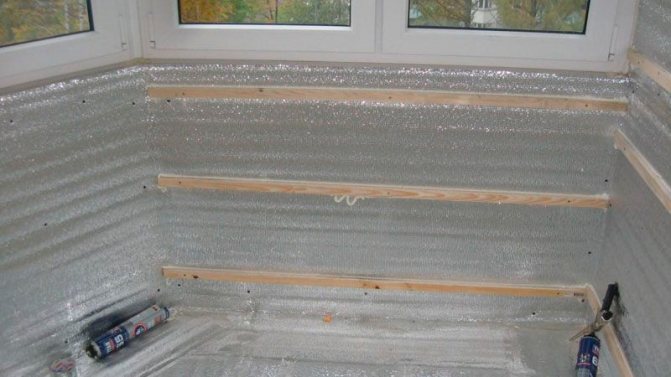
The variety of types of penofol creates opportunities for the selection of insulation of a suitable price, as well as taking into account the characteristics of the building, the climatic zone. Balcony cladding technology with this material allows you to do repair work with your own hands.
In order to take into account all the nuances of the construction stages (assessment of the quality and structure of the walls, the choice of the type of insulation, the calculation of the amount of materials), and to correctly perform the thermal insulation, it is advisable to first consult with a specialist.
Final finishing of walls with plasterboard
After the walls are insulated, we proceed to the final stage. We cut out sheets of drywall of a suitable size and fasten them to the crate with self-tapping screws for wood. First, we grab a sheet of drywall in the corners, after which we attach it around the perimeter and to the transverse bars.
Serpyanka is glued in the corners and at the joints of drywall sheets. Subsequently, all walls are plastered, primed and painted or pasted over with wallpaper of your choice.
As you can see, the technology of insulating the balcony from the inside is quite simple, with the implementation of which you can easily cope. Compliance with all the recommendations of this article will allow you to properly insulate the balcony and make it more comfortable and functional.
Waterproofing loggia outside technology
To get started, learn two simple rules. The first is that the surface is cleaned before any finishing, the same is here. If there are cracks, close them up.Second, all outdoor work is carried out in dry and warm weather, at least from +5 degrees.
You can waterproof the roof with coating materials, or you can use roll materials, which is more effective. The best option is several layers of roll material
And then the work goes according to the following plan:
- Roof insulation. This stage is desirable for residents of the last floors and private houses.
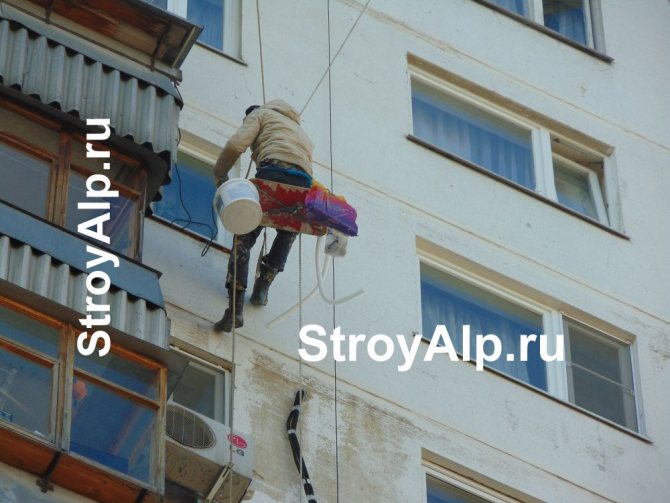
- Isolating the partition. External insulation should only be carried out by professionals using special climbing equipment. In most cases, lubricants are used.
- Insulating the floor. How to do it? Yes, according to the same principle as the insulation of the visor. But the possibilities for waterproofing the floor are many times greater. For example, to make the floor of a loggia or balcony warmer, lay a small layer of expanded clay.
And then how to insulate a closed loggia from the inside.
Recommended ventilation gap
In order for ventilation to be effective, you need to know how to use an anti-condensation film. It is best to make a gap in the range of 4 to 7 cm.If diffusion type membranes are used, you can not leave it, but lay them directly on thermal insulation materials.
Protective membranes have different characteristics. In order to understand exactly how to lay such an element of moisture insulation, manufacturers mark the material with markings. If they are not there, then it is necessary to apply an anti-condensation membrane with a gap of 8-15 cm.
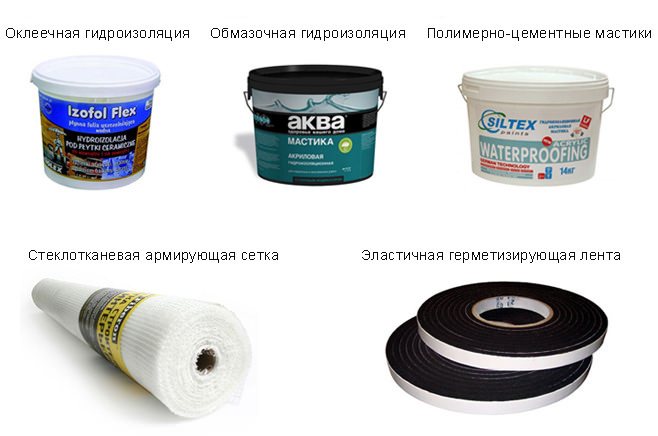
Required materials for waterproofing
For high-quality waterproofing, appropriate materials will be required. They can be divided into separate types:
- Cast waterproofing means polymers that, under the action of heating, take on a liquid state. In such a handicap, floors are flooded. After hardening, the material does not allow moisture to pass through. The downside is the fragility of solidified polymers.
- Painting waterproofing - consists in applying moisture-resistant paint. This option is notable for its low cost and ease of application. However, wood materials need to be coated permanently. Also, paint waterproofing does not tolerate sub-zero temperatures.
- Penetrating materials are a versatile type used for concrete and wood surfaces. Such compositions fill all kinds of cracks, crevices and chips, strengthen the surface to be coated.
- Gluing materials - purchased in rolls. For reliability, it is recommended to use several layers, fastening them with bituminous mastic. The main disadvantage of such waterproofing is the high price.
Waterproofing the floor of an open balcony with a paint composition
During the work, additional materials and tools will be needed, namely:
- metal brush;
- sand and cement;
- sharp knife;
- metal mesh or wire;
- self-tapping screws;
- wooden blocks;
- puncher;
- screwdriver;
- moisture resistant plywood or osb boards;
- sealant;
- grinder with stone discs;
- Styrofoam;
- gun and polyurethane foam.
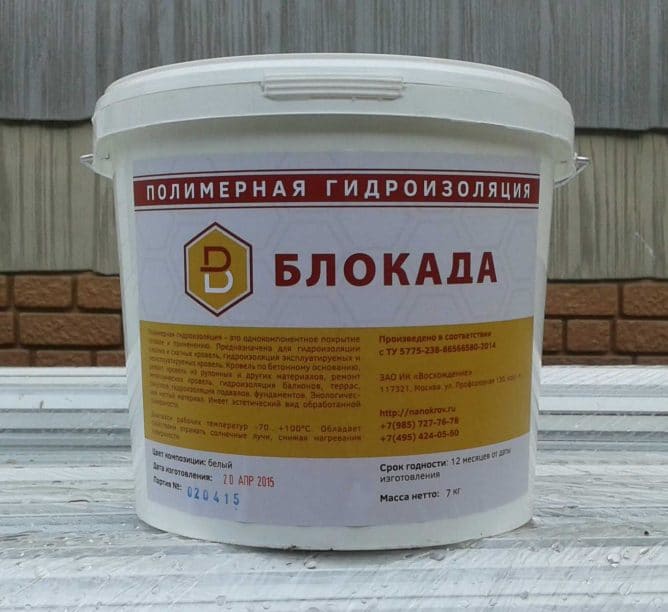
Ready-to-use waterproofing compound

Description of the characteristics of products for insulation
Penoplex has the following qualities:
- the material is moisture resistant, chemically neutral for indoor use;
- has a high resistance to heat transfer;
- very well resists the formation of mold and condensation;
- the thickness of the insulation itself saves the area of the room;
- the insulation is lightweight and very easy to process;
- the insulation is ecological and can be used indoors.
This insulation meets all of the above qualities and also performs the functions of sound insulation.
Primer for ready-mix waterproofing
Each waterproofing has its own type of primer.For waterproofing with a dry cement mixture with water dilution, different primers may be required (read the instructions carefully). Sometimes this is a deep penetration primer, and in other cases, you can simply moisten the surface with plenty of water.
It is important that the waterproofing layers do not dry out.
Acrylic or rubber base - usually requires a deep penetration of soil to exclude the ingress of dust (both construction and street). Liquid waterproofing should be applied to a good tacky surface. Some manufacturers require the surface to be treated with a primer that is specifically designed for this type of waterproofing.
Bituminous bases - a primer is strictly required! A very liquid soil of this composition is often sold ready-made in hardware stores. However, it is quite difficult to find such a primer. In order to make it yourself, you can buy a minimum amount of bituminous waterproofing (mainly based on kerasin or its derivatives), dilute with water in a ratio of 1:10 or 1: 7. You should get a liquid that penetrates well into all the pores. The substance will visually resemble highly diluted coffee (light brown tint).
It should be noted that sometimes there are bitumen-rubber mastics (also water-based). The instruction will indicate which soil needs to be used - deep penetration, water or prepare it yourself
How additional floor insulation should function
So, when and why do you need to insulate an already existing floor insulation? The main purpose of additional insulation is to improve its performance, as well as to ensure that the available heat dissipates over the floor more evenly and for a long time. In all cases, when floor insulation works without additional thermal insulation, over time, the floor heating system does not start working at full strength and, as a result, breaks down in the future.
In order for the underfloor heating system to function correctly and serve for many years, it must be organized wisely. For the arrangement of warm floors, you can use only such insulation that has a low level of thermal conductivity. What problems can be solved by floor insulation?
Types of membrane for floor insulation:
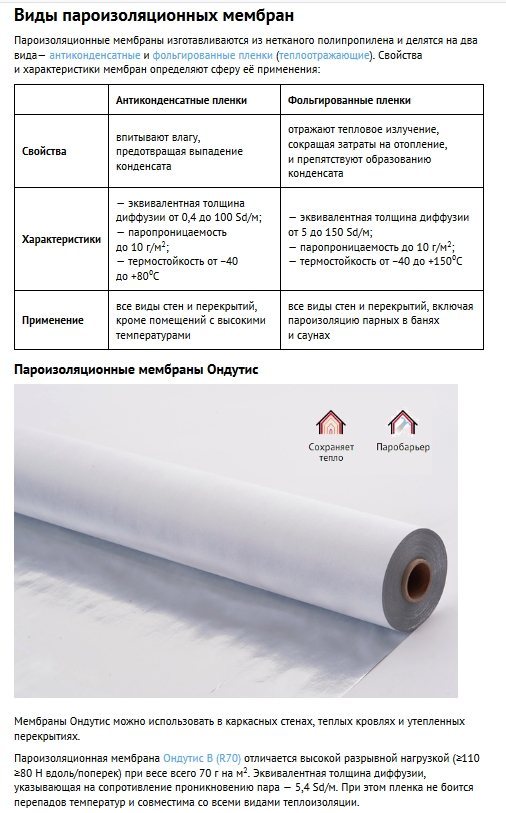
Types of membrane for insulation
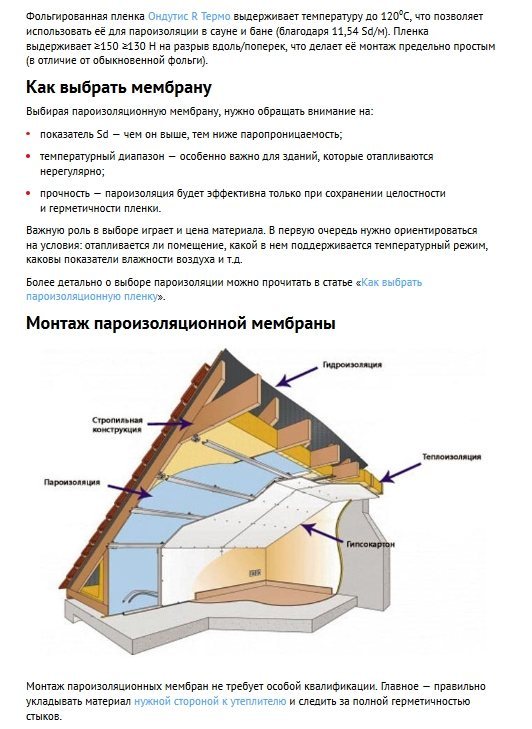
How to choose an insulating membrane
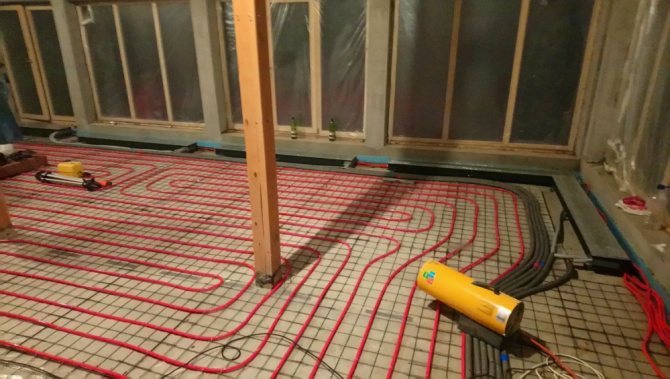
Special equipment is used for the installation of a warm floor.
Step-by-step process of waterproofing the floor on your balcony
Waterproofing the floor on the balcony is carried out in order to protect the reinforced concrete structures from destruction. This happens due to dampness, as well as when water gets into the cracks, expanding when freezing. Such an impact tears off pieces of concrete, and water seeps deeper and deeper and the reinforcement begins to rust. In very many cases, destruction begins from the ends of the balcony.
The waterproofing of the loggia begins precisely from the side and front walls. The thin spot of the sidebar will collapse faster. Therefore, it is logical that in order to preserve the structure intact and safe, it is necessary to waterproof the balcony with your own hands (the procedure is not complicated and will save a significant amount of money at work).
When is it needed for Styrofoam?
Now we will analyze the specific points when it is possible to do without a vapor barrier layer, and when its absence will lead to the negative consequences described above. Professionals know exactly where it is necessary and where it is not necessary to use vapor barrier and expanded polystyrene in one set.
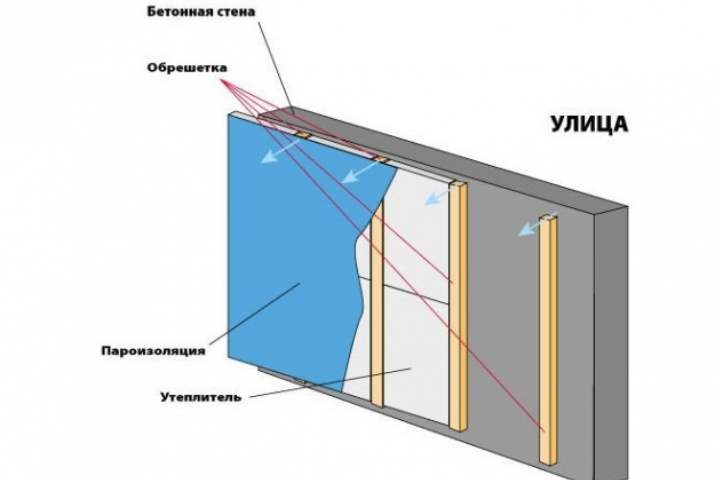
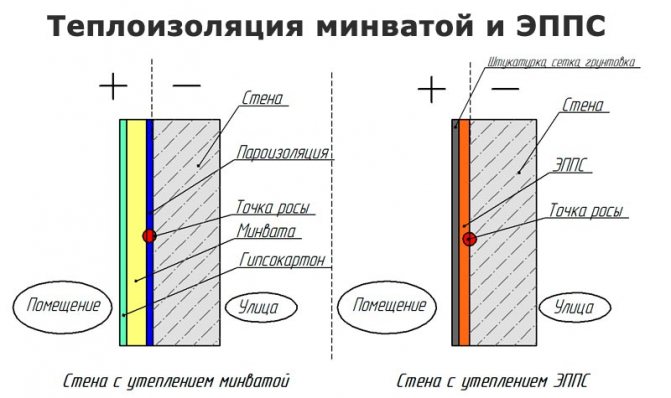
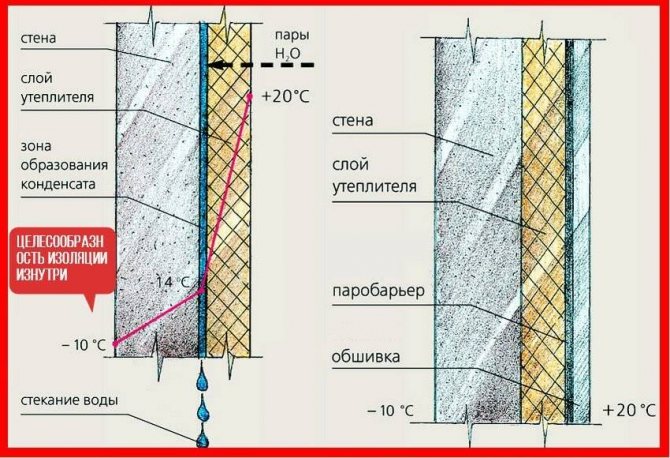
When insulating walls from the outside
Most often, the house is insulated from the side of the facade. There are a number of reasons for this, and one of them is the shift of the dew point into the environment. Here, vapor barrier is not used at all, both for buildings erected from materials with a high vapor permeability index, and vice versa.
If the main structure is made of concrete, then the risk of moisture on the outer wall is very low, which means that the glued polystyrene foam will not cause any trouble. In the case when you decided to insulate the house from "breathing" materials, it is better to use the structure of a ventilated facade. Then there will be a small gap, where air currents will naturally remove excess moisture.
Thermal insulation of walls from the inside
This option for installing insulation is used extremely rarely, including expanded polystyrene. The main reason for choosing this method is the impossibility of performing external insulation. In this case, a high-quality vapor barrier is a must. Indeed, otherwise, all moisture will begin to condense in the thickness of the wall, which will lead to:
- Wet finishing materials.
- The appearance of an unpleasant odor.
- The development of mold and mildew, which can provoke many complex diseases.
Roof of the house
Expanded polystyrene is a versatile material, therefore it is also used for roof insulation. Here, vapor barrier is also not replaced or ignored. Moreover, they also use waterproofing. To protect the insulation from moisture and from precipitation, and from the interior, they construct a kind of "pie".
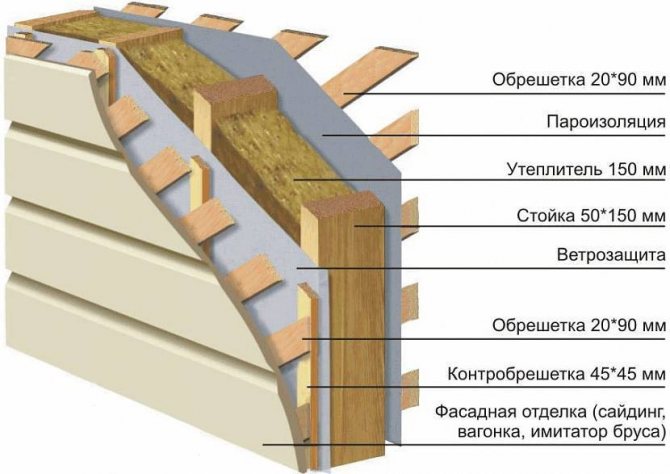
The layers are placed as follows, starting from the roofing material:
- waterproofing;
- expanded polystyrene;
- vapor barrier.
This material is also used for thermal insulation of ceilings. And here it is impossible to do without protection from vapors. Warm and humid air is always at the top, and therefore the expanded polystyrene will be exposed to it. In this case, the vapor barrier must protect the insulation, which means it is mounted from the side of the room.
Floor of the house
During the installation of thermal insulation on the floor, the presence of a vapor barrier depends on several factors:
- Using a screed - in this case, waterproofing is necessarily applied. This layer protects against moisture penetration. This means there is no need to use an additional barrier.
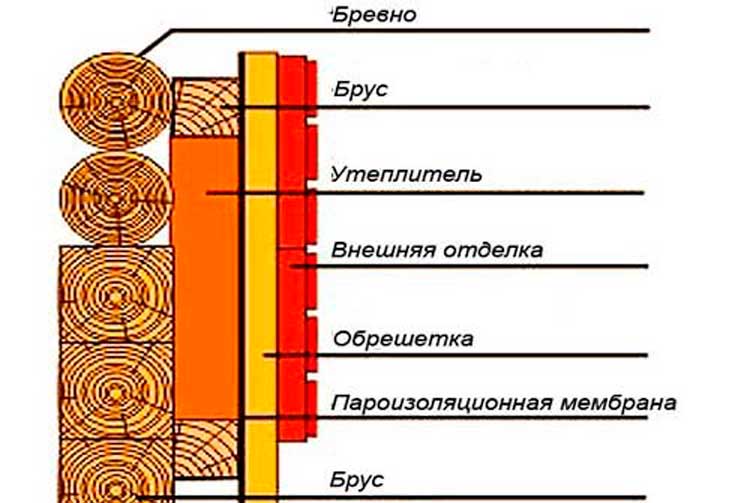
- Floor installation using wooden structures. Here you will have to spend money on vapor barrier to protect the tree. The installation of the floor is done as follows: wooden logs, then vapor barrier, and then expanded polystyrene.
In private houses, vapor barrier is completely abandoned, because warm air does not linger near the floor, and therefore does not affect these structures.
Balconies and loggias
These structures in our homes require the use of a vapor barrier. Due to the especially microclimate and conditions here, warm streams of moist air are in full contact with cold surfaces, where condensation appears.
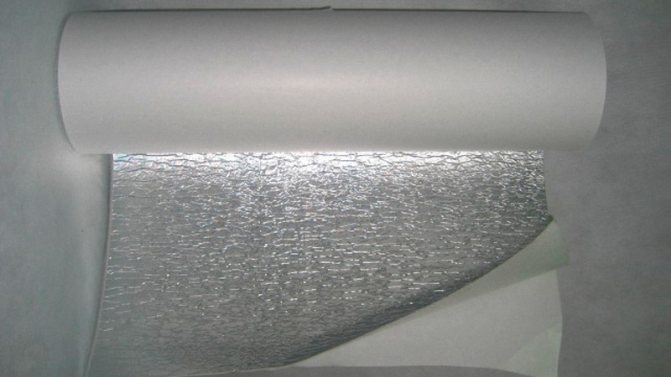
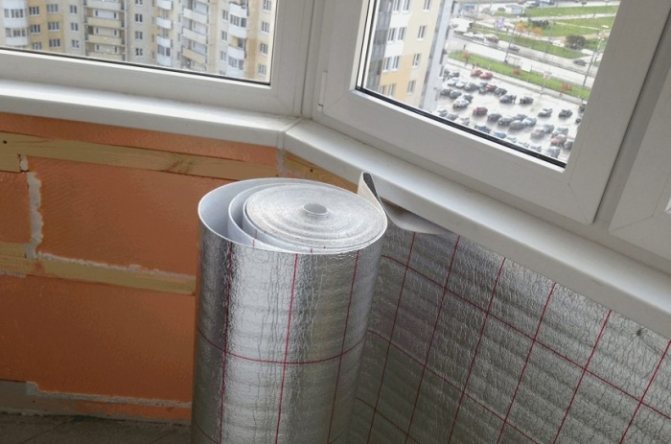
Penofol types characteristics and subtleties of application
A - one-sided foiling. Insulate walls and ceilings inside premises (residential, industrial). Can be used in the construction of buildings and the repair of old structures;
B - double-sided foiling. Suitable for arranging loggias, balconies - as it retains heat in winter and creates coolness in summer. Also used for construction and renovation work in new and old buildings.
C - one-sided foil and self-adhesive layer. Designed to insulate walls, ceilings, floors, various metal surfaces of car interiors, air ducts, pipelines. Sometimes with a less smooth adhesive surface - blue and a smoother adhesive surface - white.
Benefits:
- thin (thickness of insulation grade A - 2-10 mm, grades B, C - 2-40 mm);
- flexible;
- easy;
- environmentally friendly;
- ease of installation for balconies of any configuration;
- convenience during transportation (roll width 120 mm, weight 5-7 kg);
- affordable price;
- variety of types;
- excellent performance.
One of the advantages of penofol is its small thickness.
Disadvantages:
- softness - cannot be used for finishing with wallpaper or plaster; not used under the screed (when interacting with cement, the useful properties of the foil are lost);
- material of type A, B is difficult to fix on the surface, it is advisable to use special adhesives for installation (if the coating is nailed, then the thermal insulation indicators will significantly decrease);
- when insulating the outer side of the building, it is mounted under the surface finish, as it performs the function of an additional layer.
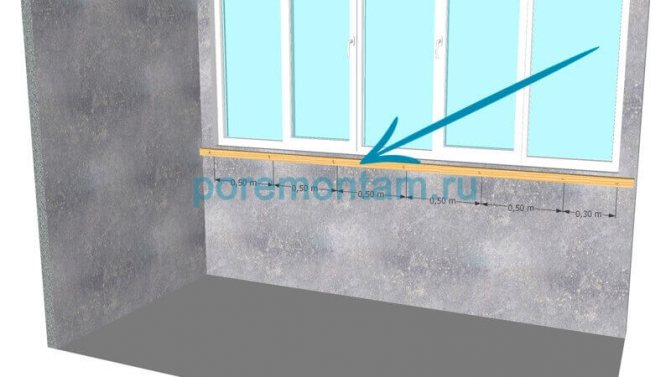
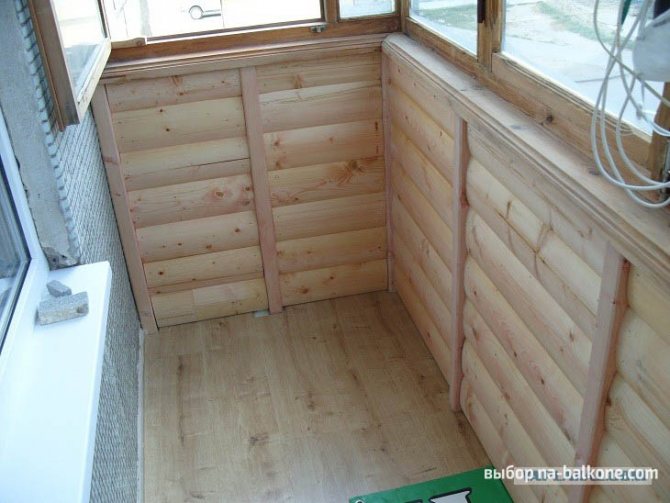
Build the battens
First, we fix the timber under the windowsill, leaving a gap of 1-1.5 cm on top.Cut the timber 1.5-2 cm shorter than the length of the parapet, put the timber against the wall and drill holes with a diameter of 8 mm for the dowel nails with a punch in 50-70 cm increments.
Having previously unscrewed the nails, we drive the dowels into the timber so that they fall into the holes in the wall. We tighten the nails with a screwdriver. The beam is fixed.
In the same way, we fix the lower beam, retreating from the floor by 1-2 cm.
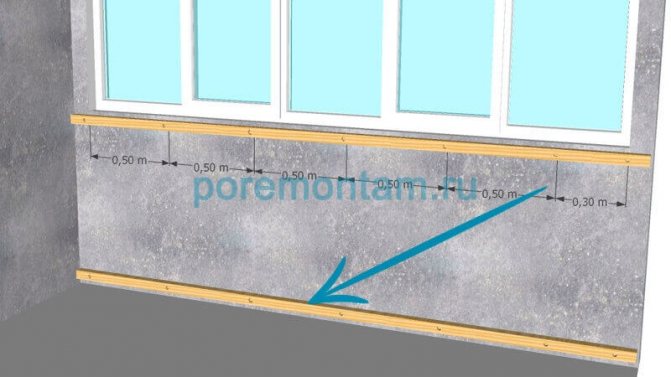
After we have secured the upper and lower bars, we proceed to fastening the transverse bars in the same way. The distance between the cross bars should be 60 cm.If the balcony is often exposed to wind load, the step of fixing the cross bars should be reduced to 40 cm.
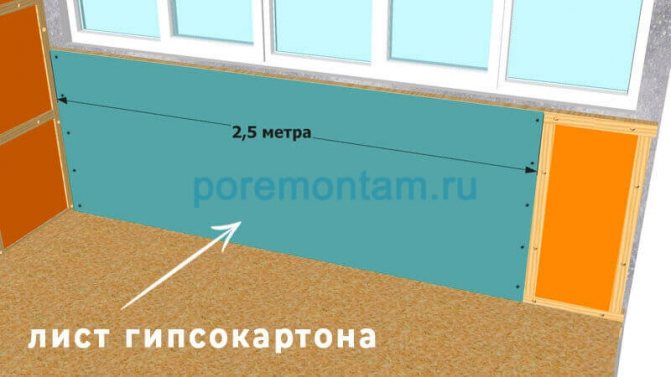
Every 2.5 meters, two beams are attached in a row (see the picture below!) This is done so that we can then fix a drywall sheet on them!
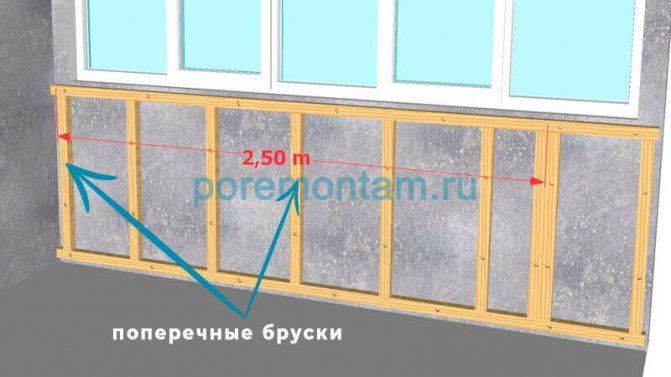
After all the transverse bars are fixed, go to the side walls of the balcony. How to understand which walls to insulate and which not? It's very simple, if the wall is load-bearing, you don't need to insulate it. But in order to achieve the perfect result, you will have to insulate both side walls, the ceiling and the floor. The wall adjacent to the room is usually not insulated. We will do so!
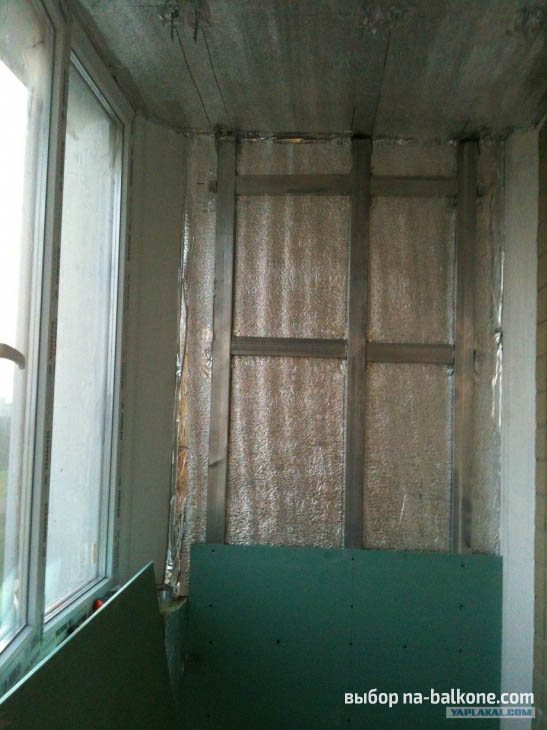
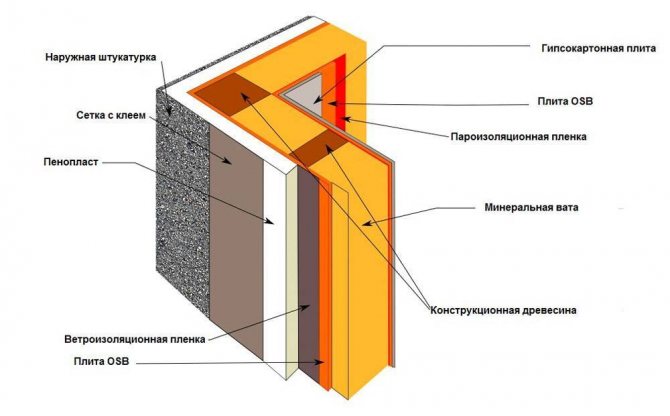
Wall and roof insulation
Foiled polystyrene foam is most often used for waterproofing walls. It is glued to the walls using frost-resistant glue. The joints are sealed. Apply mastic to polystyrene foam for waterproofing. Lay a vapor barrier layer.
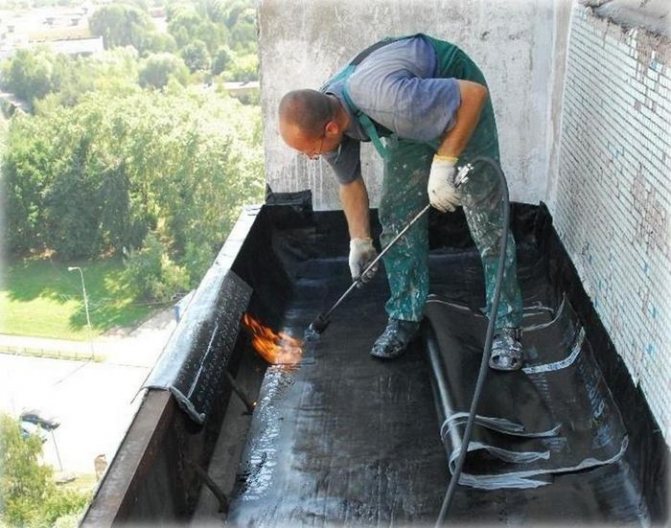
The outer part of the balcony is treated with mastic. The surface is pre-moistened. The mastic is applied in a layer of 1 mm. After it has set, after several hours, the next layer is applied perpendicular to the previous one.
When waterproofing the roof of a suspended balcony, first we process all the joints between the sheets of roofing material. Then we put the material chosen for waterproofing under the crate. Outside, we process the joints of the wall and roof with polyurethane foam. After the foam has set, cut off the protruding parts. We treat with a sealant. Above the junction of the roof and the wall, we fasten a strip of tin. We seal the joint.
Stages of waterproofing the concrete roof of the loggia:
- we lay a vapor barrier layer;
- we lay a layer of insulation;
- we make a screed on the roof and process it with mastic, as described above;
- we lay roll waterproofing material;
- we lay roofing material on it;
- we fix it with a rail along the edge, process it with mastic.
If the waterproofing of the balcony is done correctly, no leakage is guaranteed. All finishing materials will serve for a long time.
After high-quality waterproofing, you can start finishing work.
Frequent mistakes
In this scheme, the structure of the insulation is approximately the same as that used when installing a warm roof. Most often, DIYers make the same mistake - they lay mineral wool without waterproofing the outer surface. In this example, the walls act as a water barrier. In addition, there should be a gap between the vapor barrier and the decorative cladding, which ensures the normal exit from the surface of the vapor barrier membrane of air that is still warm, but oversaturated with water vapor. Otherwise, condensation will appear, and the lining will damp and swell with moisture.
Features of the use of polyurethane coatings
The finished substance is dissolved in the amount of water specified in the instructions. After that, the mass is applied to the prepared and moistened surface of the concrete base. Seams and corners are carefully processed. They are glued with waterproofing tape and coated with special protective compounds.
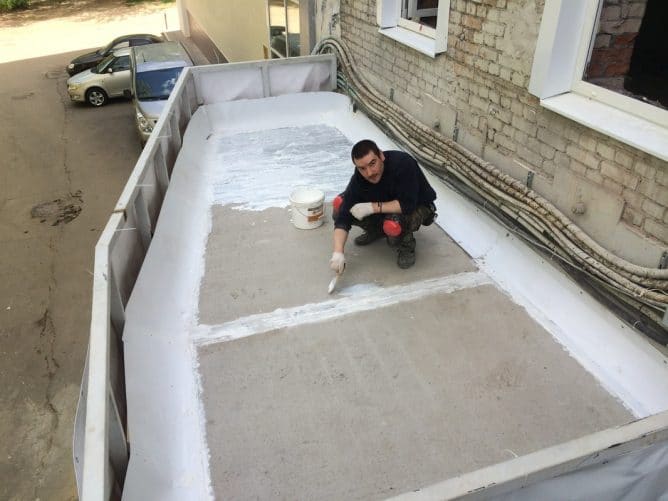
After applying a thin layer of waterproofing to the entire surface of the slab, it is imperative to reinforce the surface of the screed with fiberglass mesh, pressing the material into the insulating layer over the entire surface. After the first layer has completely dried and hardened, the second one is applied using the same technology. The application of each next layer is carried out after the final drying of the previous one. In this case, you need to ensure that the floor receives the necessary slope towards the street.
The thickness of the insulating layer of an open balcony must be at least twenty millimeters.
It must be remembered that the work is best carried out in the absence of direct sunlight, since the rapid drying of the coating will inevitably lead to its cracking. After the installation of the waterproofing is completed, at least five days must pass before the installation of tiles or other finishing material begins, only after complete drying and hardening of the waterproofing can you start finishing work.
Professional advice
According to professionals, the balcony vapor barrier should be done after thorough preparation of all surfaces. Even a small crack on the wall can contribute to poor material placement, and hence the penetration of steam or liquid.
After general cleaning of the wall, the ceiling must be carefully treated with cement and the irregularities that have arisen must be removed. After the procedure, the balcony should dry out, and only then can the vapor barrier be started. As for the floor, it does not need to be carefully leveled, because liquid collection in the lower part of the loggia is unlikely. For insurance, a thin film with aluminum interlayers can be laid under the foam, however, there is no special need for this.
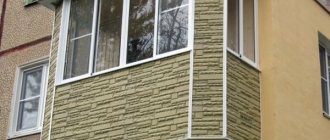
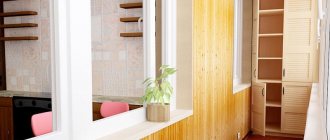
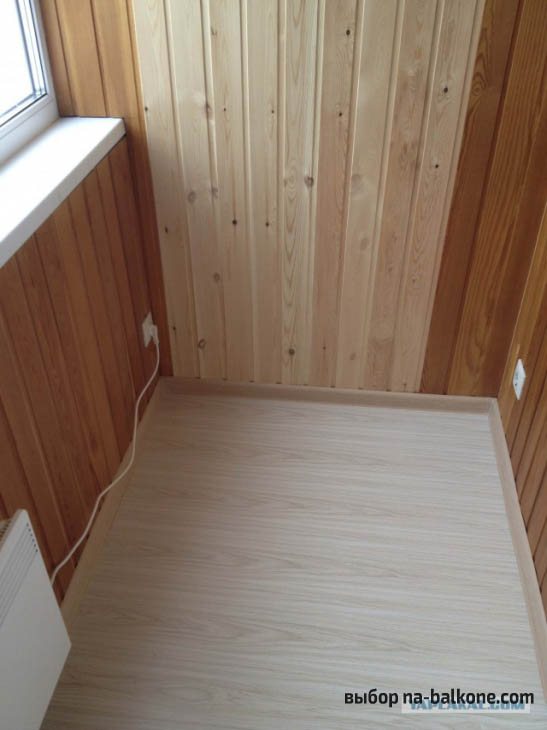
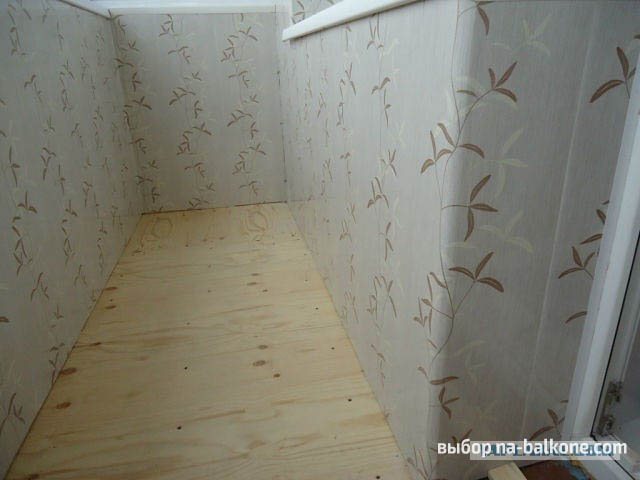
Balcony room decoration
The goals of creating interior decoration:
- External masking of the heat insulator;
- Organization of a favorable indoor environment in the room.
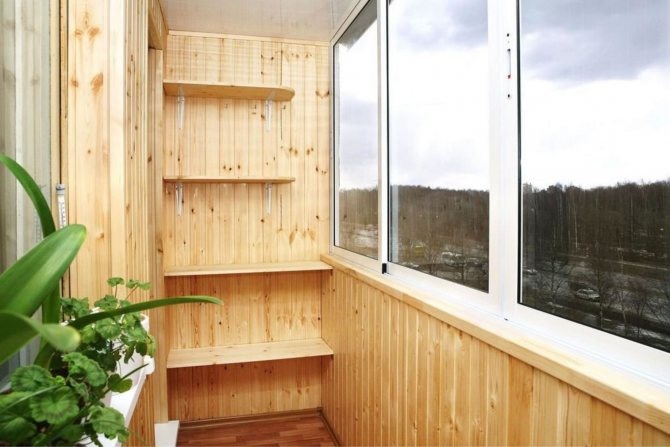
To create the interior of the balcony, you can choose from various finishes. For the finishing layer, plaster, plastic panels, MDF, lining, plywood, GKL sheets and even a block house are perfect.
Lining panels are environmentally friendly and reliable. One of the main advantages of the finishing material is rigidity. The lining is fixed on a wooden lathing frame.
The walls of the loggia are lined with clapboard, the flooring is laminate.
Facing the balcony with a block house.
The plastic panels have grooves for connecting elements. The plastic version of the lining has less rigidity and strength than wood.
Installation of sheets of gypsum plasterboard on metal profiles. Plasterboard boards can be decorated with wallpaper, painted, or veneered with decorative plaster.
Wall decoration with wallpaper over sheets of gypsum plasterboard.
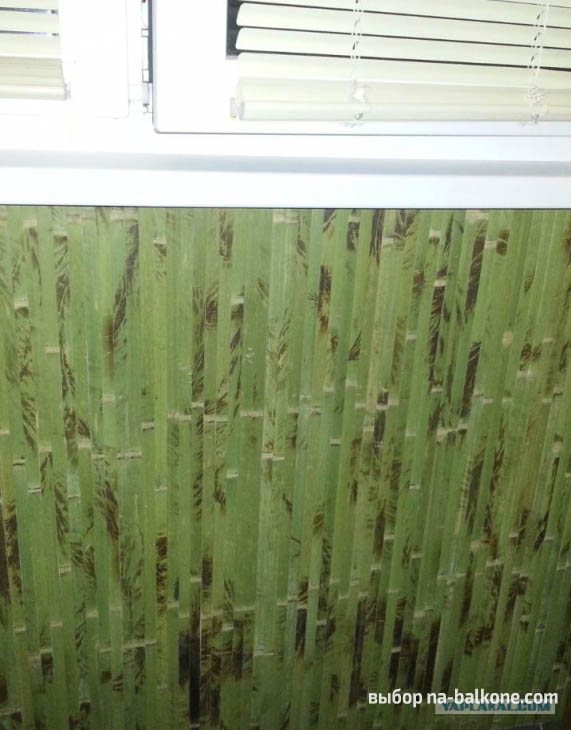
Bamboo wallpaper. The base for finishing is plasterboard.
Penoplex and its purpose
This material is among the new and modern, it began to be produced quite recently. It is a type of foam, or rather, a kind of expanded polystyrene foam. The extrusion method makes it possible to obtain a material of an unusual structure from small monolithic balls, tightly adhered to each other. The finished slab looks monolithic with air bubbles up to 1 mm in diameter.
Penoplex slabs are available in several versions, each type of slab has its own purpose and has its own set of characteristics required for use on specific construction sites. Such qualities make it possible to achieve maximum efficiency in thermal insulation of objects. there is several types of produced penoplexes:
- Foundation - designed for loaded structures, suitable for insulating basement walls, foundations, enclosing coatings, engineering networks.
- Roof - used for insulation of various types of roofs, serves as reliable insulation from precipitation, temperature extremes and mechanical damage. An excellent option for thermal insulation of balconies and loggias.
- The wall is a good option for vertical and horizontal insulation of partitions, internal and external walls, facade systems.
- Comfort - slabs of this type fit together perfectly and create a comfortable indoor climate.
Sealing the loggia
Sometimes it happens that at the end of the waterproofing work, water still gets into the room. There may be several reasons:
- cracks in window frames;
- gaps between the supporting structure and frames;
- large gaps at the joints of the walls and the slab that forms the ceiling;
- large gaps between the ceiling and the visor.
Glazing leakage is eliminated by means of strips (self-adhesive parts).
Fig. 7. PVC corner.
To eliminate all other gaps, various sealants are used, mainly based on silicone. These substances are distinguished by their versatility and high sealing performance. The gaps at the joints can also be sealed with mastic made on the basis of polyurethane.
Sealing an open loggia
The open design has to withstand all the surprises that the climate presents. If there is no drain on the bottom slab, the fence is partial, there is no floor slope, then moisture inevitably accumulates, which can destroy even concrete. Sealing of seams and gaps as a preventive measure is required even if water is not yet leaking anywhere.
The sealant in the open space must be elastic, durable, resistant to atmospheric influences. All joints and details must be processed
On the last floors, special attention is required to the roof. If polyurethane foam is used, then after drying it should also be covered with a thin layer of sealing mixture
All joints and details must be processed.
Fig. 8. Sealing of seams.
Sealing a closed loggia
If the space is glazed and insulated, this does not mean that atmospheric water does not flow anywhere. Additional finishing of ebb, slopes, seams is still required. The mounting foam used in the glazing process is unstable against ultraviolet rays, so it must be covered with a layer of sealing mixture from the inside and outside. A weak point is considered to be the joints between the screen and the metal or wooden parapet under the window frame.
The parapet also needs to be finished with an elastic, durable substance resistant to environmental influences.
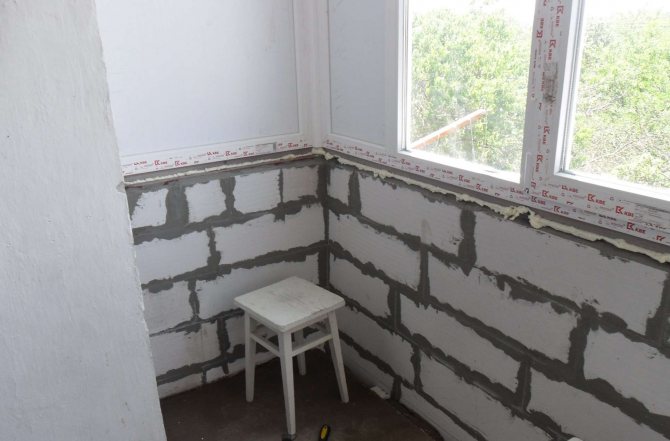
Fig. 8. Sealing the loggia inside.
Only in this case the structure will be reliable and durable.
Sealing the loggia
The measures listed above will be effective only if the preparatory work is carried out correctly. Before processing the joints, the surfaces must be thoroughly cleaned with a wire brush or sandpaper. Fungus and mold are removed with disinfectants. There should be no even dust on the ceiling, floor and walls. Processing should only be carried out on dry surfaces. Sealing mixtures are applied with a spatula. A sealing cord is placed in the wide recesses. Even the highest quality glazing is not able to provide good thermal insulation without measures for sealing joints and cracks.
If insulation is planned, the sequence of actions is clearly visible in the video:
https://youtube.com/watch?v=YKO00flP1tA
How to close up joints?
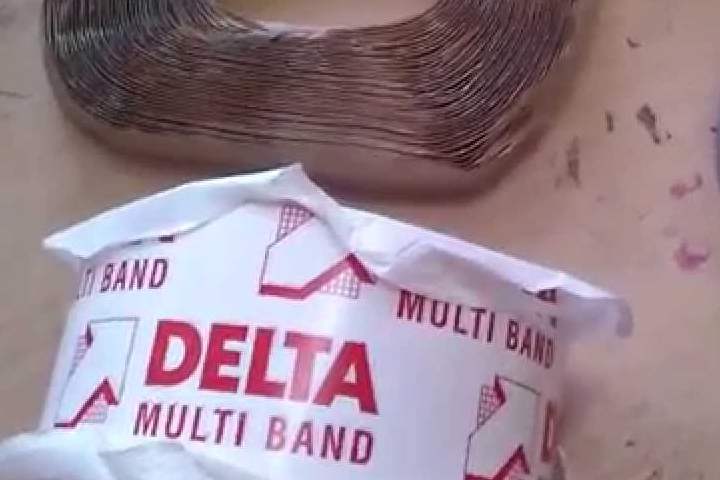
Some craftsmen incorrectly adhere films and membranes for vapor control from the inside and outside. Therefore, they start to move away. To prevent this from happening, single-sided or double-sided self-adhesive tape is best. It is made from butyl rubber, propylene, butylene and foamed or regular polyethylene.
Usually, manufacturers indicate in the instructions for such vapor barrier agents which tape is suitable. Do not use office tape for this purpose. It has a short service life and does not provide one hundred percent tightness when sealing joints.
Waterproofing the ceiling of a balcony or loggia
If the balcony is glazed, then the floor waterproofing may not be required. But what if, after glazing, the balcony is still flooding from above - water flows from the neighbors through the cracks in the floor slab? The answer is clear - repair and waterproofing of this structural element is required. And then a new question arises: who should repair the loggia in order to eliminate the leak?
The law states that if the situation is emergency, then the housing and communal organization should take measures to eliminate it. However, it is quite problematic to recognize a balcony or loggia as emergency. This requires the presence of clear signs of structural failure. It also sometimes seems impossible to convince the neighbors from above to carry out the necessary work on their part. There is only one way out - waterproofing the balcony ceiling from the inside.
Here is a step-by-step instruction for waterproofing the ceiling of a loggia or balcony using penetrating mastic:
- Ceiling surface preparation: cleaning the floor slab from plaster and other finishing materials.
- Abundant moistening of the ceiling surface with water by means of a spray gun and a roller.
- Application of the first layer of penetrating mastic with a synthetic bristle brush. In this case, strokes are made in one direction (for example, along the floor slab).
- Application of the second layer of mastic. It is produced after the first layer has set and the surface is thoroughly wet again. Brush movements are perpendicular to the original direction (for example, across a floor slab).
After covering the balcony ceiling with mastic for the first day, it is necessary to keep it wet in order to avoid cracks.
To ensure a more thorough waterproofing of a balcony or loggia, it is advisable to treat with mastic not only the ceiling, but also the walls adjacent to it to a height of about 20 cm.
What is a vapor barrier for?
Off-season weather is variable. The air temperature can rise and fall. Insulation with special means will protect against condensation formed during the appearance of steam. Gradually, the walls, floor and ceiling of the balcony will become damp.
This can lead to the appearance of a fungus that can be difficult to get rid of.
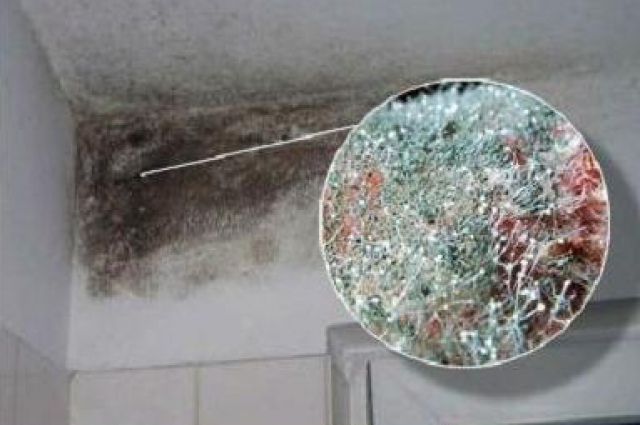
Many people believe that if the conditions on the street are always normal (for example, in the southern part), then such a process can be dispensed with. This is not the case, vapor barrier is necessary for all closed loggias, without exception.


Balcony canopy waterproofing water drainage from the balcony
The visor on the balcony is the waterproofing of the balcony, because this structure protects the balcony from precipitation, which, of course, prolongs its service life.
If you are going to install a visor, you will have to choose how it will look, what it will be made of. These can be steel sheets, for example, corrugated board or metal tiles. It can also be polymeric materials, they cover the roof well and reliably protect it.
And, of course, the third option is the installation of double-glazed windows. In this case, triplex, tempered glass is used. This is the most expensive way to decorate a visor, but it is not only a reliable way to drain water from a balcony, but also the most aesthetic and modern one.
As for, for example, waterproofing terraces, the most popular option is to combine special sealing tapes and liquid solutions. Alternatively, polyurethane glue.
Thermal insulation and waterproofing of the balcony from the inside ()
Waterproofing is necessary for both closed and open balconies. It is necessary both for the roof and for the floor, and for concrete lintels, as well as an external cornice.
It doesn't matter what composition, coating or penetrating, you use, the main thing is the high degree of moisture resistance of this material
Good day. Please tell me, we have removed the floor tiles from the unglazed brick loggia, we want to put the ceramic granite tiles on the glue, the slope is correct. Do you still need to do waterproofing or you can do without it.
Better, of course, to make waterproofing for reliability. Still, you do for yourself and for a long time, so it's better not to hack and not save on this, all the more you want to put tiles on an unglazed loggia
Good day. Please tell me, we have removed the floor tiles from the unglazed brick loggia, we want to put the ceramic granite tiles on the glue, the slope is correct. Do you still need to do waterproofing or you can do without it.
In my opinion, the concepts of waterproofing and vapor barrier are a little confused. The roof over the loggia or balcony is waterproofing, it protects from rain, and the vapor barrier film, which is attached from the side of the room to the insulation, is a vapor barrier, since it protects the insulation from water vapor. Penofol from the inside will also be a vapor barrier, but it will not be enough to insulate the balcony, and the fence will still need to be insulated with expanded polystyrene or mineral wool plate.
Protection of the facade against moisture penetration
Styrofoam can absorb a small amount of moisture. Water from the street can penetrate into it to a depth of 5 mm. Over time, this insulation will begin to chip and peel off after freezing. This situation can occur even if the walls have metal, plastic or plywood cladding.
To prevent evaporation from entering the foam, the outer surface must be covered with a film. If on the walls of the loggia facing the street there is a cladding made of corrugated board or metal, then you cannot do without waterproofing.
What consequences can a violation of balcony water insulation cause
Answering the question why and why protection from moisture is needed on the loggia and balcony, it must be borne in mind that damaged waterproofing of the loggia and balcony can lead to the following unpleasant consequences:
- Loss of quality of finishing materials with constant ingress of liquid on them - warping and twisting of the made wooden frames for fastening PVC panels, cracking of plaster, peeling off tiles, swelling of the laminate, leakage of the hatch on the balcony. Formation of fungus and mold, damaging the finish and impairing the appearance of the room. corrosion of steel trim parts and internal bearing reinforcement of concrete slabs in a closed humid environment without air access.
Fig. 2 Waterproofing the loggia from the inside with insulation
The main characteristics of vapor barrier materials
Vapor barrier layer:
- reliably waterproofs the room, thereby removing the appearance of condensation;
- retains the quality of the sound-absorbing and heat-insulating layer;
- serves as a moisture barrier.
Based on all of the above, it is clear that you cannot do without vapor barrier when decorating a balcony.
When buying a waterproofing material with such properties in a store, keep in mind that the reliability of the waterproofing depends on the strength indicator. The larger this parameter, the more reliable. The most convenient is insulating means that do not need to be fixed in complicated ways. It will also be important what water pressure such a waterproofing agent will withstand. This characteristic will guarantee that moisture will not penetrate into the room.
Types of materials
The building goods market today offers dozens of names of all kinds of materials. The builder can easily choose a suitable product from this assortment, but a beginner in this business will have a difficult time. It is better not to rely on the advice of consultants in the store, but to choose the right building material according to building codes and requirements.
In this case, waterproofing the balcony from the inside will give a good result.All coatings are divided into just a few groups.
- Coating (also often referred to as cast polymer coatings). This option is one of the most reliable and easy to do-it-yourself installation. Typical representatives of this class are asphalt pavements and mastics. The only drawback of this technology is its high cost.
- Impregnation. These materials penetrate deeply into the building material and reliably protect it. There are special penetrating compounds for concrete, wood and other materials.
- Rolled. Installation of such protection against moisture will not allow residents to regret their choice. These polymer-bitumen coatings guarantee high reliability and long service life, but installation requires a lot of labor and experience.
- Coloring compositions. The main purpose of such materials is to protect metal elements from moisture. Among the advantages are the relative cheapness, ease of applying insulation.
- Plastering. This method is considered one of the most famous and simplest. At the same time, over many years of use, it has proven its high efficiency.
- Sheet protection. This class is represented by metal and plastic sheets. It is rational to use them only in cases where other options cannot be applied for some reason.
- Injection protection. This type is used for spot insulation of cracks, seams. Such sealing of the balcony becomes possible with the use of binders.
In what cases is it necessary to use a vapor barrier for penoplex?
Warming with penoplex or expanded polystyrene in our time has become very serious. Indeed, the use of these materials leads to a significant reduction in construction costs.
However, when working with polystyrene or penoplex, you need to know some of the nuances. For example, about arranging a vapor barrier. The question of whether an additional vapor barrier is needed for a polystyrene foam insulation is one of the most frequent on construction forums.
Internal wall insulated with foam, rarely needs vapor barrier
In this article we will try to give you a detailed and detailed answer to it. By the way, we recommend buying polystyrene in Ufa.
Materials used
In order for all work to be completed quickly, efficiently and reliably, it is necessary to select the materials most suitable for a specific situation. The following is a standard list of materials for waterproofing and insulation work on the loggia. Such a list may vary depending on the complexity of the task due to the presence, for example, of large gaps, gaps between ceiling concrete slabs, etc. So, it is advisable to use the following set of materials:
- sealant (silicone, acrylic, bitumen, polyurethane) for sealing gaps;
Moreover, many of them will not be needed due to the fact that the area of the balcony and ceiling is not so large; - a penetrating composition for waterproofing concrete is a reliable way to make a loggia ceiling slab 100% waterproof. After applying such a composition, the waterproofing of the ceiling becomes as effective as possible;
- folgoizolon - a material that will perform both the function of an additional waterproofing barrier and insulation;
- sheets of extruded polystyrene foam - an excellent material for thermal insulation of small rooms. It is very easy to attach to the ceiling and does not greatly reduce the space of a limited-sized balcony;
- construction glue, knife, scissors, and other tools that may come in handy for cutting and securing the materials listed above. The sealant is applied using special tubes, in which it is sold.
Thus, you need a small set of materials and tools in order for the waterproofing on the loggia to be done efficiently and reliably with your own hands.In addition, given the small area of \ u200b \ u200bthe room, such materials are not needed very much, because of which the costs will be insignificant.
Do you want to protect the outer surface?
When lining the walls of the balcony with a vapor barrier when insulating with materials such as polystyrene, expanded polystyrene or other foam materials, there is no guarantee that the material will not suffer from the penetration of water vapor from the street. Like any other insulation, expanded polystyrene foam has the ability to absorb a certain amount of water and water vapor. Most of the steam can penetrate 0.1-0.5 cm deep. This means that even if the outer surface is protected with plywood, metal or plastic cladding, over time, the expanded polystyrene will still freeze over and a little chipping and peeling.
For this reason, the surface from the street side should be covered with a film that will prevent the penetration of water vapor into the foam. It is especially important to install insulation if the outside walls of the balcony are faced with corrugated board or metal sheet.
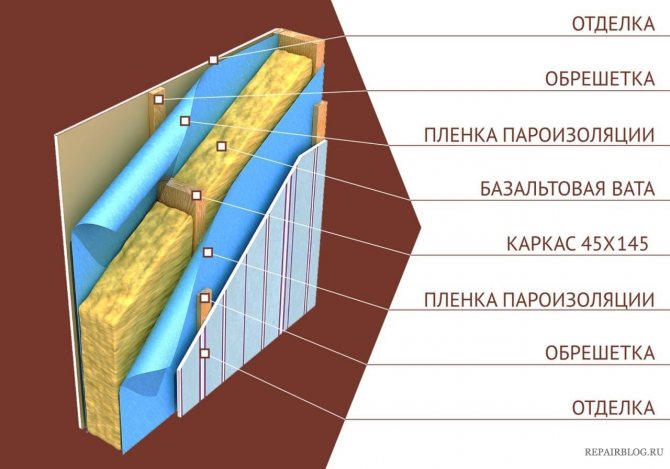
Areas of use for the windproof membrane
Let's consider each area separately:
This material is used for thermal insulation of the roof, attic and attic floors. The windproof membrane protects the thermal insulator during the installation of the roof covering (s). Thanks to this, condensation does not penetrate into the "cake" during operation.
A windproof film is used for the walls and facades of the house. Here the main role is played by the function: vapor diffusion and also hydrophobicity. The windscreen creates ventilation so that the surface can "breathe".
It is used for floors and floor joists. In this case, films that are capable of passing only steam, not water, are suitable.
Hydro-windproof film is used for frame partitions. This material helps to prevent the mineral wool particles from spraying. A protection against condensation accumulation is also formed. The efficiency of the air impermeability of the partitions is increased.
Why does mineral wool get wet
The thermal conductivity coefficient of mineral fibers is 0.031-0.042 W / m 2 * K. This means that a 5 cm thick layer of glass wool is equal to the thermal effect of a meter-long brick wall. But the insulating properties are lost when moisture penetrates into the fibers.
Reasons for getting wet:
- Damaged the waterproofing membrane when laying the insulation. They pulled the canvas too tight, accidentally pierced it with a nail or self-tapping screw.
- The joints of the film were not glued. As a result, condensate penetrates into the fibers of the mineral wool.
- The waterproofing was not fixed tightly enough near the ventilation and chimneys.
- A low-quality diffuse membrane was used.
The risk of getting wet: what is the danger of raw insulation
Wait to get wet roof insulation
dries up on its own - a dangerous delusion. Wet mineral wool does not retain heat. In addition, it becomes a source of unpleasant odors, the spread of mold and bacteria. Well, the "cherry" is in the troubles of the roofing pie: wooden rafters are destroyed, metal structural elements rust at an accelerated pace. The result is a major overhaul of the roof.

To avoid problems, check the condition of the insulation:
- if streaks or drops appear on the walls of the attic;
- cracks appeared on the roof, the roofing elements do not fit tightly;
- in places of accumulation of snow, the roof caved in.
What is mineral wool
Melts of rocks (basalts, dolomites) are used as raw materials for production. Industrial slags are sometimes added. From the molten mass, fibers are formed, which are then pressed into plates or rolls.

The strength of the final products is determined by the compression ratio during pressing and binders, which are phenol-formaldehyde or urea resins.
The more force is applied during the forming step and the higher the concentration of binders, the more dense and rigid the material will be.
Density, depending on the form of release, can fluctuate in a very significant range:
- Rolls - 20-50 kg / m3;
- Mats - 50-80 kg / m3;
- Lightweight slabs - 80-120 kg / m3;
- Plates of medium hardness - 120-200 kg / m3;
- Rigid slabs - over 200 kg / m3.
What is mineral wool
Melts of rocks (basalts, dolomites) are used as raw materials for production. Industrial slags are sometimes added. From the molten mass, fibers are formed, which are then pressed into plates or rolls.
The strength of the final products is determined by the compression ratio during pressing and binders, which are phenol-formaldehyde or urea resins.

The more force is applied during the forming step and the higher the concentration of binders, the more dense and rigid the material will be.
Density, depending on the form of release, can fluctuate in a very significant range:
- Rolls - 20-50 kg / m3;
- Mats - 50-80 kg / m3;
- Lightweight slabs - 80-120 kg / m3;
- Plates of medium hardness - 120-200 kg / m3;
- Rigid slabs - over 200 kg / m3.